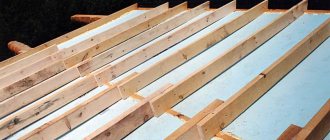
The reliability of the entire roof depends on the correct installation work. The main structural elements are the rafter legs.
To provide stability, the elements are secured using side braces, a metal angle or staples. The beams are connected to each other at the ridge part of the floor; below, the rafters are attached to the mauerlat. The element can withstand the maximum load; lumber with a cross-section of 15 × 15 or 20 × 20 cm is used for its manufacture.
Attaching the rafters to the mauerlat: a little “materiel”
To begin with, we suggest looking at an illustration that shows two types of rafter systems:
The place where the rafter leg is attached to the base is called the support node. There are many such units in the system, but we will touch in detail on the lower fastenings of the frame with the rafters. The mauerlat and rafter legs are almost always made of wood, less often - of metal. It is more profitable and convenient to use wood, since this material is light in weight, easy to install and durable with proper installation and operation.
Types of support units by level of rigidity
Support nodes are the places where the rafters are attached to the roof elements:
In the case of iron connections, the nodes are fixed and rigid (welded or bolted). Wood is a softer and more dynamic material that can swell, dry out and deform. In this regard, experts recommend making support units with allowances for possible changes in the shape of the wood. Such nodes can have different degrees of mobility:
- Zero mobility unit
- rigid fastening with corners on both sides, in which the fastening of the rafters to the mauerlat remains motionless. - Connection of the first degree of mobility
- the beam can rotate in a circle. - The connection of the second degree of mobility
is circular rotation with displacement; the installation of special sliders or slides is provided. - Third degree movable joint
– possibility of horizontal, vertical and circular movement.
For any node, whether it is movable or not, at least two types of fixation should be used. For example, notched planks are additionally fixed from the inside using a support beam, and dynamic connections are strengthened with bolts and special steel angles.
Practical advice
It has already been mentioned that the bending strength of the rafters at the splice is always less than that of the whole element. If possible , try to place this node as close as possible to the ridge, Mauerlat or various spacers . Such precautions minimize the risks of mechanical destruction of the rafter leg. If this possibility is not available for one reason or another, then it is not recommended to place the stop under the splice at a distance of more than 15% of the leg length from either end.
The node is located on the Mauerlat
Never use black self-tapping screws for connections . This metal has two significant drawbacks. The first is that it quickly oxidizes and loses its original strength. Secondly, the manufacturing technology of such self-tapping screws involves hardening. When the permissible load is exceeded, hardened screws do not stretch, but burst. During the operation of the roof, the relative humidity of wooden structures changes, and the thickness of the boards fluctuates accordingly. And this can significantly increase the tensile force of the self-tapping screw; it will not withstand it and will crack.
Black screws should not be used
Do not overdo it with the amount of hardware . If there are too many of them, then the holes will significantly reduce the strength of the parts being connected, as a result you will get the opposite effect, the build-up will not be strengthened, but weakened.
About the types of fastening of rafters to the base
Let's talk about modern fasteners. For the strength and durability of the support units, a variety of metal fasteners are used: beam holders, equilateral, fastening, anchor, reinforced corners, plates, supports, profiles, connectors, anchors, etc. All these parts are made of high-quality metal. For dynamic units (types 1, 2 and 3), sliders, angles and perforated plates are used. For rigid fastening, stationary connectors, anchors and corners are used.
Such fasteners for the rafter system are most often used:
For self-assembly, perforated fasteners are more suitable than others, since they have many holes for self-tapping screws and bolts.
Rigid or flexible connections: what to choose
So, we noted that the support nodes connecting the Mauerlat to the boards can have different degrees of mobility: from “0” to “3”. Zero degree - these are rigid fastenings that exclude any changes in the position of the beams.
Rigid connections: when they are needed
The Mauerlat is installed when it is necessary to transfer the thrust load from the rafters to the load-bearing walls. This is done mainly in houses made of bricks, panels and blocks. In this case, they try to eliminate deformation and shrinkage of the roof in order to prevent changes in the load on the supporting walls. This is where the need arises for a fixed connection of the rafter system with the Mauerlat.
Fixed units secured with a notch
Many experts recommend making appropriate cuts at the point where the rafters are attached to the floor beams for greater strength and immobility of the connecting nodes. These cuts should fit tightly with the Mauerlat. Additionally, such units are strengthened with bolts, anchors and metal plates:
Or with long screws:
And one more important point: the size of the cut of the bar should not exceed 1/3 of its cross-section. Otherwise, the rafter system may lose its load-bearing capabilities:
Hard knots without notching rafters
The fastening method using a hemming block is used in layered rafter systems. The rafters are cut according to a template and beveled (to give the roof the desired slope) at the point of contact with the mauerlat. From the inside, such rafters are reinforced with support bars and reinforced with corners on both sides to the base frame:
Another option for a non-joint joint is a rigid fastening of the rafters, reinforced with overlay beams on both sides. Two boards at least a meter long border each rafter leg. One end of such supports is cut at an angle that corresponds to the slope of the roof slope (including rafters). The boards are fastened with a cut to the Mauerlat using long bolts and reinforced steel corners. The bars are attached to pre-marked places, first one at a time. Then the rafters themselves are mounted close to the overlays on one side, which are immediately reinforced with the same overlay on the other side. There is an option to install two beams at once, and then rafters, but this method is used less often, since it requires more accurate calculations.
How to correctly hammer nails into rafters when splicing
It is not always possible and necessary to splice individual rafter elements using studs; sometimes it is easier to do this with ordinary smooth nails. But you need to be able to hammer them in correctly, otherwise over time the compression force of the boards will decrease significantly. The length of the nail should be 2.5–3 cm greater than the thickness of the rafter at the junction.
We increase the rafters in length
How to correctly drive nails to connect loaded or critical wooden structures?
Step 1. Drive the nail into the boards at a slight angle, but not all the way. It is necessary that the tip protrudes from the back side by about one centimeter.
The nail is not driven in completely
Step 2. On the back side of the rafter, bend the nail at a right angle with a hammer.
The nail is bent at a right angle
Step 3: Hammer the nail in about another centimeter. Bend the end again, the bend angle should now be much less than 90°. The more you bend it, the more secure the final fixation will be.
The nail is driven in another 1 cm (approximately)
The end is bent even more
Step 4. Now you can drive the nail head all the way in. On the reverse side, bend the protruding part until the sharp end is completely inserted into the board. Remember that the point where the body of the nail exits and the point where its tip is driven in should not lie on the same line.
Now the nail is driven in completely
The bent part of the nail is driven into the board
This technology completely eliminates the independent weakening of the pressing force.
Prices for various types of fasteners for rafters
Rafter fasteners
When do you need to make moving connections?
Here we come to dynamic support nodes - connections that can change their position. What is it for? Let's remember the physical properties of materials - many of them shrink or swell. First of all, this applies to buildings made of pure wood - timber, logs, etc. Natural wood necessarily shrinks, due to which your roof can not only be deformed, but also completely collapse. To avoid such fatal consequences, craftsmen recommend sliding fastenings of rafter legs with a mauerlat (or the upper crown of a log house).
A prerequisite when installing sliding units is to support the rafter frame on a strong ridge beam. Since the supporting lower nodes are dynamic, maximum rigidity should be achieved at the roof ridge. The upper edges of the rafters are sawed down for a tight connection between themselves and the ridge beam, connected and reinforced with crossbars, metal strips, plates and corners. It is better to connect the rafter element already fixed in the ridge to the crown of the log house.
Complex roofs
Multi-gable, hip, half-hip or dome roofs are more difficult to calculate and build. The frame is a complex system consisting of parts:
- Mauerlat;
- main, slanted (diagonal), shortened rafters;
- racks;
- struts;
- runs;
- trusses.
In half-hip roofs, the gable section rests on a horizontal reinforced board. If the slopes are connected at an internal angle, there are grooves or valleys. The structural elements are fastened together with a notch and additionally with hardware. If you don’t have enough experience, you shouldn’t take on the installation of such roofs, even if you have a detailed project on hand.
What is a sliding mount?
The movable connection is made by installing sliding fasteners called “slides” or “sliders”. Such a unit provides a certain freedom for the rafter legs, which helps prevent deformation of the roofing system after the natural shrinkage of wooden buildings:
Here are the types of sliding supports:
Should I make a gash on the rafters if the house is made of timber: an alternative expert opinion
I still suggest cutting down, but not the rafters, but the top crown. Firstly, in this case, the risk of rafter bending is reduced, secondly, the “cold bridge” is reduced, thirdly, the tangential pressure on the mauerlat (top beam of the log house) is reduced, and fourthly, the insulation of the roof in the future is simplified. The disadvantage of this method is that when cutting down the upper crown of the beam, the height of the ridge decreases, therefore, if in the future it is planned to raise the height of the ceiling, one more crown should be provided. But! Such schemes are only suitable for houses made of wood, since in brick and concrete buildings the mauerlat must be intact in order to maintain its load-bearing qualities.
How to properly attach rafters to beams?
In simple houses, mostly frame ones, the Mauerlat can be abolished. In this case, the rafters are attached to the floor beams. The most reliable option for assembling such a system is the preparation of roof trusses. Each truss consists of two rafter legs, a connecting crossbar and a bottom tie. For strength, the trusses are reinforced with central beams and struts:
The floor beams are laid in such a direction that the trusses intersect them perpendicularly in different planes. The tie performs the main load-bearing functions, is attached to the floor beams with anchors, through bolts, studs and reinforced with plates and metal corners.
It is possible to attach the rafter legs directly to the beam, which will additionally serve as a tightening. To create high-quality support units in such a system, two fastening methods are recommended:
- Connecting the rafters to the beam with a double tooth - cuts are made on the beam and the bevel of the rafter leg (two butt notches on each).
- Fastening with bolt and clamp. Through fastening may be provided, but if the boards have a large cross-section, notches are made and the parts are connected with long bolts.
Why do you need a Mauerlat?
The rafter system absorbs the load from external forces and transfers it to the walls through the support beam - the Mauerlat. Its functions are to create a flat plane for attaching rafters and distribute evenly point forces on supporting structures.
As a rule, in private construction the mauerlat is made from softwood lumber - timber or boards. The size of the section and the method of attachment to the walls depends on the type of rafter system:
- With layered rafters, large bursting forces are transferred to the walls. The cross-section of the Mauerlat is powerful enough - 150x150-200x200 mm - to ensure load absorption. It is attached to the walls as firmly as possible.
- In hanging systems, the rafter legs are rigidly connected to a horizontal tie, forming a geometrically stable truss. Only vertical load is transferred to the walls, so the Mauerlat acts as a support pad. In this case, timber or boards are laid either on the entire surface of the walls, or in sections for each truss.
Lumber for the Mauerlat must be at least grade 2, dried to a moisture content of no more than 15%, and treated with antiseptics and fire retardants. To prevent wood from rotting, waterproofing is installed when laying on brick or concrete walls.
Joint location of the support beam
Attaching the rafters to the mauerlat: step-by-step description
As an example, we will describe the process of rigidly attaching rafter connections to the Mauerlat on a simple gable roof.
I. Preparing the mauerlat and rafters for work
At this stage, it is necessary to cut out the rafter legs of a given length and mark their step on the base. The optimal step length of the rafter legs is 60-200 cm. You should also accurately determine the angle of inclination of the rafters.
Master class on installing the Mauerlat:
II. Creating a gash
We make a gash on each rafter leg for a tight connection with the base. To increase strength, you can provide an additional notch on the frame or rafter and install a thrust beam under each rafter leg.
III. Installing rafters on the mauerlat
The rafters must be laid carefully so as not to damage other elements of the building (windows, walls, etc.). We place the boards with a cut on the beams and rest them on the ridge beam. First, we install the outer rafter legs, between which you need to stretch a thread to align all the other rafters.
IV. Fastening each rafter to the mauerlat
Now that all the trusses are in place, you need to firmly secure the support units. For this we use several of the mounts suggested above:
- Nails
+ steel angles along the left and right sides of the joints between the board and the base. - Through bolts or studs
+ support beam for rafters. - Anchors or bolts
+ angles or steel plates, etc.
Two overhead boards on both sides of the rafter leg, installed on pre-marked places on the mauerlat, will help to strengthen the fastening. You can also use wire fastening as a strength enhancer for connections. To do this, you need to prepare a steel wire twist of 2-3 wires. Its length should be enough to wrap around the rafter leg at the junction with the Mauerlat and secure the ends of the twist to a metal crutch. As a crutch, you can take a long steel bolt, which is mounted into the wall 30-40 cm below the Mauerlat, strictly under the support unit.
We will also consider one of the old-fashioned methods - fastening with staples:
And finally, we suggest you watch the video:
Butt splicing with plywood
Prices for different types of clamps
Clamps
One of the methods of splicing rafters helps to save boards and rationally use waste of various lumber. In this case, cuttings of sheet plywood one centimeter thick are used.
Step 1. Lay the rafter boards evenly on the site, close the ends, pay attention to the parallelism of the side edges. The boards should be extremely equal in thickness, the ends should be cut exactly at right angles.
The ends of the boards are closed
Step 2. Using a brush, generously coat the surface with PVA glue.
PVA glue is applied
Step 3. Place the prepared piece of plywood at the joint, press it firmly with clamps. While fixing, make sure that the plywood does not move from its original location.
Laying a piece of plywood
Clamps are used for fixation
Step 4. Using long, strong self-tapping screws in a checkerboard pattern, screw the plywood to the boards. The length of the screws should be 1–2 times shorter than the total thickness of the boards and plywood; their ends cannot protrude from the reverse side. Be sure to place large diameter washers under the screws. Before tightening the screws, drill holes in the rafters. Their diameter should be 2–3 mm less than the diameter of the threaded part of the hardware.
Drilling holes for self-tapping screws
Screws are tightened
Step 5. Turn the board over with the back side up, place it under the ends of the stand, they should not hang in the air. Carefully remove all installed clamps one by one.
The clamps are removed
Step 6. Spread the surfaces with glue and place the second piece of plywood on them. Clamp it again with clamps.
Surfaces are coated with glue
The workpiece is clamped with clamps
Step 7. Tighten the screws with great force.
Self-tapping screws are tightened with great force
Important. When tightening the screws, make sure that they are not positioned against each other. The displacement must be at least three centimeters.
Step 8: Remove the clamps. To strengthen the splice assembly, tighten it with through pins. They should be placed in the same way as with conventional butt splicing.
Through pins become clogged
Practical advice. The holes for the studs should be 0.5–1.0 mm smaller than the diameter of the stud. There are times when it is impossible to accurately select the diameter of a drill bit for wood. Then it is recommended to use a drill of a slightly smaller diameter, let the pin go in with a fairly large force.
During its hammering, the first few turns of the thread are crushed by strong blows of the hammer, which makes it very difficult to screw on the nut. To avoid problems, tighten the nuts before driving in the stud; now let the thread on the end jam, it is no longer needed. Before installing the rafters in place, check that the glue is dry. In good weather, it takes about 24 hours for it to completely harden.
The final touch is applying glue
Important. If, when splicing the rafters along the length of the boards, the nuts were tightened until the washer was sunk into the wood, then this cannot be done with plywood. Carefully control the pressing force, do not damage the plywood veneer.
What is the secret of the quality of the rafter system: three main rules of the master
- High-quality lumber is half the battle on the path to successful construction. The mauerlat and rafters should not have cracks, wormholes or knots.
- The accuracy of measurements, cuts and uniformity of the position of the fasteners is an equally important point. If all the rafter legs are the same length and cross-section, then it is better to prepare a template for making cuts and notches.
- Gaps on the Mauerlat – loss of the load-bearing functions of the base by 50% or more. The percentage of strength reduction depends on the depth of the notches.
When the rafter system is ready, it’s time to install the sheathing, insulation and roofing material. But this is another interesting topic, which we will definitely talk about in the next article. In the meantime, we wish you good materials, easy work and good helpers!
Types of wood for roofing
For rafter installation, depending on the purpose of the object, the following types of lumber are used:
- Clean-edged timber, two-edged and four-edged.
- Edged board.
Coniferous wood, for example, larch and pine, is most often used in the construction of rafter systems. It has sufficient strength, is easy to process and resists rotting. Before laying on the roof, the material is treated with a special impregnation.
A standard board is 6 meters long, a beam is 3 meters long.
Defects affecting the quality of lumber:
- Knots – technical conditions regulate the number of knots in the board, which does not affect the strength of the structure.
- Wane - for rafter structures it is completely cut off.
- Cracks - occur from improper drying or cracking in the cold. This material is not suitable for roof installation.
- Rot and fungus - from improper storage in damp conditions - are rejected.
The edged board must be free of defects Source yandex.net
Having chosen the right lumber, we begin measuring and splicing the rafters.