Self-leveling floors allow you to get a perfectly flat base for laying decorative flooring in a short time. The liquid mixture is poured onto the prepared surface, spread with a tool and left until final hardening for 1-14 days. In this case, it is necessary not only to select the optimal composition that meets specific conditions. No less important is the thickness of the self-leveling floor, on which the quality and service life of the floor covering as a whole depends.
Classification of mixtures
Quick-hardening solutions for self-leveling floors are made on the basis of mineral binders or polymer resins. Fine sand, crushed stone, and expanded clay are used as fillers. The compositions are modified with various additives to increase plasticity, strength, frost resistance, water resistance and other desired qualities.
Mixtures according to their intended purpose are:
- starting ones - for leveling bases with cracks, depressions and other gross defects;
- finishing - for final finishing of floors.
The thickness of the self-leveling floor for each specific case is determined individually and can be in the range of 1-100 mm.
Rough leveling screeds
Mixtures are made using mineral binders - cement, gypsum, anhydrite. Thanks to the fairly large filler (up to 2.5 mm) and thick consistency, this product smoothes out large defects well. It is applied in a layer of 5-100 mm.
The thickness of the starting self-leveling floor is selected taking into account the condition of the base surface and the current loads. The greater the mechanical impact on the coating and the lower the initial strength of the base, the thicker the leveling layer should be.
Self-leveling floors for preliminary leveling
If you need to make a self-leveling screed of very large thickness - from 100 to 200 mm, you can proceed as follows:
- Apply the solution to the desired mark in one go. Disadvantages: long hardening time, heavy weight.
- Consistently apply 2 thin layers to the required height. The drying time will be reduced, but the load will be greater.
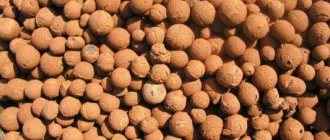
- Raise the floor level using a dry screed with expanded clay, vermiculite, sand and fill the solution to the subfloor level.
In the latter case, the load on the base is reduced, its thermal insulation properties are increased, and materials are saved.
Final alignment
Finishing of floors is carried out using finishing mixtures. The liquid solution with finely ground fillers spreads well and, when hardened, forms a durable and wear-resistant coating with a thickness of 2 to 30 mm.
Self-leveling floors made from mixtures with mineral binders cannot be used without additional protective and decorative finishing. After hardening and drying, laminate, tile, linoleum, and parquet can be easily laid on a perfectly flat surface.
A separate group of finishing coatings is polymer self-leveling floors. These are single- or multi-component compositions that harden in air due to a polymerization reaction. When using them, the final leveling and protective and decorative finishing of the floor are combined, which makes it possible to obtain finished floors very quickly.
Epoxy, acrylic or polyurethane resin is used as a binder. When preparing the working mixture, a hardener is added to the base component, which starts the polymerization reaction. The lifetime of the compound is no more than 40 minutes, during which it must be quickly and evenly distributed over the surface.
Thin-layer self-leveling floors.
The hardened polymer film is elastic, resistant to wear, water and chemicals. Appropriate additives provide antistatic and anti-slip properties.
Polymer coatings are used in the finishing of industrial, public and administrative buildings, as well as in everyday life. Interior designers use the unique capabilities of self-leveling floors to realize original ideas using techniques:
- addition of colored pigments, sand, marble chips;
- filling the still uncured surface with flocks, chips or glitter;
- pouring multi-layer floors, where banners with a pattern are laid as an intermediate layer, thereby creating a 3D effect.
Polymer floor coverings are beautiful, easy to clean, and last 20 years or more.
Advantages and disadvantages
The advantages of using this technology are its following features:
- simple procedure for preparing and using the solution . Before starting work, you just need to mix the composition with the required amount of water;
- fast drying time of the solution. They are usually indicated in the instructions supplied with the material;
- a large selection of different types of compositions. The building materials market offers products from both domestic and foreign manufacturers;
- the liquid solution fills all the unevenness and differences, forming a smooth surface;
- using the mixture requires minimal preparation. Such a screed does not require reinforcement.
Flaws:
- a thin-layer screed 5-20 mm thick forms an insufficiently strong floor;
- Screed made from a self-leveling mixture has low sound and heat insulation characteristics.
How to determine the thickness of a self-leveling floor
As a rule, manufacturers indicate the recommended thickness on the packaging, but its range is quite wide - from 1 to 100 mm. In thick-layer mixtures, the maximum thickness of the self-leveling floor can be increased to 200 mm.
Navigating a large range of products is not at all easy. First you need to select the composition for the purpose and load. It can be for external or internal use, dry or wet rooms, medium or high loads. If the mixture is suitable for installing heated floors, it is reflected on the packaging in the form of an icon or inscription.
The next step is to determine which leveling requires a self-leveling floor. For roughing, the mixture should be thicker and the applied layer should be thick enough. The finishing composition is finely dispersed, it covers small irregularities, so a loose and bumpy base cannot be leveled in this way.
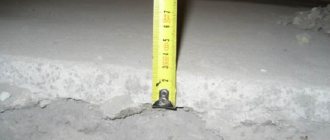
At the third stage, the task is to find the required fill height. To do this, the lowest and highest points are determined on the basis. Using a laser builder, mark the floor level on the walls 3-5 mm higher from the highest point.
If you don’t have the equipment, you can simply screw screws into the base to the desired height. They retreat from the walls by 10-15 cm and install beacons first in the corners, then along the axes of the room in increments of 1 m. The resulting plane sets the horizon, and you can accurately determine the minimum thickness of the self-leveling floor.
Thus, taking into account possible shrinkage, the subfloor mark passes above the highest point at a distance of 3-5 mm. This is true for starting levelers. For finishing mixtures, shrinkage is not taken into account, since they are non-shrinkable. They can be poured onto a flat base with a layer of only 1-2 mm, but if there are differences of up to 20 mm, it is necessary to remove the level using the method described above.
Maximum screed
There is no specific maximum possible thickness of the screed. The fill height will depend on many factors: the value is determined separately for each case. From a technological point of view, it makes no sense to pour screed to a height of more than 15-17 cm; structures with such a height are created only when necessary, as they require a lot of time and materials.
It makes sense to thicken the layer if you are arranging the floor in a room where heavy loads are placed on the floor. The simplest example of such a room is a garage: the weight of the car and its impact on the floor when moving are large, so a screed height of 15 cm is quite justified.
A high screed is also used in situations where it will be part of the supporting structure. In this case, a thick monolithic fill becomes not only a floor, but a foundation. Experts recommend increasing the thickness of the screed if the base of the floor structure is problematic soil.
Sometimes the height of the concrete pour is increased in order to hide significant differences in the surface. In practice, significant unevenness of the original surface occurs quite often, but a large screed thickness is not the only way to eliminate them.
Before deciding to pour a 15 cm high screed, many builders advise evaluating the possibility of using crushed stone or expanded clay to level out differences. Correct sudden changes with a powerful jackhammer. If surface imperfections can be corrected using these methods, then the need to pour concrete to a greater height will automatically disappear.
A minimum layer of fill will also not work in this situation, however, you will need a much smaller amount of material to screed the floor. If you level huge surface differences of 15 cm in size only with the help of concrete mortar, then your costs for the concrete itself and for paying for the work of builders will add up to a round sum. Most often, large expenses will not be justified, so it is worth doing at least partial leveling using a bulk layer of crushed stone.
Filling a screed of maximum thickness when installing warm water floors is also not financially justified. A large thickness of the cement layer above the heating elements will cause the floor to warm up slowly. The efficiency of such a design will ultimately be low, and heating costs will be simply enormous.
Self-leveling floors for high loads
In industrial workshops, warehouses, hangars and other facilities, floors experience increased loads. When designing, the requirements for coatings are taken into account:
- mechanical, dynamic, static strength;
- resistance to water and aggressive chemicals;
- resistance to abrasion and contamination;
- antistatic, anti-slip properties;
- environmental Safety;
- decorativeness.
When selecting the optimal technology and thickness of the self-leveling floor, specialists study the characteristics of the existing base and operating conditions, and calculate the loads.
Industrial floors are laid on concrete bases with a load-bearing capacity that meets the operating loads. The surface is first ground to remove cement laitance and improve the adhesion of materials.
To strengthen and remove dust, impregnation with one-component polyurethane varnish in 1-2 layers is used. It penetrates to a depth of 3 mm. If the load on the floors is not higher than average, nano-topping is used. A thin-layer coating of special sealing mixtures is applied to the wet concrete base.
For medium and high loads, thin-layer polymer coatings are used to protect industrial floors. They are applied in several layers after impregnation and priming. And finally, under very heavy loads, self-leveling polymer floors with the addition of quartz and marshalite are installed. Minerals impart high strength, wear resistance, and damage resistance.
Leveling with tile adhesive according to a simplified scheme
Another method of leveling the floor that you can do yourself. Most often, this option is chosen for ceramic tiles: it is possible to reduce work time and achieve good strength. During the process of laying tiles, it is very difficult to level the floor (laying it directly on an uneven floor), so inexperienced craftsmen correct the base all in advance.
How to level a concrete floor with tile adhesive:
- Removal of large lumps
, cleaning the surface from debris and dust, moistening the concrete with water (if the base is dry).
- Glue preparation
– it should be slightly thinner than the consistency recommended by the manufacturer. Thick ones are very difficult to work with; it is better to make a solution reminiscent of sour cream, which will spread slightly over the base.
- Glue is poured in portions onto the floor
, as a rule, the excess is pulled together (straightly, perpendicularly, in a circular motion, diagonally). The protruding mounds of the base are used as beacons (only the depressions need to be filled with glue).
- Rubbing glue into the floor
with a trowel or spatula to improve adhesion.
- Throwing glue
and re-aligning the detected depressions.
- Laying ceramic tiles
– can be performed the next day.
Acrylic-cement bulk mixtures
Acrylic is a polymer compound based on acrylic and methacrylic acid. It is widely used in construction in the form of paint, plastic, and plexiglass. It is used as a modifier in the composition of self-leveling cement floors, improving the plasticity of the mixture, reducing shrinkage deformations and cracking of the solution during drying.
Acrylic-cement self-leveling coatings combine the properties of concrete and polymers. They are resistant to acids and alkalis, withstand temperature changes and severe loads. Apply the material in a layer of 10-30 mm to the primed surface. Strength gain occurs within 3-7 days.
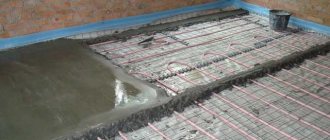
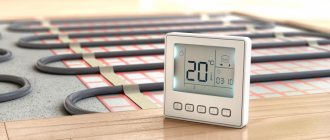
Self-leveling mixtures for heated floors
The "warm floor" heating system is very popular today. Heated air creates comfortable conditions in the area where a person stays, so heat is spent most rationally and economically.
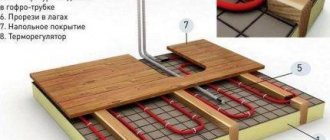
To install a heated floor, tubes with coolant, most often water, are laid on the base. Then they are filled with a solution, for which it is optimal to use self-leveling agents. They are heat-resistant, do not crack due to the addition of fiber fibers, and accumulate heat well. Manufacturers mark self-leveling mixtures for heated floors with a special sign.
The thickness of the self-leveling floor is calculated taking into account the fact that the system must fully operate, that is, accumulate and release heat in a certain mode. The recommended height of the quick-hardening liquid screed above the surface of the pipes is 30-70 mm. With this value, heat is distributed evenly in the material; there are no areas with a large temperature difference. The coating does not experience multidirectional stresses, does not deform and, accordingly, lasts longer.
The height of the screed, taking into account the diameter of the pipes, is 50-100 mm. As it increases, more time is required for heating, and thermal inertia increases, which is not economical.
After pouring the fresh mixture, the heating is not turned on for 14 days until it has completely hardened. Drying too quickly should be avoided as this will cause the floors to crack and reduce their strength.
Installation work
Preparation
Before starting work, it is necessary to prepare the room in strict sequence:
- Clear the room of furniture and foreign objects, remove all uneven areas, bumps, and remaining mortar using a spatula, collect all debris;
- Cover cracks, chips, remove dust;
- Apply primer. If once is not enough, apply again. We do this until the surface stops absorbing the primer;
- Installation of strips in doorways;
- Taping corners and walls with polystyrene foam tape around the perimeter of the room;
Attention! If you plan to make partitions from plasterboard, then first build a frame from the profile, fill the floor and only after complete drying, fix the plasterboard.
Tools for work:
- Drill;
- Primer;
- Mixture;
- Container for solution;
- Needle roller;
- Primer roller;
- Expanded polystyrene tape;
- Drywall and profiles if necessary.
The preparation of the mixture must be treated with all rigor and importance.
There are many factors influencing the quality of the mixture, which can subsequently affect the quality of the screed:
- Temperature. You cannot make a screed in the cold or in the heat, otherwise the screed will turn out to be fragile. Temperature range 15-30 degrees;
- Shelf life. Do not use expired mixtures, this will affect the quality of the floor;
- Amount of water. When preparing the mixture, we use the correct ratio of water and mixture, there are small tolerances and these tolerances cannot be violated;
- The solution must be mixed in parts. First, pour the required amount of water. Then add the mixture.
Mix thoroughly with a drill at low speeds, moving it up and down. Stir for 3-4 minutes, let the mixture stand for 3-4 minutes.
Floor thickness at low temperatures
Frost-resistant self-leveling floors are used for unheated buildings, refrigerators, car parks, stadiums, and warehouses. In housing construction, they have become widespread as covering paths, terraces, and gazebos. The thickness of the floor at low temperatures is from 3 mm to 10 cm, depending on the initial state of the base base and the materials used.
Mixtures for frost-resistant floors are made with special additives that allow them to withstand numerous cycles of freezing and thawing without destructive deformations. In addition, the materials must be waterproof, so the composition contains water repellents - water-repellent reagents.
Thin-layer mixtures are made on the basis of polyurethane, methyl acrylate, and epoxy resin. They are laid in a layer of 3-5 mm. The most frost-resistant are methyl acrylate. They are not afraid of ultraviolet radiation, unlike other polymers, do not interact with acids and alkalis, and polymerize in 1-2 hours. At the same time, the coatings are very wear-resistant, retain technical characteristics for up to 25 years, and their service life is up to 40 years.
To create a leveling layer with a thickness of 5 mm, polymer-cement is used. Such screeds are not inferior in strength to concrete, but are more elastic and frost-resistant.
Product cost
When carrying out such a procedure as screeding a floor with a self-leveling mixture, the price of the composition plays a significant role.
It would be a good idea to familiarize yourself with the cost of some types of products in advance, which will help you at least roughly navigate the volume of upcoming costs.
Below are prices for packaged goods, where the bag weight is usually 25 kg.
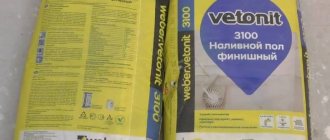
- cement mixture CERESIT CN80 – 240 rubles;
- cement mixture VOLMA Nevelir Express - 280 rubles;
- cement self-leveling floor UnisGorizont – 264 rubles;
- gypsum leveler Ecopol (weight 30 kg) – 370 rubles;
- gypsum mixture DELUXE Litopol UN – 310 rub.
Advised by professionals
- Materials need to be purchased from well-known brands and from trusted sellers. Read reviews, read instructions for use.
- The base must be strong enough. Anything that can move or deform under load must be removed.
- Dust removal and priming are mandatory stages of the technology. Materials will not adhere to dusty substrates.
- The layer thickness should be sufficient to hide unevenness plus 3-5 mm for shrinkage. For non-shrinkable coatings, the thickness is equal to the maximum difference in height of the base.
- For heavy loads, choose special mixtures with a tensile strength of at least 25 MPa.
- When laying, remove bubbles with a needle roller, the height of the needles being at least twice the thickness of the liquid solution.
- To install heated floors, use only mixtures specially designed for this purpose and marked accordingly. Observe the standard thickness of the self-leveling floor above the heating system pipe - at least 30 mm.
Recommendations from experienced builders will help you complete the job faster and easier.
Calculation of the amount of material
We calculate the amount of material
Calculating the amount of material purchased is the most important step for a person who makes his own screed. Since the material is quite expensive, purchasing even an extra bag will be burdensome, and vice versa - an insufficient amount of prepared material will not allow the work to be completed, which means that the screed layer will not be monolithic and will lose the necessary quality characteristics.
Before purchasing, carefully analyze the market for the proposed mixtures; do not neglect to carefully read the instructions printed on the packaging or on the manufacturer’s website.
Although externally similar, the compositions have different purposes, characteristics, thickness, strength, and consumption. Be sure to pay attention to the units of measurement in which the flow rate is indicated.
A mathematical calculation of the required amount of self-leveling screed can be carried out using the formula:
Material = Area * Average Thickness * Consumption * 100
Dividing the calculation result by the weight of one bag, we obtain the required amount of mixture in the bags. To correct the result, taking into account the “just in case” reserve, we multiply the resulting number by 5%. You don’t have to adjust the “margin” at all if you feel that your calculations for the required height of the applied layer are accurate.
For clarity, let's give an example. Let the room be 17 square meters. meters, and the average floor level should rise by 6 mm. Let us assume that the instructions on the packaging of the mixture indicate the material consumption - 14 kg per 1 sq. m. meter of area, and the package weight is 20 kg.
M = 17 * 0.006 * 14 * 100 = 142.8 kg
5% reserve = 7.14 kg
142.8 + 7.14 = 149.94 kg
149.94 / 20 = 7.497 ≈ 8 bags
In this way you can calculate the amount of dry construction mixture in bags. Even with such a small area and thickness of the future coating, a lot of material will be needed, which is why special attention must be paid to careful measurement and calculation of the layer thickness.