To allow access to the site, special openings are made in the fence. And to ensure that this place does not remain empty and that everyone does not enter through it, gates are built. A gate is something similar to a gate, only it is intended for people to enter.
Wickets can be made from various materials. This is a small door that is held on hinges, like doors in a house. It can cause various constipation mechanisms.
Many types of gates are not that difficult to make yourself, with minimal skills and knowledge. By looking at photos of gates made by yourself, you can find entire works of art.
Ideas for a homemade gate
In private houses, the entrance to the site is the calling card of the house, its decoration and expresses the hospitable or closed character of the owners. Therefore, most often gates are made according to individual orders, or even owners prefer to do it themselves.
With some dexterity and construction skills, it is quite possible to make it unique, beautiful and durable. In this article you will find examples of such original crafts and many photos of gates made by yourself.
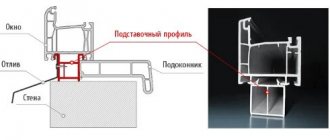
Wicket device
A gate, like any door, is a leaf fixed on hinges; it has a frame, the actual door leaf or grille and a locking device - a lock, a latch, a rotary handle.
It’s not difficult to make a gate with a wicket yourself. Similar examples can often be seen in individual housing estates and holiday villages.
Polycarbonate – a new generation material
This material appeared on the construction market recently, but has already managed to win the preferences of summer residents.
A gate made from this material has a refined and attractive appearance. It is easy to process and assemble, does not fade in the sun and has a high degree of wear resistance.However, despite all its attractiveness, there are negative aspects of its use:
- is destroyed by both high and low temperatures;
- does not tolerate mechanical stress;
- is not an environmentally friendly material.
Gate supports
In order for the gate to stand level and not warp in the ground, it is necessary to install support pillars. For them, round hollow pipes or thick-walled profiles are used. The latter is more convenient, since a lock and hinges will be welded to the supports, but it is inconvenient to weld it to a round base.
For wooden doors, you can use wooden posts. However, you need to take into account that wood in the ground will sooner or later rot, and try to give preference to metal.
The question of how deep the pillars should be dug is resolved as follows: it all depends on the degree of freezing of the soil. Because of this feature, the soil “walks”, heaves in the spring, and the door can warp. To prevent this from happening, the supports are dug in below the freezing level of the soil by 15-20 cm.
The most durable and strong option is brick masonry pillars, to which a metal frame is attached, a frame for a gate.
Material for support posts
Metal or profile pipes with a diameter of up to 80 mm are often used as pillars. The wall thickness must be at least 4 cm. Pipe pillars are a reliable support for the structure.
Their light weight allows you to install them yourself in a short time. Sometimes stone or brick pillars are used. Their production is a longer process.
The disadvantage of the seemingly impressive support of such pillars is the tendency of the masonry to sag and collapse.
Important! To strengthen the structure of such pillars, a metal pipe is passed inside.
Frame for gate
The correct frame is very important for subsequent operation. This is the frame to which the door leaf made of wood or metal will be subsequently attached.
The most common frames are welded from metal profiles or corners. On this base you can attach any material you choose - corrugated boards, boards, polycarbonate sheets, slate, mesh, metal rods, complex forged patterns, etc.
The main thing is that the load-bearing capacity of the frame can withstand the weight of the entire assembled gate. Therefore, special importance is attached to its strength and wind resistance. Typically, a profile pipe with a cross section of 60X60 mm with walls 3 mm thick is used for the frame.
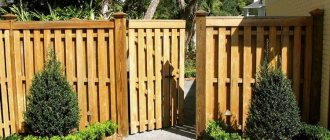
Beautiful fence
Looking at photos of forged gates, we always admire the work of the craftsmen and the beauty of their products. Such wickets and gates will help visually ennoble the area and also protect it from unwanted guests.
If desired, you can make a variety of patterns on your fence and gate. Thanks to modern technology, you can draw almost any pattern and forge it.
Wicket dimensions
To begin with, do not forget to prepare and later also look at the drawings of the gates when you design them with your own hands, so that all the dimensions match and there are no annoying surprises in the form of gaps, cracks or overlaps.
The height of the gate on external fences ranges from 2 to 1.2 meters. Gates delimiting the territory within the site can be made lower. And for solid fences, it is better to make the doors flush with the top of the fence.
The optimal width of the passage is 110-100 cm, but not narrower than 90 cm. Otherwise, passing through it will be problematic.
On your own or to order
When you have decided on the appearance, material and type of installation of the future product, you can evaluate your capabilities to manufacture it yourself (if, of course, you have the time and desire for such work).
A unique forged version should definitely be entrusted to a professional. All you need to do is choose a model and invest money. Installation usually also falls on the shoulders of the manufacturer. However, you can save on this by doing it yourself, but a beginner is unlikely to be able to do it using technology so that everything works properly. It is also wiser to entrust this work to professionals.
If you discover an uncontrollable desire to create, but at the same time you only have the skills to work with a hammer and nails, you can try to create a garden door from a picket fence or similar simple material. It is worth remembering that even the most ordinary gate is not just a rectangle made of wood. There are also many nuances during the assembly process.
If you confidently handle an angle grinder and a welding machine, feel free to take on the metal model. A correctly welded frame, well-placed forged elements, a harmoniously selected color of professional flooring or carbonate - and you are sure to create a personal masterpiece.
What to make a gate from?
The method for making a gate with your own hands depends on the main material of the canvas. Let's consider the most common options - metal and wood. Plastic, despite its practicality and lightness, is used less often for gates, since it is flammable and fragile, and breaks easily.
Metal gate
Since the fencing of the site, the fence, is most often made of corrugated sheeting, it is quite natural and appropriate to have a gate also made of corrugated sheeting, which will remain from the main work.
The frame of the gate is separately manufactured in advance, to which a sheet of corrugated sheeting of the required size is bolted. The frame is held together by longitudinal and transverse crossbars located strictly at right angles to the base and to each other.
Then standard hinges are welded, a locking mechanism and a handle are installed. The gate is ready for use.
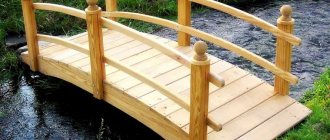
Wooden gate
A wooden gate looks organic and very homely. You will need a cutting board, fasteners and fittings. It is important that the board is well dried and does not deform after drying during use.
For gates, a ready-made pine board 6–10 cm wide and 2 cm thick is suitable. The boards can be packed tightly and with a gap of 2–6 cm, depending on how light and transparent you want your gate to be.
To impart wear resistance, protection from pests, environmental humidity and fading in the sun, the wood is coated with a special impregnation and protective composition. The wood can be painted or varnished.
Drawing construction and material selection
You should decide in advance on the size of the gate and the material used. The drawing should not only indicate the dimensions of the future structure, but also provide for the location of individual elements in the form of inserts or gaps.
Wickets made of profiled metal can be combined with elements made of plastic or polycarbonate, and forged metal elements go well with wood.
The lock for the gate and the handle should be purchased in advance and their installation should be considered. After completing the drawing, you can begin to prepare materials for the construction of the gate.
Step-by-step instructions on how to make a gate with your own hands
In order for a self-made fence gate to be durable and beautiful and to last a long time, you need to know a few important rules.
To install supports, prepare holes to the required depth (it should be below the freezing level). They can be made with a drill or dug out by hand with a shovel.
Place the posts vertically and fill them with gravel or crushed stone. Compact thoroughly and fill with concrete solution. When the composition sets, this will not happen earlier than on the 7th day, you can hang the gate, it will no longer warp.
It is important to install the hinges evenly - along one axis strictly vertically. Under this condition, the gate will close and open well and smoothly. In order to install a lock on the gate with your own hands, reinforcement from metal plates or corners will be required in this place.
The open edges of the frame pipes must be welded or closed with plugs to prevent water from flowing in and destroying the gate. You can choose plastic plugs that fit the size or fill them with silicone.
In order for a cut piece of corrugated sheet to fit perfectly to the gate, you do not need to fasten it tightly right away. It is better to install literally 4 screws around the perimeter, align where necessary, trim, tighten, and only then, having achieved an ideal fit, attach it permanently.
These were the basic rules for making gates yourself. Then you can use your own imagination and dexterity. Each homemade gate is different from the others; it reflects the character of its owner. This is its charm.
Wooden
For many centuries, wood was practically the only material for doors at the entrance to the estate. Metal appeared later, was expensive and was available only to a select few. Therefore, we associate wood with nostalgic memories from childhood, fairy tales, holidays in the country, warmth and comfort. Modern fencing options are strikingly different from the simple wooden walls of the past - wood panels are combined with polycarbonate, forged parts, brick and stone columns, products made from carved boards and carved decorations are in trend. For lovers of ethnic music, fences, palisades made of logs, and all sorts of complex structures made of boards and blockhouses are still popular.
Wooden structures have many advantages: price, ease of working with wood, ease of painting in any color, and the ability to create original structures. Disadvantages - service life up to 20 years and the need for regular treatments against fungus, combustion and regular painting.
The simplest type of wooden fence is a picket fence. First you should prepare the necessary tools and materials: a board with a width of 50-700 mm and a thickness of 16-25 mm (a thicker board will last longer), support posts (usually a rounded log with a diameter of 150-200 mm is used), bars for the frame - 50x50 mm, 50x100 mm, pegs, ropes, wood screws with a diameter of 5 mm and a length of 50-60 mm, saw, screwdriver, antiseptic, paint, bitumen mastic, fire retardant impregnation.
Before starting work, you should mark and cut out all the boards and bars, cover them one by one with impregnations, let them dry, then paint the upper part of the pillars twice, and cover the lower part with bitumen mastic. Dry everything well.
Antiseptic treatment is a very important stage in wood processing (it doesn’t matter whether we paint the wood or not. The antiseptic suppresses rotting processes, protects against bugs and significantly extends the life of the fence. Unpainted wood is antiseptic every two years. Antipyretic treatment will protect your fence from accidental fire.
Next, we assemble the door leaf on a flat surface: we lay out the bars at the required distance, lay the boards, and carefully fasten them with screws (two at the top, two at the bottom). It is advisable to cut off the protruding corners of the bars before painting. We turn the canvas over and screw the loops onto the bars. Then we nail the slanting bars. You can cut them and screw them to the boards (from the front side), and fasten them to the crossbars with metal plates.
You can fasten the frame with glue using a tongue-and-groove system and reinforce it with corners, but this work is somewhat more complicated.