Uncultivated for several years, the land gradually takes on a natural appearance, that is, it becomes more like a wild meadow, with bushes sprouting, than a place for recreation and agriculture. Any novice summer resident can face this problem.
After all, it is in this condition that plots of land cut for dachas and houses are sold for the first time; the land can end up in the same condition if no one has worked on it for at least 2-3 years. If you also become the owner of an overgrown plot and don’t know what to grab and how to achieve the desired result, choose one of five methods that have been proven over the years (and hundreds of years).
Of course, the easiest way is to hire landscape design specialists, coordinate the project and wait until they do everything themselves. But it will cost almost the same as you paid for the plot itself, so we will not offer you such a solution to the problem.
Beginning of work
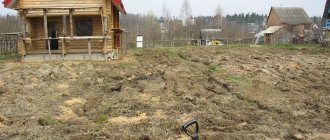
An overgrown area presents a bleak picture.
A lot of dry weeds with strong roots, wild bushes and semi-dry old trees - this is a considerable list of work that requires attention. Heaps of garbage, remains of building materials, and dilapidated buildings are also not uncommon here.
It is difficult to imagine ideal beds, spectacular flower beds or a lawn in an overgrown area. How to develop an overgrown site and make it suitable for use? Before planting flowers, sowing seeds or making a beautiful lawn in an overgrown area, you will have to work hard. Development of a heavily overgrown area requires attention and physical strength, so improvement begins with small areas.
There is a lot of work ahead. It will only take a few years to achieve a beautiful, attractive look. How to develop an overgrown plot for a vegetable garden and where to start?
- Dismantle unnecessary buildings and remove construction waste.
- Collect large debris throughout the area.
- Remove unnecessary trees and shrubs. To remove the top part, use a saw or hacksaw. The roots need to be uprooted, this will help prevent the bush from growing throughout the area in the future. To remove roots, use a winch or brush cutter.
- Dry weeds are mowed down and removed from the territory.
- The land is plowed or dug up by hand. All roots require careful removal.
That's all! You can start planting and start designing your yard.
All of the above measures will help get rid of weeds and weeds. However, many roots remain in the ground, which in a few weeks will delight summer residents with their appearance. How to clean an overgrown summer cottage and prevent the massive appearance of weeds? Let's consider several options.
Useful waste paper
This very original method will be effective if you carefully follow the instructions. To make it a reality, you will need rotted manure (you can use chicken manure, compost or humus). This composition must be evenly distributed over the entire area of the developed area and covered on top with black and white newspaper 5-7 layers thick. If you find this difficult, you can replace the newspaper with thick cardboard. Compost mixed with manure is poured onto the paper layer on top.
The advantage of this method is that you can make holes in newspapers in which you can plant any crops grown through seedlings. This is perfect for those who don’t want to wait a long time, being content with only potatoes and cabbage. At the end of the season, in addition to an excellent harvest of the crops you grow, you will also receive a clean area with soil enriched with vitamins and microelements.
Herbicides
Processing and improving a large overgrown area takes several years. However, this process can be accelerated. Herbicides are very effective in controlling weeds. They are used before they are going to dig up an overgrown area and plant vegetables and flowers on it.
It is better to use continuous herbicides aimed at destroying all excess vegetation. The first treatment is carried out in early spring before the formation of inflorescences. Herbicides are sold as dry powder or in concentrated liquid form. Breed according to instructions, taking personal safety measures.
A sprayer is used to treat large areas. Small areas of land can be watered with a watering can. Once on the leaf blades of plants, herbicides penetrate into the roots. The first results of the treatment will be visible within a few days - the weeds turn pale and dry out completely within a few weeks. After 1.5 months, the treatment can be repeated to consolidate the result.
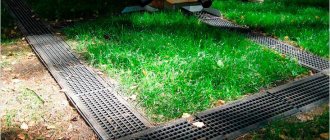
Application of non-woven covering materials
If you need to free up a small piece of land and have at least a season left, you can use covering materials. The simplest and most effective are black non-woven covering materials - they are laid out on the site in the spring, choosing the most dense ones. Over the summer, the weeds will die under the geotextile, and at the end of the season it will be possible to plow the soil and apply fertilizers in order to begin processing in the spring.
Of course, the weed seeds will not disappear over the course of the year and will continue to sprout, but there will be significantly fewer of them.
You can replace geotextiles with any dense biodegradable material, for example, corrugated cardboard. It will serve the same, although it will look less presentable.
- Covering material for beds, greenhouses and greenhouses - which one is better to choose
How to choose a good covering material, and what exactly does your planting need? Let's explore the variety of colors and textures together!
If you are in a hurry and want to plant the first vegetables and berries this year, then install the frame directly on a layer of cardboard, fill it with fertile soil, brought to order or available to you, and then plant herbs, vegetables, strawberries in these ridge boxes etc. In a couple of years, the cardboard at the base of the ridge will decompose without a trace. But the covering material is not suitable for this; it will have to be removed in the fall.
Green manure
An effective way to clear a site of weeds is to sow green manure.
They inhibit the growth and development of weeds and suppress the root system. Any plant with a strong root system can be used as green manure:
- rye;
- white mustard;
- rape;
- clover;
- alfalfa;
- oats;
- sweet clover;
- peas.
If it is planned to plant vegetables on a cultivated plot this season, green manure must be selected from unrelated groups.
The use of green manure is carried out according to the following scheme:
- Clearing the area of dry grass.
- Plowing or manually digging up the soil and removing roots.
- Sowing.
- After a short period of growth, the green manure is mowed and put into compost pits or the soil is plowed together with the plants. In this case, green manure is used as mulch.
In spring, green manure is sown several weeks before planting. Autumn green manure is harvested in the spring. They optimize the acidity of the soil, promote its loosening and saturate it with oxygen. The use of green manure allows you to avoid the stage of applying fertilizers.
Sowing green manure grasses
The most long-term and effective way to remove weeds is considered to be the cultivation of green manure. To ensure that the plants completely occupy the area and remove all the grass from it, plow the soil in the spring and sow with various green manures. Then, once they have grown, the soil should be plowed and re-sowed. This manipulation must be carried out three times per season.
Green manure plants are quite tenacious and are used as green fertilizer; they are good at displacing weeds from the site.
Black film
It is very easy to tidy up a small overgrown area. But where to start if its dimensions are impressive and manual processing is an impossible process? How to easily and effortlessly clear an overgrown area of small bushes? How to permanently remove weeds from an abandoned, heavily overgrown area and never think about them again?
Black film comes to the rescue. It is spread over the entire surface, the edges are carefully secured.
In the absence of sunlight, plants cannot carry out the photosynthesis processes necessary for life and development. First, the weeds change color. Gradually, complete death of the root system occurs. Dead roots can be removed from the ground by hand or left to decompose naturally.
Black film can be replaced with any available material:
- cardboard;
- roofing felt;
- old carpets;
- board.
The only requirement for the material is that the coating should not transmit light. This method takes a lot of time. Effective microorganisms can be used to speed up the processes of death and removal of roots.
After treating the area, various bacteria and microorganisms are included in the cleaning processes. Weeds die off much faster. After just two months, the result is visible - the top part of the weeds has decomposed.
Now it is easy to clear the area of dry grass and loosen the soil. By next spring, the entire root part of the weeds will completely disappear and you can begin the exciting task of improving the area.
In the first year you can get impressive harvests here, and after a season you can use the site as a permanent place for perennial plants and flowers.
A small amount of weed is treated according to a different scheme:
- Autumn treatment with effective microorganisms.
- Sowing green manure with the onset of the first spring days.
- When the green manure grows a little, the ground is dug up or processed with a flat cutter, using green manure as mulch.
This method makes it easy to clear the area of thickets and preserve the soil structure. The result is soft, fluffy soil suitable for efficiently growing vegetables and flowers.
Plowing and leveling with a motor cultivator
If you have a motor-cultivator, a mini-tractor, or the ability to rent this equipment for a few days, part of the problem can be solved quite quickly. However, this still won’t save you from manual labor, but it will at least reduce the load on your back.
Before you begin processing, remove from the area all debris that may fall under the cultivator blades.
Don’t rush to plow the entire area at once, do it in stages. First, process several squares, break up the lumps, select and remove the turf and roots, level the soil with a rake, and only then move on to the next area. In the process, you will most likely come across soil pests, so it is advisable to keep a container with kerosene, machine oil or other technical liquid on hand to collect them.
Lawn
An overgrown area can be improved and used not only for growing vegetables. We'll look at how to make a beautiful lawn in an overgrown area below. The best time for this is early spring, when the earth warms up to 10 °C.
Before digging the overgrown area with a shovel under the lawn, it is cleared of debris and dry grass. The turf is removed and all the soil is carefully dug up. The land needs complex nitrogen-containing fertilizers, which are applied during soil cultivation.
To get a smooth, beautiful lawn, the soil is leveled with a rake and thoroughly compacted.
The best time to sow lawn grass is after a good spring rain, when the soil is well saturated with water. During the dry period, it will be necessary to provide preliminary watering of the entire territory. The seeds are scattered evenly over the area, deepened into the ground using a rake.
After just 10 days, the first shoots appear. To maintain a beautiful appearance, the lawn needs to be mowed every three weeks.
Stage 6: Laying electrical wiring on site
This stage is recommended to be done in the fall. Then, before spring, the earth will have time to settle, and it will be possible to fill up the formed depressions, and then lay out a lawn or plant plants whose roots do not penetrate too deeply into the soil: perennials and small shrubs.
When laying wires around the site, they are first laid in plastic pipes and placed in pre-dug trenches 60-70 cm deep. The places where they are laid should be marked with signal tape made of film or bricks (15-20 cm above the cable).
In this case, any electrical equipment placed on the site (sockets, lamps, transformers) must have sealed housings protected from dust and moisture (minimum degree of protection IP 55). And home lighting (intended for use inside buildings) cannot be used on the site, even to illuminate canopied terraces and gazebos. Since their parameters and protection do not provide for outdoor use.
Please note that high-voltage equipment (220 V) can only be designed and installed by specialists who have the appropriate permit - permission to perform electrical installation work.
Low-voltage equipment (12 or 24 V) can be installed on the site yourself. Here you will need a step-down transformer. It is best to lay such wires at a depth of at least 30 cm (so as not to cut them with a spade while digging up the ground), or along the surface of the ground.
You should remember about safety precautions. Firstly, the cables should not intersect with gas and water pipes. Secondly, they should be laid as far as possible from already growing trees and shrubs. And although there are no rules regulating this point, it is believed that 50 cm from the edge of the projection of the crown of a tree or bush to the place where the cable is laid is sufficient.
Results
Tidying up an overgrown area is quite labor-intensive and time-consuming. However, a set of chemical and mechanical measures, desire and limitless patience will help restore order and improve any abandoned area.
Related Posts
- Vinegar and salt based weed killer
- Excellent against weeds in garden beds
- How to get rid of purslane
- How to get rid of the weed Pigweed
- How to get rid of weeds on strawberries
- Annual and perennial cereal weeds
- The width is thrown back: description and control measures
- How to get rid of thistle
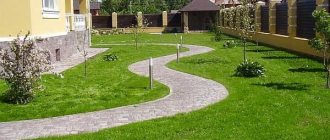
Stage 7: Arrangement of paths on the site
Floor tiles are most often used for paths and surfaces in areas. The method of its installation depends on its purpose.
For entrances and other places where heavy traffic is not planned, you can make a base of compacted crushed stone or coarse gravel. Then a layer of sand or a cement-sand mixture (cement-sand in a ratio of 1:9) is laid on it, and then stones, concrete or ceramic elements: slabs, FEM, paving stones, clinker.
For paths that will only be walked on, it is enough to make a base of well-compacted sand or a mixture of sand and cement.
Regardless of the type of covering being laid, you need to remember to form transverse slopes (1-2%), along which water after rain should flow onto lawns or under plants. Thus, you will not only speed up the drying process of paths and areas, but also, by accumulating water in the soil and allowing it to evaporate slowly, you will make a contribution to environmental protection. This solution will also reduce your garden watering costs.
Soil: preparing the site for spring planting
Drops are ringing in the yard, April begins - the time to prepare the soil for sowing and planting vegetable crops in open ground.
The main condition for obtaining a high, high-quality harvest depends on soil preparation. All plants need fertile, as light as possible, loose, water- and breathable soil, which breaks down into small lumps when mature. Floating, heavy or sandy ones are not able to provide the required conditions. Such soils need improvement, which consists of adding cultivators, additional organic matter and other techniques and methods.
Spring soil preparation in the garden
How to make beds correctly?
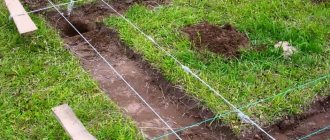
Classic beds
Classic beds are formed directly on the soil. They do not have standard sizes. Typically, each gardener marks the area (width and length) so that it is convenient to process and care for plants from the paths without disturbing the surface of the bed.
The beds are arranged in such a way that each has free passage on both sides. With this arrangement, the optimal width of the bed is 1.5-1.6 m. That is, on each side you can cultivate the area of the bed to the length of an outstretched arm (70-80 cm) without stepping on the bed itself. The length is arbitrary and depends on the size of the area allocated for the garden. Paths 50-100 cm wide are left between the beds, which will allow free use of garden equipment, watering and processing of plants. By the way, during the warm season weeds and other waste are dumped on the path, and in the fall the paths are cleaned, throwing organic matter onto the bed and digging it up as additional organic material. Permanent beds and convenient paths will make the garden neat and attractive and make it easier to control weeds.
In the garden beds, plants are planted in a north-south direction. This arrangement of plants contributes to better illumination of rows of plants and reduces their shading by each other. If the beds are oriented from east to west, then sowing/planting is carried out not along, but across the beds.
On slopes, the beds are placed across the slope in separate terraces.
If the beds were fertilized in the fall before digging, then no fertilizer is applied in the spring. Work is limited to closing moisture (harrowing with rakes), pre-sowing cultivation and (if necessary) local watering in furrows or holes before sowing/planting.
Conclusions about the main thing
There are several ways to drain a plot of land yourself, but if you are not ready to carry out heavy excavation work and do not have sufficient experience and knowledge, it is more effective to entrust this to specialists.
To choose the right drainage, the following factors should be taken into account:
- soil composition and permeability;
- dimensions and shape of the pit for future construction, weight of the building;
- groundwater level depending on the season (the highest value is applied);
- the possibility of seasonal floods due to melting snow and autumn precipitation;
- speed of movement and direction of groundwater.
All factors can be foreseen only after a geodetic analysis of the soil; in some cases, test drilling is used.
Complicating care
After 3 years, the embedded organic matter will burn out. The top layer of soil will need to be removed and replaced with a fresh layer of soil, preferably organic matter, followed by mulching with an organic-soil mixture. To prevent the soil in the box from overheating, frequent watering is necessary, which destroys the soil structure. After a few years, new organic soil layers are needed to start a warm bed, which complicates maintenance.
And at the same time, in the cold north, box beds are a progress in open ground vegetable growing.
To prepare the site for early sowing, you need to:
The best beds for the south are classic, raised and trench.
For cold regions with short summers and severe frosts in winter, early vegetable crops are best grown in box beds, box beds, in which the soil, which is not connected to the main soil, warms up faster.
Source
Pest control in autumn
Soil treatment against the Colorado potato beetle in autumn
Traps are made for the Colorado potato beetle in the fall. Collect the tops in heaps and leave them on the site so that insects gather under them. Then everything is burned along with the pests.
Or after harvesting potatoes, they bury the peelings in the ground, which will act as bait. Colorado beetles gathered for a “free lunch” are destroyed.
Soil treatment against mole crickets in autumn
They make slightly different traps for mole crickets. In the fall, holes are dug. Their depth should be half a meter. Straw dust is placed at the bottom. When it's cold, holes are dug up and the mole crickets that have gathered there for the winter die from the cold.