An uneven plot only seems like an insignificant problem, but when it comes to pouring a foundation, planting a lawn or laying out paths, soil defects will make themselves felt. To level the area you need to prepare:
- Mark the territory (the easiest way is pegs and rope).
- Clear the ground of debris, large stones, uproot stumps and snags.
- Select a method for leveling the area.
Important! It is best to work in sunny, windless weather, when the ground is well dry. Rain will quickly turn the soil into mud, and frozen soil is difficult to handle even with technology.
When is it necessary to level the terrain?
It is necessary to level the territory before starting construction on it, but this is only a small part of all the work.
So, the site for construction is ready, building materials have been purchased and work is in full swing. When all construction work is completed, you can begin to improve the rest of the territory.
The ground for decorating flower beds, beds, garden paths, paths, and recreation areas should also be level. When placing beds, the nature of the terrain plays a special role.
When watering, moisture will flow evenly to all plants, there will be no stagnation and, conversely, dry areas, which can have a detrimental effect on the root system of plants.
Take a look at the photo of a flat area, and you will see that the nature of the surface is also important for the placement of garden paths.
Paths and paths not only make the area well-groomed and attractive, but also allow you to move freely around the garden, even if it has rained heavily. In order for the work on laying paths to go smoothly, the area must be leveled.
Feasibility
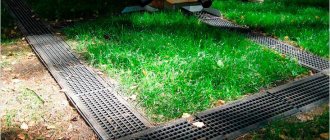
Leveling the site before sowing lawn grass mixture is necessary, since the presence of unevenness will lead to the following undesirable consequences:
- the lawn loses its attractiveness;
- bald spots appear: seeds are washed away by rain from highlands to lowlands;
- When watering, water stagnates in lowlands, causing the grass to become sick;
- the haircut is done unevenly: in the lowlands it is too long, in the hills it is almost “zero”. If there are significant differences in height, cutting is generally impossible - there is a risk of damaging the lawn mower;
- injury hazard. When children frolic in outdoor games, they often run onto the lawn, and if it is strewn with bumps, falls are inevitable.
They also resort to leveling the site if it is planned to:
- setting up a vegetable garden;
- pool installation;
- building a house or fence.
At the same time, one should be aware of the high labor intensity of such work.
If you do not plan to create objects, it would be wiser to resort to an easier method:
- hide unevenness by planting a flower bed;
- plant berry bushes, for example, currants: this will also make the relief less noticeable;
- beat up the irregularities by arranging a decorative pond, a rock garden, or a corner decorated in a fairytale style.
When can you level a plot of land at your dacha?
The most favorable season for landscaping work is autumn. The harvest has been harvested, the flowers have faded, and the summer season has come to an end, which means that the time has come to restore order on the earth.
Relatively flat areas are dug up, and holes and hills are leveled. Over the fall and winter, the soil will settle, become saturated with oxygen, and in the spring it will be ready for planting vegetation.
How to achieve a flat plane
Lumps and hummocks on the surface of the ground create inconvenience for walking and cutting grass with a lawn mower. Water collects in depressions after rains. And visually such an area looks unkempt and unkempt. When leveling loose soil, such defects are difficult to detect by eye. But there is a simple way to make a flat area in the country and bring it into one plane, regardless of whether it is a horizontal or inclined area.
This area needs careful leveling Source wp.com
You will need several long pegs, strong twine, a hammer and a long water level or level.
- Pegs are driven around the perimeter of the site in increments of about 1 meter.
- Using a level, marks are placed on them at the same height.
- A string is stretched between opposite pegs along and across the site. It is attached at the tag level.
- When all the strings are stretched, they form a grid of squares over the area.
- In those squares where the distance from the string to the ground is large, soil must be poured from those where it is small, achieving the same distance from the string down.
If the slope is small, the area can be brought to the horizon in a similar way. To do this, you will need a wheelbarrow, since you will have to transport large volumes of soil from a high level to a low one.
How to manually level the ground slope is described in detail in the video:
Ways to eliminate irregularities
There are several ways to level the ground:
If the unevenness in the area is no more than 15 cm, then it can be eliminated using a walk-behind tractor. The soil is plowed and then leveled with a rake over the entire area.
You can also level the area with a tractor. Its bucket covers a large amount of earth, so work is carried out according to a pre-planned scheme or without it in an area where the height of unevenness exceeds 1 meter.
Adding land. In this case, the unevenness disappears due to the delivery of soil and its horizontal filling. This option is most optimal for areas located on slopes.
Non-standard situations
If the site is initially located on a large slope, then during the leveling process it can be transformed into a multi-tiered area, instead of flat land, but at an angle. The principle of operation is the same, but preliminary sectorization must be done not only by squares, but also by levels, if you decide to do the work yourself.
Site located on a slope
Each tier is leveled separately, but it is important that they are parallel to each other. The distance between them and their number is calculated based on the vertical distance between the lowest and highest points on the site. For example, if the height of the slope is approximately 80 centimeters, then you can make two tiers with a distance between them of 40 cm or three, but with a distance of 25 cm. During the operation of construction equipment, a special drive must be arranged for each tier.
Leveling the land in tiers
The resulting gap levels can be beautifully lined with stones, with several small paths between them. You can also arrange a mini-waterfall or just a stream. But they should be sealed for greater reliability. For example, protect stones from the soil with waterproof fabric.
Transitions between tiers decorated with stones
With such a layout, residential buildings must be erected at the highest level.
A multi-tiered suburban area will be a rather unusual solution, and will also solve the problem of the general slope of the territory. Plus, it will look quite unusual, delighting both guests and hosts with its appearance
Multi-tiered summer cottage
Along with standard leveling in a dacha area, the relief can be artificially distorted. For example, build a mountain or a depression under a body of water. This method and feature of leveling for a summer cottage will be a very original solution. Thanks to it, it will be possible to give the dacha a more natural and pristine look, as if the mountains or depressions were created by nature itself, and not by man.
Artificial mountain with a pond on the site
Leveling the dacha plot
The first step is to install markings on the treated area. The most accessible tools are pegs and twine.
Then you need to remove debris, blocks, plant roots and stumps remaining from the felled trees.
Next, you need to decide exactly how the alignment will be done: manually or using special equipment.
Equipment will definitely be needed if the area is large and has significant unevenness. In other cases, all the work can be done independently.
It is worth considering that special equipment only performs rough work. You will still have to level the surface yourself.
During operation, a tractor or excavator displaces fertile soil and after leveling is completed, it is necessary to treat the surface with steam or boiling water.
If the area is processed with hand tools, then the first layer of soil must be removed and then returned to its place.
How to measure the area of a plot yourself: various methods and devices
How to measure a site without the help of specialists and what is needed for this?
In what units is the area of a plot measured?
Most often, the area of a small summer cottage is calculated in acres, a large one - in hectares (ha), and the measurement is usually carried out in meters. How to convert one unit to another? We'll have to remember the school mathematics course.
What is 1 hundred square meters? This is an area equal to 100 sq.m. In Soviet times, dacha plots most often had an area of 4-6 acres (400-600 sq.m.).
What is a hectare? A hectare is a larger unit of measurement and is equal to 10,000 sq.m. There are 100 acres in one hectare. Therefore, if the area of your plot is 0.5 hectares, then this means that it is equal to 50 acres.
Thus, by measuring the length and width of your plot and multiplying one by the other, you will get the area of the plot in square meters, which can be easily converted into hundreds or hectares:
100 sq.m = 1 hundred square meters = 0.01 hectares
1000 sq.m = 10 acres = 0.1 hectares
10,000 sq.m = 100 acres = 1 hectare, etc.
You can convert square meters to hundreds even without memorizing this table. To do this, you need to divide the number of square meters obtained by 100 - you get the number of acres: 500 sq.m / 100 = 5 acres.
You can measure an area in different ways. Let's talk about the most common ones.
Steps
You can find out the area of the site even in the absence of any devices. Your own steps will help you with this. There are two options here:
- Measure the length of the area in your normal steps. Then measure your stride length using a tape measure and multiply it by the number of steps taken. You will get the length of the section in meters. For example, 100 steps × 0.7 m (step length) = 70 m. Then do the same with the width. After this, all that remains is to multiply the length and width.
- Try to step so that your step length is equal to a meter. Learn to walk in just these steps, and then walk around the area, measuring its length and width. Multiply one number by another and you get the area in square meters.
Measuring an area in steps is the simplest, but also the most inaccurate method. It will only show the approximate area of the site. If you need more accurate data, use other options.
Surveying compass
Land-measuring compasses were used back in pre-revolutionary Russia, and then they called it a land-measuring sazhen. Now this tool for measuring area is popularly called differently: walking triangle, pedometer or “goat”. It can be made from any wooden materials: slats, sticks and even branches.
Knock down two sticks at the top point. Then take the third (it will act as a crossbar) and nail the connected sticks to it so that there is a distance of exactly 2 m between them. Make a mark in the middle on the crossbar - it will be needed if during the measurement (usually this happens at the end) the length The “step” will be less than 2 m.
Take a surveying compass, stand in any corner of the site and walk along its length, and then along its width. Multiply the number of “steps” obtained by 2 - get the length and width of the site in meters. And then everything is the same as in the previous version: multiply the length and width, get the area, convert it to hundreds.
Roulette
Using a tape measure is the most accurate way of measuring the area of a plot of land available to ordinary summer residents (non-specialists). Find the starting point (corner of the site) and measure the length from it, and then the width.
It is most convenient to use a special geodetic tape measure for this purpose. Unlike the usual one, it has a number of advantages:
- the length of a geodetic tape measure is longer than a regular one and can be 30, 50 or even 100 m;
- the instrument is equipped with a soft tape, so it is convenient to take measurements even alone;
- At the end of the tape measure, most models have a small ring, with its help the tape measure is hooked to a peg driven into the ground to mark the beginning of the countdown;
- Many tape measures designed for use in open areas come with a sharp peg that can be driven into the ground at the starting point.
In addition, such a tape measure is not much more expensive than a regular one. It will be a good purchase and will be able to help you more than once at your summer cottage.
How to measure an irregularly shaped area
Calculating the area of a rectangular or square plot is not difficult. How to measure an irregularly shaped area? This is more difficult, but you can also do it yourself.
Many people remember from school mathematics that the easiest way to calculate the area of such figures as a rectangle and a triangle. To measure the area of a complex shaped area, try dividing it into rectangles and triangles. Then calculate the area of each of the figures and add up the resulting values - this will be the total area of the entire site.
In practice this happens as follows:
- Measure all sides of your site.
- On a checkered sheet of paper, draw a reduced area according to scale.
- Divide the entire area into rectangles and triangles.
- Calculate the area of each figure using the formulas from your geometry textbook.
- Add them up and divide the resulting number by 100. You will get the area of the plot in acres.
Why is steam tillage necessary?
This is a unique procedure that helps preserve the results of leveling work for a long time. Pests and weeds also die under the steam jet.
At home, you can simply pour boiling water over the soil. Chemical soil treatment with sulfur or copper oxide is also allowed.
Useful tips
- Filling work should be carried out in several stages so that each poured layer is compacted properly.
- Calculation of the amount of materials for filling should be made taking into account their compaction.
- After filling, it is advisable for each layer to settle under the influence of precipitation.
- In a place reserved for green spaces, in front of fertile soil, it is necessary to pour a thirty-centimeter layer of sand.
- It is best to fill the area reserved for the car and paths with crushed stone.
Leveling the fertile soil layer for planting
If the slope or unevenness in the area is small, then it can be leveled without removing the first layer. First, you need to remove large debris and walk around the area several times with a walk-behind tractor with a special cutter.
Then the surface is leveled manually using a rake and the remaining weed roots are removed along the way. Next, the plowed area is left for a couple of weeks to shrink.
If the slope is steep enough, then the fertile layer of soil is removed, then the surface is loosened and laid back. Cultivated plants can be planted in the ground only 1-2 weeks after shrinkage.
If the soil contains a large amount of clay, then it must be leveled in the fall. The soils are plowed and, with the onset of spring, treated with a cultivator.
Required Tools
To level the area you will need:
- water level (spirit level);
- bayonet and shovel shovels;
- wheelbarrow for removing soil and garbage;
- roulette;
- pegs;
- twine.
You can make a water level yourself.
A transparent garden hose is suitable for this role. If there is an opaque hose, clear plastic tubes are inserted into it at both ends. The operating principle of this instrument is based on the fact that the water surface in communicating vessels is located at the same horizontal level.
Cost of land leveling work
It is possible to cope with the work without the involvement of equipment only in a small area. Working with land is not as simple as it seems, so if you own a spacious territory, it is better to trust the professionals.
Usually, the beauty of the site is created specifically using mini-equipment. A list of services can be obtained from an organization specializing in these types of work.
The cost of services may vary and depends on both the area of the site and the type of equipment. The price is also affected by the condition of the land, the amount of work, and the season. Simple leveling of the area will cost at least 3,000 rubles per square meter.
In addition, the purchase of land will be required. This procedure is not necessary, but is necessary if the fertile soil layer is too small or the unevenness is eliminated by topping up.
You can save money here too. It is enough just to find a construction site where work is being done to prepare the foundation pit and negotiate with the builders.
Work on removing soil is already included in the estimate, so the worker will be happy to give you the land cheaply or free of charge.
Drainage system
In case of long-term stagnation of water in the area, the area should be leveled at a slight angle, up to three degrees. And at the lowest point, install a drainage system. This is done in order to avoid stagnation of water, which will lead to the slow destruction of the relief. This layout will allow it to flow into the drainage, and then go underground or outside the site.
If the site has clay or a similar type of soil, then the water will not go under it, but will roll down to the bottom of the territory and stagnate there, gradually destroying the soil and soil. In such a situation, along with leveling, it becomes necessary to install a drainage system. You can make a simple version or an advanced one.
Stock pit
This is the simplest version of the drainage system. At the end of the sloped area, dig a longitudinal trench about half a meter deep. After this, its bottom must be clogged with fragments of brick or something similar. Then fill it all with sand and put gravel on top. At the end, fill the remains of the hole with soil dug out from there.
Drainage pit diagram
Advanced system
You can organize an advanced closed drainage system. The recess for the trench should be 70 centimeters and the width 30 centimeters. The pipe that will be placed there should be lined with branches or gravel, or both. Place one or more water intakes around the site, depending on the area of the territory.
Organization of a closed drainage system
Selecting a drainage system option
Although the first option is simpler to implement, the second is much better. Accordingly, if you have the funds, as well as a certain amount of time, it would be best to install an advanced closed-type drainage system.
Construction location analysis
Area for laying the foundation When laying the foundation, you should conduct an in-depth analysis of the area:
Determine the type of soil. There are two types: natural and artificial. Natural soil for the future foundation provides high strength. Artificial - requires additional compaction. This can be achieved by tamping or using chemical components. Correctly determine the terrain. Are there any elevation changes and by how much? Determine the depth of soil freezing. For different types of soil, this factor affects the load-bearing characteristics of the foundation differently.
Much attention should be paid to heaving soils (clayey, marshy). In any case, the foundation should be laid below the freezing depth of the soil by at least 20 cm. An important factor for choosing the type of foundation is the groundwater level.