The rafter system is the basis of the supporting structure of the roof. When making calculations, it is necessary to take into account the fact that the rafters must withstand not only the weight of the roofing, but also snow and wind loads.
The main parts of the rafter system are made of coniferous wood. They are treated with special fire-bioprotective agents.
The loads to which the rafter system is subjected are divided into two types - temporary and permanent. Temporary loads include the impact of repair and maintenance equipment, people accessing the roof, snow and wind.
There is also a special type of load. In seismic zones, this is a seismic effect on the building.
The constant load is the weight of the entire roofing structure, the value of which is the sum of the following indicators: the weight of roofing materials, rafters, insulation and insulation, interior ceiling finishing.
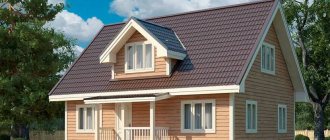
Types of angled roofs for log houses
There are layered and hanging rafter systems. According to statistics, layered structures are most often used. When arranging such a system, the rafters rest against the mauerlat. The function of the central part is performed by a simple ridge run. To increase the strength of the system, supporting beams are installed.
Construction of a gable roof rafter system
In the case of hanging rafters, the system design is equipped with additional racks that promote optimal load distribution over the entire area of the roof structure.
Types of rafters
The manufacture and installation of rafters of both types is carried out in a similar sequence, but taking into account the above-listed features and differences.
It's no secret that log houses go well with a roof that has two slopes. Knowing what technologies are usually used, it is quite possible to carry out high-quality installation of a gable roof rafter system on a log house. Typically, the roof slope angle chosen is from 45 degrees and even up to 65. The figures below clearly demonstrate the types of roof angles for log houses. The roof can be:
- with insulation;
- without the use of insulation;
- attic;
- roofless.
It is noteworthy that construction from logs retains ancient traditions, but also includes new technologies that allow wood to move freely without the risk of destruction of the structure. The fact is that installing a gable roof rafter system on a log house involves two methods:
- Installation takes place on males, namely on chopped log gables. The load-bearing parts rest on the gables. Then the sheathing itself is laid.
- Roofs based on the rafter system. They are built according to all the rules and regulations dictated by existing technologies. These roofs are either hanging or sloping. The gables themselves can be covered with boards, which significantly reduces the construction budget.
In some cases, the rafter and male system are combined. In this case, a truss with a hanging appearance is installed in the middle of the male type roof. Often the beam of the ceiling-type log house itself - the translation - can act as the basis for installing inclined rafters, and in some cases it acts as a tie that combines the elements into a triangle called a hanging triangle.
When it comes to the male scheme, you can take advantage of the enormous benefits provided by chopped boxes. They can be assembled and also disassembled without difficulty, like a constructor. To do this, you need to remove the crowns from their places and install them on a platform that is ideal for these purposes. The area must be level.
When work takes place on solid ground, it is much more convenient. Spacers made of aspen chocks are mounted under the crown itself. They will reproduce the previous rows of the logs themselves. The result is the top of a house made of logs, which converges like a wedge. It is built as usual, but the width of the end walls becomes much thinner.
A slightly ridged type will unite the tops of the existing males. The log that completes the pediment is always cut exactly at 2 edges. In this case, the protrusions resembling steps that the male has obtained must be sawed off or hewn into the shape of a triangle. The remaining open areas at the top are filled with shorties.
Few people know, but the old craftsmen, when carrying out fastening, never used fasteners when installing the presented roof. This greatly extended the life of the wood, since there were no metal rods inside it that were prone to rust. Such structures could last for several hundred years.
In some cases it is not possible to construct a male roof. This can occur when the excess has been cut off from the legs or males too much, and the cut-in joints have suffered. In such a situation, the usual option on top should be supplemented with rafters, thereby eliminating the need to cut off the humps.
Alignment should occur along the very edges on top of the existing rafter legs. The rafters themselves should be created strictly according to the established template; notches, as well as the lengths of the legs, are always marked in it. High precision cutting of future joints is not very important. It is better that the bowls are 5 cm larger than the arbis itself, since the log house will sag significantly for a long time and lose its former height. Behind the settling frame, the bottom of the existing rafters near the roof will sag, and the connection angle will decrease.
It is the wide notch that can guarantee complete safety during displacement. It is important that there is a small gap between the tops of the legs of the rafters resting on the ridge beam. When the rafters begin to gradually move apart from below, they will gradually move closer at the top. After the moment when shrinkage occurs, the tops must be connected with an overlay or a special tightening. Sometimes they are connected using a hinge joint and do not wait for shrinkage to occur.
In order for the roof to be reliable and not to be demolished from the house, it is necessary to tie the rafters through one, this happens in the 2nd crown from the top, into which the pins are driven, and wire twists are used for connection. Gradually the twists will weaken as they shrink, then they need to be tightened.
The fastening is similar to the previous one, but this option does not require slugs. The legs of the rafters are called layered for the reason that their top and bottom rest on supports that are completely independent. In this case, the heels from below rest on the crown, and it serves as a power plate. If we consider resting the top, then it must be said that in such a situation there are several options.
- A prince's or ridge's line can be laid between the males. It is important that the tops of the existing rafters, which are laid flat, are not fastened together, or they are connected using a hinge.
- A wall that is capital. There must certainly be some gap left on top of the rafters themselves.
- A ridge structure is installed using the matrices, mounted under the beam. Males will not be needed. To reliably ensure compensation for shrinkage, it is necessary to install the support pillars on devices that make it possible to carry out regulation. We are talking about screw structures.
We invite you to familiarize yourself with: Denominations of Swiss franc banknotes in circulation
The legs of the rafters were called hanging ones, since they seem to hang over the box itself. They rest on the walls. A part of the rafter will serve as a support for the top. And the heels from below are connected using the tightening method. As a result, the rafters begin to resemble a triangle with equal sides. It is often called a truss, or called an arch. It is the tightening that is ready to accept the thrust that is transmitted to the walls.
The expansion is compensated, and this is a huge plus. A beam called a ceiling beam may well act as a tightening. It is impossible not to note one more advantage of the hanging or layered option. The roof is assembled at the bottom; it is not necessary to go upstairs. Under safe conditions, all rafter triangles can be adjusted and joined together. But such a system is not suitable for buildings with large spans. If the spans are more than 5 m, then the tie rods for them will bend from their own weight.
Types of rafters
In accordance with the type of structure, rafters are divided into layered and hanging. The main shape of the rafter system is a triangle - the most rigid geometric figure.
If there are large spans, trusses are created on the basis of layered, suspended structures, and sometimes a combination of both.
Layered rafters
The layered rafters of the side rafter leg rest on the external load-bearing walls and load-bearing structures located on the inside - columns or walls (if any) through a system of racks.
If the span (the distance between the external walls) is no more than 6 meters, then you can do without racks, especially if there is nothing to support them on.
In any case, it is necessary to install a ridge beam in the center, in which the opposite legs of the rafters will converge. A rafter beam - Mauerlat - is laid on top of the walls along the perimeter of the building.
In the case of wooden log houses, its functions are performed by the upper crown. To save money, it is recommended to place cuttings of the same cross-section under each leg, rather than using a whole beam.
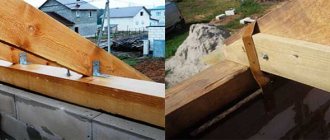
The Mauerlat must be secured to a reinforcing concrete belt using pins or bolts. Fastening is carried out in a vertical position to a depth of 40 cm or on wire ties, which must be laid already at the stage of wall construction.
In the place where installation on the mauerlat is to be made, it is necessary to make a selection of a certain size and shape for laying on the rafter beam. To provide additional strength, the assembly is secured using bolts, staples or metal plates.
For new buildings, the shrinkage of which has not yet been completed (this is especially true for houses made of timber and logs), a rational choice is a sliding rafter system.
The rafter leg is not attached rigidly, but using a plate with slots. Through them, a bolt or self-tapping screw screwed into the rafter leg has free movement.
The rafters are attached using hinges and on the ridge beam. Thanks to this, they do not bend or break during shrinkage, but simply take on a shape corresponding to the new configuration of the load-bearing walls.
Hanging rafters
Since the hanging system is different in design from the layered one, the technology for installing the rafters will also be different.
The ends of the hanging rafters rest on the walls of the building or mauerlat without the use of intermediate supports. They are used in buildings with light walls.
In this type of system, the rafter legs work in compression and bending. Since the structure creates a horizontal thrust load transmitted to the walls, to reduce it, a wooden or metal tie is used to connect the rafter legs.
In this case, the only force transmitted to the wall is the vertical pressure of the roof. The tie can be located at the base of the rafter leg or above it.
Its strength should increase in direct proportion to the height of its location. For a span of more than 8 m, a stand with struts (headstock) is installed.
The advantage of hanging rafters is the ability to cover large spans with them.
In this case, before being connected by rafter and ridge beams, they represent a completely autonomous system. The rafter legs can rest either on the mauerlat or on the load-bearing wall.
If the span width does not exceed 6 meters, the floor beam can act as a tie.
If the span is larger, then there is a need for additional installation of headstocks, slopes and crossbars.
To connect the puffs and headstocks, use a bracket that is passed under the bottom of the puff. For other nodes, the fastening methods used when working with layered rafters are used.
How to attach rafters
You can secure the rafters using several methods:
- using Mauerlat;
- through floor beams;
- with tightening and rafter wooden bars;
- connection with the upper crown of walls made of logs;
- using the strapping of a house that is built using a frame system.
Mounting points for the rafter system.
Rafters used when installing roofs in log houses are divided into hanging and inclined. When constructing wooden houses with a large roof area, hanging rafters are used.
The main tools for work are:
- roulette;
- saw;
- square;
- pencil;
- hammer;
- screwdriver;
- level.
Fastening the rafters is a crucial moment in the roof installation process. The condition of the roof under the influence of gusts of wind, snow cover, and sudden temperature changes will depend on the method of fastening the rafter elements with the Mauerlat. All wooden elements are capable of absorbing moisture and at the same time expanding, and under the influence of rising temperatures, contracting.
Given the characteristics of wooden structures, it is not recommended to arrange all connections with rigid fastening, as this leads to breaks and displacements. The occurrence of expansion forces affecting the walls of the log house due to careless installation of structures can also pose a danger. To prevent this from happening, you need to have an idea of how to install rafters on a log house.
The type of interface is used taking into account the shape of the roof and the type of rafters - layered or hanging.
Types of roofs
Currently, about ten different types of roofs are used for residential buildings and outbuildings. Some of them are more familiar to us, others are very rare. The main design options are:
Pitched roofs made using straight rafter systems:
- single-pitched;
- gable;
- hipped - hip and half-hip (with a ridge) and hipped (without a ridge);
- multi-tongs:
- conical
Pitched roofs with curved rafters:
- semicircular;
- hemispherical.
Almost all types of roofs are based on special parts that provide the roof with the necessary strength and give it the desired shape. We are talking about rafters.
Rafter system design
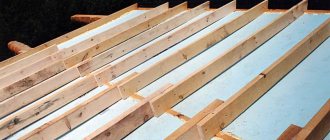
Traditionally, this structure consists of rough flooring, waterproofing and sheathing with counter-battens and must ensure reliable fastening of the roof, uniform distribution of the entire load from the roof on the rafter system, and also ventilation of the attic space.
- For the installation of rough flooring, edged boards, plywood, chipboard and fiberboard are used; as an economical option, an unedged board with underlay during installation is possible. In order for the flooring to create additional rigidity, two or three nails are driven in at the joints of the flooring boards at the level of the rafters. The flooring serves as the basis for waterproofing and counter-battens, forms the overhangs of the gables, and for roofs with a small angle of inclination, the flooring acts as a sheathing. The lower flooring boards are cut and straight, and the overlap of the gable overhangs is made more than 600 mm, for further trimming on site.
- Any rolled materials are suitable for waterproofing carpet. But if waterproofing is installed for an insulated attic, then the material must have both waterproof properties and vapor permeability. The roll material is laid from below, horizontally, with an overlap according to the technical characteristics of the material, but not less than 150 mm.
- The counter-lattice is stuffed from bottom to top, on top of the waterproofing layer and consists of bars 25*60 - 30*70 mm. The pitch of the counter-lattice is from 30 to 60 cm and depends on the type of roofing; this information is given by the manufacturer in the material installation manuals.
- After installing the under-roof structure, the roof is installed.
Pediments and gable canopies complete the device. The gables of a log house can be made from different materials - asbestos-cement flat slab, metal tile, plastic, plywood, it all depends on the construction budget and preferences.
Any rafter system consists of the following main components:
- rafter legs. Mounted parallel to the slopes. Prevents deflection of the roof structure;
- run. It is a transverse beam installed longitudinally from above;
- beds and racks - support the purlins of the rafter structure;
- struts are components of a sub-rafter truss that provide additional stability to the rafters.
Rafter diagram
Installation of a building system for a log roof
Marking the fastening of boards to the frame must begin from the gables, with the elements being laid tightly to the gables. But first, a supporting element - a tooth - must be cut out in the board. In the upper crown of the log house, repeating the size of the tooth, a groove is cut out. It should also be noted that without a tooth and groove it is impossible to fasten the rafters. When positioned from above, the ends of the elements must be laid 5 cm lower, taking into account the height of the pediment.
When the design of a log house roof includes a ridge element made of timber or logs, marking the installation, the rafters need to be nailed to them. When all elements (braces, sheathing) are installed, the temporary fastening in the form of nails is removed.
Rafter marking diagram.
This is required so that during the shrinkage of the log house all elements do not hang up.
Typically, rafters are installed in increments of 60 cm or more.
The step distance will depend on the building project and its location. The rafters are installed on both sides of the pediment, resulting in a tent shape. In places where the rafters come into contact with the gables, there should be a gap of at least 5 cm, which is subsequently filled with insulating material.
Features of installation of the log rafter system
- Mats serve as supports for the rafters. Their protrusions beyond the walls of the log house are aligned “along the cord”, and to bring the upper surfaces of the mats to the horizontal, their planes are either cut off or raised by nailing a board of the required thickness. The thickness of the leveling boards and the depth of trimming are also determined using a stretched cord.
- The assembly of the first roof truss requires special precision, because once adjusted, this truss will be used as a template for all subsequent trusses. The trusses are assembled using nails 100 mm long (weave).
- It is important to ensure that the rafter legs are tightly installed in the recesses at the ends of the mats; for this, a tenon template is made at the end of the rafter leg and all the ends of the footrails are cut according to it. Tools for making recesses in mats - a hammer and a chisel. The recesses are selected according to the template of the rafter leg tenon, at equal distances from the ends in each matrix.
- After marking the recesses, the first, template truss is disassembled and the required number of elements for all trusses is prepared from its parts; fillies are also prepared in the required quantity - two per truss. The fillies are prepared one meter long from boards 50*100 mm.
- The entire assembly of the trusses is done at the bottom, also using hundreds of nails. Particular attention is paid to controlling the distances along the rafter tenons. They must correspond to the distances between the lower points of the recesses of the matrices.
- The installation of roof trusses requires two workers, since the installation is done with vertical adjustments along the plumb line. Temporary rigidity is achieved by fixing it with boards - spacers.
- Attaching the rafter legs to the mats is done with 200 mm nails, with 6-8 mm drilling to prevent the wood of the ends of the rafter legs from splitting.
- When all the trusses are installed, the racks are installed. The posts are attached to the rafters at the top using double-sided pads. The verticality of the racks is verified with a plumb line, then the rack is inserted with a tenon into the recess of the matrix and adjusted in height by trimming it in place.
- To install the overhang, fillets are installed with an outlet beyond the rafters of about 300 mm, while the projection of the roof overhang onto the ground surface will be about 800 mm, but not less than 750 mm to organize reliable protection of the walls of the house from rain and snow. Of course, the release of fillies can be of a different length, this depends on the design features of the rafter system used. But in any case, it is irrational to make the overhang less than 450 mm for a brick house and less than 600 mm for a wooden one.
- To install the fillies, notches are made at the ends of the mats, next to the rafter legs, using chisels and a hammer (mallet). Nails for nailing fillies are also used - weave, and the installation of fillies along the length is set “along a stretched cord”.
We invite you to read: How to assemble a log sauna
Installation of rafters and crossbars during roof construction
Question:
Hello! When building the house, we installed rafters on the roof without crossbars, simply nailed them at the top, and nailed the lower parts with one nail to the ceiling joists. Those. it turned out to be just a triangle. The rafters alternate 150 by 100 with 150 by 40. The width of the house is 6 meters. The height under the ridge is about 3 meters. The roof is asymmetrical. The axis of the ridge is offset by about 1-1.5 meters from the center of the house. What could this mean? How can you strengthen it? Is there no way to change it? Thank you !
Andrey, Moscow.
Answer:
Hi Andrew!
Those guys who built your roof must have been in a hurry, not so much to build as to get paid.
Because in the vast majority of similar structures, crossbars are still installed.
As far as I remember from the theoretical mechanics course, a triangle is a rigid structure and the additional crossbar in it should not bear the load. According to theory, the crossbar is a zero rod, that is, a waste of material.
But in practice this is not entirely true. Due to any inaccuracies in practical spatial geometry, the crossbar is loaded. If any of the theorists wants to verify this, then let them install tensor sensors on similar roof crossbars and they will show it.
Yes, and the crossbars may later be needed as a basis for the ceiling of the future attic, which you will most likely build in the place of your attic. Because not using this space under the roof would simply be a crime.
The crossbar is usually located at a height of about 2.3 - 2.5 meters above the level of the floorboard. The height of 3 meters at the ridge, which you write about, fully satisfies this principle. In any case, the tallest member of your family or guest, after the attic-attic is lined from the inside with clapboard or some other material, along the lower planes of the rafter pairs (legs) and crossbars, should not reach his head to the ceiling.
The crossbar is usually nailed on each side with a couple of nails. Moreover, they stitch through both the crossbar and the rafters, and the exposed tip of the nail is bent with a hammer. It will be stronger.
I hope that the rafter pairs at the top are not overlapped? Hasty people sometimes do this to simplify their lives. If this is still done this way, then the crossbar on one side is nailed onto one rafter with an overlap, and its other end is sawed down at the angle of inclination of the second rafter.
That is, ideally, all your crossbars will be about 1 meter long (the 40 millimeters you mentioned is sufficiently thick) and overlapped on one side of the rafter pair, without cutting down their corners or with minimal cutting. And the joint itself at the ridge of the rafters is still sawn at an angle.
However, during my construction practice, which began in 1993, several times I came across attics without crossbars. The roofs did not collapse. Especially if it was just outbuildings like a barn.
As for the bottom of your rafters, fastened with just one nail, this is clearly not enough.
Therefore, the fastening of the bottom must be strengthened. For which, most likely, you will have to use metal plates made of galvanized iron sheet with perforations. They are sold in a wide range at construction markets in pavilions with fasteners.
That is, the shape of the plate can be either a triangle or a rectangle with several dozen holes. Apply such a plate on both sides of the bottom of your rafters. Approximately half of their area should be adjacent to the rafters and to the base of the rafters (matitsa).
Nails are either driven into the holes or self-tapping screws are screwed in with a screwdriver, at your discretion. Do whatever is easier. It all depends on how accessible these places are. You didn’t write whether the sheathing boards were installed on the rafters.
According to normal construction technologies, metal strips are now additionally sewn onto the internal surfaces of rafters. Which are also sold in rolls in the same pavilions mentioned above.
That is, along each roof slope such a tape is sewn crosswise from the ridge to the bottom of the rafters. It turns out to be the spitting image of a “St. Andrew’s cross”, like on a naval flag or jack.
Personally, I prefer to do this. Although many shabashniks are critical of this, considering it a useless undertaking.
So you can use some of my recommendations. Everything will be stronger.
Good luck to you!
Construction in Moscow and Moscow region
We work with a guarantee! Wide range of construction services. Foundation, walls, ceilings, roofing, turnkey! +7 (905) 797-20-34
luxurykomfort.ru
Other questions on the topic of roofs:
- Height of the ridge of the house - CALCULATION
- Estimate for a gable roof for a house 9 by 12 m
- Log house and frame under a common roof
- Do I need a transom under the ridge beam?
- The slate on the roof gets wet
- Mauerlat for the common roof of the garage and annex
- Common roofing for log and frame
- Budget roof for a bathhouse 4 by 4 meters
- How to fasten the waterproofing of a roof pie
- Calculation of metal beams for a garage roof
- Calculation of roof ridge height
- Base for a metal greenhouse
- Warming veranda with a roof made of corrugated sheets
- Insulate a slate roof from the inside with mineral wool
- Repair of garage roof made of asbestos-cement pipes
- Gable roof 12 by 12
- Beams for the roof on a log house lined with bricks
- Roof on a house with a mixed foundation
- Install a valley roof on a new frame
- The thickness of the reinforcement for the crossbar is 6.8 m
- Cost of replacing slate with metal roof tiles
- Calculation of rafter length
- How to connect the roofs of two adjacent balconies
- Half-hip (hip) on a chopped pediment
- Temporary roof for a log house made from banners
- Fastening the rafters of a pitched roof and a gable roof
- Insulation of the attic roof
- Didn't put film under the roof insulation
- Roof on a log house with outriggers
- The roof rafters squeeze out the top crown of the frame
- Extension of a veranda with a gable roof
- What roof shape to choose for a one-story house
- Roof across floor beams
- When to put a roof on a freshly assembled timber frame
- Armobelt for the roof of the house and extension
- Replacing the roof of an adobe house with room equipment
- Replacing slate roofing with corrugated or soft sheeting
- Common roof for a log house and a garage made of a twin block
- How to attach rafter legs to a sliding valley
- House with a mezzanine for children's rooms
- How to fix a chopped pediment
- Insulating the attic with sawdust
- Brick gables swayed, what to do
- Is it possible to put a roof on a log house for the next year?
- Roof for a house made of hand-cut logs
- The roof is pushing up the walls
- Thermal insulation of a slate roof of an old house
- Which roof to choose for an extension
- Gable roof for a house 10 by 10 m
- Repair of reinforced concrete soft roof slabs
- How to close the gap between the roof and the top log of a log house
- The roof of the veranda is leaking, which is also the floor of the open terrace
- Slab roof structure on stone gables
- When and from what to make a roof on a fresh log house
- Slate or metal tiles
- Replacing the ceiling and roof of an adobe house
- How to seal the joint between a chopped pediment and a roof
- Which roof to choose for a house 14 by 10 m
- Choosing a roof for an extension to a house
- Calculation of the connection between the roof of the house and the veranda with a step
- Roof of the yard supported by the house
- Is it possible to remove bows at home?
- Roof with inspection hatch for caisson
- Soft roofing or metal tiles, what to choose
- The junction of the porch roof and the log wall
- Removal of beams in a log house under a canopy and a common roof
- Roof insulation if the rafters are made of logs
- Completion of a timber house and erection of a roof
- Repairing the roof of an old village yard
- Rafters and log gable
- Roofing pie of an open veranda
- Attaching a protective fence to a slate roof
- Living in a house while the roof is being replaced
- Fastening rafters in a timber house
- Convert a shed roof to a gable roof
- Economical arrangement of gables
- Rafter system of a pitched roof
- Roof of an extension to a house with a mansard roof
- Corrugated sheet for the roof without gap and waterproofing
- Joining the roof of the extension and the walls of the house
- Metal profile on old roofing felt
- Place ondulin on old ondulin
- How to fix the roof of a balcony on the 5th floor
- Section of rafters for the roof
- What to put under a soft roof
- Roof over an old house on supports
- Covered with slate without roofing felt
- How to straighten a collapsed roof gable
- Rafter system for a house made of timber 9 by 12 m
- Fastening the lower ends of the rafters
- Connection between the roof of the attached veranda and the house
- The height of the roof of the house is 10 by 10 m
- New roof on an old brick house price
- Warps the roof when the frame shrinks
- Old and new house under one roof problems
- How to make slanted rafters in a log house
- Installation of a crooked roof
- Roof on attached veranda
- Do-it-yourself half-hip roof
- Construction of a carport
- Timber extension to a brick house under a common roof
- Garage roof sheathing 5 by 7 meters
- Rafter spacing for a gable roof
- Shed between veranda and barn
- Rafter system for a house made of 6 by 9 timber
- Sealing the ceiling in an underground passage
- Roof geometry
- Waterproofing the floor of an open balcony
- An alternative to tiles
- Replacing ondulin with metal tiles
- Roof insulation in a production area
- Option of a rafter system for a 10 by 10 house
- Roof trusses
- New roof on a panel house
- How to cover ondulin or ceramic plastic
- How to insulate a slate roof
- How to attach Volna corrugated sheeting to the roof sheathing
- Slate on sheathing without waterproofing
- Raise the roof and make an attic
- Converting the roof to a pitched roof
- Metal tiles on a non-shrunken log house
- Cover an adobe house with slate
- Drainage system and snow retainers for the log house
- How to lift slate onto a roof
- Temporary roof for an extension
- Does slate get wet?
- Workshop roof 8 x 6
- How to properly re-roof an extension
- Canopy project 8 by 14 meters
- Slate - front and back
- Supports for rafter legs
- Construction of an attic roof
- Profile for garage roof
- How to Level a Shed Roof
- Garage roof repair
- How to attach wave slate to a roof
- Roofing felt RPP 300 installation
- Calculation of the length of rafters for the roof
- Roof - galvanized or painted corrugated sheet
- About lumber for floors and roofs
- Extension of a log house when replacing the roof
- Log roof with frame veranda
- Analogues of roofing felt when covering a wooden roof
- Material for the construction of an attachment
- Rafter system for a large log house
- Is it possible to put rubemast on rubber?
- Barn and gazebo under one roof
- What kind of wood should be used for the roof?
- How to straighten a sagging roof
- Remodeling a gable roof
- Slope of a corrugated roof onto a garage
- Insulation of the junction of the roof and the wall
- Flat roof on a log house
- Roof shape for a garden house 6 by 4.5 m
- Uncovered roof in winter - risks
- Installing a roof on a log house
- How to increase roof box releases
- Partial roof repair at sub-zero temperatures
- Temporary roof for a house using Canadian technology
- Calculation of the roof for an extension made of aerated concrete
- Roof for garage - floor beams and rafters
- Roofing on a fresh frame and ridge height
- The rafters are installed crookedly
- How to Attach a Galvanized Wind Board
- Roof sheathing pitch for flexible tiles
- Place a terrace and a house under one roof
- Installation of an attic roof and windows in a log house
- Temporary roof for winter
- Repairing an old slate roof
- Common roof or separate for an extension to the house
- Balcony roof fastening from the inside
- Metal siding as a roofing material
- Arrangement of the roof on chopped gables
- Shed roof for garage made of slabs and rails
- Connection between roof and gutter
- Roof of Sudeikin
- Connecting the roof of the timber building and the house
- Extension to a sloping roof
- Rafter system for a log house
- Converting the roof from hip to gable
- How to make a roof and cornice for an extension
- How to sheathe the roof on the top floor balcony
- Permanent roof on a newly assembled log house
- How to make a 10 by 8 m canopy without internal supports
- Attic roof for a house 13 meters wide
- Common roof for a new log house and its extension
- We made a mistake when laying the film under the roof
- What is profile for roofing
- Is a counter-lattice needed for the roof of a summer cottage?
- Metal roof and its insulation
- One roof per house and new extension
- Installation of rafters in a log house
- The height of the attic roof of a 6 by 7 house
- Solarium on the country roof
- Raise the roof of the house to increase the height of the ceilings
- Blowing snow under the roof
- Condensation in roof insulation
- Installing a roof on a non-shrink log frame with gables
- How to attach a roof adjacent to the wall of a house
- Roof with four gables
- Joining the roof of the house and the extension
- Installation of the rafter system
- Moving the crossbars to increase the attic
- Inserting one roof into another
- Insulation of a roof laid without film from the inside
- Should I remove roofing felt when installing a permanent roof?
- How to temporarily close the gables after installing the roof
- Cover metal tiles on broken roof geometry
- Replacing roof insulation without removing metal tiles
- Roof on only installed log house
- How to build a roof on an extension and insulate it
- Replacing a slate roof sheet
- When is the best time to install a roof?
- Galvanized roof rattles on the balcony roof
- How to make a roof on an extension to a house
- Roof over the balcony
- Hip roof sheathing
- Roof on the top floor balcony
- How to attach rafters and crossbars in an attic roof
- How to eliminate rattling balcony roofs
- Height of a gable roof of a house
- Rest area on the roof of a foam block house
- Roof repair
- Roof insulation without removing the roof
- Insulating a slate roof
- When to put a roof on a log house
- Wind board installation
- Repair of an old slab roof in a workshop
- Roof for a bathhouse in oriental style
- About proper garage roof sealing
- Roof on the balcony
- Mansard roof
- Glassine and metal roof
- Fastening slate on the almost vertical side of the roof
- How to cover a roof with rubemast?
- How to properly cover a hip roof with slate?
- Rafter system for the roof of a house
- Roof over the top floor balcony
- How to build a wooden roof 30 m long and 24 m wide?
- Slate roofing
- Questions about arranging an attic roof
- Installation of rafters and crossbars during roof construction
Construction in Moscow and Moscow region
We work with a guarantee! Wide range of construction services. Foundation, walls, ceilings, roofing, turnkey! +7 (905) 797-20-34
luxurykomfort.ru
Roof arrangement
Scheme of the roof of an Old Slavonic hut
All questions to Semenych about construction
Semenych (author of materials)
Our site is regularly updated with interesting and unique materials and articles on the topics of lumber, building materials and works, the author's opinion and knowledge of a real coven with more than 15 years of experience are provided. There is a section - funny stories of shabashniks. If you would like to receive information about this, subscribe to our website's newsletter. We guarantee that your address will not be shared with third parties.
Apartment renovation in Moscow and Moscow region
We work with a guarantee!
Wide range of repair work. Professional craftsmen.
+7 (905) 797-20-34
luxurycomfort.ru
| Country house | Bath |
| For the dacha | Tool |
| Materials | Tales |
| Foundation | Log houses |
| Roofs | Insulation |
| Walls | Siding |
| Floors | Cellars |
| Attics | Doors windows |
| Stairs | Extensions |
| Wells | Toilets |
| Balconies | Loggias |
| Condensate | Flooding |
| Fences | Kennels |
| Sidewalk | Birdhouse |
| Adobe | Carts |
| Garages | Barn |
| Greenhouses | Bath |
| Swing | Brazier |
| Shower | Horizontal bar |
What are the rafters made of?
What to make rafters from
Most often, rafters are made of coniferous wood. This is a relatively inexpensive, fairly durable and easy to process material.
If you make your own rafters, it is best to use timber with a section of 10x10 or 15x15 cm.
Also, when choosing wood, you need to pay attention to its moisture content. The maximum allowable rate is 20%. At higher values, the material will shrink, which will lead to disruption of the configuration of the entire roofing system.
Installation of a roof truss
In this case, only the walls serve as support, which can lead to a horizontal thrust load throughout the entire structure (log house). To alleviate these loads, before installing and connecting the rafters to the wall base (log house), it is important to use a tie, which is made from a bar or board, thanks to which the opposing elements are connected when the rafters are rigidly connected in the upper part. The result is a non-thrust triangular frame, which is installed on the crowns of the log house.
There is a similar method when floor beams are used. Such elements are installed with the rafters in the same plane and perpendicular to the wall base. A similar method is used when installing attic buildings.
Diagram of hanging rafters.
It is recommended to use the connection of the structure with beams, regardless of the weight of the roof, if the walls of the log house are sufficiently strong and stable. This is due to the fact that the pressure on the walls of the log structure itself will be point-like, and not uniform, as when using a Mauerlat.
With this method, beams for the floor structure must be selected with dimensions of 50x150 mm. When arranging a roof overhang, wooden blocks are taken of a size that allows for a protrusion of at least 55 cm. The rafter elements with this method should protrude beyond the base of the wall and be attached to the edge of the block.
For convenience, you can build scaffolding
The structure includes supporting legs and connecting components. The farm resembles a triangle. Carry out the work in the specified sequence, and the finished structure will be able to adequately withstand all incoming loads.
Installation of the ridge beam and the first rafters
The truss can be made on the ground with further lifting upward, or directly on the roof. The first option is simpler and easier to implement.
Another rafter in place
We assemble the truss in the following order. First, we cut the prepared material to the required size, join the bars at the top edges and fasten them with screws. To prevent cracks from appearing at the fastening points, we pre-drill holes in the bars with a diameter slightly smaller than the size of the fasteners.
Installation of rafters
We also use a crossbar to connect the rafter legs. We fix it half a meter below the top point of fastening the elements. Crossbars will help increase the rigidity of the structure and eliminate the risk of deflection. We fasten the crossbars in recesses previously prepared in the rafters by cutting down.
If necessary, the rafters are cut at an angle if this is required by the features of the roofing structure being installed.
Options for cutting rafters into beams
We install roof trusses in the following sequence:
- we install end trusses;
- we fix the central trusses.
When installing edge trusses, we adhere to the following important rules:
- we install the base of the triangle on the mauerlat or the upper frame in the case of arranging the roof of a wooden structure;
- first we make several holes in the base for its subsequent fastening to the log house;
- Be sure to check the straightness of the installation of the truss. To do this, we use a plumb line attached to the crossbar;
- We fix the base of the truss only after confirming the evenness of its installation;
- To ensure additional stability of the farm, we attach the jibs from the log house to the rafter leg. Select the length according to the situation, it is not of fundamental importance;
- Before tightening the jib with screws, we again make sure that its placement is straight.
Rafter system
Manufacturing of lower chords of roof trusses
Assembling a roof truss
Assembling a roof truss
Rafter trusses are installed in the design position
After completing the installation of the outer trusses, we proceed to fixing the central and subsequent structures, if their placement is provided for by the project. The optimal installation step for trusses is 100 cm.
We invite you to familiarize yourself with: Do-it-yourself rafter system for a gable roof
To secure the central rafter triangle, we use temporary jibs. After the visor is installed, the jibs can be removed. Recommendations for fastening the central and other trusses are the same as in the case of the outer structures.
After installing all structural elements, we begin attaching the sheathing and further arranging the roofing system: moisture, heat and vapor insulation, as well as installation of the selected finishing coating.
House frame with rafters
Good luck!
Assembling a ridge truss
Fasteners for rafters
Main nodes: types of element connections
Any of the designs discussed above will work correctly only if all the main components are properly connected. Only then will they perform their function without deforming under the influence of external factors.
From above, the rafter beams are combined at an angle and connected end-to-end, overlapping or by cutting. This knot is called a ridge knot. Butt fastening involves joining the ends of beams cut at an angle and fastening them with metal or wood overlays. When joining with an overlap, the upper parts of the rafters overlap each other and are secured with a bolt and nut or stud.
A half-timber notch joint is similar to an overlap joint. But in this case, the tops of the rafters are placed on top of each other after cutting out recesses half the thickness of the timber. Then the sawn parts are connected, a through hole is drilled in them and they are tightened with a bolt.
In arch designs there is also (for example, in a regular three-hinged arch) a connection of the lower part of the rafters with a tie - a cornice unit. The connection is made by frontal cutting with a single or double tooth and fastening with bolts. Also, for fastening, short boards or metal plates can be used, placed at the joint of the rafters with a tie and fastened with nails.
The raised tie is cut into the rafters in an overlapping half-way, followed by bolting.
In a scheme with a raised tie or transom, the rafters are connected to the mauerlat. In this case, sliding (like a slider) or rigid fastening of supports is used. Sliding fastening is carried out using metal sliding supports that allow small movements of the rafters. For rigid fastening, a tooth cut is used; a support block can also be used.
Preliminary calculations
Roof rafter system
We calculate the optimal length of the rafters. The standard length of factory-made products is 450 or 600 cm. If necessary, the length of the rafters can be changed.
To determine the optimal cross-section of timber you need to know the following:
- rafter length;
- element installation step;
- estimated indicators of future loads.
The required information is shown in the following table.
| Rafter length, m | Distance between rafters, cm | Rafter beam cross-section size, cm |
| Until 3 | 120 | 8x10 |
| Until 3 | 180 | 9x10 |
| Up to 4 | 100 | 8x16 |
| Up to 4 | 140 | 8x18 |
| Up to 4 | 180 | 9x18 |
| Until 6 | 100 | 8x20 |
| Until 6 | 140 | 10x20 |
The remaining elements of the roofing system should have the following sections:
- Mauerlat - 10x10 or 15x15 cm. It is also possible to install a Mauerlat from timber with a section of 10x15 cm;
- diagonal rafter legs and valleys - 10x20 cm;
- puffs – 5x15 cm;
- purlins – 10x10, 10x20 cm;
- struts - 10x10 or 15x15 cm;
- hemming boards – 2.5x10 cm;
- crossbars – 10x15 or 10x20 cm.
Calculation of the load on the rafters
Knowing the length and cross-section of the rafters, as well as the step of their installation, you can easily calculate the required number of elements, focusing on the length of the building wall.
Calculation of the rafter system
Additionally, the rafters must be calculated for deflection. That is, you need to find out how much the rafters can bend before they break. For example, when designing an attic roof structure, the calculation of the truss must be done so that the deflection is no more than 1/250 of the length of the section that is subject to pressure.
Based on the above, if the length of the rafters is 500 cm, the maximum permissible deflection value will be 0.2 cm. The indicator seems insignificant, but if it is exceeded, the deflection of the roof will be visually noticeable, and this will not have the best effect on the reliability of the structure.
Shed roof rafters
General principles for calculating hanging rafters
As you have already seen, the hanging rafter system is a complex structure and requires correct calculation based on many factors. Incorrect final parameters will lead to the fact that the roof will not be able to withstand potential loads, which can lead to deformations and collapses.
Therefore, it is advisable to entrust the calculation of hanging rafters to professionals or use a ready-made house project. As a last resort, calculations can be performed using one of the online calculators, of which there are quite a few on the Internet.
The following data is used for calculation:
- dimensions of the overlapped room;
- presence of an attic;
- expected maximum load;
- slope angle;
- type of rafter system;
- wall material;
- roofing material.
As a result of the calculation, the following is determined:
- rafter section;
- rafter pitch size;
- farm shape.
Mauerlat attachment technology
The Mauerlat is one of the outermost elements of a log house roof. It bears pressure from the large weight of the entire roof, which should be equally distributed among the load-bearing elements. The Mauerlat is fastened with rafter elements, which provide this pressure. Mauerlat can be made from solid logs laid around the perimeter, or in meter-long pieces that are placed directly under the rafter elements.
For the manufacture of Mauerlat, only logs, beams and boards with minimum dimensions of 100x100 mm, 100x150 mm and 150x150 mm are used. If logs are used, then one of the sides is cut for maximum contact with the top crown of the log house. The Mauerlat can be secured using several methods.
Scheme of rafters with a sliding support.
When the log house is made of logs or timber, the mauerlat is mounted along the top row and installed on the logs. You can pin:
- using wooden or steel dowels;
- steel staples;
- metal corner;
- using galvanized wire with a minimum diameter of 4 mm.
Tools for installing rafters.
When installing rafters on beams using the rigid fastening method, it is important to adhere to certain requirements and eliminate bending, twisting, turns and shifts between elements.
These requirements can be achieved:
- secured with a corner with a hemmed block for support;
- making a cut on the rafter element and fastening this connection with nails and staples.
Using a corner with hemmed support bars, the rafters are placed on the mauerlat. The element itself must have a rigid stop along the load line due to a hemmed beam about 1 m long. It is also fixed on the sides with a metal corner to avoid shifting.
The second installation method is most applicable. With this option, fixation with nails is carried out from the side, at an angle, they are crossed inside the Mauerlat, and a third nail must be driven vertically. This results in a rather rigid assembly when fastening.
In both options, the connections are secured by another fastening of the elements to the wall, using wire or anchors.
At the same roof slope angle, the rafters are prepared using a template, that is, the same size.
Video description
More about this in the video:
Houses built from gas silicate blocks, foam blocks and other relatively fragile materials are necessarily reinforced along the upper perimeter of the walls with a monolithic concrete belt. Without it, reliable fastening of the Mauerlat is impossible, since such materials do not hold the fasteners well. As a rule, even while pouring the concrete belt, studs are installed vertically into it, onto which the Mauerlat is subsequently “attached” and secured with nuts.
In this case, the wooden lining of the walls is more reliable and can withstand thrust loads well. In addition to the methods already described on how to attach rafters to the Mauerlat, you can use others. For example, using an overhead perforated plate with or without a rafter cut. Or on a staple or three crossed nails without sawing. It is only important to cut off the supporting part of the rafter so that it exactly coincides with the plane of the Mauerlat.
Fastening with a plate without cutting Source krysha-expert.ru
See also: Catalog of companies that specialize in roofing work
Please note that when installing without cutting, the rafter legs will have to be lengthened by extending them with fillets to form an outlet for the eaves overhang.
To reduce the bursting load on the Mauerlat of a gable roof, sliding (hinge) joints are used. These can be special fasteners, one vertically driven nail, or fastening to a bracket with multi-directional teeth.
Hinged joints of the lower part of the rafter legs are most often used when it is necessary to decide how to fasten the rafters on a pitched roof. But in this case, the upper part is firmly fixed to the ridge beam or the wall of the pitched roof, which performs its functions.
We turn wooden beams into rafters
We are making a template with which further work will be performed. The rafters have the same design, so the template will save you time and effort.
Use a template to mark and trim rafters
We connect two boards along one edge with a nail. The result should be a design that resembles scissors.
Making a template
We place the free edges of the “scissors” on supports at the points of future placement of the rafters. This will allow you to determine the slope of the roof slope.
We take an extra pair of nails and fix the angle set between the boards. The template is ready. Additionally, secure it with a crossbar. To ensure that the set slope angle of the roof slope does not change under the influence of loads, fasten the crossbar with self-tapping screws.
Be extremely careful when creating the template. Even the slightest deviations can cause the entire structure to deteriorate.
Next, we make a new template for preparing mounting cuts on the system elements. Use plywood 0.5 cm thick. For reinforcement, use a 2.5 cm board. Select the dimensions of the cuts taking into account the cross-section of the rafters used.
Using ready-made templates, we make cuts and begin to assemble the truss.
Marking the opposite end of the rafters
Application of sliding joint
The method of sawing and installing the rafter element and sawing the Mauerlat:
- making a connection using 2 nails on the sides diagonally so that they intersect;
- making the connection with one nail, which is hammered in the upper part through all the rafters and into the mauerlat;
- the nails are replaced with a plate with holes;
- using staples, fasten the rafters and the mauerlat;
- the rafters protrude beyond the wall and are secured only with plates.
The connection is made using special fasteners - slides.
Each method allows the rafter elements to move relative to each other.
Tags: log, system, rafter
« Previous entry