Hanging chairs attached to the ceiling have been gaining popularity in recent years. Such furniture is placed not only in children's rooms, but also in living rooms, bedrooms, and on the verandas of country houses. A variety of models allows you to choose the right option for any interior and taste. The fastening must be reliable in order to withstand the weight of the furniture and the person sitting inside. In this article we will look in detail at how to properly hang a chair from the ceiling. We will also conduct a master class on how to make this piece of furniture yourself.
Installation on a concrete ceiling
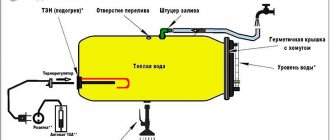
Yoga hammocks are attached to concrete ceilings (floors) with anchor bolts with a ring, recommended size M12/16x100.
Installation procedure for simple fasteners:
- Marking the holes for the anchor must be done as accurately as possible. The installed and fixed fasteners can no longer be removed.
- Using a hammer drill, drill a hole in the ceiling to the diameter and length of the anchor. The diameter of the hole must be precise so that the bushing body enters the wall with little force. The hole must be perpendicular.
- Thoroughly clean the hole from concrete crumbs and dust (vacuum cleaner, brush, blow with air pressure).
- Install the anchor into the hole until it stops.
- Tighten the anchor, then the nut. The readiness of the fastener for operation will be indicated by the inability to turn it in the hole and high resistance to further tightening.
- Check the reliability of the fastening.
- Do steps 2-6 with the second fastener.
- Hang the slings to the ceiling mounts (the slings are included with the hammock).
- Hang the hammock to the slings at the required height.
The procedure for installing fasteners with a safety system:
- Installation of a fastening with a safety system is recommended for ceilings and floor slabs with a large number of voids, as well as for halls in clubs and studios.
- The mount with a safety system consists of 3 anchor bolts with a ring, a safety cable and an additional safety carabiner.
- The procedure for installing anchors corresponds to the procedure for installing simple fasteners.
- The safety anchor is installed between the main outer anchors (see “Layout diagram of the safety anchorage system”)
Let's start making a swing
Step 1. Assembling the seat
If we are dealing with simple plywood, the task becomes much easier.
If the seat is a prefabricated structure made of slats, you need to assemble the following from them:
The main thing is that the blocks do not crack. Therefore, before tightening the screws, it is advisable to drill thin holes for them. This way you will solve two problems at once - the blocks will not crack and it will be easier to screw in the screws. Please note: the corner screws must be screwed in offset, since there will be large holes for the rope in the corners of the structure. You can go even further and glue the outermost of the five cross bars.
Step 2. Drill holes for the rope
This will seem strange, but all the other parts of our future swing will not be rigidly attached to each other. The design will be very flexible. When removed, such a swing can be easily folded so that it does not take up much space and put away until next season.
First, we will make longitudinal holes in the blocks - the uprights of the crossbars:
The work requires accuracy. It is advisable to make the holes exactly in the center. If you have a vice, then it is worth securing the parts in them while drilling. After all 10 blocks have been drilled, you need to sand them down with sandpaper. While swinging, the child can grasp them with his hands; it is important that no splinters or flakes remain on the surface.
Next, carefully drill holes in the corners of the seat and in the top slats:
As a result, we should have the following construction:
All pictures for this review were prepared in a 3D modeling program and were originally intended for the website www.mark.kashkanov.com
Now that the seat is assembled and all the technological holes are drilled, you can glue foam rubber onto it and cover it with fabric.
It is necessary to sand the edges, glue foam rubber and tighten it all with a piece of cloth, which we have already talked about. The material must be secured properly so that during the swing, or when the child slides from the seat to get off the swing, he does not tear off the fabric.
It is best to use the leg of old jeans, which you have long worn out in a certain place and put in a long drawer “until better times.” With a slight movement of the hand, jeans can be turned into elegant shorts, as they said in the famous film, and the freed lower parts of the legs can be used for swings. If the size of your trousers allows, you can even pull the trouser leg over the seat like a sleeve, and then secure the edges on the bottom side with small nails or staples.
Hammock in an apartment: tips and photos
As a type of decor, it is not suitable for all interiors. As a rule, it is used in loft, Mediterranean, Provence, country, and maritime styles. It will look out of place in a classic design.
The second circumstance that you need to pay attention to is who exactly it is intended for. If we are talking about a nursery, then you need to choose a safer design, add pillows and not hang it high
When choosing a product, you need to remember the basic color scheme of the interior. Of course, the hammock should not blend in with the color of the walls. Enough bright contrasting details to make the interior more interesting. For example, ropes or strips.
A hammock is a great area for relaxation. If installed correctly, it can be very useful for overall relaxation of the body after a hard day at work.
What is better to hang a homemade chair on?
For this purpose, chains, cables or ropes are used. Many people prefer the first option because they consider it more reliable. But that's not true. The durable climbing cord can support up to 900 kg when suspended. This is more than enough for both the chair and the person sitting in it.
In addition, the chain jingles and makes noise when swinging, which can distract from relaxation and disturb others. A chair suspended on a rope moves silently and is capable of spinning at a greater number of revolutions. Thus, it is better to choose a durable cord.
How to attach
There is nothing difficult in installing such devices. It is necessary to prepare a hammer drill, a drill of suitable diameter and fasteners. Installation begins with choosing a suitable location. It is necessary to determine it in such a way that there is at least a meter and a half meter of free space on each side of the installed hammock. This will make it possible to easily approach the suspended net and swing a little. Next, mark the points where the hangers will be screwed in and you can proceed directly to installation. This is done in the following order:
- Holes of the required depth are drilled according to the markings.
- The anchor is inserted and tightened. After this, the fastening nut is tightened. This must be done at each point.
- When all the bolts are secured, you need to check the reliability of the fixation - if everything is held tightly, you can hang the hammock.
In principle, there is nothing here that even the most inexperienced master cannot do. The main thing is to choose the right mounting option in accordance with the type of floor in the house. Since ordinary bolts will not hold in hollow slabs, it is necessary to buy a variety with a drop-down part. For wooden floors, it is enough to use a regular screw-in hook.
How to sew and secure a hammock correctly
Often after flying yoga classes, instructors are asked a question about how to make a hammock yourself. There's really nothing complicated about it.
You just need to clearly follow the instructions for making and properly attaching a hammock in a few simple steps:
Choice of fabric. Preference should be given to nylon or cotton mixed with polyester. The fabric should not only be as durable as possible, but also soft, pleasant to the touch and environmentally friendly. It should only stretch across the width. Parachute nylon measuring from 1.6 to 3.2 m is suitable. Additionally, you will need fabric for hangers: 20 cm (2 pcs.) and 140 cm (2 pcs.).
Optional equipment. You will need a pair of duralumin carabiners and comfortable handles (6 pcs.). You also need to think about the fasteners. Typically, yoga hammocks are secured using a pair of anchor bolts. You will also need a climbing rope (10 m).
Select a mounting location. Ideal mounting of yoga hammocks is possible on almost any horizontal surface (ceiling, beams, horizontal bar). Even tree branches will do
But it is very important to screw in the anchor bolts firmly and firmly.
When everything is ready, we fix the bolts in the ceiling or on the horizontal bar, thread the handles through the ends and select the required length. Next, we tie them up using a climbing rope. Then, using a carabiner, we carefully attach it to the sling. And we make handles that should also be attached to carabiners.
The result should be a fairly long and wide canvas, the edges of which are reinforced with a carabiner. And it, in turn, is attached to strong ropes. And only then is it fixed to the base in the form of a ceiling or beam.
Which rope is best to use for a swing?
To hang a swing you need a strong rope that can withstand heavy loads. In addition, it should not stretch, crack at sharp bends, or unravel in separate threads. Climbing rope or sisal rope works best. The optimal thickness is 13 mm.
The ends of the rope may become frayed. To prevent this from happening, they are tied with twine. Various options for strapping schemes are shown in the photo.
History of origin
The amazing movement, based on performing physical exercises in a hammock, was first created in 2007 by Christopher Harrison, a former champion in the field of artistic gymnastics.
It was he who developed a lot of acrobatic plots, through which he came to the realization of how gravity could be overcome. He dreamed of not only floating in air currents, but also receiving tangible benefits from it.
And one day, while resting after another performance in an ordinary hammock, he accidentally turned over. And he just hung upside down, his feet hooked on the fabric. Then he realized that a properly installed hammock could help stretch his back well and relieve the feeling of discomfort and tension.
After that, he performed various yoga exercises for a long time in combination with gymnastics and Pilates in order to develop a completely new direction, called “anti-gravity yoga” (yoga fly).
And today, thanks to this original approach, when performing exercises it is possible to avoid stress on the joint apparatus and significantly develop and strengthen the muscles.
How to make a hammock with your own hands?
Of course, you can buy a hammock: they sell both handmade options straight from Mexico and Africa, as well as mass-produced products. But if you see exactly what colors and sizes a hammock should be, and you like to work with your hands and know how, you can make a hammock yourself.
The easiest way is to find a piece of durable fabric and reliable rope. But if you have basic macrame skills, you can weave a hammock. We have selected several successful, simple master classes for you.
This tutorial uses a beach towel, rope and pieces of leather. A little work with a sewing machine and the hammock is ready. You can choose any color and easily combine with the interior. Link to master class.
Another hammock made of solid fabric. This time the ropes are threaded into cute rings, and a durable furniture cover is used as the main material. Link to master class.
A classic two-tone wicker hammock made from ship's rope. Link to master class.
How to weave a macrame hammock: in detail and with photographs. Wooden sticks are used as fastenings at the ends. The author added two more pieces of wood on the sides to make a chair. Link to master class.
Photos: livinator.com, inmyinterior.com, 2015interiordesign.com, buytrion.com, abcgreatpix.com, homedit.com, designrulz.com,
ideastodecor.com
Add to favorites3
- Tags
- hammock
- with your own hands
hammock, do it yourself
History of the creation of antigravity yoga
This type of sports activity has many other names. This set of exercises can be called anti-gravity or anti-gravity, yoga in the air or aero, as well as fun yoga.
Regardless of what these exercises are called, they are all performed in a hammock suspended from the ceiling, that is, in the air. The unique system was created by Christopher Harris, a former American gymnastics champion. The idea arose unexpectedly when, after another performance, the athlete was relaxing in a hammock and accidentally turned upside down, catching his feet on the fabric. Being in this position, he felt relaxation spread throughout his body, discomfort, tension and bad mood went away. While in the hammock, the athlete began to perform all kinds of exercises from yoga, Pilates, dance and gymnastics. Thus, a new technique was born, which was called yoga in a hammock.
Hammock in the interior of the apartment
A hammock is a suspended fabric structure that is attached to the ceiling using a holding device. As a rule, the fabric sags under the weight of the weight. Therefore, when choosing, you need to proceed from the weight of the largest family member.
A hammock in the interior can be used as the main element of decor, around which the entire design is built. For example, nautical style. Or as an additional element that completes the entire design.
Why is the structure needed?
- For relax. Scientists have proven that rocking movements help you calm down and tune in to a specific topic. In addition, it is convenient to read, think, listen to music, watch movies;
- For sleep. If the hammock is firmly fixed and it is comfortable to lie in it for a long time, then it is perfect for a person with low weight as an alternative to a bed. But remember that the body becomes numb in one position, and it is better not to stay in it for a long time.
Benefits of a hammock:
- Easy. The structure itself weighs little. Additional kilograms add fastenings. But even they can be chosen from plastic;
- Takes up little space. It can only be hung when it is needed. The rest of the time, you can either hang it on one mount, or remove it completely and put it away;
- Doesn't require much storage space. The main condition is to fold in accordance with the instructions so as not to damage the finish and fabric. The item must be wrapped in a bag or paper and placed in a box. The more carefully you treat this piece of furniture, the longer it will serve you;
- Does not require complex care. You can wipe it, machine wash it or take it to the dry cleaner. It all depends on the fabric from which it is made. As a rule, all its components are easily separated, and therefore there is no need to be afraid that the metal fasteners will damage the walls of the machine.
A hammock today is not just a fashion statement. This is a balanced and deliberate decision to decorate a room or home. It gives a certain arthouse feel to the entire design and becomes a highlight in the interior. They are made not only from one fabric, but also to order, in the color of the main details of the room, from the material that is required. Of course, the price will be higher than what is sold in a regular store. But the design is also exclusive, made to suit your requirements.
Pros and cons of rope swings
Simplicity of manufacture is the main, but not the only advantage of rope attractions.
The advantages include the following:
- The versatility of the swing is confirmed by the area of use. The rope product is compact, takes up little space, and is lightweight. It can be hung anywhere: street, house, terrace, indoor pavilion. A swing is convenient for the room, where instead of a wooden board there is a fabric seat. During swinging, the possibility of damage to furniture or wall cladding from an accidental impact is eliminated.
- The long service life is explained by the absence of complex components. The swing does not have hinges with bearings, which can jam from intensive use. The product will last as long as the quality of the hanging rope is chosen.
- The rope ride is beneficial from an economic point of view. When making it yourself, you will not need expensive material for support posts. Small expenses will go only to purchase the rope.
- In terms of ease of making with your own hands, a rope attraction comes first. Even a woman can make the design.
- The environmental friendliness of the rope structure is an important factor. The absence of paints, protective impregnations, and chemical materials will have a positive effect on the child’s health.
- The design can be adjusted at your discretion. Craftsmen who weave rope swings with their own hands create exclusive masterpieces. Products are decorated with ribbons, colored laces, and beads.
Disadvantages are hard to find. The disadvantages include the impossibility of keeping the swing outdoors all year round. The ropes gradually deteriorate from frost, snow, rain and sun. However, this problem is quickly resolved. The swing can be easily removed and brought into the barn, where it will take up little space.
What types of hammocks are there: advantages and disadvantages
Before we begin the classification of hammocks, let’s agree on what is actually considered a hammock. So, a hammock is a piece of fabric or woven mesh that is suspended from two or more supports. Based on the material, the canvas is divided into the following types:
- mesh - the simplest and lightest, but can withstand a weight of no more than 100 kg;
- fabric - both from natural fabric and synthetic material;
- wicker - usually made of wooden rods or bark.
It is best to lay fabric on a mesh hammock so as not to leave marks on the skin Source zelena.ua However, hammocks are usually divided into only two types - according to the method of fastening:
- Hanging hammocks. In addition to the classic ones, this also includes hanging chairs in which you can only sit, hammocks - swings that have only one attachment point, due to which they swing well. For its fastening, this type of hammock requires a reliable support, from which it is suspended using ropes, hooks and carabiners. Its advantage is its simplicity and ease of fastening.
- Frame hammocks. They have a collapsible frame that serves as a support for securing the hammock. Because of this, they can be installed anywhere. When disassembled, they can be easily transported from place to place. Disadvantages include the large size and the fact that if any part breaks, it will be difficult to replace. In addition, such products are several times more expensive than traditional ones.
Frame hammock Source carpenters.rapidly.ru
Types of hanging chairs
All variety is divided by type of design, materials and sizes. By design, this furniture belongs to one of the following categories:
- Hanging chair with a rigid frame . As a rule, it is made in the form of a hemisphere, oval or drop.
- Solid plastic chair . The product comes in the shape of half a ball or an egg, transparent and colored.
- Cocoon chair . Maximum closed on all sides, can be hard or soft. The hole through which one enters is sometimes equipped with a curtain for complete privacy.
- Hammock chair . Suspends from one attachment point, directly or through a horizontal spacer stick. More often found in fabric version.
- Chair with fastening to the floor and ceiling . You won't be able to swing, just spin around your axis.
- Chair on a stand . Used when there is no possibility or desire to hang furniture from the ceiling. This design takes up more space and has a limited range of motion, but the chair can be easily moved to another location.
The frame is made of metal, wood or wicker. It is braided with rattan, strips of leather or ropes, and covered with fabric.
Often a hanging chair is complemented with matching pillows or other harmonizing colors.
The sizes are divided into children's, adult and family. Rocking chairs for children are usually smaller and brighter in color. Among them there are often cocoons in which the baby settles down, as if in his own house. In the soft version, the design is also called a bag.
An oversized hanging chair is designed for two or even four people. Usually has the shape of a horizontal oval.
When choosing, take into account:
- Who is the chair intended for (adults, children, couples).
- In which interior the furniture will be placed - this affects the choice of materials and colors.
- What they will do in it: seek privacy (then closed models are more suitable), relax (pay attention to soft options), swing (the type and length of the fastening is important).
What is yoga in a hammock?
Before installing a special hammock in your apartment, you should understand what it is.
Today, most experienced and qualified specialists call this direction only a certain type of yoga, since it focuses on artistic gymnastics, coupled with yogic asanas and Pilates.
And a special fabric hammock, sewn in the form of an original trapezoid, helps him in this.
It is this kind of hammock, attached to the ceiling, that allows you to perform various exercises right in the air. It is usually hung a meter from the floor, which allows you to observe certain safety measures and get a good feeling of weightlessness during exercise.
Almost everyone can do fly yoga, from inexperienced beginners to real professionals. It is ideal for children and pregnant women.
You just need to choose a hammock and an instructor, so that after some time you will learn to control your body and realize the hidden capabilities of your body. Not to mention a good mood and a feeling of complete relaxation.
Swing base
A swing starts with a base, which can be very diverse. The easiest option is to buy a ready-made swing, which you just need to secure. Another option is to make a wooden seat with your own hands. For older children, you can use just one board, which will act as a seat. For younger children, such a seat will be dangerous, so a frame is needed for the child to hold on to. To create a frame, you can use round wooden slats or timber 2-3 cm wide. It is important to sand the wood well so that the child does not injure himself.
Also, the swing can be made of fabric. Moreover, this can be either a model without a frame, similar to a hammock, or a model with a wooden square base on which a fabric basket for a child will be held. It is important to provide holes for the child’s legs in this model so that he can swing comfortably. Such swings are most often used for children under 5 years old.
Height calculation
When calculating the height, the following rules should be taken into account
- The mounting height is calculated depending on the distance between the fastening points. The distance between fasteners should be twice the height.
- When the place on the wall where the fastening is supposed to be made belongs to the passage area, then for special safety it is better to make the fastenings higher than the height of the tallest person living in the apartment.
- It is optimal when the fastenings are placed at a distance not exceeding the level of an outstretched arm, so that the product can be hung and removed without spending a lot of time.
- When the distance between the fasteners is quite large (up to 6 m) and it is necessary for the product to be placed not in the middle, but slightly to the side of the wall, then in order to level the position of the hammock, it is recommended to place the most distant support higher than the nearest one.
Thus, we can conclude that it is better to install fasteners at a height of 1 m 80 cm from the floor surface. If the distance between the fasteners is 300-350 cm, then they can be fixed slightly lower, retreating 1 m 50 cm from the floor.
If you intend to install a hammock with slats, then the fastenings can be positioned a little lower than recommended. In addition, it is better to choose the smallest size of ropes, which will not allow the product to sag and it will be in a tense state.
The height of the fastening elements depends on the distance from the floor. Practice shows that it is better to relax in a hammock stretched higher than in one that is located close to the floor surface. A win-win variation is to form 2 loops on all ropes so that it is possible to hang the hammock in 2 positions: the safest position (when your feet can be placed on the floor) and the traditional one (when the product is higher).
Where to hang a hammock
If you choose trees as a support, then pay attention to their diameter. The trunk cannot be less than 15 - 20 centimeters in diameter, and the distance between trees must be at least four meters. Only these parameters will enable the structure to be reliable and the trees to be safe and sound. Moreover, the trees must be healthy, strong, without cracks, with long branches located above the ground at a height of at least a couple of meters. They will make it possible to securely secure the hammock and make it safe.
How to hang a hammock correctly
Helpful advice! With frequent use of the hammock, the ropes stretch, causing it to sag. When hanging, you need to remember this and install the fasteners slightly above the expected mark.
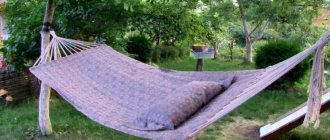
Hammock options for relaxation
The classic version of a hammock suspended between trees is familiar to many from childhood. Today it coexists with more original models. Several canvases (beds), a variety of decor, the presence of a frame, an awning, a hammock in the form of a chair or a swing - everything for a better rest! Ideas for a hammock and photos will help you decide.
Frameless hammock cocoon
A simple frameless hammock (“Mexican”). It is suspended from two supports and has the appearance of a cocoon. Relaxing in it is a pleasure, but getting in and out of it is a bit difficult. It is mobile, but if you choose low-quality materials, it will not last long.
Suspended structure on yards. The width of the product canvas is fixed on them, only then suspended from the supports. Easy to use even for children, but must be at least 1.5 m wide.
Hammock on yards
Frame hammock. Does not require additional supports. Both stationary and mobile models are available for sale, which are easily folded and transported. The frame can have a rather bizarre shape, which makes the product not only a place of relaxation, but also a real decoration of the garden. It looks especially advantageous on the patio, near the pool. Often complemented by an awning and a side table.
Mobile hammock on a metal frame
Hanging bed on a wooden frame
Hammock chair. It differs from the traditional design in the shape of the lounger, as the name suggests. It is comfortable to relax and even work while sitting or reclining. A pleasant addition will be soft pillows under the back and for the seat, and a canopy.
Wicker hammock chair
Hammock swing. Ideal option for children. Rocking occurs due to the fastening of the structure at just one point.
Swing-hammock in the interior
Hammocks decorate not only gardens, but also the interiors of apartments and houses. They find a place on spacious balconies, in rooms with interiors in the appropriate style - Scandinavian, ethno, marine, eco-style and others.
Hammock in the attic interior
Have you decided on your preferences? It's time to learn how to make a hammock yourself.
Choosing a site for a hammock
It is most convenient to arrange such a resting place next to a lake, pond or swimming pool, on the far side of the garden. But not every site has a suitable corner, so the structure is often hung in a house, gazebo, porch, balcony or terrace. In any case, when choosing a site, you need to take into account several criteria.
Instagram @carlyshome
Instagram @lydias_layton_life
Criterias of choice
- No direct sun or draft. To avoid sunburn and freeze.
- Smooth, clean surface underneath. When it rains, the holes will fill with water, making it uncomfortable to climb into the hammock. There should be no snags or stones under it.
- Away from noise. It is best to choose a place away from the road, garage, water pump, transformer.
- The distance between supports is 3-4 meters. The gap should slightly exceed the length of the canvas (+30 cm) so that after installation it does not sag too much.
- The diameter of each tree and pillar is approximately 20 cm. The support must be intact, without splits or other damage.
These rules are not that difficult to follow. Otherwise, it all depends on the layout of the site and your taste. Of course, it is best to secure the structure so that it offers a beautiful, calming view. However, the scenic outdoor location may have one drawback. Rest near water and in closed areas is spoiled by mosquitoes and other insects. But there is a way out of this situation - a mosquito net or a thick canopy.
Hammock Greenhouse
Options
In addition to the fact that the fastening system will be different, the hammock itself may also differ. It would seem that there might be a difference - the grid, it is a grid in Africa too. However, this device can have several modifications that differ quite greatly from each other:
- sedentary
- Full size, can accommodate one person
- Wide, for two or more people
- For yoga
The seated type means that it can be used by only one person, just like the full-size single version. The wide model can accommodate two or even three people at the same time, and the yoga version is generally made not of mesh, but of fabric. When choosing a specific modification, you need to take into account not only your wishes, but also the height of the walls in your home. Some types of such devices will require quite a lot of space in height, for example, yoga models.
The choice of mounts depends on what type your model is. For seated varieties and yoga models, you will need to use a mounting plate with a hook and several holes, since the load will be significant and the only fastener simply will not support the weight of a person in this case.
For full-size single and wide models, fastening can be carried out on separate loops, spaced far apart on the ceiling. In this case, the load is distributed over several points and everything will be fine with secure fixation.
Egg/ball
A hanging chair for a balcony in the form of a part of a ball looks very original. Most often it is half a ball or egg, or even a little more. When compared to a regular ball chair, it has a greater seat depth, which reaches 70–85 cm. While the standard model has 50–60 cm. It must be borne in mind that a ball chair will require more space, this must be taken into account. It can be mounted on the ceiling, a support stand or a rod that is fixed to the wall.
The egg chair has a more elongated shape. This model has a high back, so tall people feel great in this chair. An egg-shaped chair takes up less space because its seat depth is 60 cm.
Video description
To see how to attach a hammock, watch this video:
After the appropriate surfaces have been selected, the locations of future holes for anchor bolts are marked on them. Height matters because once installed, the hammock should not move around on the floor. A hole is drilled with a hammer drill into which the anchor bolt is driven. There are bolts on the market with a hook or a ring at the end that are ideal for our application. Now all that remains is to install the hammock by tying it to these hooks.
The hammock can also be installed on the balcony. Unfortunately, the length of most balconies is standard and does not exceed 3.5 meters, so there is practically no room left for a traditional hammock. It is for such cases that manufacturers produce hammock chairs or hammock swings, which are attached not to the walls, but to the ceiling. Depending on the design, there may be one or two attachment points.
Hanging chair-hammockSource postroika.biz
The installation procedure here is almost the same as in the case of an apartment: a hole is drilled in the concrete ceiling slab with a hammer drill, into which an anchor bolt is screwed. The hammock itself is attached to it using ropes.
When choosing anchor bolts, you must be guided by the load they will experience. It is best to consult with the seller, who will select anchor bolts with the appropriate pulling force.
On the wall
If the wall is load-bearing, hooks 10 cm long and 10 mm in diameter will be sufficient. For a non-load-bearing wall, take large threaded hooks and secure them with nuts. It should be borne in mind that such a surface may be unreliable. Pipes, door frames, and lightweight partitions will not suit your purposes.
Hammock chair Greenhouse
Otherwise, the method of hanging the canvas is the same. For mounting on crossbars, it is better to use self-tapping hooks if they do not have transverse elements that would prevent the hinge from sliding. Before installing the structure, imagine the swing trajectory. This is necessary to understand whether furniture and other objects will interfere. Then mark the locations for the bolts or hooks and drill holes in them. If it is concrete, clean out the cement chips from it before installing the hook.
The video shows how to attach the structure to the wall on the balcony. This method can be used for both a country terrace and an apartment.
Briefly about the main thing
The hammock is suspended between two supports, which can be strong trees, part of a permanent building, or any other reliable support.
If there are no suitable supports on the site, you can create them yourself by digging two metal pillars at the required distance.
Hammocks can also be hung in an apartment. For this, anchor bolts with rings or hooks at the end are used, to which a hammock is tied with ropes.
It is best to hang a hammock chair or hammock swing on the balcony. They are smaller in size and are attached to the ceiling using the same anchor bolts.
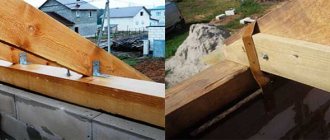
On beams
The height and diameters of the supports should be the same as in the previous case. To calculate the distance between them, add 30 cm to the length of the canvas. The frame can be sanded and stained to protect the wood and be decorative. Metal pipes - paint or use anti-corrosion impregnation.
Sequencing
- Bury the posts to a depth of at least half a meter and compact the soil around them. If the length of the pillars is more than two meters, the optimal depth is at least one meter. To strengthen the structure, concrete is poured into the bottom of the pit and beams are placed in it.
- Cement the site. The option with concreting is more reliable - the soil will not become soggy from rain.
Instagram @furnlovers
You can attach the fabric in the same way as on trees. Use knots or self-tapping hooks to hang the canvas between the posts. The second option is considered more reliable, since the rope can slide on the pole. So, you have a durable, permanent structure that will last for many years. It can be supplemented with a canopy in case of bad weather or a pergola - an openwork partition for growing flowering and decorative deciduous vines.
Hammock Greenhouse
Rules for caring for a yoga hammock
The first thing to remember is that caring for a yoga hammock is simple and does not require special preparation. The main thing is to follow some simple rules
1. Before washing, you need to remove the carabiners from the yoga hammock that are attached to the rope fastenings.
2. internal carabiners, on which the fabric is collected and the main carabiners are attached, do not need to be removed (since putting it back on can be problematic without sufficient skills). But when washing, these internal hooks will hit the walls of the drum and can damage the machine. What should I do? It’s simple: grab the inner carabiner and begin to roll up the hammock. After wrapping the fabric a couple of times, take the elastic band and secure this bend so that when moving, the elastic band does not move and the carabiner does not fall out of the fabric.
3. wash the hammock in the machine in the “Delicate/hand wash” or “Sportswear” modes. Both modes involve washing in warm water, with a spin cycle at minimum speed.
4. For washing, you can use any detergent (powder, gel, tablet) that does not contain bleaches.
5. You need to wash the yoga hammock separately from other things.
6. Hand washing is not recommended. A yoga hammock is a large product that will also become heavy when wet. In such conditions, it will be extremely difficult to carry out high-quality washing.
7. You can dry the yoga hammock in both a horizontal and vertical position.
8. If there are specific contaminants on the yoga hammock (oil, berry juice, etc.), before washing, you need to pre-treat the stains with the appropriate composition/type of stain remover for the type of contaminant.
If you follow these simple rules, your yoga hammock will delight you and serve you for a long time!
Source
METHOD No. 1
Advantages of method 1:
- does not reduce the length of the ropes
- The loop is very easy to tighten
4. As you can see, it’s easy to tie such a loop.
5. You can hang a swing with such a loop on a frame that has one free end. For example, on a horizontal bar like in the picture below. If the sports complex has not yet been assembled, you can hang it on the upper frame, perpendicular to the wall. If the sports complex is already assembled, and you want to hang it on a frame perpendicular to the wall: - remove the horizontal bar (usually you need to unscrew 2 bolts for this), - install the swing: - screw the horizontal bar back.
To hang a swing on the upper frame without removing the horizontal bar, you can pull the end of the rope out of the swing, tie it on the frame, and then pull it back. The last method is less preferable, as it can get confusing.
Basic points of creating a hammock with your own hands
It is necessary to learn the basics of making such an unusual vacation spot. Knowing them, you will be able to find new, original solutions and produce more complex products.
Selection of materials for the canvas
So, you've wondered how to make your own hammock. To begin with, stock up on the necessary materials. Fabric or strong rope is used to make the base. They can be natural or synthetic.
Natural fabrics allow the body to breathe, which is important in the summer heat, and easily take its shape due to its softness. But they stretch out and lose their appearance if the hammock regularly gets wet in the rain, fog, etc.
d. It is quite difficult to remove dirt from such fabrics. Synthetic analogues are more durable, lighter in weight, and sometimes have good moisture resistance.
Canvas for a hammock
Available and suitable quality fabrics - calico, canvas, mattress teak, nylon, nylon with cotton.
For braided versions, cotton ropes are often used. They make working on the product and its operation comfortable, since the knots are soft, tighten well, and do not slip. The disadvantages are the same as those of natural fabrics. Nylon cords and ropes are suitable from synthetics. You can opt for nylon analogues, but they are slippery and not very convenient to work with.
Fabric woven from ropes
Measurements required for work
In order for your hammock to be comfortable and safe in all respects, you need to take some measurements. Important for you:
• Distance between supports. It consists of the length of the canvas and 30–35 cm of fastening towards each support. On average, this is about 2.8–3 m for an adult.
• Height of attachment of the hammock to the supports. This takes into account your height, the sagging of the canvas and how comfortable it is to climb into it. The average mounting height is 1.5 m. The sagging depth of the product can be adjusted by tensioning the ropes.
• Blade width. Usually it is 1.5 m.
Scheme of hanging the canvas between the supports
Fastening matters - how to hang a hammock in the country and at home
The hammock must be safe and strong. It’s not pleasant to enjoy the singing of birds and the measured movement of clouds, and then suddenly fall from a height of half a meter (at best)
For this reason, it is important to know how to hang a hammock correctly. You will have to work on two fronts: attach the retaining elements to the canvas and fix the entire structure on the supports
Wooden log supports
How to secure a hanging structure to a tree
To connect the support and the canvas, ropes with a diameter of 8–10 mm are usually used. An alternative could be a metal chain with a carabiner or a fabric strip. A loop is made on the support and tightened tightly. To avoid damaging the trees, you can put a cloth under it or put a soft silicone cover on the rope and chain.
Loop for hanging the lounger from a tree
Loop on the hammock for attaching it to the support
The second option involves tightening and wrapping the edge of the canvas with a fastening rope. Then its free end is wrapped around the support and tied with a knot. It's faster and easier. Relevant for lovers of hiking and fishing.
Scheme of a “torus node”
How to hang a hammock in the country or in nature
Before attaching the hammock, you need to determine the area where it will be installed. This should be a dry place, cleared of debris, where there are no drafts, quiet, and protected from rain. If desired, you can buy a product with a special awning and mosquito net, which remove some of the requirements for the installation site. The question of how to attach a frame hammock does not need to be considered: all the accessories for this are included with the hanging lounger itself.
Hanging from a tree
You should choose two healthy, strong trees, which at a height of 1.5 - 2 meters from the ground have a thickness of at least 12 - 15 cm, since this is where the hammock will be hung. The distance between them should be the same as the length of the hammock itself, plus 30-50 cm in reserve for adjustment. The ideal option is if the place where it is attached to the tree has thick and long branches that will prevent the rope from sliding down. If not, then it’s okay.
A curved tree trunk is an additional obstacle to the rope sliding Source ledevoir.com
See also: Catalog of companies that specialize in garden furniture and storage systems
For hanging you will need two ropes 2 - 3 meters long and about 10 mm thick. First, a knot with a free loop is tied at one end of each rope. Then the free end of the rope is threaded through the “eye” of the hammock and the remaining loop of the knot. Thus, the ropes are attached to the hammock, all that remains is to hang the hammock itself.
If it comes with carabiners, then the free end of the rope is tied with a noose knot and the carabiner is threaded through it and wrapped around a tree trunk and finally fastened to the rope going to the hammock. For greater reliability, the end of the rope with a carabiner can be wrapped around the rope leading to the hammock and attached to the one wrapped around the tree.
If you don’t have a carabiner at hand, then the free end of the rope is wrapped around a tree and tied with a knot at the end that goes to the hammock using one of the knots described below.
The height of the suspension is usually calculated as 2/3 of the length of the unfolded hammock. Taking into account standard dimensions, this is about 1.5 - 2 m from ground level.
A properly hung hammock is shaped like a banana Source e-matras.ua
Precautionary measures
Here are a few nuances that need to be taken into account in order to properly hang a hammock in the country.
Please note that the reliability of the structure should be checked carefully, with a gradual increase in load. First you just need to sit in the hammock, and only after that you can lie down and lie down for a while.
If the tree trunk is rough, the rope may wear out over time. In this case, it is best to use slings with loops at the end to tie the trunk itself before securing it. It is through these loops that the end of the rope is threaded and a knot is made.
Please note that if the trunk is smooth, the hangers will gradually slide down. To make this happen as slowly as possible, you can slip a piece of fabric under them.
It is also necessary to take into account that over time the hammock itself stretches in length, that is, it sags. Therefore, it must be periodically hung a little higher.
The distance from the bottom of the hammock to the ground when a person is in it should be at least half a meter.