Film shower
This type consists of corners made of wood or metal, which are covered with film. The main disadvantage of this structure is its short service life.
If we consider the advantages, then such a shower is easy to assemble and it is mobile. If necessary, it can be moved to another place.
How to make a homemade shower tank
You can make a shower out of a barrel at your dacha using sheet metal with your own hands. A thickness of 2-3 mm is suitable. You also need a welding machine and skills to use it. Otherwise, it is better to use the services of a specialist. You will need 20*20 corners to strengthen the frame, a grinder and several metal discs.
So, how to make a shower in the country from a barrel:
- Drawings and markings are made. The sheets are cut to the required parameters.
- All parts are welded together. For convenience, the top part can be made opening to allow access to the inner surface of the tank.
- A shower head and a faucet for sanitary drainage are installed.
Advice: after making the structure, it needs to be checked for leaks, and then attached.
You can make a shower for your dacha from scrap materials. For example, the frame is made of wood or metal. The main stages of installing a shower:
- Dig a drain hole. For convenience, you can drive bars into the corners to make a frame. There is no need to dig too deep, 80 cm is enough.
- Laying the floor. Here you need to be careful in choosing the material, because the floor becomes slippery from water.
- Installation and covering of the frame.
- Installing a tank on a shower structure.
Metal tank from a finished barrel
For this you will need a barrel, approximately 100-200 liters. You need to decide how it will stand on the shower structure: vertically or horizontally. Now you need to make holes for the tap at the bottom and top to fill the water. If you plan to place it vertically, then you don’t have to solder the top and just make a lid, but if you plan to place it horizontally, you still have to solder the top of the container and make a separate hole for collecting water.
Important: it is necessary to install a shower barrel in a dacha only on a solid foundation, since you need to take into account both the weight of the water and the container itself.
Making your own plastic tank for a country shower
For this you need a plastic barrel or any other suitable container. The main thing is that it is suitable in size, shape and quality of material. First, thoroughly rinse the container. Then we check the tightness.
If a barrel has been selected, then you need to decide how to position it: vertically or horizontally. In the first case, it is enough to make a hole in the bottom and insert a tap with a sprayer there. For the top part you need to make a regular lid, water will be poured there. When positioned horizontally, you need to solder the lid and make holes for the faucet with a sprayer and for draining the water. This should be done at the very bottom.
How to make a shower in a country house made of a barrel airtight? To do this, you need to solder the lid to the container and do the following:
- All joints must be thoroughly washed.
- If there are any unevenness, use a hair dryer to warm them up.
- Place the lid tightly on the barrel and press it, this can be done with wire or a clamp. Keep it like this until the plastic cools.
- Then thoroughly clean the joints again and apply special glue. Dry and do this step again.
- Wrap the gluing area with film and secure tightly with wire or a clamp.
- Before installing the tank on the shower, it must be checked for leaks. Then, make holes for the tap and water supply.
Tip: to solder plastic, it is advisable to use a special welding machine.
Frame building
This is a solid monolithic structure that will last a long time. It has good ventilation and fast water heating. The downside is the environmental impact.
After several years of operation of such a structure, the appearance will not be very attractive.
Preparing the base
At the site of construction of the cabin, it is necessary to select all the fertile soil, reaching the underlying layer of soil - sandy loam or loam.
Next, a cushion is built in the resulting recess, consisting of a 15-centimeter layer of gravel and a layer of sand of the same thickness.
Next comes laying the foundation.
Existing types of shower
To build a shower in a country house, different materials are used. The choice depends only on the finances that you are willing to allocate for this building.
Water supply
It is quite difficult to collect water into containers with buckets, especially for pensioners.
To facilitate this task, you should use a pump, which can be of two types:
- Mechanical - in this case, the pump is driven, usually by foot, like a car pump. This option is not the most convenient in terms of operation, however, its advantage is energy independence and low price. With this pump you can pump water from a barrel or buckets into the tank.
- Electric – allows you to pump water into the tank directly from the water supply source. The type of apparatus depends on the depth at which water will be extracted. It should be noted that the installation instructions for some types of this equipment are quite complex and require the involvement of qualified specialists.
Advice! If the country house is connected to a central or independent water supply, you can equip a country bathroom with a shower indoors, which will make living outside the city even more comfortable.
Tire drain pit
If more than three people live at the dacha, then it is necessary to organize the drainage and disposal of wastewater, since on average, about 40 liters of water are spent on bathing one person. Otherwise, the water will spread over the area, turning it into a swamp.
If the dacha does not have an autonomous sewer system, then the solution to the problem will be a drainage hole, which, as a rule, is dug behind the shower. Its size depends on the number of people living. The larger the family, the more spacious the pit should be.
The easiest way to build a pit with your own hands is to lay car tires on top of each other and fill the bottom with sand and crushed stone. If the pit is large, then its walls should be filled with concrete or lined with brick.
Note! For safety reasons, the top of the pit must be covered with a concrete slab or boards.
To drain liquid from the shower stall, an asbestos-cement or plastic pipe is laid into the pit at a slight slope and inserted into the pit. The drainage system must be thought through at the stage of arranging the pit.
Shower head with valve
After erecting the cabin and solving the main problems of its arrangement, you should install accessories, which include a shower head, mixer or valve, etc. Recently, purchasing accessories for a country shower is not a problem, since they are sold in every specialized store.
As a rule, fittings are installed as follows:
- A fitting is cut into the tank, to which the pipe is attached.
- A valve is installed on the pipe.
- A shower head is attached to the valve.
Shut-off valves are often controlled using a pedal. This option is more complex, however, it is easy to use and economical in terms of water consumption.
Diagram of a water supply device using a pedal
It should be noted that components for a country shower are selected depending on the equipment. For example, with natural heating, a ball valve will be sufficient as a shut-off valve. If the water is heated by force to a high temperature, then you cannot do without a mixer.
Advice! If a collapsible cabin is installed on the site, a country mini-wash shower is an excellent option for its arrangement. This is a small electric pump that supplies water from a container directly to the watering can. The device can operate both from a car cigarette lighter and from a 220 V network.
Here, in fact, are all the most common options for arranging a summer country shower.
You can build and equip an outdoor shower in different ways, each of which has its own advantages and disadvantages. In most cases, the best option is a frame country shower with a pedal and heating, which is easy to erect and at the same time convenient to use.
From the video in this article you can find some additional information on this topic.
Wooden shower
A wooden shower is a well-known and common construction option. This is explained by the fact that it is very simple to build.
One of the few disadvantages of this type of shower is its poor moisture resistance. To do this, before construction, all wooden parts are treated with special substances.
The optimal type of wood for such buildings is coniferous wood. They have better moisture resistance.
A wooden shower is a frame structure. To protect logs that will be in the ground, they are treated with bitumen mastic and wrapped in roofing felt. The racks are connected at the top and bottom using horizontal bars.
Ornamental grass: review of the best decor options and instructions for using ornamental grass (170 photos)How to design a flowerbed - instructions, diagrams, types and options for proper placement of a flowerbed (140 photos)
- DIY flower beds - 180 photos of unusual ideas for beginners and features of their application
They are usually fastened with bolts and a metal corner. A sanded board is installed in the sides of the cabin. At the end, all wooden parts of the shower are coated with varnish or paint to protect the wood from moisture.
During construction, it is necessary to consider a drain for used water. Shower containers of various shapes and sizes are used for serving. They are located on the roof.
Should I choose a Eurocube or a barrel?
There are several options for water tanks.
These are barrels and Eurocubes. Barrels come in plastic and metal. If you have a choice, it is better to buy a plastic barrel, since metal ones quickly rust. At the same time, plastic barrels also have a disadvantage - they can crack in the cold; they must be additionally insulated. A plastic tank is more durable, but the water in it is not as warm as in a metal one. Metal is quite heavy and requires special care: painting or applying special anti-corrosion solutions. Metal barrels take a long time to heat up, but when painted black, the heating speeds up. And the price of an iron barrel is a little cheaper.
In general, barrels are very convenient due to their compactness and variety of available volumes. The disadvantage of barrels is their shape: when installed vertically, it requires additional fastening. Installation of barrels has its own characteristics. If desired, the barrel can be laid horizontally, but in any case there must be supports to prevent it from swinging.
You can buy eurocube barrels of various sizes with heated water inexpensively in our store. In this case, pickup in Minsk or delivery throughout the Minsk region is possible.
Eurocubes are large-volume containers, they can be from 800 to 1800 liters. The scope of application is households, as well as industry, that is, for larger-scale purposes. They are ideal as a reservoir, but it is better to install them on permanent brick structures.
Since barrels and Eurocubes have different shapes and designs, this causes some differences in the installation of such tanks on the top of the shower. We will discuss these features below, but in any case, the containers listed are an excellent way to arrange a country shower without high expenses.
Corrugated sheeting for a country shower
Another material from which you can build an outdoor shower is corrugated sheeting. It is relatively lightweight and durable. The frame is constructed from wooden blocks.
The construction of the shower is carried out by analogy with polycarbonate. The transverse profile is used to connect the racks. It adds rigidity to your structure.
The corrugated sheet is fixed with galvanized self-tapping screws and a sealing washer. To cut corrugated sheets, use a grinder.
Organization of heating
The simplest option is to use solar energy. Yes, it heats water through the walls of the tank. But the water thickness is too large for it to warm up quickly. That’s why people come up with various installations for solar water heating.
Method of heating water by the sun
As mentioned above, the warmest water in the tank is at the top. And the traditional feed comes from below. That is, we take the coldest water. To ensure that the warmest water flows into the watering can, a hose is attached to it, and it is attached to a piece of foam plastic, which I let float. So water is taken from above.
To speed up the heating of the water, they make a “coil” (in the photo above it is the right picture). At the bottom of the water tank and above, two pipes are welded into one of its walls. They are connected to a black rubber hose, which is folded into rings in the sun. If there is no air in the hose, the water movement will be quite active.
If the sun is not enough for you, but you can supply electricity to the shower, you can use heating elements (wet). They need to have a thermostat so you can set the required temperature. They are usually used in storage water heaters, so you can find them.
Diagram of a device for heating water with a heating element in a summer shower
When you pull the power line to the shower, do not forget to install a circuit breaker with an RCD. This is the minimum that will ensure your safety.
Brick shower
To build a brick shower, you need to prepare the foundation. When the concrete mortar on the foundation has hardened, you can begin laying bricks. Calculate how much area the door will occupy and leave the doorway unblocked.
For the door, choose a frame made of metal or wood. It is sheathed with corrugated board. Wooden blocks are laid on top. They will form the basis for the roof.
We equip the foundation and ensure the outflow of water
The basis of any structure, of course, is a reliable foundation. In the case of a summer shower, the foundation must not only protect the structure from being washed away by groundwater and subsequent subsidence, but also be able to quickly drain used water in large quantities. The construction of any foundation begins with markings. It is necessary to draw an outline in the selected location. For example, the size of the shower will be 120x120 cm - a person of any size will be comfortable in such a space. You need to drive pegs into the corners of the rectangle, pull the cord around the perimeter and check the dimensions using a tape measure.
This marking is universal and is performed before the construction of any type of shower.
Now let's look at the types of foundations for various buildings.
Foundation for a simple temporary shower
For temporary construction, it is enough to remove the top layer of soil 15-20 cm deep within the outlined rectangle and level the area. Now you need to make a pillow that will help drain the water. To do this, prepare a mixture of crushed stone and sand. You can simply fill the hole halfway with sand and add a layer of crushed stone on top. Small stones will allow soap scum to settle on their surface. Additional filtration with a sand layer will avoid rapid mulling. This design can also be placed near the garden without harm to the plants. Wooden pallets are usually laid on top of such a base, which serve as the floor in the summer shower. To prevent rapid rotting of wooden materials that will often come into contact with water, it is recommended to place pallets or boards knocked together at a height of 15-20 cm above ground level. For formwork you can use old bricks or paving slabs. They are laid out around the perimeter of the base, leveled and compacted using a mallet.
Wood can be used for finishing walls or floors only after appropriate treatment to make it moisture resistant. The most effective method is impregnation with hot oil and subsequent opening with drying oil or varnish. Arranging such a foundation will allow you to use a summer shower for more than one season.
Foundation for capital construction
If the shower will be used frequently and not by one or two people, you need to think about constructing a permanent building. The most expensive method would be a brick construction. But it is easiest to heat it in the cool season. To do this, it is enough to insulate the walls with foam plastic. The best option would be a frame building made of metal or wooden beams. Particular attention should be paid to establishing a reliable foundation. In this case, it is necessary to pour concrete foundation .
According to the markings, you need to dig a hole about 30-35 cm deep. You need to make mortgages around the perimeter of the rectangle. For these purposes, you can use old iron pipes. The larger their diameter, the stronger the structure will be. In the places where the pipes are located, using a drill, a hole up to 30 cm deep is made, into which pipes or wooden beams are driven. If you use wood, you need to protect its surface by wrapping it in roofing felt or treating it with hot bitumen. After this, the cement-sand mixture is poured. Wooden mortgages can be made not only in the corners, but also along the entire perimeter of the base. To do this, use logs of sufficient width, which can ensure further installation of the floor. The base must be level. This will help prevent water from accumulating in sloped areas. Filling is carried out using floor screed technology. Use special construction beacons and rules.
The disadvantage of a poured foundation is that you can begin arranging the interior space only after it has completely dried. For brick buildings, you can use a solid reinforced concrete slab with a thickness of 170-300 mm as the base. This will significantly reduce construction time.
Arrangement of water drainage
Any capital building needs high-quality water drainage.
- Best suited for waste collection septic tank, which must be placed next to the shower stall, but in no case under it. If you decide to save space on your site and still place the septic tank under the shower, after a short period of time you will begin to feel a sharp, unpleasant odor inside the building. In addition, there is a risk of soil collapse around the septic tank and, as a result, destruction of the foundation. The recommended distance from the shower stall is 1-2 meters. A drain pipe is removed from the shower tray or a drain ditch is drawn into a septic tank, which must have a sump and drainage tank. A pit is dug for the receiving chamber. It must be sealed. This could be a tin barrel or concrete rings. It is recommended to cover the container with a lid to prevent rain or groundwater from filling it. There is a leaky drainage container nearby. It should be installed on a bed of sand and gravel. These two compartments are connected to each other by pipes.
- Another option for collecting waste water is cesspool. To equip it, you need to dig up about 2m3 of earth. This is the optimal volume that will ensure long-term use. A drainage cushion of sand and gravel is made at the bottom of the pit, and the walls must be strengthened and made waterproof. You can line them with bricks, use ready-made concrete rings, or you can reinforce the hole with old rubber tires. When setting up a drainage hole, do not forget that it needs to be pumped out. In this regard, it must be located in a place where unhindered access for special equipment will be ensured. In addition, the pit must have a distance from the residential building of at least 3-4 meters, as characteristic odors may form.
- For simpler types of shower that will not be used with great intensity, it is enough to equip drainage well. It will be located directly under the shower stall. A hole is dug, 2 meters deep, a layer of crushed stone is poured at the bottom, and then a plastic pipe with perforation is inserted. Such a well is filled with material that will act as a filter. It can be gravel, crushed stone, old broken bricks, slag. The well is filled to the very top, then covered with a layer of geotextile and covered with soil. A wooden pallet is already installed on top of the formwork, which has slots for water infiltration. This is the most affordable, but no less effective method that will ensure the necessary outflow of water.
Choosing a location
Before building a country shower, you need to choose its location. In this case, you must adhere to the following rules:
- The selected location should be illuminated by sunlight throughout the day. This will allow the water in the tank to warm up well.
- It is better to build a shower near the house.
- It must be installed on level ground.
- There is a water drain nearby.
A foundation for an outdoor shower will only be necessary when it is planned to build it from bricks, concrete blocks or other heavy materials.
One of the most common types is a tile foundation. In addition, it serves as a floor in the shower stall.
What types of heated showers are there?
In specialized stores you can find a great variety of different devices and devices to make country life easier. There are also shower installations.
All showers for heated cottages can be divided into two main categories:
- Shower installations. This device is a cabin with a tank installed in the upper part and having a heating function. Such showers work from the network. They may have additional functions such as temperature display, mode switching, fast heating, and so on. It is worth purchasing an installation if you plan to use it constantly and place it in one specific place. The cost of this shower ranges from 15–20 thousand rubles.
- Portable portable water heater-shower. It has a body with a heating element, wire and nozzle. The device is placed in a container of water, connected to the network and begins to supply heated water through the hose to the nozzle. Such a device can be placed in a tank installed on the roof of the shower stall. This device is not distinguished by high power and heating speed, but still in about 10-15 minutes it can heat approximately 8-10 liters to 40-45 degrees. The cost of such water heater-showers varies from 5 to 10 thousand rubles. The main advantage is mobility, because the device can be taken with you on a trip and moved to any suitable place.
Construction process
They choose a place, clean it and make markings.
They dig a pit. When making a brick shower stall, the depth of the pit is approximately 15 cm. 5 cm of sand is poured onto the bottom.
Concrete is poured. The surface must be made smooth. This will avoid making a screed.
Cabin design and tank installation
The design of the cabin can be very diverse. It all depends only on your imagination and safety.
The main concern when installing a vessel is safety. Due to the weight of 100-300 kg of a filled tank, it is quite stable, but since the center of gravity is high, the shower cabin may tip over in case of strong wind or other external influence. It is also worth remembering that the tank should not fall down. To prevent this, it is recommended to make a frame from a steel profile and concrete the base or somehow weigh it down.
The pallet is usually made from thick boards 150x30 mm.
If there are often strong gusts of wind in your region, then it is better to take round barrels, so the design will be better streamlined.
For greater reliability, cylindrical barrels are secured with belts, clamps or ropes.
Installation of a shower cabin
You can build a shower at your dacha yourself or buy a ready-made model in a store.
If you are purchasing a shower stall, then before purchasing you should pay attention to the following:
Dimensions. The cabin should be comfortable for absolutely all family members. To do this, you need to try on the largest family member in it.
What materials is it made from? Your cabin should not outwardly stand out from the overall design of the summer cottage. The material from which the cabin is made should perform well in this climate.
Water tank size. When choosing, you need to take into account the number of family members and calculate which tank is needed. One person uses approximately 35 liters of water. You should choose a tank with a small reserve.
Price. There is now a wide range of prices for shower designs on the market. You can buy a cabin starting from five thousand rubles and up to infinity.
To install the cabin, you need to prepare a level place. It is best to make a concrete platform on which your shower stall will be stable.
When building a shower, you must complete the following points:
- Make a shower drain of water.
- Build a foundation.
- Build a frame
- Finish.
- Install the tank and connect it to the water.
Helpful information
How to use and apply the Eurocube
Published: November 15, 2015
What are Eurocubes used for?
Another name for such containers is IBC container. Such containers can be used in various fields, but most often they are used to transport liquids. To date, no more convenient and effective analogues have been invented. Many people use Eurocubes for personal purposes.
How to use and apply the Eurocube at the dacha?
The main purpose of manufacturing such containers is the ability to transport large volumes of various liquids without any problems. That is why Eurocubes are primarily used in production. But, since these containers are characterized by a long service life, excellent performance, high reliability and quality, the use of Eurocubes in the country has become a fairly common practice. You can use the container for quite a wide range of purposes.
mini gas station for diesel fuel from a Eurocube
Always rinse the container under running water before use. This is especially true for used Eurocubes. If you want to use a container for storing water (for drinking purposes or for watering plants), then pay attention to what exactly was transported in it before. It is not recommended to use containers that have previously contained chemicals or other similar substances.
Let's take a closer look at the areas in which you can use the Eurocube:
- To collect water. Watering the garden
- For a font or yard shower.
- For a septic tank.
- To store animal feed or as a water trough for livestock.
- For aquaponics.
Today, many owners of country houses use Eurocubes to quickly and easily collect rainwater. When it rains, drops of water will flow freely down the lid of the containers directly inside. The Eurocube for collecting water is a fairly simple and simple device. Moreover, you can use two containers at once, which can be placed on top of each other and placed under the roof of the house.
Of course, rainwater is not suitable for use as food or drink. Even a special mesh that will protect the liquid from dust and dirt will not help you here. But a similar tank of water is suitable for domestic use: watering the garden, washing the car or dishes, flushing the toilet.
Please note that you will be able to collect about a liter of water from one square meter of roof. A water collection container made from a Eurocube is also convenient because it has a special tap, which greatly simplifies the use of the water inside.
An outdoor shower or a font made from a Eurocube will definitely come in handy at your dacha. After all, how you want, after a hot summer day spent in the garden, to plunge into cool water and wash off all the dirt before entering the house. This design will also be useful for those who are just building a summer house on the site and cannot pamper themselves with tap water. To create a summer shower, you need to build a metal frame and place a Eurocube on top of it, into which water will be supplied. Typically a 1000 liter container lasts for one month.
Do you like saunas? Then you definitely need to build a font from European cups . Despite the fact that this is a fairly cheap option, it will perform its functions 100%. To make such a structure, you need to cut off the top of the container and line it with clapboard.
Don't forget to think about how the water will be supplied and drained.
A septic tank made from a Eurocube has become a fairly popular option among modern summer residents. This can be explained by the fact that this type of sewerage is cheaper and more accessible. To create a septic tank, you need to purchase two or three containers with pipes and taps already provided for water drainage.
Please note that everything must be completely sealed. Install the Eurocubes in a pre-prepared concrete pit.
Don't forget: one of them must be lower than the second. Weld the Eurocubes together. Insulate all sides with polystyrene foam and fill with additional concrete. Before pouring concrete, fill the containers with water. This way they don't become deformed.
A container for storing feed, fertilizer or water for animals can be easily created using Eurocubes. What is very important here is the fact that such containers are created from a special type of polyethylene, which does not enter into any reactions with chemicals. The Eurocube will be no less convenient for garbage disposal.
the aquaponics method is becoming very fashionable . It involves growing plants in water where fish live. This method prevents the accumulation of pesticides and other harmful substances in products.
As you can see, using a Eurocube at the dacha is a fairly effective practice.
Typical Eurocube sizes
The dimensions of the Eurocube, as well as other similar containers, are standard. If you purchase a container for yourself, you can see all the information about its dimensions at the top. The most common are 1000-liter Eurocubes, so we will list their typical size below:
Length: about 1200mm (+/- 10mm)
Width: about 1000mm (+/- 10mm)
Height: approx. 1160mm (+/- 10mm)
Volume: 1000 l (but can be 50 l more)
Weight: approx. 53 kg (+/- 10 kg)
Manufacturers who produce Eurocubes try to strictly monitor the dimensions of the containers. Therefore, during the purchasing process, it will be quite easy for you to decide which one is best for you.
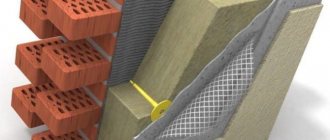
Insulation materials
For insulation use:
- Mineral wool. This material is easy to install.
- Glass wool. This option is much more difficult to install; you need to be very careful when working with it.
- Waterproof foam. A new material suitable for insulating shower stalls.
An insulated shower can be used even in adverse weather.
Features of the construction of the heating system, floor
To heat the washing room, you need to install an old thin-walled radiator connected to a closed circuit with heated water circulating through it.
The movement of water in the circuit is ensured by a circulation pump.
In the washing room, instead of the floor, you should install a commercial shower tray (low version).
It is installed inside a frame made of wooden beams.
The floor in the locker room is made in the form of a grid, which is assembled from beams with a cross-section of 40x40 mm or polypropylene pipes. In the latter option, the holes in the pipes should be filled with foam so that moisture does not accumulate in their cavities.
Installing a water tank
When choosing a shower tank you should consider:
- Heating of a metal tank occurs much faster. At the same time, a plastic shower is more durable. It is also an order of magnitude lighter, which makes the process of constructing the foundation and frame easier.
- When painting a tank, you should give preference to dark colors. This will reduce the time it takes to warm up the water.
- Tank tightness. This will avoid water contamination.
- Before installation, it is necessary to make holes in the tank through which water will be drawn in and drained.
At the end of installation, the water source should be connected to the tank. This is done using garden hoses and polyethylene pipes.
If desired, you can make a heated summer shower. The optimal way to heat water is to use a heating element. You can also heat water using a boiler or boiler. Some use solar panels for heating.
Shape and volume
- Barrel shower. Not the best option. The water in it will not warm up well.
- Square. Standard type of shower tank.
- Flat square. The best option. This type of construction will quickly warm the water under the sun and serve as a kind of roof, and is also suitable for sloping roofs.
In order to choose the required volume, you need to decide how many people will visit the country shower. If it is planned for one person, then you can take a bottle with a volume of up to 15-20 liters. In this case, the tank can be made suspended. If a whole family plans to wash, then you need to take 100-200 liters. In this case, it is necessary to place the tank on a solid foundation.
Interesting: to take the right size tank, it is recommended to calculate 20 liters of water per person.
Shower drain
Draining is performed in several ways. The water is either discharged into the sewer system or passed through a filter and used for irrigation. The second option allows you to water your summer cottage without unnecessary expenses.
A shower in a country house is a fairly cheap and very necessary device. This article will help you choose a shower cabin and material for it. To make it easier to choose a model, you can look at a photo of a summer shower.
How to choose the best shower stall for a small bathroom?
First of all, you need to decide on the size of the cabin, then understand what shape it should be. So you will already have an idea in which place in the bathroom it is best to install it.
Then you need to choose a cabin with or without a pallet. The last solution is more complex and expensive, but you can hide the border between the shower and the rest of the room, which will visually increase its area. Once the problem with the pallet is solved, you need to focus on choosing the options: size, color, features, etc.
You can do all the calculations yourself. But, given the specifics of this room, we recommend consulting with engineers and interior designers, because not every solution, even if it seems good, will be truly profitable to implement.
Did you find this article helpful? Please share it on social networks: Don't forget to bookmark the Nedvio website. We talk about construction, renovation, and country real estate in an interesting, useful and understandable way.
Summer shower photo
Please repost

33333333
Self-construction procedure
Building a shower with your own hands begins with:
- Site preparation. All debris is removed from it and the site is leveled. As noted earlier, the construction site should be located in a sunny and wind-free place.
- Next is the draining. Experts recommend making it several times larger than the volume of the water tank. The easiest way to drain is by laying an inclined pipe from the cabin. And install a septic tank and drainage next to the drain.
- After this, you can begin installing the pallet. To do this, a small trench is dug, which is first covered with roofing felt and covered with crushed stone on top.
- Next, the frame is constructed. It should be installed very carefully and firmly, since a rather heavy tank of water will rest on it. The selected material for the frame is attached using self-tapping screws (if we are talking about timber). And if a profile pipe is used as it, it is better to use a welding machine. Although some home craftsmen fasten metal pipes with bolts.
- The next step is covering the frame with any materials (polycarbonate, wood, metal). Here it is important to consider how important the aesthetics of the building is (if it is in the front yard, then its design should match the design of the house and other buildings).
- Next, the roof is mounted, and a heated tank is installed on it. Some summer residents do not install roofing materials on buildings if the area of the tank completely covers the roof of the building.
- The final stage is the installation of doors and interior finishing work. The booth has shelves for shampoos, masks, scrubs, hooks for towels and clothes.
Attention : it is recommended to use natural and environmentally friendly materials that are easy to care for as finishing in the shower room.
That's the whole simple workflow for building a simple heated summer shower. The only thing is, if you plan to use the room in the cold season, you need to know how to insulate a summer shower. For this, various materials are used: mineral wool, polystyrene foam, expanded polystyrene.