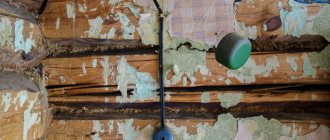
Hello readers of my blog! Today we will talk about how to seal the cracks between walls with your own hands. It would seem that the matter is not tricky, but when you are faced with this problem, you have to think about how to do it correctly, what preparation to do, what materials to choose. Thus, I decided that this article would be useful to someone, and I am devoting my efforts to this subject. In it, I will answer a number of questions that will arise immediately before sealing the cracks between the walls with your own hands, and some even after that. This topic is quite broad, because before work, thorough preparation is necessary, but how to do this? And this is a separate topic. You can learn about all this in great detail in the article below. How to seal the gaps between the joints with your own hands
Today, many articles and even books have been written about how to insulate a house. Any hardware store will tell you what you need to buy for this, and any of the companies or teams specializing in construction and finishing will offer modern technologies for insulating a country house or cottage.
But all this is not cheap... But what if the budget is limited, but you don’t want to freeze at the dacha? Insulate using available materials, experience and ingenuity. It’s already cold outside, so today we will discuss how to significantly reduce heat loss in a wooden house with minimal costs (money, time and effort).
I emphasize: wooden! For buildings made of other materials, the approaches may be different, although many general principles remain the same. Paths by which heat leaves our home You can install any, the most modern heating system in your home, but it will be ineffective if the heat flows out into the street. Insulation is, in fact, the elimination of such leaks. Therefore, before getting down to business, you need to understand where to look for the problem.
The figures given by experts may (depending on the source) vary somewhat, but in general the picture is something like this: windows and doors account for 25% (according to some sources - up to 30) of heat loss; 10-15% evaporates through the ceiling; minimum 15% goes through the floor; 35% (and maybe up to 50!) of heat we lose through the walls.
If we want it to be warm, we need to consistently analyze all vulnerable areas of our home, identify leaks and get rid of them. Easy and simple, right? No matter how it is... If you approach the issue competently, “according to science”, using modern materials and technologies, your home will certainly become much warmer and more comfortable, but... The amount that you will have to pay for this will be in the tens, or even hundreds thousand rubles.
This time we will go a different way)) Let's remember the old-fashioned methods and try to fit into a very modest budget.
Window
Those who have plastic windows with double-glazed windows installed in their dacha can safely skip this section - we will talk about wooden windows. Perhaps old ones.
Maybe even requiring replacement. These are exactly what many people have in their dachas. However, even new wooden windows (tested!) may not protect very well from the cold, and this is their absolute disadvantage.
What to do? You can replace the glass with thicker glass, or even with double-glazed windows. One of our authors has such experience, and the whole process is described in detail in the material New old windows or double-glazed windows in old frames.
You can make shutters on the windows - they will protect from the wind and reduce heat loss (of course, to do this you will have to keep the shutters closed). But both of these methods are also quite labor-intensive, require time and financial costs. We will use old methods - without changing anything, we will insulate what we have: using a special sealant or frame putty, we strengthen the joints of the glass with the window frame.
If necessary, we change (put in place of the lost one) the glazing bead; if there are cracks on the glass, it would be better, of course, to replace them; if this is not possible, ordinary stationery tape glued over the crack directly onto the glass will help (note: if it is wet or frozen, the tape will not stick); if the temperature outside has not yet dropped below zero, we glue insulation around the perimeter of all frames - PVC or rubber (if glued at low temperatures, the self-adhesive insulation will not stick to the frames or will, but very poorly); we plug all the cracks in the frames using cotton wool (from an old mattress, for example), scraps of foam rubber or batting, newsprint and similar improvised materials ;we seal it all on top with paper strips (purchased - with an adhesive layer - or homemade); if the frames are double, you can lay cotton wool or any other insulation between them below, making a neat roller out of it.
If everything is done carefully and efficiently, and the frames are not too old, this will be quite enough.
If, despite all your efforts, there is still a noticeable blow from the window, or you simply don’t want to bother with piercing and sealing, you can use a very simple method, which nevertheless gives an excellent effect.
You will need a piece of plastic film (slightly larger in size than the window) and a furniture stapler with staples (if you don’t have a stapler, use a hammer, glazing bead or narrow strip and small nails). We fix the film around the perimeter of the window (between the frames or on the side of the room - depending on the design of the frame and your own desire).
That's all! If you use a stapler, it will take about 15 minutes for one window (if you have the dexterity, even less). The film serves as a barrier to cold air and drafts and prevents heat from escaping through the window. The downside of this method: you won’t be able to open the window to ventilate the room.
You should think about this in advance and not “brick up” all the windows tightly - ventilation is needed even in winter. Well, for those who like to look out the window, this option is also not suitable: only the blurred contours of the surrounding landscape will be visible through the film. But here you have to choose what is more important...
Doors
It makes sense to insulate both external doors and interior doors, especially those leading to cold utility rooms or the hallway.
Our main task is to eliminate the gaps that sooner or later form between the door and the frame.
And this can be dealt with in fairly simple ways: install seals (this option is suitable if the gaps are small); if it blows from under the door, attach a special sealing brush to it from below (buy a ready-made product or make it yourself from thick rubber or other available materials ) hang a thick curtain. If you need a quick and effective method, then the last option turns out to be the most successful. The main thing is that the curtain material is really thick (summer chintz curtains will not save us from the cold).
Such an insulation element can become a bright and original part of the room decor. Well, if design issues don’t concern you much, then you can even use old woolen or cotton blankets. Here, perhaps, someone will wrinkle their nose contemptuously: “Ugh, old-fashioned!” - well, sometimes it’s these old-fashioned things that work better than modern “bells and whistles.” Let me give you an example from practice.
In my new house, I have a large (about 1.5 x 2 m) opening in the wall that separates the warm living space from the cool hallway. Doors or any other fundamental structures in this opening are not yet included in my plans, but somehow I need to save the heat... I found an antique plush curtain of just the right size. Many people told me: “What’s the use of it?
All the heat will still go into the gap between the wall and the ceiling, and the curtain won’t hold anything back.” But since none of the advisers suggested anything better, this curtain “worked” safely all last winter. The temperature difference in the rooms that it separated could reach 3-4 degrees.
And in my country house in the winter, the front door to the warm (living) part was always covered with a cotton blanket - extremely simple, but effective.
Ceiling
I’ll say a few words about roof insulation. Today it is considered almost mandatory.
Meanwhile, take a look at old village houses - will you find many insulated roofs there? And in a heated hut and in severe frost it is warm. Why?
Insulating the roof makes sense if the second floor (attic) is residential. If it’s just an attic, then you should focus on insulating the ceiling (floors). Even those who are not familiar with physics probably know: warm air is lighter than cold air, and therefore rises.
And it leaks into the atmosphere through cracks in the ceiling, if any. The ceiling, which does not allow heat to “escape” from the house, is one of the most important points of good insulation. Perhaps the most economical and simple option would be polystyrene foam. But, from my point of view, its advantages and merits end there.
It is suitable if you need to insulate quickly and very inexpensively (however, I would not recommend saving on the quality of the material and choosing polystyrene with a minimum density; PSB-S 25 is optimal). I will not go into details - this topic can easily be devoted to a separate article. I will only say: if you want better insulation, buy polystyrene foam boards with milled edges - they overlap.
Attempts to tightly fit the usual smooth edges of the slabs are doomed to failure: there will still be gaps between them, which can also increase as the wooden load-bearing structures shrink. Well, through these cracks, of course, precious heat escapes.
Is there an alternative?
Within a limited budget - I’m afraid not (if there are specialist builders who can correct me, I will be extremely grateful: for me this question has great practical value.
Earth filling, which was used in old village houses, is now practically not used. Sometimes you can come across recommendations to cover the ceiling from the inside with penofol (options: isocom, energyflex and the like). It's really fast, simple and relatively inexpensive (depending on the brand of material and its manufacturer).
But (the subjective opinion of an amateur - don’t judge strictly)) I still think that this is not the best option for a living space... Those who have tried it, let’s discuss it in the comments, share your experience and impressions. I especially want to find out how much such insulation can affect the level of humidity in the room (would condensation form on such a ceiling?)
Floor
Cold floors are the problem with most wooden houses. Today there are many ways to radically solve this problem, but today, as you remember, we are talking about the simplest and cheapest options.
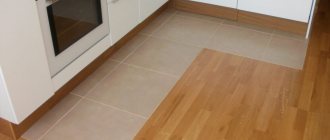
Therefore, we will not consider the topic of heated floors, for example. What then can be done? The first is to insulate the living spaces around the perimeter: no matter how well the floor is fitted and the baseboard is selected, there is a gap between the floor and the wall.
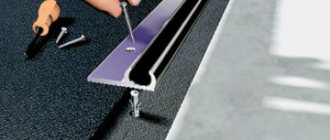
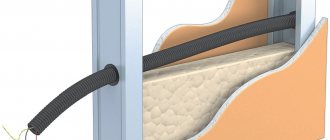
If the basement is not insulated, cold air will penetrate from below through these gaps. And this is where penofol comes to our aid: we fasten strips of this material (with a foil layer inside the room) using a furniture stapler (or small nails, if there is no stapler) so that one edge goes to the wall and the other lies on the floor. Quick, simple - and the room becomes noticeably warmer.
They also use penofol for continuous thermal insulation of the floor (someone already does what they do: someone fixes it on the basement side, someone uses it instead of a backing for flooring, but I have heard only positive reviews from both). The second is the floor surface. Homespun rugs in village houses, in addition to their decorative function, also have a purely practical one: this is additional insulation.
So, if you have carpets, rugs, runners and rugs, lay them on the floor and you will be warm.
Walls
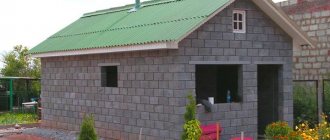
As we remember, it is through the walls that the maximum amount of heat leaves the house. And here I have bad news: insulating wooden walls quickly, easily and cheaply will not work. If we want the house to live for a long time, we need to do high-quality external insulation.
Unfortunately, you can’t get by with improvised means and materials. In addition, a lot depends on the material and construction technology. Beam or log?
What thickness (diameter)? Regular timber, laminated timber, profiled timber? Is the log simple or rounded?
And so on... Each case has its own nuances. Moreover, there are issues that should be considered at the design stage - then it will be more difficult and expensive to fix problems. But this is a broad topic that requires a separate discussion, so we won’t dwell on it now. Tips and hints from our other publications will help create a comfortable environment at the dacha, despite the cold weather: For those who take the issue seriously and do not want to be content with temporary solutions, the article 7 typical mistakes when insulating a wooden house may be useful.
Wooden floor in the apartment
Natural wood flooring is popular, despite the abundance of modern materials.
However, the wooden floor in the apartment after long-term use needs repair or complete replacement. Restoring an old floor in an apartment or country house is possible provided that the wood is kept in good condition. Most often it is necessary to repair the floor due to creaking or the formation of holes and cracks between the laid boards.
But sometimes eliminating minor defects will not improve the condition of the floor due to wear and tear on the boards. If the flooring cannot be repaired, it will have to be re-laid. We will tell you why defects in wooden floors appear and how floor repairs are carried out in a private home.
Methods for eliminating squeaks
If the wooden floor in your apartment creaks, we will tell you what to do next. For work you will need a hammer, a hammer and wooden wedges. Methods for repairing squeaky floors:
You can get rid of squeaking for a while by sealing the spaces under the boards using polyurethane foam.
In an underground space 9 cm high, the foam quickly expands and compresses the deformed boards. However, this strengthening of the floor weakens over time, because the foam is crushed and destroyed. To strengthen loose boards, wood wedges must be driven into the seam between them. Sometimes a wedge is driven between the board and the beam.
As a result, the floorboards will not rub against each other or against the joists. This method is not suitable for very worn boards. In this case, the floor is dismantled to replace the worn floorboards. If you do not know how to eliminate the creaking of a wooden floor, use metal anchors.
This method is suitable for coverings laid over a concrete slab. However, strengthening the floor in this way is very expensive, because the anchors are installed in increments of no more than 1 meter, so it will take up to 200 fasteners to cover the entire surface. In addition, the work will require a hammer drill or a powerful drill to drill a hole through the board into the concrete and drive an anchor into it. A better repair of wooden floors will be achieved if the entire structure is completely rebuilt.
It is necessary to review all boards and joists in order to replace damaged and deformed products with new ones. In addition, during a complete inspection, it is recommended to replace all nail fastenings with self-tapping screws, since it is in this place that the creaking appears, and self-tapping screws do not have this drawback. The surface can be restored and protected from squeaking using plywood 12 mm thick or more, which is laid on top of the floor. As a result, you will get rid of the squeak for a long time, but after prolonged use it may return. If the squeak occurs only in one place, and you are sure that this is due to the friction of the board on the beam, then to eliminate it you can simply screw the floorboard with a self-tapping screw to the beam.
Sealing internal joints on plasterboard sheets
Let's deal with the internal seams first, as a simpler matter. To reinforce these drywall joints, use the following tool:
- putty. At this stage, the one designated as “starter” on the label is quite suitable. If you don’t want to get fancy and buy separate types of mixtures for different jobs, take those that are positioned as “universal” - they are also suitable for finishing smoothing;
- reinforcing masking tape. There are two types: elastic serpyanka and perforated paper. To make finishing the corners of drywall bring you less difficulty, buy self-adhesive sickle tape, it’s easier to work with;
- spatula - small, since the work to be done is fine, almost jewelry-like;
- sandpaper to remove excess mixture.
It will also require patience and accuracy. If you have never plastered before, these are the qualities that will help you gain the necessary experience faster and without wasting time, labor and consumables.
Puttying sequence step by step
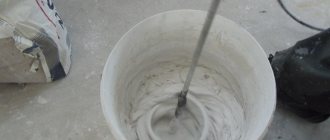
- The putty is diluted in accordance with the manufacturer's instructions. We draw the attention of inexperienced repairers that the volume of the prepared solution should be small: over time it loses its adhesion properties.
- Sealing corners between sheets of drywall begins with the fact that you must putty the grooves - the recesses in the joint. They are filled with a small amount of putty, the excess is removed with a trowel.
- Next comes gluing the serpyanka. A piece of the required length is unwound from the reel and cut off. For the convenience of the procedure, you can buy a holder similar to the one used to measure stationery tape. In this case, the tape will not stick together until it touches the wall: its edge is fixed at the top of the seam, and the serpyanka unwinds under the weight of the dispenser. Your task is to direct it evenly so that the central axis coincides with the middle of the joint.
- The entire surface of the tape is smoothed with a plastic trowel. If somewhere it doesn’t stick well, you can coat the bottom with PVA. It is also important to ensure smoothness - wrinkles when sealing corners are unacceptable.
- The glued element is puttied: a small amount of solution is put on a spatula, it is applied to the middle of the corner and evenly distributed over both gypsum board panels.
After the putty has dried, the plasterboard joints are sanded and primed, after which you can begin finishing puttying.
Methods for eliminating cracks
Now we’ll tell you how to seal cracks in a wooden floor. The following modern tools are suitable for this:
Factory putties allow you to choose a color to match the shade of the coating.
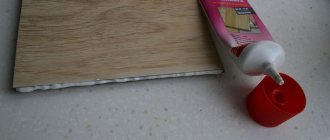
But even if you can’t choose the exact shade, don’t despair, because the imitation surface underneath the deck looks quite original and beautiful. It’s best to seal the gaps with silicone sealant. Its main advantage is good elasticity. Basic recommendations for use:
The most convenient way to apply sealant into the cracks is with a mounting syringe. It guarantees precise application and treatment of all hard-to-reach areas.
A special acrylic sealant for wood is also suitable.
It is easily sanded, varnished and can withstand changes in temperature and humidity. This material, unlike a silicone product, is completely transparent, easy to wash off your hands and does not emit an unpleasant odor. Polyurethane foam is suitable for filling the space between the boards. To make it easier to fill voids, place a cocktail tube on the spout of the mounting gun and flatten its end.
For dense filling, the applied foam is pressed with a bar soaked in water and soaped. After drying, excess foam is cut off with a knife. To prevent this porous material from absorbing various contaminants and being destroyed by sunlight, the foam is painted over with several layers of paint.
Spray foam helps provide additional thermal insulation for the floor. To seal cracks under carpet or in areas where aesthetic appeal is not important, use 2-inch reinforced tape. It is glued to the gap, and the edges are secured with a stapler. This way you will get rid of odors from the underground and drafts.
When listing how to cover up cracks in a wooden floor, it is worth mentioning proven old-fashioned methods.
Surface preparation
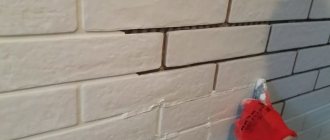
To prepare you need:
Remove old coating. Clean the surface, smoothing out any unevenness. Seal the cracks: deepen them with a spatula, then treat them with a primer and seal them with putty. Small cracks are best sealed with acrylic sealant.
Important The wallpapered surface must be cleaned by removing the old coating. Old wallpaper is generously moistened with warm water and cleaned off after a while. If the surface has been whitewashed with lime, it will need to be washed away
A solution of ammonia, soda or soap and water helps with this. The surface is first wetted with the solution and then washed off with clean water. After cleaning and leveling, the surface is washed with clean water, which will remove dust, and primed. The primer is applied to a clean, dry surface in two layers. The second layer is applied only after the first has completely dried.
How to seal the joint between the bathtub and the wall
Almost all renovation work in the bathroom is not only functional, but also aesthetic in nature, especially when it comes to finishing walls, floors and ceilings.
However, a stylish decorative frame made of tiles or designer porcelain tiles can easily be disturbed by what appears to be an insignificant defect at first glance, for example, an unmasked gap around the bathtub.
The interior will not suffer if you know how to seal the joint between the bathtub and the wall. Let's consider several popular options for sealing and upgrading the area adjacent to the bathtub.
Drywall joints in corners
Drywall corners are finished using the following auxiliary corners:
- aluminum, it is quite rigid, not subject to rust, it can be used if you need to seal drywall corners at right angles;
- galvanized, it is more rigid, it is difficult to break, but it can rust over time, also used for right angles;
- made of plastic, this element is less rigid, does not rust and is not brittle, can be used for any angles, for sharp, straight and turned ones.
How to work with drywall joints
The question arises, how to seal the corners of drywall using corners? You can watch a video about this process on our website.
The principle of working with all types of corners is the same:
- we remove the chamfer from the end edges with a special plane for working with plasterboard so that there are no protrusions;
- We apply a layer of gypsum putty on both planes; the Knauf fugenfüller is best suited for this;
- glue the corners, pressing them with a rule or an even strip so that the excess mixture comes out through the perforation;
- We give the corners a chance to set with a thin layer of fugenfüller.
Important. The price of Knauf fugenfüller often exceeds the prices of leveling putty from other manufacturers. But this is a well-known brand that has proven itself well. If you choose material from another manufacturer, try to read reviews about its quality before making a decision.
How to avoid a gap near the wall?
If you have already had to install a bathtub before, then you know that all products, without exception, are produced according to standard sizes - for example, the most common models are 1.5 m or 1.7 m long.
Unfortunately, there are no equally strict standards in construction, so the length of the wall can be either greater or less than the specified parameters.
If the size of the bathroom does not allow you to install the usual model (and this often happens in the old residential sector), it is better to install a shower stall or a miniature sitz bathtub.
In rare cases, they do it differently - they knock out part of the wall with a hammer drill, and insert one edge of the bathtub into the resulting niche. But this is only possible if the wall is thick enough.
More often, the length of the walls prevails over the dimensions of the acrylic, steel or cast iron model, and then a joint appears between the bathtub and the walls - a gap ranging from a few mm to 1.5-2 cm wide.
Taking into account the unevenness of the walls and angles that do not coincide with the norm of 90º, a gap arises near all three walls, to which the sides of the bathtub are directly adjacent. It can be smooth throughout or discontinuous if the corners of the product touch the corners of the room or the walls have noticeable protrusions.
If the width of the gap at the end is more than 3 cm, you can build a false wall; a gap width of 10 cm or more allows you to build a superstructure, but it is better to seal a short distance (1-2 cm) using one of the methods presented below.
Tips for choosing ceiling skirting boards
When choosing fillets, it is important to take into account not only the material from which they are made and their decorative features, but also a number of other indicators
Prices for fillets
fillets
- The dimensions of the side of the plinth that is attached to the wall must be at least 25 mm, which will hide almost any technical gap.
- In most cases, you should choose lighter skirting boards; this will allow them to stick well to the wall and not make the stretch ceiling structure heavier than necessary.
- To finish a room with a large number of joints or broken corners, use durable and flexible polyurethane fillets. Other materials will often break or become deformed during installation.
- Skirting boards can be of different lengths, but they usually do not exceed two meters. When choosing, take into account the characteristics of the room so that you do not have to make a large number of cuts and artificial joints.
- The top of the fillet should be wide enough to cover gaps of varying widths.
Choosing a ceiling plinth
Features of the color scheme
- If you install a baseboard in a bright contrasting color, it can look interesting and unusual. But it is better that at least one more piece of furniture has this color - this will create harmony.
- You should not use black color - it makes the room gloomy and visually reduces it (unless such a goal is specifically pursued).
- White color is good because it usually matches the color of the stretch fabric, and this increases the space. It is ideal for rooms with low ceilings (up to 2.5 meters).
- When using fillets with several steps, you should not make them multi-colored - it will look too colorful. The only option is a combination of black, white and some third color.
Fillers for stretch ceilings
Width selection
- The widest fillets will hide much more installation errors than narrow fillets. Keep this in mind when choosing a plinth based only on the shape criterion - sometimes it is better to choose a wide, but less beautiful edging.
- In small rooms there is no need to install wide fillets - narrow ones will look harmonious, and wide ones will compress the space even more.
- If there are many corners in the room, then skirting boards with large elements will look good at the joints. This will round the corners and make the environment more peaceful.
Ceiling plinth width
Shape selection
- Use complex and voluminous fillet shapes if this is justified by the overall interior design (for example, powerful stucco-shaped plinths look good in an antique-style room).
- The lines are simple and elegant, suitable for the decoration of any room, and speak of the owner’s good taste and sense of proportion.
- Complex and voluminous shapes of the plinth are very difficult to join at the corners.
A short range of ceiling plinths of various shapes
Ways to disguise the joint between the bathtub and the wall
To ensure that the result is not striking and does not differ from the surrounding interior, it is necessary to choose the right method for sealing the wall gap.
The material that will be used during repair work must match the wall cladding in color and texture. Its technical characteristics - water resistance, strength, durability - are also important, otherwise after some time the repair will have to be repeated.
Let's take a closer look at how to use construction solutions (foam, sealant) and special products to seal the joint between the bathtub and the wall.
The most common joint materials
Each of the above list works in its own “niche” and in its own way. For example, pure acrylic substances have no place in the gap when sealing against water. But modern suspensions of fillers in acrylic water dispersion give excellent results thanks to excipients.
Silicone ones have a full range of performance indicators and meet all the requirements for sealing materials. They easily tolerate moisture, household chemicals and shampoos. Even without primer, the walls demonstrate excellent adhesion (international requirements ISO 10590, ISO 9047), i.e. the ability to bind materials together. Their elastic properties are not affected by temperatures up to + 200 ºС.
Even in the summer heat, when the room is more than +30 ºС, it is possible to seal the bathtub using silicones.
Application of polyurethane foam
Only at first glance it seems that using polyurethane foam is a fairly easy task. During the drying process, the volume of foam increases 3-5 times, so only an experienced person who has already dealt with it can use it.
A better option, preferable for working in rooms with high humidity, is the use of fine-pored foam. You can close a gap 1-8 cm wide with professional fine-pored foam. Experts recommend using moisture-resistant polyurethane-based material.
For decoration, a material similar to cladding is usually used. If the walls are covered with porcelain stoneware, a ceramic border is installed along the edge, plastic panels are complemented with a plinth made of the same material.
Next to painted walls, a sanded surface covered with similar paint looks good.
Ceiling putty
This is a very important stage, on which the quality of all preparations before the suspended ceiling, painting or wallpapering will depend.
From the very beginning you need to prepare a tool and comfortable chairs or a trestle. You should have free space to move, and leave up to 200-250mm on top for better quality control.
Then you need to prepare the mixture by diluting the dry material with water and mixing everything with a mixer. The finished putty should last for 40-50 minutes. work. It is advisable for beginning craftsmen to prepare small batches.
It is recommended to carry out the work in this order:
- Apply the first layer with a wide spatula, placing the tool at an angle to the ceiling and pulling it towards you;
- repeat these steps until the material on the spatula is completely consumed, avoiding the appearance of clots of solution on the ceiling;
- after drying, apply a second layer, but perpendicular to the movements carried out during the first operation;
- walk over the surface with coarse paper;
- apply primer;
- Apply two layers of finishing putty.
Gap sealing solution
After repairs, there is always some mortar or tile adhesive left behind. Both compositions are suitable, but, unlike polyurethane foam, the dried solution will not stick if the gap width exceeds 3-4 cm.
To seal a wide gap, additional clamps will be required that will hold the dried mass and prevent it from falling into the opening.
This method of sealing wall space is good only for narrow gaps. The dried mass loses its elasticity and mobility, and using the bath implies various kinds of dynamics. Simply put, when a person takes a bath, under the influence of his weight, as well as high temperature, it gradually shifts by 1-2 mm.
Accordingly, the solution will slowly crumble or become covered with cracks. The smaller the joint width, the higher the likelihood that the seal will last longer.
Main varieties
The main purpose of foam ceiling tiles is to finish the ceiling surface with subsequent painting with water-based compositions or the use of other decorative methods.
The shape of foam ceiling tiles can be:
- square (25x25 cm, 30x30 cm, 50.50 cm);
- rectangular. Available in dimensions 100x165 cm, used for finishing ceilings of public buildings;
- any other irregular geometric shape. With its help you can create a unique designer interior.
Depending on the manufacturing methods and thickness, the following types are distinguished:
- stamped is made from polystyrene foam blocks using stamping. Thanks to this, a relief pattern is obtained on the surface of the elements. The thickness of the squares ranges from 6 to 8 mm. Due to the fact that there is no protective coating on the segments, the tiles are susceptible to mechanical damage and may break when pressed;
- extruded. In the production of such ceiling tiles, polystyrene strips of small size and low porosity are used. The finished product is obtained by pressing, its thickness does not exceed 3 mm. A special coating makes the tiles resistant to dust and other contaminants;
- injection. It is obtained by baking and casting raw materials at high temperatures. The thickness of the plates ranges from 9 to 14 mm, the products are durable, not afraid of temperature fluctuations, with a clear and deep relief on the surface.
Injection tiles are available only in white, but they can be painted in any tone with acrylic or water-based paint.
The tiles also differ in their front surface: smooth, embossed, with or without edging. Such products are produced mainly in standard white color with a simple pattern. But you can also find color options on sale.
Using silicone sealant
The choice of sealants is large, but we will need one that can be used in the bathroom - a room with high humidity and thermal changes.
This means that the material must not only be reliable and elastic, but also contain antiseptic additives. As you know, mold often grows in bathrooms, and the favorite place for fungus to appear is in the cracks between the tiles and the joint near the wall, where water constantly collects.
Antiseptics protect the material from mold, although they do not exclude regular maintenance. Such a characteristic as water resistance is characteristic of all sealants without exception.
Silicone sealants are sold in tubes or small tubes. The latter are suitable for sealing small cracks and chips, and we will need a tube and a special plunger gun.
With its help, it is convenient to distribute the sealant along the entire length of the joint, and it also guarantees uniform application. Universal sealants are transparent, but if desired, you can find white or colored material.
In order for the masking strip to acquire an attractive appearance, it is leveled with a finger dipped in a soap solution. If you carefully carry out the entire procedure, the seam will be practically invisible.
Ceiling decor with fabric
A very bright and very original way to decorate the ceiling. It is convenient because you can easily do it yourself, it is quite mobile - it can be removed quickly and easily if desired.
How to use fabrics to create “clouds” on the ceiling:
- We choose blue fabric for decoration; it is better to give preference to tulle, tulle or organza.
- We stock up on decorative rope, double-sided tape, plastic hooks and beautiful ribbons.
- We randomly tie the entire piece of fabric with a rope, the approximate distance between the dressings is at least 50cm.
- We attach the hooks to the ceiling with double-sided tape.
- We hook the fabric onto the hooks in the dressing areas.
As you can see, creating airy decor on the ceiling is quite simple.
Application of border tape
Elastic two-millimeter polyethylene tape is not an independent sealing material, but rather an external finishing of a seam sealed with silicone.
On one side it is covered with a smooth, waterproof material impregnated with fungicides, and on the other with an adhesive layer. The width of the tape should correspond to the size of the gap, that is, be at least 2 times wider than it.
It should be remembered that curb tape is a temporary option, its service life is no more than a year. After this time, it loses its attractive appearance and requires replacement.
Preliminary stages
When choosing the appropriate method, you should determine the thickness of the tile, and also calculate what the thickness of the adhesive layer underneath will be. If the walls were not previously leveled to zero, and the tiles on the kitchen apron were laid on a pre-applied layer of glue, you should allow time for it to dry completely. This should be done because during drying, the thickness of the adhesive mixture decreases.
At the next stage, grouting of the tile joints is carried out. After the specified drying time for the adhesion agent has passed, the tile should be wiped with a damp sponge, removing excess grout, as well as traces of the mixture, which usually stains the surface of the tile. The resulting dust must be brushed off the top row (end) of the tile. Then the end part is primed and time is given for the mixture to dry.
Installation of plastic plinth
PVC plinth is an inexpensive and easy-to-install analogue of a ceramic border. This is a lightweight standard size bar (usually 1.8 m), some types of which have soft rubber edges.
Rubber, an adhesive layer, a slightly curved shape of the edges - all these additions are designed to more effectively seal the joint.
There are two types of plastic plinth: one is installed under the tile, the second is installed on the outside. The last method is the simplest and most popular.
To attach the baseboard, you need a special glue, which must be moisture-resistant and match the material being glued - plastic.
Instructions for installing plastic skirting boards:
If the edges of the baseboard move slightly away from the bathtub, the places where they touch are also coated with transparent silicone sealant. You need to act carefully: any flaws will be noticeable in the future, since sealants and glue acquire a yellow or brownish tint over time.
Building a niche with drywall joints
Let's assume that we need to build a false wall with decorative niches according to the project with our own hands. Let's look at the sequence of actions. We will have approximate instructions for the procedure.
Advice. If you want to make decorative electric lighting, then you need to remember the rules of the PUE, which state that wiring behind drywall can only be laid in a corrugated pipe that does not support combustion.
This is a metal hose or a special plastic one with the NG marking.
Installation of ceramic border
Porcelain stoneware and tiles require a suitable material for sealing the joint, so the ideal option in this case is a ceramic border.
They are laid along the line of contact between the bath and the wall, thereby closing the gap between them. If you do everything correctly, you will get a smooth transition from the wall to the side of the bathtub.
The difficulty is that ceramic tile collections do not include special borders for framing the bathtub. They must be purchased separately, taking into account the shade of the main wall covering.
As a rule, these are monochromatic glossy elements in white or pastel shades. Sometimes, instead of special products, skilled tilers cut pieces of tiles or use a narrow, flat, decorative border, but special skills are required to install it.
The procedure for installing a ceramic border:
Essentially, the border is laid in the same way as ceramic tiles on a wall. To treat the joint with the bathtub, it is better to use white sealant, which will last longer than the grout.
Seal drywall joints
We start working with drywall, doing it in the following order:
- we mark the future structure in accordance with the drawing;
The drawings will allow you to seal drywall joints later without any extra work.
- we build a base for drywall from a metal profile and guides;
Think about the nuances in advance so that there are fewer joints on drywall
- we fix the side crossbars from the profile;
- The frame is ready, let's move on to its covering;
- we attach the gypsum board strips to the inner side surfaces of the niches so that its ends are at the level of the front side of the guides;
- we sew up the entire front part of the wall with plasterboard, covering the lining of the side surfaces of the niches;
- prime the surface of the plasterboard;
- we use drywall corners to process all rectangular joints followed by putty;
The number of joints on plasterboard sheets was reduced
- we process the seams by gluing them with serpyanka and putty with a leveling mixture twice;
- completely putty all the drywall with the finishing mixture;
- Our design is ready for final finishing.
Matching the sealing material to the style of the bathroom
When carrying out construction work, one should not forget about the aesthetic side - the interior design of the bathroom. Wall decoration should look harmonious, which means that the material for sealing joints must be correctly combined with wall cladding, plumbing fixtures and the general furnishings.
If you are doing a budget renovation, both curb tape and plastic baseboard will do. To seal a very narrow gap, one strip of sealant is enough.
One of the generally accepted options is when the space near the wall is covered with a box (made of boards or plasterboard) and then tiled. The result is a kind of table for shampoos, very convenient and practical. Finnish polyurethane foam is quite often used to seal gaps, passages or joints in rooms with high humidity. When finished, its volume doubles.
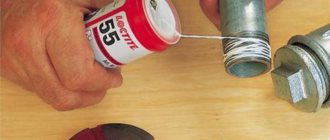
There are two types of foam: household and professional. The household one is designed for amateurs and is suitable for masking small gaps. To use professional foam, you will need a special gun and skills to work with it. “Draft version” of using polyurethane foam: for protection, the adjacent wall tiles were covered with paper masking tape, which, together with the remaining material, must be removed after drying. The simplest option is to mount it on the wall just below the opening of a narrow wooden slats that serve as a kind of “stand”. To disguise a narrow opening sealed with mortar, you can use mosaic decor that harmonizes with the wall covering. Several rows of mosaics cover the gap between the bathtub and the wall, simultaneously playing the role of a decorative frame. Moment brand sealant, available in several varieties, is popular among builders and finishers. The cost of one tube of universal sealant is from 190 to 290 rubles. It is advisable to use mounting tape (blue in the photo). The sealant is difficult to remove from the surface of the bathtub or tile. Sealants are not suitable for sealing large gaps; the ideal gap width is up to 5 mm. For greater reliability, you can apply the material in 2-3 layers, lightly pushing the extruded mass into the joint.
For reliability, after gluing the border tape, it is necessary to prevent water from entering its surface for about a day - during this time the glue will dry and the functional qualities of the seal will increase
About half an hour after installing the PVC skirting board, check the reliability of gluing - try to move it from its place. If you notice gaps where the tiles touch, be sure to fill them with sealant, otherwise water will get under the baseboard.
These are special ceramic parts that have a concave shape on one side and a right-angled base on the other.
Ceramic skirting boards are not as elastic and flexible as plastic ones, so their installation should be carried out with special care. It is better to have 2-3 elements in stock - in case of replacement
An ideally installed bath implies a complete absence of gaps in the wall space. In the illustration, the sealing of the joint is almost invisible due to its visual coincidence with the seam between the tiles. The main indicator of the quality of the correct installation of the curb is its inconspicuousness. Ideally, an inexpensive skirting board should completely blend into both the bathtub and the wall cladding.
Well, now it's time to finish the article. All the material I wanted to share has been reviewed. I hope it will be useful to you, and you will use it if necessary to seal the gaps between the walls. Improve your own practical skills and gain new knowledge, as they say: “It’s never too late to learn!” That's all, thank you for your attention, successful and easy repair!
Plastic corners for joints of plasterboard sheets
Installing this element is a fairly simple type of work that even a beginner can do with his own hands. In general, corners are used not only for strengthening and leveling - if you choose decorative plastic, it will serve as an excellent decoration for doorways and niches, as well as for decorating arches and podiums.
If you are installing a plastic corner as a brace for an internal or external corner, it will adhere perfectly to the special putty for gypsum boards. If you decide to use decorative models, then it is customary to use liquid nails (assembly glue) as fasteners.
Drywall corners come in both plastic and metal and are an accessible and inexpensive element of plasterboard structures. The price for plasterboard corners is not high (about 50 rubles per piece), so everyone can make high-quality and durable plasterboard structures for themselves without worrying about serious expenses.
Gluing
Having secured the baseboard under the ceiling, you can begin gluing wallpaper. Gluing is carried out starting from the top of the wall, from the baguette.
The part that will be adjacent to the tile is turned onto its end. The excess fabric is carefully trimmed with a stationery or special knife with a retractable, replaceable blade. The cut is made at the fold. With a small layer of glue, the cut can be made directly along the tile line.