Floor repairs can include a whole range of work, including leveling and exterior finishing. Sometimes the question arises about raising the floor level in an apartment. This article will tell you how to do all the work correctly and not make mistakes.
How to raise floors in an apartment
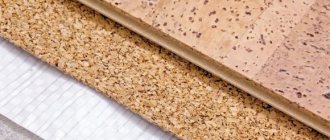
Screed with expanded clay on the balcony
The main reasons for raising the floor level
Usually, during renovations in an apartment or house - especially an old one, where the ceilings are quite low - they try to make sure that the floors rise slightly during leveling. But in certain situations, the floor level may still need to be raised somewhat.
The main reasons for raising the floor level
Quite often, the procedure for raising the floor is associated with the redevelopment of the room. For example, the floor can be raised onto a loggia in order to then remove part of the wall and increase the space of the room. Also, sometimes it is necessary to level the floors in the entire apartment and make them at the same level, and here, too, most likely, you will have to raise the base a little in some room.
In neighboring rooms, the floors can have different heights, and they can differ either significantly or by just a few millimeters. It depends on the house itself and the type of room layout.
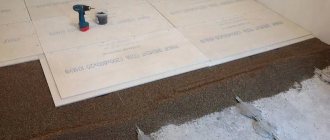
Raising the floor with a dry screed
In a private house, raising the floor level may be necessary to lay an additional layer of thermal insulation if the previously laid one is not enough. To do this, you need to raise the base a few cm (about 10) in order to lay insulating material into the void.
Communications under the joist floor, installation
Carrying out preparatory activities
Before laying a new floor covering, the base, cleared of old material, must be brought into proper shape:
Dust is removed from the surface to see if there are any defects in the base, such as cracks or crevices, areas with peeled or crumbled pieces
Also pay attention to the presence of traces of mold and dampness. If the above defects are detected, they must be eliminated - otherwise the effect of thermal and sound insulation will be less. To do this, use cement mortar, sealant or foam.
The choice of material depends on the extent of damage to the base. If fungus or mold is detected, the concrete is treated with impregnating antiseptics. After the subfloor has dried, the list of further measures depends on the type of new floor surface.
How to raise the floor
In general, the procedure for raising the floor requires certain knowledge and considerable financial and labor costs. At the same time, work is not carried out in all rooms at once if the scope of work is expected to cover the entire living space. Raising the floor level is carried out in each room separately according to individual calculations.
Important! Before deciding how the floor will be raised, you should make calculations and find out what load the floors can withstand without damage and without damage.
Wooden floor on the balcony with joists
All calculations are made taking into account the choice of finishing coating that has already been made, since the decision on how the floor will be raised will largely depend on its weight. Moreover, if different types of covering are installed in different rooms, then calculations are made individually for each of them.
On a note! The load on the floors may not be calculated if the apartment is on the ground floor and there is no basement underneath. If there is a basement, then you will have to calculate the load.
How to raise the floor
When calculating materials and permissible load, we can assume that the floor slab in a concrete house can withstand a load of about 400 kg/m2. And the density of reinforced concrete averages about 2700 kg/m3.
The main reasons for the procedure
Owners of apartments with standard ceiling heights do not face this problem. If it is necessary to install heating pipes in a room, they try to slightly lower the floor base so that after installing the system, the ceiling height in the room does not change. When the house was built on stilts, and the heating procedure from the lower part of the living space did not show a positive effect, it will be necessary to increase the height of the ceiling partitions and carry out thermal insulation work in parallel.
Another reason that led to the need to raise the floor is the leveling of the base of the slab. In this situation, the choice of building finishing material (finishing material) is made quickly, since many products in this category meet the requirements of a rough coating.
Raising the floor structure is most often necessary in different rooms: kitchen, bathroom, bedroom, corridor, hall. But sometimes, for safety reasons, you need to increase its height on a balcony or loggia. In this case, questions arise when choosing and purchasing building materials. This is due to the fact that in all residential premises the base of the floor is represented by a concrete slab, so the way out of this situation is to raise it in the most convenient way with minimal expenditure of money, effort and time.
Ways to raise the floor
There are 4 main methods of raising the floor. In general, they are all called screeds. Let's look at them in the table below.
Table. Methods for raising floors.
| Way | Short description |
| Screed made of cement-sand mixture | This is the most popular and familiar method to many. And the most durable even with intensive use. However, many builders do not like to use this method due to the long drying time. The cement-sand screed itself can be laid quickly, but after that it dries for about a month. And other work cannot be carried out during this period under any circumstances, otherwise all the work will go down the drain. It will be very difficult to correct the mistakes made. Also, a cement-sand screed is a rather difficult way to level the floor, and it puts a colossal load on the floors, which requires careful calculation and consideration of the amount of materials and the permissible height of the screed. |
| Self-leveling floors | This is a special type of screed, which is made using special self-flowing building mixtures. It is usually used for additional leveling of the floor and if the level needs to be increased slightly. The type of mixture for pouring floors is selected depending on the conditions in which the floor will be used - a wet or dry room, in a heated or unheated room, etc. One of the main advantages of this method of raising the floor level is the high drying rate of the poured layer. However, it is important to remember that self-leveling floors are very demanding on the condition of the base - it must be well cleared of debris and leveled. Yes, and such mixtures are not cheap, but they require a lot of attention during the pouring process. |
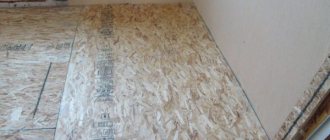
| Dry screed | To raise the floor level, you can make floors from gypsum fiber - this is the so-called dry screed. GVL slabs are laid on a leveled expanded clay bedding. In this case, installation occurs quickly, the process does not generate a large amount of dirt, floor design work can be continued almost immediately after laying the slabs, and this method of raising the floor significantly increases the thermal and sound insulation of the base. But GVL floors also have disadvantages - it is waterproof, and if the floor level rises significantly, you will have to use a lot of expanded clay bedding and over time, because of this, the floors may sag. |
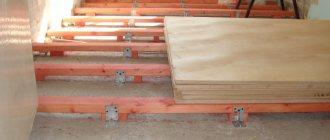
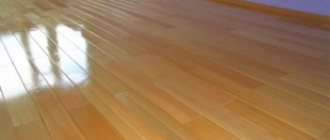
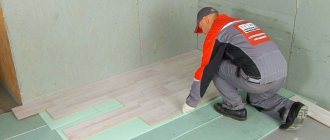
| Floors on joists | This method, like cement-sand screed, is considered one of the most popular and is considered traditional. It has become especially often used recently both for arranging floors in private houses and apartments. It makes it possible to raise the floor by a certain amount with particular precision and is ideal for laying laminate and parquet. The work is completed quite quickly; after completion, you can begin laying the topcoat immediately. Using this method, the floor level can be raised to 15 cm or more, while the ceiling will not experience significant load. In the voids remaining between the joists, various communications can be placed or additional floor insulation can be done. But the lag system also has its drawbacks - if the work is done incorrectly, the floors may begin to creak or sag. |
No. 3. Self-leveling mixtures
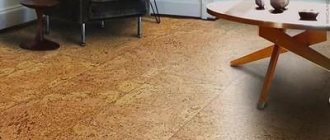
Self-leveling mixtures are otherwise called self-leveling mixtures, floor levelers and self-leveling floors. This is a fairly simple way to level the floor and get an excellent result. Suitable if the height differences are no more than 3 cm. Such mixtures can be used to level floors for finishing with tiles, cork, linoleum, carpet, etc.
The basis of the self-leveling mixture is cement, but in addition to it, the composition also includes special modifying additives that can increase the plasticity and fluidity of the solution. Some additives allow you to reinforce the solution and inhibit the appearance of microcracks in the future. Depending on the composition, self-leveling mixtures are divided into:
- high strength;
- for heated floors;
- fast-hardening;
- thin-layer.
In addition, there are self-leveling mixtures on sale, intended not only for rough finishing, but also for finishing , as well as compositions with special properties. There are also compounds for rough leveling , they are intended for surfaces with significant unevenness.
All self-leveling mixtures boast a number of advantages :
- simplicity and high speed of working with them;
- speed of hardening;
- high strength indicators, so this leveling method is quite suitable for rooms with a high degree of traffic;
- resistance to temperature changes.
disadvantages to this method of leveling the floor - these are rather its features. Large differences in the level of the floor surface cannot be leveled with a self-leveling floor. You need to work with the mixtures very quickly - if you hesitate and allow it to dry out, then it is unlikely that you will be able to achieve a smooth surface.
Working with such mixtures is really simple. They are usually used to level concrete and sandy bases. Preparation of the mixture consists of diluting the purchased powder with the required amount of water. For mixing, it is better to use a construction mixer or a drill with an attachment. The composition is prepared in portions, since its properties are lost within 20 minutes. Naturally, before starting work, you should carefully prepare the original surface: clean it from dust, seal all cracks, and treat it with a primer.
When the mixture is ready, it is immediately poured onto the floor. The principle of its operation is based on the law of gravity, so there is no need to install beacons and level the solution according to them. It is also worth remembering that this solution is self-leveling and not self-spreading, so after pouring it onto the floor it must be leveled with a wide spatula or a needle roller. It is better to immediately fill the entire floor in the room, but if the area is large, apply the solution in strips, acting very quickly and not allowing the edge of the strip to dry out. In this case, only professionals can achieve a perfectly flat surface.
The hardening speed depends on the room temperature, humidity and layer thickness. On average, after 6-12 hours you can move on the surface, and after 3-4 days you can install the finishing coating.
How to raise the floor in a wooden house
In a wooden house, the floors can be raised using any of the above methods - there is no need to worry about the load on the floors, since there are none here. The best options are wooden logs or cement screed. And you should choose depending on which method the home owner likes best.
Important! When installing a floor in a wooden house, do not forget about high-quality insulation, as well as the mandatory waterproofing of the floors. Otherwise, the floors will quickly become unusable.
Waterproofing a wooden floor
If in a private house the floors need to be raised to a considerable height, then you can combine both cement screed and logs. First, a concrete base is made, on which a wooden structure is then installed.
No. 5. Leveling with plywood
Another dry way to level floors is to use plywood. This method is applicable only for those rooms where there will be no significant changes in humidity during further operation. Leveling with plywood is used, as a rule, for wooden and concrete floors when the topcoat is laminate, parquet or linoleum.
Depending on the level of deformation and height differences, two main methods of leveling with plywood are used:
- installation of plywood directly on the plank floor;
- installation using lag.
The first option is applicable when the height difference is minimal, and the unevenness is caused mainly by the deformation of correctly laid floorboards. In this case, logs will not be required - their role will be played by the tubercles of the curved floorboards. The thickness of the plywood sheets, in this case, will be 8-10 mm if the width of the main floor boards does not exceed 20 cm, and they are all uniformly deformed. If the floor consists of boards more than 20 cm wide, or not every floorboard will rest against the leveling layer, then it is better to use plywood 20 mm thick.
It is better to keep plywood sheets for several days in advance in the room where the work will be carried out. They should be treated with an antiseptic . Before starting work, the sheets are laid out on the floor in the way they will later be attached. If sheets measuring 125*125 cm are used, it is better to cut them into 4 parts for ease of work. They are laid out on the floor, moving each row relative to the previous one and imitating brickwork, leaving a gap between the sheets of 1-3 mm and a gap between the sheets and the wall of 1-2 cm for the expansion of the wood. Now all that remains is to attach the sheets to the “ridges” of the plank floor with self-tapping screws.
Sometimes sheets of plywood are laid on an already leveled concrete floor. This technique helps to achieve the most even surface possible.
The second method is used when the elevation differences are significant. Concrete and old wooden floors can be leveled using joists. Work begins with preparing the base , which is cleared of debris. If the base is a wooden floor, then it must be treated with an antiseptic. Then a layer of waterproofing is laid, which can be a polyethylene film or a special membrane. Joists and plywood are pre-treated with an antiseptic.
As a lag you can use timber with a side of 40*40, 50*50 or 60*60 mm, second grade board or cut plywood. If it is undesirable to raise the floor too much, then use not timber, but cut pieces of plywood. The logs are laid across the direction of incidence of the sun's rays in increments of 40-50 cm. Now you can install transverse jumpers, which are attached using self-tapping screws.
Next comes the most crucial moment - placing the finished sheathing at the level previously marked on the wall. For this purpose, metal wedges, roofing felt, roofing felt are installed under the logs, but most often wooden spacers are used, which will resemble point supports. Some people use sand for this purpose. After leveling, the entire system is attached to the floor, for which you can use dowels three times the length of the log thickness. The space inside the sheathing can be filled with a layer of insulation (mineral wool is often used) or with a screed made of wet sawdust and PVA glue. In the latter case, the mixture is applied in 2-3 layers, waiting for hardening for 2 days, but less thick plywood can be used. Pre-prepared and processed plywood sheets are fastened with self-tapping screws, leaving a gap of several millimeters between the sheets.
If the height differences are more than 5 cm, but less than 8 cm, then a more complex mini-lag system . Wooden pads are installed under the logs and lintels, and the height of each such supporting element is calculated separately and can be different, and this is the most difficult stage.
In general, the leveling method using plywood can be called quite fast, because you don’t need to wait for it to harden. Joists and sheets of plywood do not create such a load on the floors as concrete, so in the case of old housing stock this option is irreplaceable. But in some cases, this leveling method will require a professional approach, and will cost a pretty penny.
How to raise the floor level in an apartment?
In an apartment, raising the floor is done differently depending on where the work will be done. Kitchen, bedroom, bathroom or loggia - everywhere the floor level will rise in its own way.
You should be guided by the following principles: if the floors rise to a level of up to 8 cm, then the screed is easiest to make using the wet method, that is, using a cement-sand mixture. In some cases, the ceiling can be additionally covered with expanded clay mixture. If the apartment is located above the first floor, then you can do without additional insulation.
Floor installation methods
On a note! A regular screed by itself will raise the height in the room by up to 5 cm, even without laying insulation or joists.
If it is planned to create a multi-level screed in the rooms, that is, a floor of a certain height will be made in each room, then calculations are made for each of them separately. Here it is optimal to use the method with logs, because with such a design it is most convenient to change the height.
Pouring cement-sand screed - work carefully
The prepared solution begins to be poured from the far corner of the room between the beacons. It is necessary to immediately level the composition after applying each individual portion of it, using the rule. We move it towards ourselves, and not away from ourselves. Also, the rule is to “spread” the mixture on the sides (some level it exclusively along the guides, which is incorrect) in order to achieve a good compaction of the screed layer and fill the existing voids.
Pouring and leveling the solution
Professionals also advise piercing the applied composition with a metal rod of small diameter. This simple action will avoid the risk of air voids appearing in the screed. If the mixture of sand and cement is made of a large thickness, it is advisable to strengthen the screed with reinforcement from a convenient (available at hand) material. In addition, it is recommended to cut special seams in it (they are called shrinkage joints) every 250–300 cm. Long breaks when laying a cement-sand composition should be avoided.
Raising the floor in the bathroom or kitchen
The kitchen and bathroom are rooms where air humidity is quite high. Therefore, it is not recommended to use structures made of wood or plasterboard to raise the floor level. The best option is cement-sand screed or self-leveling floors.
How to raise the floor in the bathroom
A layer of waterproofing materials must be laid. This could be roofing material or polyethylene film. It is also worth remembering that the floor level in the bathroom or toilet should not be exactly the same as in other rooms. The fact is that it is in these rooms that floods usually occur due to the presence of water pipes. And if the floor level here is the same as in other rooms, then if the apartment is flooded, water will get into other rooms. A small threshold or drop will allow the water to remain in the bathroom.
Waterproofing the bathroom floor
Important! If pipes are replaced, then all communications are changed before the screed is poured. Otherwise, you will have to carry out a number of additional works to create holes in the floor for laying pipes.
Preliminary stage
Before you begin leveling the floor in the kitchen, you need to remove furniture and large household appliances from the room, remove the kitchen sink, and dismantle the finishing of the floor, walls, and ceiling. At the same stage of work, the installation or replacement of utilities is carried out, if required by the project.
Since the kitchen is a wet room, it may be necessary to install waterproofing, but this will require dismantling the old screed, which complicates the work and increases repair costs. But if you just have a cracked screed, then today manufacturers offer a wide selection of self-leveling mixtures for rough finishing of the floor, including for leveling complex bases - such materials are suitable for use with cracked, uneven screed.
When choosing a self-leveling mixture, consider the following parameters:
- curvature of the surface (if the height differences are large, it is better to level it in two steps - with a rough and finishing layer);
- condition of the screed (composition may be required for complex bases);
- type of finishing coating (the base under the tile must be rough to ensure good adhesion to the adhesive layer, the base under the linoleum must be even and smooth).
Raising the floor on a loggia or balcony
During construction, the floor level on a loggia or balcony is often lower than in other rooms. However, it is often raised in order to avoid tripping over the resulting threshold. Also, raising the floor level on the balcony and loggia is done if this part of the housing is planned to be combined with the room in which it is located.
When raising the floor level on the balcony, care should be taken to waterproof it. To do this, the base can be treated with bitumen mastic or covered with film.
DIY balcony floor
Removing outdated wood flooring
This process is the most labor-intensive and unpleasant, but it is impossible to do without it.
When the old floor covering is wooden, you will need to prepare the following tools for dismantling:
- hammer with nail puller;
- hatchet;
- mount;
- screwdriver;
- electric saw or jigsaw (they will be needed for cutting old boards);
- shovel;
- garbage bags.
Dismantling begins with removing the baseboards along the perimeter of the room.
If you plan to re-lay floorboards or old boards will be used for the construction of joists, then they should be dismantled very carefully, trying to minimize damage. Use a nail puller to remove previously driven nails, and use a screwdriver to remove self-tapping screws.
When the removed wooden elements are no longer needed, they should be removed from the apartment. After freeing up the space, they begin to dismantle the logs. Very often they are securely attached to the rough base, so they must be removed carefully so as not to damage the base. Otherwise, you will have to waste time sealing the resulting holes.
Raising the floor level in rooms
In rooms, you should choose the method of raising the floors according to your own preferences, the strength of the floors and the properties of the selected finishing coating. Since the area in residential premises is usually larger than in a bathroom or toilet, the mass of the cement screed here will be significant. Thus, in rooms it is easier to use a wooden joist system to raise the floor.
In general, the floor level usually rises to a maximum of 10 cm, and according to average indicators - only 2-3 cm. If the floors need to be raised as much as possible, it is also recommended to use a joist system. The voids between them can be filled with insulation or other materials so as not to “move through the air.” It is optimal to use mineral wool or polystyrene foam as a filler.
Raising the floor in an old apartment
So, the decision on choosing a method to raise the level is influenced by the following aspects.
- Budget for repairs . Some materials are more expensive, others are cheaper, and you need to correctly calculate all possible options and choose the best one.
- Rationality of the work carried out . You don’t always have to choose a complex and time-consuming option; sometimes the simplest is enough - it will be enough to lift the floors without effort and at minimal cost.
- Labor costs . It is always worthwhile to adequately assess your time and effort that will have to be put into performing certain works.
Laying semi-dry screed
The finished solution of semi-dry screed, due to its consistency, is not poured out, but rather poured onto the floor.
Next, the solution is compacted, maybe with your feet, leveled with a rule, poured in, tamped again and leveled with a rule. It’s a cyclical process: pour, tamp, level.
Related article: Dry kitchen screed: level the kitchen floor with your own hands
If you are making a screed for the first time, then you can make beacons from the solution. Exactly from the same solution.
A semi-dry kitchen screed needs to be done in one day.
Floor raising technology
Let's get acquainted with the technology of raising the floor using cement-sand screed.
Step 1. The floors in the room where the work will be done are thoroughly cleaned of debris and leveled as much as possible. After this, using a building level, markings are applied to the wall, marking the level of laying the expanded clay mixture. Using a tape measure, measure the height from the rough base to the marked line. This is necessary to calculate the amount of mixture.
Marking walls using a laser level
Step 2. The area of the room is calculated. The required amount of material is purchased - expanded clay and sand concrete mixture M 300, as well as reinforcing mesh with a section of 6x6 cm.
Sand concrete - dry mix
Calculator for calculating the amount of ingredients of a mortar for floor screed
Go to calculations
Step 3. Expanded clay consumption – 1 bag per square meter. It is poured out in an even layer on the floor. In this case, it is recommended to focus on the previously applied markings so as not to overdo it with the amount of expanded clay.
Filling the floor with expanded clay
Step 4. The sand concrete mixture is diluted with water to a liquid state. It is poured onto the surface of expanded clay. Wait until the mixture sets a little.
Pouring sand concrete mixture
Step 5. A reinforcing mesh is laid on the spilled expanded clay mixture. Individual sections of mesh are laid overlapping each other in 1-2 cells.
Laying reinforcing mesh
Step 6. Using a building level, markings are again applied to the walls, this time at the level of the finished floor.
Laser level
Step 7. Beacons are installed. They sit on the solution and are sunk to the desired level. Lighthouses must be located on the same level. The distance between them should not exceed 1.5 m.
Installation of beacons
Step 8. The sand concrete mixture is mixed with water until it reaches the consistency of sour cream. The floor is being poured.
Pouring the floor with sand concrete mixture
Step 9. After this, using the rule, the mixture is carefully leveled. The rule must be of such length that it applies to two beacons at once.
Leveling the mixture using the rule
Step 10. Once the screed has set, check the floor level. This can be done using a rule (see if there are any unevenness) or using a level.
Checking the floor level
Video - Screed with expanded clay
Method 3: leveling with expanded clay
Do-it-yourself Knauf bulk floor
Features of the method
It uses light bulk material, most often expanded clay. It allows you to smooth out even deep holes and strong slopes.
When to use
Leveling the floor with expanded clay
There are several ways to level a floor with expanded clay, but all of them are used when it is necessary to remove significant unevenness. If the height difference is more than 10 cm, the concrete screed will be very heavy, which will create a load on the floor slabs. It will dry unevenly, taking longer in holes than in shallow places, which will lead to cracks. In such cases, it seems more appropriate to use expanded clay.
Stages of work completion
- All preliminary steps: preparing the base, waterproofing, laying damper tape, searching for the zero level. In this case, it will be quite high, since the thickness of the backfill layer must be added to the height difference, and it is not less than 3–4 cm.
- Installation of beacons.
- Preparing expanded clay. You need to mix two fractions: medium and fine. The medium one is needed to reduce the weight of the finished screed, and the small one is needed to compact it.
The following are possible options:
- Expanded clay is leveled along the beacons, compacted, and sheets of various flooring materials are laid on top. This can be gypsum fiber board, chipboard, fibreboard and similar things. They are laid side by side according to the principle of brickwork, so that the transverse seams of one row do not coincide with the other. A second layer is laid on top of the first layer, which is attached to the bottom layer with self-tapping screws.
- Expanded clay is poured onto the floor, leveled along the beacons, not reaching their top 2-2.5 cm, compacted and filled with cement “milk”, that is, a mixture of water and cement. This will give strength to the expanded clay pillow. After a day, when the composition has hardened, you can lay out a solution for a regular concrete screed on top, leveling it now along the tops of the beacons. Or you can remove the beacons, wait for complete drying, cover the expanded clay with a waterproofing film and fill it with leveling agent.
- Preparation of expanded clay concrete leveling mixture. To do this, cement, sand and expanded clay are combined with water, and the finished mass is laid out on the floor along the beacons, not reaching 2–2.5 cm from their top. A layer of concrete screed will complete the structure.
expanded clay
Raising the floor without screed
On a loggia you can raise the floor level without using a screed. Let's look at how this is done.
Table. Raise the floor level.
| Steps, photo | Description of actions |
| Step 1 | The base of the floor is thoroughly cleaned of debris. |
| Step 2 | The adhesive composition is applied to the cleaned base using a notched trowel. |
| Step 3 | Polystyrene slabs are placed on the glue and pressed carefully. |
| Step 4 | The entire base is covered in the same way and dried well. |
| Step 5 | Next, a layer of reinforcing mesh with small cells is laid on top of the polystyrene slabs. It is laid with an overlap in 1-2 cells. |
| Step 6 | A layer of adhesive is applied to the mesh. |
| Step 7 | Next, a layer of finishing coating is laid. |
Prices for Ceresit tile adhesive
Ceresit tile adhesive
Tools and materials
To properly level the floor in the kitchen, we need to prepare:
- building level, tape measure, pencil, cord;
- plastic marker beacons (self-adhesive), a quick-setting mixture for sealing seams and cracks and a metal spatula (medium size),
- reinforcing mesh made of polymer fiber, primer for concrete and a stiff brush with a long handle;
- vacuum cleaner, chisel and hammer, containers for mixing self-leveling mixture;
- dry mixture (for rough and/or finishing leveling);
- electric drill, mixer attachment or unit for automatic solution supply and needle roller.
Floor construction with adjustable joists
Introduction
Floor construction on logs is used not only in private housing construction. In apartments, flooring on joists is widely used when you need to quickly raise the floor to a small height without messy screed work. Floors on joists are widely used for glazing balconies. This floor design allows you to simply and effectively insulate the loggia from the floor side without spending a lot of time on the work.
If you need to raise the floor in a room by 5-25 cm and you cannot or do not have the desire or ability to significantly load the floor, there is a technology for installing the floor using adjustable joists. There are two technologies, and, therefore, two designs of adjustable floors using joists:
- Adjustable floor design with plastic adjustable supports;
- Adjustable floor design with adjustable metal anchors.
Both structures can withstand loads of up to 3-5 tons per square meter. meter.
The adjustable floor anchor, with a working length of 17 cm, can withstand an axial compressive load of up to 700 kg. If you make 6 anchors per square meter of adjustable joists, this means that 1 sq. meter of floor can support 3.5 tons of weight.
Floor construction with adjustable joists on plastic bushings
Plastic bushings can raise the floor by 5-10 cm. The design itself is very simple.
- Holes are drilled in the joists.
- Plastic pins are screwed into them every 60 cm for wooden floors and plywood, and 30 mm for laying gypsum fiber board sheets and subsequent laying of tiles.
- The logs with studs are placed on the floor and leveled.
- Since the studs are hollow, holes are drilled in the floor from the outside and the studs are attached to the floor with dowels.
Floor construction with adjustable joists on metal anchors
The adjustable floor on metal anchors can be raised to a height of up to 30 cm. The strong fastening of the anchor to the base and the strong fastening of the logs themselves provide a reliable base for further laying the floorboard or two layers of parquet plywood. Monolithic fastening of the logs ensures the absence of floor squeaks and warping.
The technology for installing a floor using adjustable joists is also not very complicated.
- Through holes are drilled in the joists along the diameter of the anchor;
- Holes are drilled in the floor for attaching anchors in increments of 60 or 30 cm (30 cm for laying tiles);
- The anchors are fixed in the floor and adjustable support elements or, more simply, a nut and washer are installed on them;
- Logs are laid on the adjustable elements, with the studs passing right through the logs;
- The logs are secured on top with washers and tightened with bolts. The bolts are recessed into pre-prepared mounting holes;
- Excess protruding pins are cut off with a grinder;
- A floorboard or two layers of 12 mm moisture-resistant plywood or one layer of 20 mm parquet plywood are laid on the joists. GVL sheets are laid on the joists under the ceramic tiles. The joints of plywood and gypsum fiber board sheets should fall in the middle of the joists, and not hang between them.
In conclusion, it is worth noting that the adjustable floor along the joists is easily insulated.