At least once in your life you have encountered such a malfunction. The socket is shorted or the socket is loosened so that when you insert a plug into it, you see that there is no current. If you follow safety precautions, you can repair the socket and plug yourself at home.
Before repairing an outlet, determine its type. A regular socket has only two wires, while a European standard socket has three. That is, two connecting wires and one grounding wire, which is necessary to avoid the risk of fire when the voltage in the electrical wiring is overloaded - if there are many electrical appliances in the house. This ground wire is not connected to the other two. When repairing an outlet, you must not mix up the wires when connecting.
Socket for regular plug
Socket for European standard plug
Causes of sparks in an outlet
As noted in several previous publications on our website, such manifestations are characteristic of poor contact. Therefore, the reasons must be sought directly in the plug connector. List all possible options:
- Inconsistency in the standards of the main elements of the contact connector, that is, sockets and plugs.
- Connecting multiple cobbled electrical appliances through an extension cord or tee, resulting in electrical overload.
- Worn connectors caused by various reasons.
- Loosening of contact clamps.
- Poor quality electrical installation products, in this case sockets.
Let us consider in detail each of the listed options.
Plug and socket mismatch
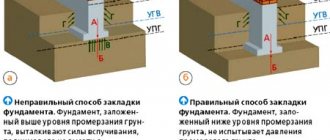
Let us immediately note that this is one of the most common causes of malfunction. The fact is that the sockets are old-style, produced during the Soviet Union, designed for electrodes Ø 4.0 mm. Modern household appliances are equipped with Shuko plugs with thicker electrodes Ø 4.80 mm.
a) Soviet standard plug; c) Shucko fork
It would seem that the difference in the diameters of the electrodes of the plug design is less than a millimeter, but this leads to the fact that when you try to plug a Shucko plug into a Soviet-standard socket, you can damage the body of the latter or stretch the contact jaws. As a result, if you try to connect devices with an old plug into a given socket, sparking will be observed due to weak contact. A similar effect will be observed if a Soviet plug is plugged into a modern outlet.
Overcurrent
Like any electrical connector, a plug socket has its own characteristics that determine the permissible connection parameters. Simply put, if the permissible current of 16.0 A is indicated on the installation electrical device, then it is allowed to include electrical appliances with a total power of no more than 3.50 kW. How to calculate the permissible power from the rated current will be discussed separately.
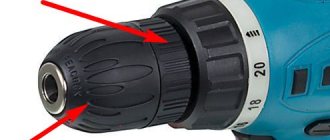
Indication of the rated current on the socket body
Those who do not want to bother themselves with calculations can use the table below.
Table 1. Correspondence of the rated current of the socket to its power.
| Rated current parameters (A) | Rated power (W) |
| 6,0 | 1300,0 |
| 10,0 | 2200,0 |
| 16,0 | 3500,0 |
| 32,0 | 7000,0 |
If the permissible load is exceeded, the contacts of the socket connectors will begin to heat up. This leads to the fact that the conductors connected at the connection points begin to gradually burn, increasing the contact resistance, causing even greater heating and sparking. That is why it is not recommended to repeatedly connect electrical appliances through a tee or splitter. If this becomes necessary, it is better to install double sockets.
How to calculate the power of an outlet?
To do this, use Ohm's law for an alternating current circuit. In our case, the formula will have the following form: P = I*U*cos φ, where:
- P is the required permissible load power;
- I – permissible rated current value (indicated on the socket or in the technical documentation for it);
- U – voltage of the electrical network, at home – 220.0 V;
- cos φ – the value of the power factor; if it is not indicated on the electrical appliance connected to the outlet, then we take the value 0.95.
Let's give an example of a calculation. Let's say we have a 16 A socket, which means the permissible load power on it will be equal to 3344.0 W (16 x 220 x 0.95). As you can see, the calculated value is slightly less than the value in Table 1. That is why it is not recommended to load the outlet to the maximum. There is another reason to avoid maximum loads, which will be discussed further.
Worn socket connectors
The contact terminals are the weakest link in the design of the plug connector. Sooner or later they weaken and cannot fix the plug electrodes with sufficient force. As a result, the reliability of the electrical contact decreases, which leads to sparks and damage to the socket (if measures are not taken in time).
Result of connector wear
It is believed that such a malfunction is typical only for sockets that have been in use for a long time. This is not entirely true, the fact is that plug connectors are not designed for frequent switching on/off of electrical appliances. For this purpose, the latter have switches. If you plug electrical appliances into the outlet several times a day, its resource will be reduced and it will last significantly less than the period specified by the manufacturer.
Loose screw terminals
The condition of the contact clamps plays an important role in the reliability of the plug connector. Over time, they can weaken and the connections between the wires begin to heat up. What this can lead to has already been described above.
Socket contact screw terminals
This problem is especially typical for old wiring, which was installed using a cable with aluminum conductors. This metal is characterized by characteristic fluidity. As a result, the pressure exerted on it by the contact pad over time causes the aluminum to “float”, causing the electrical contact in the screw terminal to weaken. A similar “fluidity” is observed in copper conductors, only with them this process takes much longer.
Literature
1. Powerful electromagnetic relays. Engineer's Handbook. St. Petersburg, 2001.
2. Kurilin S.L. Electrical materials and technology of electrical installation work. Gomel, 2009.
3. Krivandin S. Powerful Omron contactors for energy, industry and transport. Electronic components No. 11, 2007
4. Datasheets for the presented components are taken from the official OMRON website https://www.components.omron.eu/.
JFB Series Polyester Film Capacitors for Wide Applications
JFB series capacitors are made using metallized polyester film technology: polyester (polyethylene terephthalate) film is used as a dielectric in these capacitors, with a metal layer deposited (metallization). The body is made with an epoxy coating, which increases the parameters of heat resistance, moisture resistance and also increases resistance to external aggressive environments and solvents.
A wide range of capacitances and voltages, the ability to use direct, alternating and pulsed current circuits, make the JFB series one of the most popular and in demand film capacitors in the segment. Its main areas of application are switching power supplies and electronic ballasts.
The JFB series capacitors are an analogue of the existing B32591...B32594 series from Epcos, MKT 368 from Vishay, ECQE from Panasonic, MKS from Wima. Capacitors of this category are better known under the names K73-17 in the domestic market, and CL21 in the foreign market.
Features and Benefits
- Non-inductive design
- Suitable as blocking, isolating and filtering capacitors
- Wide range of operating voltages and capacitance ratings
- Epoxy coating for protection from the external environment
- High quality and reliability indicators
Main technical characteristics
- Dielectric material: polyethylene terephthalate
- Rated voltage: 100V(2A), 250V(2E), 400V(2G), 630V(2J) DC
- Capacitance rating range: 0.01…6.8 µF
- Capacitance tolerance: ±5%, ±10%, ±20%
- Attenuation coefficient: ≤0.01 (1kHz)
- Temperature range: -40…85°C
In addition to polyethylene terephthalate capacitors of the JFB series, the COMPEL warehouse presents polypropylene noise suppression capacitors of the JFV series of protective class X2 from JB Capacitors.
•••
How to eliminate sparking in an outlet?
Having dealt with the reasons, let's move on to ways to eliminate each of them. Let's start in the same order:
- Mismatch between plugs and sockets can be easily resolved. It is necessary to bring them to a single type. We recommend choosing modern standards, otherwise you will need to change the plugs on each newly purchased electrical appliance. That is, we are replacing Soviet sockets with European standards. In addition, if the house has vintage electrical equipment, we replace the old plugs on it.
- To eliminate an outlet overload, you can go in several ways:
- Replace the electrical installation device with a more powerful one. For example, if the outlets are rated at 10.0 A, then replace them with 16.0 A products.
- If one outlet is not enough, then install an outlet block. This will be much more reliable than using a tee. If for some reason there are difficulties with installing the socket block, use a double socket installed on one seat.
Double socket - You can try to repair a worn plug connector if the case is not very advanced. To do this, you need to remove the socket (after de-energizing the line from which it is powered), clean it, and then bend the contact plates using duckbills (thin pliers). If the socket cannot be repaired, we replace it.
Remember that frequent plugging will shorten the life of the plug connector.
- If the clamps are loose, tighten the contacts (after turning off the power). For copper wiring, it is recommended to repeat this procedure every 5-10 years; for aluminum wires, not once every two years. If possible, replace the wiring with copper.
- Do not purchase low quality products. Savings in this case are somewhat inappropriate. It is not too difficult to distinguish a counterfeit from an original; first of all, it is a suspiciously low price and the lack of certificates for products. This product is also characterized by low quality plastic housing, lack of packaging, and incomplete packaging.
Where to go for help?
This question is relevant for those who are not ready to carry out the above steps on their own. It is best to call the dispatch service of your management company, if there is one. You can call an electrician from any organization that provides services of this kind. The dispatcher should be told what exactly stopped working, whether there is light, how it happened: after an electrical appliance burned out, after a short circuit or a flood. As you understand, you or your neighbors will have to pay for the electrician’s services if the fault is on their side (for example, you were flooded, as a result of which the sockets in half the apartment or one room stopped working).
Now you know what to do if the sockets in the apartment do not work and what are the reasons for this situation. We hope the tips provided helped you fix the problem yourself!
Sources
- https://electrikmaster.ru/ne-rabotaet-rozetka/
- https://elektrika.expert/rozetki/rozetka-ne-rabotaet.html
- https://elektrik-sam.ru/jelektroprovodka/3576-chto-delat-esli-ne-rabotajut-rozetki.html
- https://YaElectrik.ru/elektroprovodka/kak-pochinit-rozetku
- https://samelectrik.ru/chto-delat-esli-ne-rabotayut-rozetki.html
- https://zen.yandex.com/media/electroom/chto-delat-esli-ne-rabotaiut-rozetki-5d89bc06e882c300b18ee82a?feed_exp=tag_feed&from=feed&rid=2983775614.430.1579515622444.23888&integration=publishers_platform_ yandex
[collapse]
Possible consequences
For those who are delaying the repair of a sparking socket, we recommend that you read this section carefully and then begin immediate repairs.
Without eliminating the cause of the sparking, the home master puts himself and everyone who lives with him at risk. A problem plug can cause a fire in your home. Sometimes a weak spark is enough for a fire to engulf a home.
The plastic of high-quality products is not subject to combustion, but this does not mean that it will not melt and if you try to pull out the plug, you may be exposed to the harmful effects of electric current.
You should not blindly rely on the operation of circuit breakers, especially if they were installed 5-10 years ago and were not checked after that. Connecting a high-power device or extension cord with equipment connected to it may cause the wiring to catch fire due to overload, and the AV may become faulty. In practice, such cases are not uncommon; it is especially surprising when a plug is inserted into a sparking connector, since it is located very conveniently.
To repair an outlet or replace it, it will take no more than 10-20 minutes, a maximum of twice as long if you lack the skills. But with a reliable electrical contact, the danger will no longer threaten your home.
Problems with the junction box
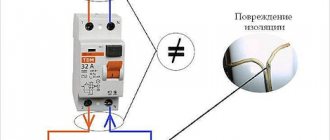
The source of the problem is in the junction box - this is not uncommon. It is necessary to open it and carefully check all connections: burnt or broken cables will be immediately noticeable.
First of all, naturally, you should turn off the power to the apartment and then measure the voltage. If the reading at the input terminal is sufficient and the reading at the output terminal is zero, then the system is faulty and needs to be rebooted.
Next, you need to inspect all the contacts, which sometimes burn out. We remove the insulation from the darkened, oxidized wire, clean it with a knife and sandpaper, and then twist it and wrap it with electrical tape. We throw away the damaged fragments. After all these steps, we assemble the distribution box and, after connecting the power, measure the voltage at the outputs again.
If none of the cables in the junction box are damaged, the problem must be looked for elsewhere. In the worst case, you will have to look for faulty wires in the walls.Causes of sparks in an outlet
The purpose of the plug socket is to connect the plug with the electrical network. During normal operation, current flows through the contacts with minimal heat generation. In some cases, when inserting a plug into a socket, a breakdown occurs. The higher the power of the device being turned on, the more intense the sparking and crackling. The temperature of the electric arc is very high, and a characteristic smell of molten plastic appears.
Sockets crack for several reasons:
- Exceeding the power for which the electrical installation product is designed.
- Long service life and natural wear of connectors.
- Loosening of contact clamps.
- The plug connection parts are manufactured to different standards.
- The product supplied was of low quality and had a short service life.
If the socket shorts out when you turn on electrical appliances, you should temporarily use another power point. There are several factors leading to failure.
Overload
Electrical installation structures are designed for a certain rated current. The parameter is indicated by the manufacturer on the panel. Before the advent of powerful household appliances, it was sufficient to install a product with a current of 6-10 A, now the figure is 16 A. For three-phase networks, the parameter is at least 32 A. Exceeding the rated current leads to heating of metal parts. High power of equipment increases the load on electrical wiring. For safety reasons, it is made of cable with copper conductors.
Spark arresting chains.
Currency rate: USD EUR Advantages of RC circuits parallel to the load: - Good arc suppression, no leakage currents into the load through open relay contacts. Disadvantages: - With a load current of more than 10 A, large capacitance values lead to the need to install relatively expensive and large-sized capacitors; to optimize the circuit, experimental testing and selection of elements is desirable. To protect the contacts of an electromagnetic relay, you can use this nomogram. Using the known power source voltage U and load current I, two points are found on the nomogram, after which a straight line is drawn between the points, showing the desired resistance value R. The capacitance value C is measured on a scale next to the current scale I. The nomogram provides the developer with fairly accurate data, with For the practical implementation of the circuit, it will be necessary to select the closest standard values for the resistor and capacitor of the RC circuit.
How to fix the problem
If the sockets spark, you need to call an electrician or try to fix the problem yourself. First of all, turn off the power to the panel and warn the apartment residents about the repair. To inspect the contact part, you will need to remove the front panel. Procedure:
- Check the condition of the wires; oxidation on the copper must be cleaned with sandpaper.
- Tighten the screw terminals with a screwdriver and bend the contact plates.
- Inspect the wiring; if there are exposed areas, cover them with insulating tape.
- Secure the structure with the set screws located on the sides.
You can check the quality of the repaired structure by inserting a plug. A tight crimp of the pins indicates that the main problems have been eliminated. After the electricity supply is restored, the point is checked by turning on a medium-power appliance, such as an iron. If the result is satisfactory, it is recommended to periodically monitor the condition of the plug connector.
If the contacts and plastic are blackened and charred, it is better to replace the socket. If the standards do not meet, you will have to buy a modern electrical installation product of a suitable type. It will ensure normal use of household appliance plugs.
It is impossible to increase the power of the outlet, so to connect electric boilers and furnaces, install a structure with a rated current of at least 16 A. If the power of one point is not enough, several should be installed. The socket block is safer than the tee.
Dismantling
Disassembling the socket is carried out in the following sequence:
- turn off the power supply to the outlet and check the absence of voltage with a phase indicator;
- unscrew the screws securing the front panel and put it aside;
- unscrew the screws that regulate the position of the spacer legs;
- remove the inside of the socket and inspect it;
- If necessary, disconnect the wires from the terminals by unscrewing the corresponding screws. If a 3-wire wire without color marking of the wires is connected to the outlet, you must mark the ground in some way before disconnecting it.
If the repair of an outlet is caused by the fact that the devices connected to it work intermittently, you cannot rely on the readings of the phase indicator. It is possible that the wire has become disconnected from the terminal while remaining energized. Caution should be exercised until the socket is disassembled and the wires can be inspected directly.
If the socket is only loosened, an attempt is made to do without dismantling: screw in the screws, spreading the spacer legs wider. If this ensures that the socket does not move, it is reassembled in the reverse order.
If there is no positive result—the socket box is deformed or loose—a new one is installed instead. In old houses, there may be no installation box: the socket rests with spacer legs on the concrete or brick walls of the hole, and they tend to crumble.
Debris found in the socket - the remains of cockroaches, spiders and other insects - is swept out with a brush: in the future, if there is a problem with the socket, they may flare up.
Consequences of sparking in an outlet
in the socket, the appearance of sparks and melting of the structure can lead to a short circuit. In the worst case scenario, it causes a fire. A bad contact will knock out the machine and melt the insulation of the electrical wiring. Voltage drops lead to breakdowns of household appliances, laptops and computers. A faulty electrical installation is dangerous to human health.
When making sockets, manufacturers include a safety margin. This applies to original products. Counterfeits or goods of unknown manufacture may break in a short time. After the first sparks, crackling or humming noises are noticed, a good socket does not need to be replaced. It is necessary to check its condition and troubleshoot problems.
Inconsistency of standards
One of the simplest causes of sparking can be considered a difference in standards between the electrical plug and the outlet itself. The fact is that since the times of the USSR there have been two main standards: Soviet (C) and Schuko. The difference between them is the cross-section of the plug electrodes. At first glance, the difference is not too great, but at the same time, this run-up becomes the reason for loose contact between objects. If the Shuko plug fits tightly into the Soviet sockets, there will be no problems, but feedback may cause the socket to spark when the plug is turned on.
Software method for eliminating button chatter
The easiest way to deal with the problem of button chatter is to pause. We simply stop and wait until the transition process is completed. To do this, you can use the delay() or millis() function (for detailed information, you can refer to the article on using the delay() and millis() functions in Arduino). 10-50 milliseconds is a completely normal pause value for most cases.
int currentValue, prevValue; void loop() { currentValue = digitalRead(PIN_BUTTON); if (currentValue != prevValue) { // Something has changed, there may be a zone of uncertainty here // Make a delay delay(10); // Now we calmly read the value, assuming that the instability has disappeared currentValue = digitalRead(PIN_BUTTON); } prevValue = currentValue; Serial.println(currentValue); }
In this example, we used a delay in the program in order not to react to random bursts and to determine the real change in the signal.
Fighting button bounce using the Arduino library
The problem with bounce is so popular that there are special libraries in which you do not need to organize waits and pauses manually - this is all done inside a special class. An example of a popular library for dealing with button bounce is the Bounce library.
Example of using the library:
#include ; #define PIN_BUTTON 2 #define PIN_LED 13 // Create a Bounce object debouncer = Bounce(); void setup() { // Set the pin type pinMode(PIN_BUTTON, INPUT_PULLUP); // Let the library know which pin we connected the button to debouncer.attach(PIN_BUTTON); debouncer.interval(5); // Interval during which we do not receive values from the pin //Setup the LED : pinMode(PIN_LED, OUTPUT); } void loop() { // Let the library object know that the state needs to be updated - we have entered a new loop debouncer.update(); // Get the value of the button int value = debouncer.read(); // Now we know exactly what state our button is in if ( value == LOW ) { digitalWrite(PIN_LED, HIGH ); } else { digitalWrite(PIN_LED, LOW ); } }
Low quality
The second, no less obvious influencing factor is the low quality of products. This reason applies to cheap Chinese fittings. The assembly of the products in this case is quite poor: the contacts are poorly tightened, the metal parts are very thin, the plastic is soft, and the fasteners themselves are unreliable. The result is poor contact between the plug and the power source, which causes the socket to spark when the plug is turned on.
The solution to this problem is simple - replace Chinese products with more expensive ones. We recommend giving preference to manufacturers of sockets and switches such as ABB, Legrand and Jung.
Worn wiring
The next reason for an outlet to fail is the deterioration of the electrical wiring in the house (or apartment).
If the diameter of the cores is small, then you should not connect powerful electrical appliances (for example, a microwave), otherwise the line will simply not withstand the current load, as a result of which the outlet will begin to spark. Here you need to first inspect the old current-carrying line and, if necessary, replace the electrical wiring in the house. Correct replacement is carried out based on calculation of the cable cross-section for power and current.
Why is zero heating dangerous?
If the zero heats up, it can burn out. In a single-phase network this is practically not dangerous; in the worst case, a zero break will simply occur and two phases will appear in the socket, as described above, and accordingly your wiring will not function. If the neutral wire in a three-phase network burns out, for example at the entrance electrical panel, a phase imbalance will occur. As a result, the voltage in each phase can significantly exceed the nominal 220 volts, which can cause your household appliances and other electrical appliances to fail.
Heating also occurs during twisting, especially if aluminum is twisted directly with copper, in which case you need to use terminal blocks or a bolted connection. In this case, direct contact of copper and aluminum is eliminated by placing a washer between them.
Now you know why the zero in the electrical wiring heats up and how to eliminate this such a dangerous phenomenon. If you detect excessive heating, immediately begin to search for the cause that caused the emergency, or call an electrician, because further developments could be disastrous!
Screw clamps are loose
Any dismountable product tends to wear out over time. All screws, latches, springs are unscrewed and weakened over the entire period of operation. The result of this, again, is poor contact of the electrodes with the network, as a result of which you can see how the socket sparks on its own (without plugging in the plug).
If the wiring consists of aluminum conductors, then the screw terminals need to be tightened several times a year, because aluminum tends to “leak”, as a result of which the contact weakens, from which it begins to spark. The connectors themselves where the plug is inserted may also be worn out. The plug is fixed using special clamping jaws, which unbend when frequently connected/disconnected. In this case, you need to bend them inward with pliers.
These two reasons are the most popular, and if sparking is detected in time, the situation can be saved by ordinary repairs. If you have already disassembled the outlet, carefully examine all other elements of the structure: perhaps intervention will be required somewhere else.
Electric motor design and operating principle
The magnetic field is created by the stator.
The main element of its design for a DC motor is a permanent magnet, for alternating current it is an excitation winding. The rotor (armature) has its own winding, to which voltage is supplied using a brush-commutator unit. The interaction of magnetic fields causes the rotor to rotate.
The collector consists of a set of contacts, which are copper plates located directly on the rotor. Micanite or mica cuffs act as insulators for each individual contact. Graphite brushes are sliding contacts pressed against the commutator.
Current overload
Another, no less banal reason that the outlet sparks is carelessness when purchasing a new device. Each product has its own letter marking, as shown in the photo below. The rated current must be indicated on the case (for example, 16 A). This means that the current load from electrical appliances should not exceed 16 amperes. Otherwise, problems may arise, including sparking of the product when a plug is inserted into it. If you connected the sockets together with a cable and noticed that one of them heats up when you remove or plug in the plug, then the electrical installation was incorrect (for example, you chose too small a cross-section of wires or did not tighten the cable properly). It is advisable not to connect adjacent sockets to each other, but to branch wires to each electrical point from the distribution box.
To choose the right electrical accessories, remember the following calculation: 1 ampere can withstand no more than 220 W of power. In total, a 16-amp device can withstand approximately 3.5 kW, which is quite enough to install a washing machine or an electric boiler.
A few more important points should be noted here. If you buy, for example, a double socket and it says 16A, this does not mean that each socket can handle that current. In this case, the rated current is divided between both sockets. The second, no less important point is to take into account the current parameter when connecting the extension cord. Very often, people connect the carrier to 5 outputs, each of which operates a powerful electrical appliance. If the power exceeds the maximum possible, the product will begin to spark and quickly fail!
Preparing the wires
It is advisable to bite off the ends of the cores that were previously clamped in the terminals, even if there is no charring or other signs of overheating on them. If they are pressed into the terminal again, they may break off.
If an aluminum cable is connected to the outlet, it is advisable to switch to copper, for two reasons:
- fragile aluminum, when fixed in the terminal, deforms faster and is more prone to breakage;
- Usually sockets are equipped with brass contact elements, and when aluminum communicates directly with brass, as with pure copper, both materials are destroyed due to an electrochemical reaction.
Copper pieces are connected to aluminum wires in one of the following ways:
- with a special sleeve for crimping of the GAM brand (aluminum-copper sleeve). The geometry of the sleeve takes into account different cross-sections of wires for the same load. For example, in a sleeve with an “aluminum” input of 4 mm2, the “copper” one is designed for a wire with a cross-section of 2.5 mm2. The sleeve is fixed on the conductors with special press pliers, then a heat-shrinkable tube is installed as insulation (can be replaced with electrical tape);
- spring terminal. A special one is also required, marked “Al Cu” (aluminum - copper).
There are two types of terminals:
- disposable. The spring-loaded contact automatically clamps the core upon insertion. It cannot be removed without damaging the terminal;
- reusable _ The wire is fixed by turning the lever. If it is necessary to dismantle the terminal, turn the lever in the other direction.
If the wire sticking out of the wall is too short, it is extended using the same methods - using a sleeve or terminal, or, if it is copper, twisting and then soldering.
Before connecting to a socket or another conductor, the end of the core is stripped of insulation and cleaned to a metallic shine. If it is determined that a thin cable with a core cross-section of 1.5 mm2 (used to power lighting networks) is connected to the socket, it is better to replace it with a wire with a cross-section of 2.5 mm2 or more. Otherwise, the wire will heat up when you turn on a more or less powerful device.
How to avoid problems?
Above we have provided the main reasons why the socket sparks when the plug is turned on and how to repair the product yourself. Now I would like to talk about how to avoid these problems, and in other words, about preventive measures.
- Check your electrical wiring at least once a year. A visual inspection will allow you to prevent trouble in time.
- Inserting and removing the plug should only be done when the power to the electrical appliance is turned off. The course of action is as follows (using the example of a TV): connect to the network, turn on the button and vice versa - turn off the button, disconnect from the network.
- Install a circuit breaker on the outlet line, which will prevent current overloads and save not only the power source, but also household appliances.
- In wet rooms (for example, a bathroom or bathhouse), install only waterproof devices.
What could be the consequences?
If you do not detect in time that the socket is sparking on its own or heating up, then the result can be disastrous consequences. First, the plastic case will begin to melt, at the same time the contact will slowly burn. In the future, the electrical wiring will ignite, which will cause a fire.
In addition, no one can rule out electric shock and short circuit, the damage of which can be quite large-scale.
That's all I wanted to tell you about what to do if the socket sparks when you turn the plug on and off. Before starting repair work, you must turn off the power to the room so as not to receive an electric shock. We hope that the information was useful to you and was used only for self-development.
Related materials:
Required Tools
For simple wiring work that can be done at home, you need a very small set of tools:
- Voltage indicator. Electric current is invisible to the eye, and not everyone can determine its presence by touching a conductor without consequences. For a preliminary assessment of the condition of the wiring, the simplest indicator will do, but it is better if it is a sensitive device that responds to an electromagnetic field - sometimes you need to find out which way the wire goes from the socket.
- Dielectric pliers. It is generally accepted that they are distinguished by the presence of rubber covers on the handles, but now even standard plumbing tools are equipped with these so that they do not slip in the hand, so on paper those that have been verified are considered dielectric, but in practice they are simply insulated. If you only have old pliers at home with non-insulated handles, then you just need to wrap them with electrical tape. In this case, you must first apply a couple of pieces of tape crosswise to the lower part of the handle, and then wrap it around the main part.
- Screwdrivers - Phillips screwdrivers are most often used, but a regular straight screwdriver can also be useful.
- Knife. The smallest one will do - it is only needed for cleaning the insulation from the wires.
- Hammer and pry bar. They are needed as a last resort if you have to poke around the walls in search of distribution boxes, but as practice shows, they will come in handy in any case - at least as stands.
This set should be enough, but if a standard probe is used, then you will also need some small device to additionally check the socket - at least a table lamp. You can also prepare a piece of wire so that it will last from the outlet to the far end of the room - you may have to ring the wires one at a time.