The construction of any structure must be approached with all responsibility, and therefore it is worthwhile to equip a buried foundation. The foundation for a house is a structural necessity, which, if properly executed, will help the structure last for many years on any soil.
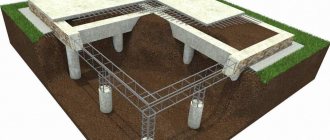
Scheme of a buried foundation
What are the consequences of non-compliance with technology in the arrangement of this necessary element of any serious development - distortions, deformations both vertical and horizontal, excessive consumption of material, cracks and shrinkage. There are several types of buried foundations, differing in design features.
Recessed strip foundation
This base is in the form of a tape, which is deepened into the soil, and is equipped in cases where it is intended to make a basement floor in the building. In this case, the recessed strip foundation itself serves not only as a support for the structure, but also as walls for the basement, in which it is planned to arrange a basement or living space. There is another positive side to the buried foundation strip - the ability to build a building on almost any type of soil, even with very complex terrain.
Various options for installing a strip recessed foundation
The positive aspects of using this type of foundation are obvious. Therefore, it is worth considering in detail the step-by-step process of constructing a strip buried foundation.
Arrangement of the base in the form of a tape
There is nothing overly complicated in arranging a foundation of this type - it is a strip in the ground, which can consist of blocks or solid reinforced concrete. The tape rests on a special sand cushion located at the bottom of the trench.
If we want to look at this type of base in cross-section, we can observe: on a cushion of 10-15 centimeters lies a block of concrete with reinforcement from reinforcement located across the block.
This monolith is located along the entire perimeter of the building; in some cases, when the specific gravity of the building is too large, a monolithic slab is poured, which connects two opposite walls - a transverse tape.
Scheme of the foundation structure in the form of a tape
Determination of belt depth
Strip foundations with a large depth of the foundation base are poured on soils that can support such a heavy monolith, these are:
- rock;
- clay;
- loam;
- soil containing rocky debris.
It is worth saying that the depth of the foundation strip is mainly influenced by the level of freezing of the ground in a given area and the weight of the structure, which depends on the material for construction. For this reason, if a wooden house is being built, then the foundation strip does not lie deeper than twenty meters; if the structure is concrete or a brick house, then the laying depth is eighty meters. From this we can conclude that the foundation depth varies between 1.2-2 meters.
Groundwater
You have decided that your house will have a basement, no matter at what stage of construction. Be sure to determine the groundwater level, otherwise there is a high risk of “drowning” all investments. In the middle of the hottest month (if possible), dig a hole 1.5–2.0 m deep and see if there is water at the bottom. Observe for at least 24 hours. If this is not possible, interview neighbors who have already built basements. In the video you will see how to correctly measure the groundwater level and organize drainage.
The decision to build a basement below the base of the foundation is up to you; refusing it means cutting costs in half, and laying it out and thinking about it in advance means saving on additional technical premises on the first floor of a two-story house.
Types of foundation strips and material of manufacture
There are two types of strip bases:
- monolithic - which can only be installed directly on the construction site;
Example of a monolithic foundation - prefabricated are standard foundation blocks produced in a factory, the so-called “FBS”.
They are brought to the site and, using cranes, installed in several strips into a trench; the lower strip of blocks is shaped like a trapezoid. In addition, there are several types of material:
- rubble concrete is concrete strips with aggregate, which consists of large fragments of brick, boulders or large river gravel, acting as reinforcement;
- reinforced concrete is concrete grade B150-B300, the reinforcement in this situation is iron reinforcement. These two types of foundations are considered the most popular, as they can support the heaviest buildings on any soil. Concrete is the most popular material in construction, as it is inexpensive and at the same time has excellent quality characteristics;
- brick - the material is used if monolithic formwork work cannot be carried out in specific conditions. Can only be used if the building is no higher than five floors, with lightweight building material.
We deepen the old foundation using the brickwork (rubble) method
Scheme of the construction of a rubble concrete foundation.
The above method is quite complicated to implement, and it is most advisable to use it under existing loads that are insignificant. If all the conditions are met, then first of all they work on unloading the foundation and, if weak sections of the wall are detected, they install a rand beam.
- Next, they proceed to work on small grips (from 1.5 to 2 m), located separately and in a predetermined order, and excavate wells to the depth specified in the project. At the same time, do not forget to temporarily strengthen the walls and dismantle the weak section of the foundation (lower). This is not always done, but only when necessary.
- Next, the soil is removed and temporary fortifications are placed under the foundation. After completing the preparatory work, you can begin to build a new foundation. This must be done while performing mandatory ligation of sutures. All fastenings are removed from bottom to top. The resulting joint between two sections of the foundations must be caulked using a semi-dry mortar of cement and sand. The proportions of this composition correspond to the value 1:3.
How to build a recessed strip foundation yourself
There are several steps that must be completed in order to make a high-quality strip base with your own hands:
Preparation
This stage includes:
- cleaning the area;
- delivery of materials;
- marking the area in accordance with the size of the building, while on a level area you can only use pegs and lacing, but on an uneven area you will have to use a hydraulic level and slats.
Construction of the trench
- dig a trench by hand or with an excavator;
The process of digging a trench for a buried foundation - if an excavator was used, then level the bottom of the trench with a shovel;
- fence the pit;
- fill a 12-20 cm cushion of sand;
- fill the pillow with water and compact it;
- lay waterproofing.
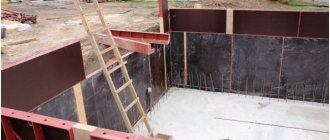
Arrangement of formwork
- make shields from planed boards;
- install the shields and secure them firmly by installing spacers;
- additionally install U-shaped jumpers at a distance of 50 cm;
- check the verticality of the formwork using a plumb line;
Foundation formwork diagram - arrange openings for water pipes, sewerage, and electrical wiring in a private house.
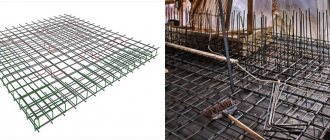
Reinforcement
- take parallel reinforcement bars;
- assemble them into a frame using transverse rods by tying them with wire;
- install the finished frame in a trench with formwork.
Reinforcement installed in such a way that when poured with concrete, a reinforced concrete strip foundation is obtained that will serve for a long time.
Fill
This is done gradually, since it will need to be compacted well to remove air voids that can weaken the structure.
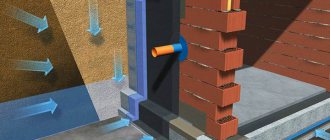
Waterproofing
After the concrete has set, you can remove the formwork, this will happen within about 14 days, and you can begin waterproofing. To do this, roofing felt is cut into strips and the entire concrete structure is covered with these layers, then coated with liquid bitumen.
Foundation waterproofing scheme
The deeply buried strip foundation is ready.
The need for a basement
If during the construction of the building, for some reason, the house did not have such a room, which is extremely necessary for the household, then it is quite possible to equip it after construction, in a building that is in use. To do this, several measures will have to be taken to deepen the basement below the base of the existing foundation. It should be taken into account that realizing the cherished desire of the owners of a country house to arrange a basement will require a significant amount of labor and financial expenses.
Scheme of work on deepening the basement
Columnar buried foundation
This is a pillar that is immersed in the soil to the required height, or concrete poured into a dug hole, forming the same pillar. They can be connected to each other by beams or reinforced concrete tape. Columnar foundations are used in the construction of structures that do not have a large specific gravity, for example, frame houses. The materials used for this type of foundation are:
- wooden poles, which are pre-treated with special anti-rotting solutions;
- brick, which is usually held together with cement-based mortar;
Installation of a columnar recessed brick foundation - natural stones with increased strength;
- high-grade concrete, which, when strapped, allows you to build a building that is quite heavy for such a structure.
A recessed columnar foundation has one positive aspect - the price of this structure will be 40% cheaper, since less material will be used. The negative sides are:
- the design is not so strong and durable;
- inability to arrange a basement;
- walls need to be built between the pillars.
Video about pouring a columnar buried foundation.
Some features
At the moment when you are building a foundation, special attention, in addition to the correct depth, should be paid to the accurate execution of alignment work. In addition, it is mandatory to comply with the technological rules of construction and carry out the correct calculation of the entire fundamental structure, while taking into account all types of loads from the construction site and the qualitative features of the soil, which allow it to accept the existing level of load without being subject to deformation processes.
Calculations and various methods by which foundations are constructed will help you with this. When performing them, the different characteristics of the building materials used and the methods of their installation are taken into account. It is this option that will result in a perfectly suitable technical solution that will make your foundation the most reliable, with a high degree of strength and quite economical.
And, of course, to achieve this goal, it is most advisable to seek help from professionals who have the necessary knowledge in all areas, from engineering to geological. They will also be able to easily apply all the standards in practice, calculate the necessary coefficients and other important parameters.
How to build a columnar foundation yourself
The most common type in construction is a reinforced concrete monolithic columnar foundation; let’s look at how to recreate this structure with your own hands.
- Preparation. The first thing you need to do is clear the construction site. The turf is removed, approximately two meters more in all directions from the intended location of the future structure. You need to remove about 30 centimeters. As soon as the cleaning of the construction site is completed, you can begin planning the horizon; it needs to be made as even as possible. To do this, use a level installed on a long board of 2.5 meters. After this, you can deliver the material to the construction site.
- Site layout. The layout involves transferring the house plan onto the site using pegs.
Marking the area for the foundation
It is necessary to accurately determine the length of the load-bearing structures (walls) - there should be no distortions. Then the angles are set - they should be 90 degrees. To do this, you need to pull ropes along the diagonals, the length of which must be the same. Wooden slats are installed at the site where the foundation pillars are installed; they must be under each ceiling. - Digging holes for a columnar foundation. For this type of foundation, you need to dig a sufficient number of square holes located along the axes. Important! If the holes are more than one meter, then slopes need to be constructed to prevent the soil from collapsing. Shields are constructed from waste boards, installed in the pit on all sides, and secured with spacers. The hole is dug 30 centimeters more than the planned depth of the foundation pillars. The width of the pit should be 40 centimeters larger than the pillar on each side.
Prepared pits for foundation pillars
The foundation pillars themselves are equal in width to the material from which the building will be constructed. At the bottom of each hole, arrange a sand or gravel cushion; it will protect the future foundation from winter heaving. Each pillow needs to be well moistened and compacted. Next, waterproofing is installed to prevent water from leaving the concrete when pouring. To do this, you can use roofing material or polyethylene of 20 microns in two folds. - Arrangement of formwork. Planed boards 40 mm thick with a moisture content of at least 25% are used for formwork. You can also use plywood or OSB boards, which are coated with water-repellent impregnation. In some cases, iron structures are also used, but they adhere more strongly to concrete, so their use is not advisable.
Formwork for foundation pillars
Install the formwork strictly perpendicular to the base of the foundation; this can be checked with a plumb line. Some builders do not install formwork, but this is only possible if the soil is dry and does not tend to crumble. But in this case, it is necessary to waterproof the walls of the pit to prevent water from leaving the concrete. You can also use an asbestos pipe with a cross-section of 100 mm; in this case, concrete will be poured directly into the pipe, which will remain in the ground along with the foundation pillar. Important! If the formwork is made of wood, then before pouring concrete they are generously moistened. - Installation of reinforcement. Reinforcement of pillars is best done with reinforcement with a cross-section of 12 mm with clamps arranged at a distance of 25-30 centimeters. For clamps, you can use wire with a cross-section of 6 mm.
Install the reinforcement poles into the hole strictly vertically. The reinforcement should be of such length that it protrudes from the foundation by 10-15 centimeters. This is necessary so that the reinforcement for the monolithic grillage can be welded. - Pouring concrete. This process is carried out in the same way as when pouring a strip foundation, in layers with mandatory compaction, using a manual vibrator.
- Arrangement of the grillage. For its arrangement, a reinforced concrete rand beam, prefabricated or monolithic, is used. As soon as the foundation is ready, you need to check the horizon of the seismic belt; if there are deviations, it is removed using a solution. As soon as the surface is leveled, you need to arrange a layer of waterproofing, as in a strip base.
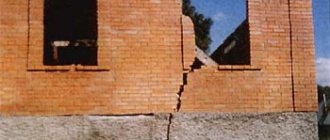
The walls of the house are damaged
This problem relates to the first one - uneven subsidence of the structure. The solution is similar - strengthening the wall thickness, adding piles. In the case of the wrong choice of foundation, in some cases it is more effective to replace it. This is a complex process, but necessary to ensure the safety of the facility.
When piles deviate from the design position due to soil heaving, the following actions are taken depending on the situation:
- Replacement of pillars and installation of grillage with new ones;
- Adding piles in areas of subsidence;
- Insulation of the blind area or its arrangement on a thick sand and gravel cushion.
In general, shrinkage with some deformation of the walls is normal in the first year or two.
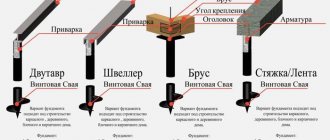
Recessed pile foundation
This type of foundation uses individual piles or groups of piles, which are connected to each other by a beam or slab - a grillage. A buried pile foundation is constructed if other types of foundations cannot be constructed due to instability of the deep soil, for example:
- wet sands;
- quicksand;
- soil prone to severe subsidence.
A pile foundation with a recessed grillage is used not only in multi-story construction, where buildings have a large specific gravity, but also in private construction. In this case, reinforced concrete piles of short length or wooden ones can be used for piles. Piles differ by type:
- driven piles - driven in with a pile driver. This kind of piles is used in undeveloped areas, if there are no buildings nearby;
The process of driving foundation piles - poured - concrete is loaded into an already prepared well;
- pressed - presses the pile into the ground under high pressure using a hydraulic pump;
- screw piles - screwed into the ground using a special machine - a drill.
The screw pile has a thread at the end, and they are successfully used not only in the construction of buildings, but also for bridge supports, mast and tower foundations, as well as for power line supports. This type of piles can be laid to any depth and in different soils.
This foundation cannot be called cheap, since its arrangement requires the use of special equipment not only for installation, but also for transportation. The positive thing is that the arrangement does not require excavation work or a large amount of material. In addition, there is no need for reinforcement, which reduces labor costs.
Operating principle of a screw pile
Even the largest building can be screwed into piles in one day, which reduces the construction period to a minimum. There is no need to wait for the concrete to dry.
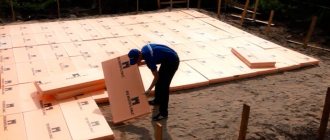
Cold floor on the first floor
During the construction of the foundation, errors may be made in the insulation of the basement, which leads to cooling of the ceiling. There are several solutions to the problem:
- Insulate the floor as much as possible;
- You can work on the basement insulation from the inside - it is not necessary to dig out the walls from the outside. To do this, polystyrene or mineral wool slabs are attached to the basement ceiling.
The problem is especially felt in houses with pile foundations, where walls may be completely absent. In this case, the best option is to equip the walls with insulation.
Arrangement of a pile foundation
In this case, the most labor-intensive process will be to deliver the required number of piles to the site, drive a special drill and mark the site. There is no need for any preparatory earthwork to level the site horizon. Before installing a pile foundation, you need to mark the area; the plan for this work was described earlier and is no different. Piles are installed in the corners of the building and along the walls every 1.5 meters if it is a light country house. With a heavier structure, you need to reduce the distance to half a meter.
Ready mounted pile foundation
Once all the piles are installed on them, a long board is laid and the installation level is checked.
TISE technology
These foundations are considered multi-purpose; there are no soil restrictions for its construction. With his assistance, it turns out to build any structure on all foundations, except rock foundations. The TISE foundation creates a zero level on the most difficult, heaving-prone soils,
The TISE foundation is excellent for the construction of structures that will be located close to highways or railways.
It does not experience strong pulsations and performed well in difficult conditions. The cost of a TISE foundation is several times less than a conventional one.
TISE technology device diagram
When creating it, practically no work with the ground is required, and a lot of concrete is not needed for its construction. TISE technology involves assembling a base structure from ready-made blocks. The video describes the process of installing a pile foundation with your own hands.
Destruction of concrete
During operation, sometimes another problem arises - the destruction of the concrete layer of the foundation (tape, grillage, reinforced concrete pillars). Moreover, we are not talking about old buildings, but about new ones.
Possible reasons:
- Use of concrete of a lower grade than required structurally;
- Thin protective layer of concrete;
- Poor waterproofing.
The danger lies in weakening the structure and reducing its load-bearing capacity, as well as oxidation of the reinforcement.
It is possible to determine how good the concrete was used even at the construction stage: suppliers must include an accompanying document (passport, certificate of conformity); also, when preparing the solution or receiving it, it is recommended to make samples of 10x10x10 cm to test the stone. In the absence of both, the quality of concrete can only be determined instrumentally with the help of experts.
A thin protective layer is visible to the naked eye: in places where the reinforcement is exposed, you can measure the thickness of the stone - it must be at least 2 rod diameters.
The lack of waterproofing is also noticeable: the surface is wet and crumbles like porridge or flakes.
Troubleshooting:
- Strengthening the foundation with an additional layer of concrete after draining the layer and knocking down the damaged stone.
- It is advisable to change the foundation under the house if the problem is weak concrete. Only specialists can cope with this task by raising the walls and completely replacing the structure.
- In case of poor waterproofing, the concrete layer is renewed, after which work is done on gluing or coating the structure with bituminous polymers.
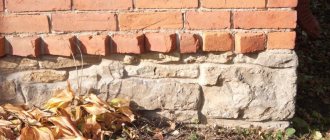
Restoring the foundation under an existing house - causes of destruction and repairs
The appearance of cracks in the base and slight distortion of window or door openings indicates deformation of the base of the building, which poses a certain degree of risk that threatens the collapse of the load-bearing walls of the old house. The installation of gypsum beacons will help you determine independently whether there is constant deformation of the foundation of the house or whether it has stopped. They are applied across the cracks, and if the surface of the control marks has not undergone destruction within several weeks, it can be judged that the deformation processes have ended. In this case, they make do with sealing the small cracks that have formed with cement mortar. However, if the gaps are deep, then a major restoration of the foundation will be required.
Planning our possibilities
Do not leave the pit until next year - this may reduce its strength.
Before starting any construction, it is necessary to carefully plan the entire course of work. To do this, you need to know how to carry out the work correctly and in what sequence. The most common mistake is soaking the pit or installing a strip foundation without a house.
Sometimes, a foundation pit is dug ahead of time, and the construction of the foundation itself is postponed until next year. This is usually done to save time, so that you can start pouring the foundation in early spring into a dug trench, without waiting for the soil to completely thaw. Such actions can lead to a decrease in the strength and load-bearing characteristics of the foundation. The full cycle of work on installing a strip foundation, from digging a trench to backfilling, should be completed in one season as quickly as possible. To learn how to prepare a foundation pit, watch this video:
Sometimes there are situations in which, after installing a concrete foundation, construction is frozen for several years. If the object is properly preserved, losses will be minimal.
Preparatory work
Groundwater
At whatever stage of building a house the decision to build a basement is made, it is important to find out the groundwater level so that there is no flooding of the underground premises.
In summer, when the water level is low, a hole is made 2 meters deep into which the slats are lowered. A day later, it is removed and the bottom is checked for the presence of water. If you have neighbors nearby, you can ask them for this information.
Recessing basements below the base of the house is the business of every owner, and refusing to build such a room saves the estimate by at least twice. And such an underground room, thought out at the design stage of a house, can make the house more spacious and expand the possibilities for arranging the first floors.