Anyone knows that the stability and durability of a building depends on how competently and accurately the foundation is laid. It takes on a static, uniformly distributed load throughout its entire service life. The deformation of linear stresses is controlled by the reinforcement located inside, and the compressive loads on the foundation are absorbed by the concrete.
Knitting reinforcement for a strip foundation is the best option for fastening the metal component of a future building. These connected metal rods of different diameters, after filling the formwork with cement concrete, retain the spatial linear contour given to it when knitting.
When concrete gains the required strength, this reinforcement allows it to maintain the desired location under load. If the fixation was carried out by welding, then when the cement concrete vibrates, the welding reinforcement seam may separate. This will create the possibility of tension within. Because of this, it may collapse prematurely.
Features of strip foundation
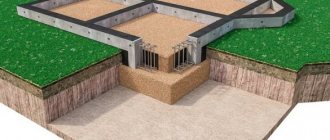
Strip foundations are more common than monolithic foundations. It can be used in construction from different materials, or you can make it yourself. Also, during its construction, money is simply saved. But it also has a drawback. The production of strip foundations is only suitable for dry, rocky soils. In wet, unstable soil, a device to a greater depth will not be cost-effective.
A strip foundation is a reinforced concrete slab of any selected dimensions. The dimensions depend on the pressure the future house exerts on it. During construction, foundation preparation is important. In addition, the reinforcement knitting pattern must also be strictly followed.
In order to avoid subsidence of the base and premature destruction, and possibly the house itself, additional compaction is performed to ensure the necessary strength of the base. If necessary, the strip foundation is supplemented with internal load-bearing lintels.
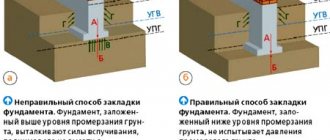
The depth at which the strip foundation is installed depends on several factors. If the upper soil layers are unstable, then the base of the base is installed below the freezing level. It can also be combined with piles. If the compaction of the base is sufficient, then there is no particular need to immerse the strip foundation below.
Corner reinforcement
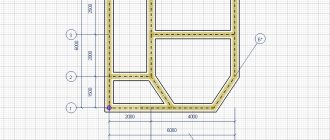
In the design of a strip foundation, the weakest point is the corners and the junction of the walls. In these places loads from different walls are combined. In order for them to be successfully redistributed, the reinforcement must be properly tied. Simply connect it incorrectly: this method will not ensure load transfer. As a result, after some time, cracks will appear in the strip foundation.
The correct scheme for reinforcing corners: either bends are used - L-shaped clamps, or longitudinal threads are made 60-70 cm longer and bent around the corner
To avoid this situation, when reinforcing corners, special schemes are used: the rod is bent from one side to the other. This “overlap” should be at least 60-70 cm. If the length of the longitudinal rod is not enough to bend, use L-shaped clamps with sides also at least 60-70 cm. Schemes of their location and fastening of the reinforcement are shown in the photo below.
The abutments of piers are reinforced using the same principle. It is also advisable to take the reinforcement with a reserve and bend it. It is also possible to use L-shaped clamps.
Reinforcement diagram for adjacent walls in a strip foundation (to enlarge the picture, right-click on it)
Please note: in both cases, in the corners, the installation step of the transverse jumpers is reduced by half. In these places they already become workers - they participate in the redistribution of the load.
Types of reinforcement for tying
Before starting work, you need to decide on the fittings that are best suited. How to properly knit reinforcement for a strip foundation? Tying the strip foundation reinforcement is done with any pneumatic tool or hook. What if they are not around? An improvised tool is used. This is what is good about a strip foundation. Knitting of reinforcement can even be done using pliers.
Corrugated reinforcement is used in the main sections, because it has better adhesion to cement concrete, and smooth reinforcement is used for bonding in cross sections. It will cost a little less than the corrugated one.
Tying metal reinforcement
There are certain rules for mating. When choosing fittings, it is necessary to choose one that meets the requirements of GOST. During construction, a material that complies with GOST-5781-82 is often used. Has six strength classes.
It can be bent if necessary, and also welded using a welding machine. In the manufacture of the first class, low-carbon steel is used, and when the class is changed, the concentration of alloying additives increases, due to which the mechanical strength increases.
Bonding of composite reinforcement
Made from fiberglass, carbon fiber, basalt plastic. It contains fibers of carbon, basalt, as well as glass and aramid. The most common is fiberglass. It is lighter, cheaper, does not rust, does not bend, and cannot be welded with a welding machine. In the absence of welding capabilities, composite reinforcement has to be tied together. The advantage of this type is that it has low thermal conductivity.
Tying fiberglass reinforcement
Bound plastic reinforcement can be distinguished from metal reinforcement by the permissible distributed weight. When choosing fiberglass reinforcement as a reinforcing material, it is necessary to calculate the possible loads because the specific gravity it perceives is significantly different from the weight that metal reinforcement is capable of supporting. The binding process itself remains the same. The same tools and the same accompanying materials are used.
Recommendations
An armored belt for a foundation is a metal structure that takes on the resulting loads and deformations. Technological recommendations will help in its manufacture:
- how to make an armored belt for aerated concrete;
- what mesh to use for the screed;
- what marking of fittings is used during manufacture;
- what is marble concrete;
- what types of couplings there are for connecting reinforcement;
- what is a plasticizer and why is it needed?
Knitting of frame elements, depending on the conditions, is carried out directly inside the formwork or in another place on the construction site.
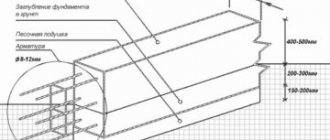
Scheme according to which reinforcement is distributed in a strip foundation
The reinforcement located in the cement concrete distributes the load. Therefore, the quality of the knitting will directly determine how long the structure will last.
Features of the frame arrangement:
- Preference is given to fittings with a diameter of at least 1 centimeter;
- The minimum distance from the frame to the inner edges of the formwork must be maintained, usually 30-50 millimeters;
- Between the rods no more than 40 centimeters;
- The elements that run lengthwise and crosswise are made from smooth rods 6-8 millimeters long;
- Between clamps 10-50 centimeters;
- Compliance with the number of tiers according to SNiP.
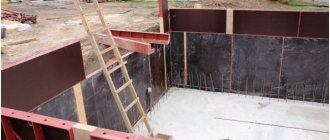
The procedure for creating formwork
The creation of formwork traditionally precedes the implementation of reinforcement.
Formwork can be created for the construction of small buildings from OSB boards, plywood, wood, and fiberboard. When the height is expected to be more than 150 centimeters, it is better to create the formwork from metal. Next, you will need to evaluate how to properly make the foundation. The foundation can be created in a dug trench
The bottom layer of the base becomes sand up to 150 mm high, which will need to be carefully compacted and filled with a layer of concrete of about 4-5 centimeters. When creating the foundation, it is important to consider the location of communications. The bottom of the formwork will be held in place by pegs installed around the perimeter; deviations from the width are best checked with pre-prepared slats. The formwork can be held together with nails driven from the inside, which are removed after the foundation is completed.
Next, it’s worth moving on to reinforcement.
Calculation of wire for the frame
How to knit reinforcement on a strip foundation? It is necessary to ensure that the characteristics comply with GOST 3282-74. It is subjected to heat treatment, after which it becomes plastic without losing its strength properties. The section error is no more than 0.02 millimeters.
Types of wire separation
By processing method:
- Annealed;
- Unprocessed.
Load resistance:
- Group I;
- Group II.
By availability of protection:
- Protected;
- Not protected.
SNIP requirements
Work on reinforcing the corners of the strip base is carried out in accordance with SNiP 52-01-2003. The standards indicate how much reinforcement should be used in each individual case.
For calculations, you need to take the total cross-sectional area of the entire foundation and calculate 0.1 percent of it. The resulting figure is the minimum cross-sectional area of the rod that must be used.
All calculations regarding the strengthening of structural elements must be made at the design stage. If this has not been done, before starting the construction of the foundation, you need to think about its reinforcement, decide on the type of reinforcement and the number of belts.
SNiP dictates the distance between the longitudinal elements of the reinforcing belt (25-40 cm) and the minimum pitch between the transverse jumpers (1/2 of the working section, but not more than 30 cm).
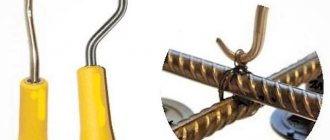
Tools for tying reinforcement
Correct knitting of reinforcement for a strip foundation implies that the nodes must be firmly fixed with wire. If this is not done, then when the cement-concrete mixture vibrates, the knots may finally come undone. This will then lead to increased loads and premature failure.
For a strip foundation, the reinforcement is knitted:
- Hands - crochet;
- Inertia hook;
- With a pistol.
Tying hook
To the question of how to properly tie reinforcement to a strip foundation, you can answer that you first need to choose a good tool.
Crochet hooks vary in shape. The choice of tool is purely individual. Buy it based on your own binding technique. With the wrong tool, your hands will get tired very quickly, and you risk getting calluses.
They are small in size, suitable for tying in both hard-to-reach places and in normal circumstances. When purchasing a hook, take a closer look and try it out right away.
Homemade crochet hook
Homemade hooks are made according to a template, just like models made in production. In their production, reinforcement is used, which is sharpened on the side and bent in a vice. The handle is made from molten plastic and then screwed on. A polymer tube can also be used for the handle.
The reinforcement is knitted with them schematically, reliably, with the obligatory observance of the distance between the nodes. Therefore, homemade hooks are also great for crocheting.
Screwdriver with hook
Using a screwdriver or other semi-automatic tool will speed up the work process and may also help relieve your hands. By tying the reinforcement of a strip foundation with your own hands, you put in more effort, and this can significantly affect your productivity in case of large volumes of work.
The hook is located on the leg. During operation, the hook catches the wire, pulls it upward with force, and the leg, turning, makes revolutions and twists the ends of the wire. The operation is performed until the required tightening of the knot is achieved.
Knitting gun
It is the best tool for the highest quality fastening. But it is quite expensive. It is used by professional builders who cannot afford to waste time. The device has a replaceable spool on which the wire is wound. These coils charge the device.
The big bonus of this tool is its so-called “autonomy”. When working with it, you do not need to connect to the network, which makes it even more convenient. Also, in addition to the high cost, it has another significant drawback. The knitting gun is not used in places with limited space.
Binding with wire cutters
Another way to knit strip foundation reinforcement with your own hands. It is used when it is necessary to tie several wire knots because working with pliers for a long time will make your hands very tired. For large volumes of work, it is much more preferable to use another tool.
Knitting methods (patterns)
First, about the tools for knitting. They will speed up and improve quality. Basic:
Crochet hook (there are two types). Buy a factory one or make your own.
Reinforcement gunThe tying gun automatically grips the bar and automatically ties it. Super! True, you won’t buy it for homework. If you know a builder, contact him for such a thing. To build a bathhouse or a house, it is needed only once, so the investment is unprofitable.
They also use a screwdriver with an attachment: twist quickly, but sometimes it’s not convenient...
Well, now the diagram, or rather the diagrams. Watch your hands, as the magician said:
- a) knitting in a bun without pulling;
- b) tying knots in the corners;
- c) double-row knot;
- d) cross knot;
- e) the node is blind;
- e) fastening the connection. element:
1, 3 – rods, 2 – connecting element. I – front view; II – rear view.
That's all. I hope the article was useful and answers the main questions posed.
Anecdote: - Sir, what an unusual sword you have. - This is fittings, sir...
Subscribe to news, success and the right “tricks” for you!
Wisdom Quote: Laziness makes everything difficult.
Rules for fastening rods
According to this scheme, you can tie the reinforcement:
- The wire is tied in half.
- A hook is inserted through the loop.
- On the reverse side, the end is wrapped around the intersection and also placed in the hook.
- The wire twists.
Recommended rules and methods of work when knitting:
- The rods are pulled up, twisted, the ends are bitten off with wire cutters;
- The wire twists several turns when it is tightly stretched;
- The rods and clamps are tied.
Using paper clips, staples, clamps
If necessary, speed up the knitting using the above-mentioned materials. In these situations, knitting is done by hand without using a tool. Rods with a small diameter can be tied with self-tightening plastic clamps. Universal devices suitable for any sections. They are light, installed by hand and do not smudge. Do not forget that they have low strength and can be damaged at low temperatures.
Advantages of staples and other fasteners of the same type:
- Productivity increases;
- The density of connected nodes increases;
- Easy to use.
The feasibility of strengthening the base
A properly constructed foundation of a building, which is a concrete monolith, has high strength characteristics. Without steel reinforcement, it will not have the required operational strength. Concrete has increased resistance to compressive loads, but can crack under tension.
This is fully compensated by the reinforcement cage installed before pouring the strip foundation at the lower and upper levels of the strip contour. Significant forces are concentrated in the corners of the foundation. That is why proper reinforcement of the corners of a strip-type base is a guarantee of a long service life of the structure and its strength.
Additionally, vertical metal rods need to be installed in the corner parts
Reinforcement installed in the corner parts of the foundation significantly increases the strength characteristics of the structure and compensates for bending and breaking loads. Vertically positioned steel rods support reinforcing chords located at the top and bottom of the frame.
Step-by-step instruction
Before knitting, you need to set up the formwork, concrete it, you need to purchase materials, deliver them and perform a number of other preparatory steps.
Start of reinforcement
List of actions for reinforcement and binding:
- Sorting;
- Cleaning from dirt;
- If necessary, align the rods;
- Cutting into pieces of the required size;
- Tying reinforcement blanks in the plane of the frame;
- Connecting planes to each other.
The diameter of the selected reinforcement and wire is selected based on the total load and the expected dimensions of the strip foundation.
Installation is carried out at the construction site. The four frame elements are tied together with an overlap. As a result, the belt will consist of pairs of twisted rods, which will be vertically and horizontally located.
Laying the finished reinforcement cage
Before installation, you need to prepare the base and place the formwork. Then comes the installation of two belts, which are then both concreted.
Action diagram:
- Driving in fixing rods;
- Sequential stacking of blocks;
- Checking elements.
Core mating
The best options are considered to be a rectangular or square strip foundation. For maximum stability, the reinforcement is made in a square, at 90 degrees. At the corners of the foundation, the production process becomes a little more complicated due to the use of bent rods. The workpieces are attached with bundles (clamps), and reinforcements are attached at the joints. To increase the strength of the house, the reinforcement is bent and overlapped using clamps.
Helpful Tips:
- Pay attention to the reinforced corners of the foundation;
- Use clamps so that the reinforcement cage does not come into contact with the soil and formwork;
- Use metal of the required quality without rust;
- Knit reinforcement with overlaps;
- If the wire is not flexible enough, place it in the fire for half an hour.
Using additional parts for spatial fixation of reinforcement
You should not assume that the use of fixing devices when constructing a strip foundation can be neglected. They form a “protective layer” that will help protect your foundation from corrosion and premature destruction. This seemingly trifle will save the building and a huge amount of money.
Clamps are used to fix the lower plane of the reinforcement frame, laying them on the base, and fixing the side planes to the walls of the formwork. Also for temporary fastening of elements during frame installation.
Another great tool is staples, which are used to tie together rebar intersections. They are very elastic and act in a springy manner. They have a diameter from 2 to 4 millimeters.
When building a strip foundation, it is necessary to take work with reinforcement very seriously. Be extremely careful! It is very important to choose high-quality materials that do not have rust, and when working, strictly follow the technological sequence so that your home lasts a long time. If in doubt, it is better to leave this work to professionals.
How much rod do you need?
Having developed a strip foundation reinforcement scheme, you know how many longitudinal elements you need. They are laid around the entire perimeter and under the walls. The length of the tape will be the length of one reinforcement rod. By multiplying it by the number of threads, you get the required length of the working reinforcement. Then add 20% to the resulting figure - a margin for joints and overlaps. This is how much in meters you will need working reinforcement.
You count how many longitudinal threads according to the diagram, then calculate how many structural rods are needed
Now you need to calculate the amount of structural reinforcement. Calculate how many crossbars there should be: divide the length of the tape by the installation pitch (300 mm or 0.3 m, if you follow the recommendations of SNiP). Then you calculate how much it takes to make one lintel (add the width of the reinforcement cage with the height and double it). Multiply the resulting figure by the number of jumpers. You also add 20% to the result (for connections). This will be the amount of structural reinforcement to reinforce the strip foundation.
Using a similar principle, you calculate the amount needed to reinforce the sole. Putting everything together, you will find out how much reinforcement is needed for the foundation.
You can read about choosing the brand of concrete for the foundation here.
Slab
The frame for a slab foundation consists of two reinforcing meshes, the distance between which is determined based on the selected slab thickness. Each such mesh is a collection of longitudinal and transverse rods of the same cross-section (12-14 mm). Ribbed reinforcement is used to ensure maximum contact with the concrete mixture. The distance between two reinforcing meshes is maintained by jumpers, which can be made from metal corners, scraps of PVC pipes, sand-cement tiles - any materials that are not subject to rotting and are resistant to heavy loads. It is advisable to refrain from using wood. When making a frame for a slab base, as in other cases, be sure to leave space for a protective layer of concrete (50 mm): on top, bottom, on the sides.
Anchoring during dressing
The choice of anchorage depends on the type of reinforcement and the site of the structure. Bending of reinforcement is carried out using a vice or a special machine. All types of reinforcement anchorage and their specific application in corners:
- The least desirable in corner joints is straight. Only for periodic profile reinforcement. This is a simple overlapping of rods and ligation. But if the dressing is done efficiently, then it is acceptable for small buildings. It is important to achieve complete rigidity of the structure; if shifts are obvious when pouring concrete, then the reinforcement was laid poorly.
- Foot - the end of the rod is bent in the form of a right angle.
- Hook – bend 180°. Thus, the end is adjacent to the main part of the rod.
- Loop - the rod is folded in half, the loop is located in the corner.
- Welding of crossbars.
- Additionally, a washer or a steel angle is used.
The last two methods are suitable only for reinforcement suitable for welding, and direct anchoring and claw are only suitable for rods of different diameters.
Types of reinforcement anchorage
Horizontal cross clamps
These rods are assigned structurally and do not depend on the cross-section. It is necessary to take into account the load from the building elements (for massive ones it is better to provide a reserve). According to the same documents as for longitudinal reinforcement, the minimum diameter of transverse rods is 6 mm, but not less than 0.25 of the diameter of the working reinforcement.
The pitch of the rods is assigned to at least 20 diameters of the working rods. For example, with a cross-section of longitudinal elements of 14 mm, the pitch of horizontal clamps must be at least 280 mm. For ease of installation, the rounded value is 300 mm.
The length of the rods depends on the width of the tape and the required protective layer. Fastening is carried out on top of the working reinforcement. Length joining is usually not required.