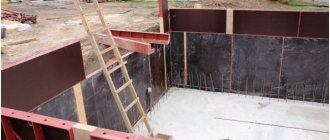
Currently, the most popular type of foundation in private construction is strip foundation. It is quite versatile and easy to construct; even beginners with no experience in construction can build it. The start of construction work is always preceded by the design stage. The quality of the foundation of the house and, accordingly, the reliability of the entire building depends on how accurate and thoughtful the drawing of the strip foundation is.
Everything you need to know about strip foundations
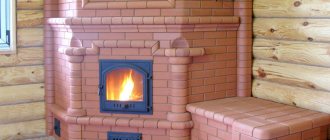
Experts in the construction industry classify the strip type of base as a monolithic base, but only with the exception of one, but very significant difference - cost-effectiveness and accessibility. Despite the fact that the amount of concrete solution required for the work is reduced, the foundation does not lose its strength characteristics and is particularly reliable. Today it is used for the construction of high-rise buildings, industrial and public facilities, and also, of course, in the construction of country cottages of any number of floors.
Differences between an insulated monolithic Swedish slab and a video about its construction
As mentioned earlier, the insulated slab under the house developed by Swedish builders is energy-saving. During its construction, permanent formwork made of extruded polystyrene foam is used. As a result, heat leakage into the ground is minimal. The second fundamental difference is the water heated floor system built into the slab.
Since engineering systems are poured deep into concrete, it requires accurate and competent calculations. High demands are also placed on execution. Even small mistakes are critical. You can make USP yourself, but it is better to order the project. See the following photo for an approximate breakdown of costs. The amounts are no longer relevant, but the percentages are correct. The cost of the foundation project is about 1%.
In the following videos you will see the stages of making a Swedish stove for a specific house. Many useful devices are described that will make work easier, and explanations are given for some of their features.
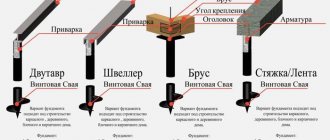
Supports for strip base
Support structures that are used for this type of foundation come in 2 varieties, namely:
- Strip monolithic foundation. The concrete mixture is gradually and evenly poured into the pit;
- Prefabricated strip foundation. In addition to the mortar, ready-made reinforced concrete structures are also used.
Drawing with additional drawings (large scale)
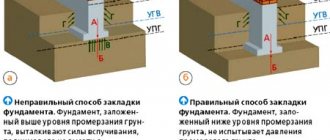
In order to determine how deep the trench should be in this case, it is necessary to be guided by a soil freezing map.
It is different for each area, and if an inaccurate indicator is used during work, then such an oversight can be fraught with shrinkage of the structure or even destruction of the entire foundation. The width of the pit depends on the load that will be placed on the foundation during the direct operation of the house.
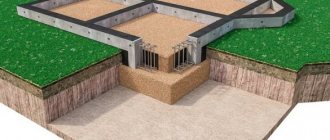
Features of the installation of a monolith on the ground
“Floating” slabs, erected above zero ground level, can be used for various types of soil, but are most effective on soil that is particularly prone to heaving at sub-zero temperatures , as well as in swampy areas.
For example, clay soil, due to its flowability and plasticity, is one of the heaviest types of rocks for the construction of foundations, therefore, for such conditions, it is preferable to use a “floating slab” foundation.
The construction of the load-bearing structure of the slab begins with marking the area and digging a pit to a depth that will correspond to the thickness of the base made of non-metallic materials; as a rule, we are talking about the combined use of sand and crushed stone. Most practicing builders use a traditional layer combination: 20 cm of sand and 20 cm of crushed stone.
If the foundation is built on clay, then the parameters of the nonmetallic pad should be at least 20 cm larger than the slab itself on each side. This is the only way to ensure a sufficient degree of monumentality of the structure.
It is mandatory to lay a layer of waterproofing material on top of the pillow:
- roofing felt;
- several layers of polyethylene and/or extruded polystyrene foam;
- which simultaneously performs the function of a heat insulator.
Then the builders begin installing the formwork, knitting the reinforcement cage and directly concreting.
What should be taken into account during calculations?
In order to carry out calculations correctly, it is important to consider the following characteristics:
- the weight of the future structure. To calculate this indicator, you should be guided by the total weight of the materials that will be used for construction. An important factor is the number of storeys of the structure.
- soil type. It has a direct impact on the degree of shrinkage.
- the degree of load on the foundation during the period of operation.
Constructive section: how to draw drawings and diagrams of individual elements
The structural section is an already detailed part of the project, which contains both general and individual data, various layouts of building elements: foundation, staircase structures, floors, trusses. Also included in this part are detailed drawings of all components, which indicate the specifics of products and materials.
The cross-sectional drawing of the foundation deciphers the dimensions of the strip fortifications of the house, the depth of their occurrence and the materials that are necessary for their construction.
The image of the foundation is presented in the form of the following plans and drawings:
- general foundation plan;
- longitudinal section diagrams;
- cross-sectional drawings.
Certain types of drawings provide a cross-section of floor slabs, their longitudinal and transverse sections at different elevations:
- overlap plan at point +0.00;
- at + 3.00;
- at an altitude of +6.00.
At the constructive stage, layout plans for the foundation, floors, and trusses are made.
Assemblies of structural parts are objects of a special structure, including stairs and flights both outside and inside the premises. Accurate calculations for strength and static strength are also given here.
This section of the project contains in separate tables the characteristics and sequence of use of materials, in particular:
- steel reinforcement;
- reinforced concrete elements;
- wooden crossbars.
Making a plan correctly
When creating supports for a strip foundation, the drawing must meet the following requirements.
- When determining the most appropriate scale, it is highly recommended to choose either 1 in 100 or 1 in 400.
- Before starting construction work, the site should be marked.
- If you plan to create a house or public structure with columns, be sure to indicate this designation and section on the drawing.
- All lines on the paper must be clear and precise, the thickness of each of them is 0.5-0.8 millimeters.
In the general diagram there must certainly be a designation of the sole, as well as the places in which various bulges or depressions will be located. This is important in order to calculate the location of communications from central highways.
Such holes and protrusions must be displayed on the diagram as contours and broken lines. Explanatory notes and footnotes may be provided if necessary.
Siding installation procedure
Once you know how much the work costs, purchase the necessary materials and tools, and you can begin construction. The building base is covered with siding as follows:
- First you need to install the sheathing. A metal profile is used for this. During installation, attention should be paid to each fastening unit. It is possible to use a wooden frame, for example from timber, but keep in mind that such sheathing will be less durable. The tree tolerates winter worse.
- Place thermal insulation between the slats. Also consider waterproofing. If you are building a wooden house, pay special attention to the joints. Each node must be carefully worked out.
- Next, attach the starting rail to the sheathing 8 cm above the bottom point of the cladding. Using a building level, make sure that it is strictly horizontal, then install the corner strips. Make sure they are secured strictly vertically.
- Place the siding panel on the starter strip and slide it into the corner strip, securing with self-tapping screws.
- Insert the second panel into the starting strip and slide it towards the first. Carry out the fastening in the same way as the previous point.
- Cover all remaining walls.
- Install the finishing strip.
- Install the last panel. If necessary, cut it to the required size and insert it into the corner and finishing strip.
- If the base of the house is protruding, i.e. it is wider than the wall of the first floor, then install the drain plate at the very end of the work.
Complex sections of the circuit
If you are planning to build a capital and large-scale structure, then it will most likely require the creation of a complex prefabricated or monolithic foundation. As a rule, such diagrams cannot be contained in one drawing. Therefore, experts in the construction industry strongly recommend developing separate plans for complex areas. Alternatively, you can apply additional centerlines and section designations (if necessary) to the main plan, as well as create large sections on the sheet, having previously made a mark about this. In addition, depending on the degree of section, it is recommended to choose a scale of 1 to 20, 1 to 25, or 1 to 50, in order to get the section and complex structural elements as close as possible.
Drawing the second floor
Here everything will be much easier - after all, the rooms in the house can be located identically (the most important thing is not to change the relative position of the bathrooms - in order not to complicate communications). It will be enough to design the location of the front door (many architects recommend making two entrances to the second floor - at home and from the street) and windows.
Step 5: We plan the premises of the second floor in the same way. Don’t forget about communications - we place the bathrooms and bathrooms one below the other
Step 6: Place the Doors
Step 7: draw the second floor windows
We received this 3D model of the second floor
Additions to the scheme
If you are going to create a monolithic or prefabricated type of strip base, then, to clarify the drawings, you should accompany them with the following technical documents:
- Scheme of reinforcement of the site based on the future load of the structure on the foundation;
- An application that displays the design features of a structure;
- Advisory explanations regarding preparatory work on the site;
- Tables and diagrams that are necessary for waterproofing and thermal insulation of foundations.
- Data on load standards on foundation supports.
Protective materials
The foundation waterproofing unit can be made of different materials. They are laid out on the protected surface in layers in 2-4 steps. Examples could be:
- paint insulation using material type 1-5;
- adhesive layer type 7 or 8;
- cast with raw materials type 4.
Sometimes a combination of different types of materials is practiced. For example, type 5 asphalt insulation is applied to primed crushed stone with bitumen impregnation. Then reinforcement material (fiberglass) is placed on the cement screed (3 cm) and grout (1 cm). Type 2 paint insulation is applied on top.
Cast
Painting room
Pasting
Determination of the degree of depth
As already mentioned, the depth of the trench to create a strip-type foundation is calculated depending on the scope of application of the supports. Today, two main types of structures are popular – deep and shallow. Once you decide which option is worth giving preference, the corresponding designation should be made on the plan.
- The first type of base is characterized by reinforced reinforcement and is an excellent choice for large structures, the design of which involves the creation of basements, attics or heavy partitions. It is believed that the most optimal indicator of the degree of deepening of a trench for a tape is an indicator that is 20-25 meters higher than the level of soil freezing depth in a particular region.
- The drawings certainly contain information about how deep the tape will be buried. It is important to remember that the amount of consumables for forming buried supports is an order of magnitude greater.
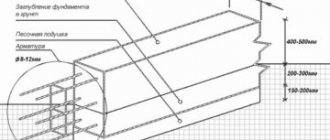
Additional drawing (complex reinforcement)
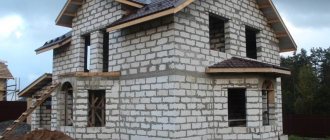
Construction planning
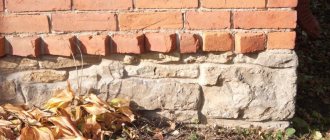
Based on the fact that the base of the house has protective and decorative properties, its construction should be taken seriously. Before starting construction, it is necessary to understand all the characteristics of the structure and draw up a plan.
Height
The standard plinth height is from 50 to 70 cm. A lower plinth level is considered ineffective, and a higher one is necessary in cases where the house has a basement or underground floor. In the latter case, the height of the base can be increased to 1-1.5 m.
Waterproofing
As already mentioned, the key requirement for the construction of the plinth is proper waterproofing, which will prevent moisture from entering the material of the building walls. The issue of waterproofing is especially relevant when building a wooden house.
Ventilation
Ventilation holes provide air circulation in the subfloor. Usually they are made at a level of 15 cm above the blind area.
The holes are sealed with fine metal mesh. Why is this necessary? Firstly, this will prevent pests from entering, and secondly, it will help in the cold winter. The mesh will prevent large pieces of ice from getting into the ventilation.
In some cases, ventilation must be closed during the winter. To do this, additionally equip the holes with valves.
Cost of work
Very often, the main question that concerns the home owner is the question of how much it costs to build a basement. There is no clear answer to this question. The final cost is influenced not only by what materials you will use and in what quantity, but also by where you will purchase them.
In order to determine how much a job costs, you need an accurate estimate. It should include the following aspects:
- price of necessary materials;
- rental or purchase of tools;
- cost of delivery to the construction site;
- work force.
We carry out the calculations ourselves
We assure you that today there is a sufficient amount of information available on the Internet in order to carry out all the necessary calculations as much as possible. To do this, it is absolutely not necessary to be an engineer or have a technical education. With a responsible approach to the issue, as well as being an observant and attentive person, you can easily calculate all the criteria necessary to create, for example, a strip foundation for a non-residential structure or a building envelope. It is important to consider the following:
- Vertical impact on the ground;
- The weight load of the main structure on the base;
- The weight of the roof and rafter system (but only if you are going to build a barn or non-residential outbuilding);
- When creating a foundation drawing, in order to eliminate errors, the results must be multiplied by “2%”. This will help protect against possible shortcomings during the independent design process.
How to make a frame correctly?
Before proceeding with the reinforcement of the strip foundation, drawings of suitable frames should be studied. After all, the strength of the frame determines whether the foundation will serve for many decades or will become covered with cracks in the first spring due to seasonal fluctuations in soil level.
Strip foundation reinforcement scheme
In order not to make mistakes during manufacturing, you need to remember a few rules:
- The overlap (the distance from the place of knitting to the edge of the rod) should be at least 5 centimeters.
- At corner joints, perpendicularly running rods must be connected to each other - in no case should you use two separate blocks that are not connected to each other. The ideal solution would be corners made from bent reinforcement - this type of foundation reinforcement scheme is the most reliable. But for this you need to have special equipment; if the reinforcement has a diameter of 14 millimeters or more, smaller diameters can be bent at home.
- Connections using wire must be tight - if you use a crochet hook, then tighten the wire until it stops so that there is no free space between the clamp and the main reinforcement. Also check with your hand; if the clamp moves when touched, you should make an additional tie with wire.
- The overlap during reinforcement should be equal to 40-50 diameters of the reinforcement. There must be a separation between adjacent connecting rods and the top and bottom layers, according to the design.
- The reinforcing frame must stand level in the formwork. It is also necessary to take care of a protective layer of concrete for the reinforcement, done according to the requirements of the drawing. It should be remembered that the minimum protective layer is equal to the diameter of the reinforcement.
Corner reinforcement scheme
Junction reinforcement scheme
As you can see, the rules are as simple as possible. But some inexperienced builders are unaware or forget about their existence. This leads to the fact that the reinforcement technology of the strip foundation is disrupted and its service life is significantly reduced.
Using a crochet hook
Before reinforcing the strip foundation, it is worth learning how to use the working tool. A special gun is rarely used for private house construction; such equipment requires additional costs. Investing in tools is only beneficial for fulfilling orders, and not when building one house.
For this reason, the most common tool for knitting in private housing construction has become a hook. It will be easier to use if you prepare special templates in advance. This part works like a workbench and makes the work much easier. Things will go faster. To make a template, wooden blocks are required, the width of which is about 30-50 cm, and the length cannot be more than 3 m, since such a workbench is inconvenient to use.
The most common way of knitting is crochet
In the wooden fixture you need to drill grooves and holes that will follow the outlines of the rods in the frame. Pieces of knitting wire 20 cm long are laid out in advance in such holes, and then the reinforcement rods are fixed.
In order to understand the knitting technology, you can consider examples. During construction, two options will be required: for crosses (when the elements are located perpendicular to each other) and for overlap connections. In a strip foundation, the second technology is often needed; when constructing a slab structure, the first will be the most relevant.
Knitting methods
To connect the laid frame into a single whole when joining with an overlap, the hook should be used in this order:
connections are made in several places along the length of the joint, the location of the wire is designated so that it is in the recessed part of the reinforcement profile; the wire is folded in half and placed under the junction; use a hook to hook the loop; the free end is brought to the instrument and placed on it with a slight bend; begin to rotate the hook, twisting the wire; carefully remove the instrument.
For one overlap connection, the procedure is repeated 3-5 times. Connecting the elements at one time, as is done with cross-connection, is not enough. Tying reinforcement under a strip foundation in this case will be unreliable, since fixation at one point does not prevent the elements from shifting.
Proper connection of the frame will ensure the reliability, strength and durability of the supporting part of the building.
Will the services of professional specialists be required to create the drawing?
Of course, a plan for a strip foundation for a residential building requires much more accurate and detailed calculations, which are best left to a specialist. When contacting a master of his craft, you can be sure that the drawing will:
- easy to read;
- as accurate as possible;
- meeting all SNiP requirements;
- containing comprehensive information about the preparatory work;
- having, in addition to the main drawing, technical applications in the form of various tables, diagrams, etc.
In this article, we tried to provide comprehensive information about the process and principle of creating a drawing of a strip foundation for residential as well as non-residential structures. And remember that if you are not confident in your abilities, then do not try to carry out the calculations necessary for such a basis on your own or using unlicensed programs. Saving in this case can be fraught with huge losses or even the destruction of the entire building or fence.
Exterior finishing
Is it always worth finishing the basement of the house? It is believed that even in cases where the base is not considered as a decorative element of the building, cladding is a mandatory stage of work. Many may disagree with this statement, not understanding why additional difficulties are needed when working with a summer house or bathhouse.
Finishing the lower part gives the building a finished look and protects the structural components from destruction.
Thus, the base of a bathhouse or residential building, left without finishing, will not fully fulfill its main protective function; the structural components may not withstand the winter. Modern facing materials have not only aesthetic, but also protective properties. In addition, insulation can be done simultaneously with finishing.
A wide variety of materials can be used to finish the base. In particular, you can consider the method of cladding with siding.
Siding is one of the most budget-friendly materials for external decorative work. In addition, it is of high quality and durability. If you are concerned about how much finishing material costs, this is the most economical option that will fit even into a modest budget.
Correct height above ground
The section of the tape that rises above the ground level is called the plinth.
It is necessary to solve several problems:
- Raising the floor level of the first floor. The height of the plinth determines the installation plane of the ceiling, which most owners want to raise above the ground.
- Protection of wall material from contact with snow masses in winter. If the snowdrifts come into contact with the walls, the materials may become wet and saturated with water, which contributes to the destruction of the house’s structures.
- Giving the house solidity and respectability. A high base makes the house more attractive and increases its size.
Usually the height of the base is made at least (minimum value) 40 cm and above.
Connecting fittings to each other
In addition to overlap welding, it is also possible to overlap reinforcement bars using tie wire. To do this, the rods must be connected with an overlap of at least 30 diameters, and the distance between the centers of such joints must be at least 65 diameters.
The joints of the reinforcement should be staggered so that there are no joints of adjacent bars at the same level.
According to SNiP, at the intersections of the reinforcement, it is also necessary to fasten the rods together with tying wire or ties. It is allowed to knit only 50% of the joints in a checkerboard pattern
This is especially important when knitting reinforcements, when there are not just a lot of such joints, but a catastrophic number and the workers begin to slack. All ends of the rods must be knitted without exception
In seismic areas such as the Krasnodar Territory, all joints must be knitted.
Reinforcement of adjacent connecting structures at corners is the weakest point in reinforcement. Hack workers or simply illiterate workers simply overlap reinforcement bars into a sort of mesh. But corners are not reinforced this way! With such reinforcement, the walls seem to work separately instead of working together, and cracks appear in the corners of the foundation.
Curved elements are used in corners, openings, and edges of structures. According to the rules of both SNiP and the American Concrete Institute, reinforcement can be bent at an angle of 90 degrees on a mandrel of at least 5 rod diameters with a thickness of up to 26 mm; large rods can be bent on a mandrel of 8 diameters. The free bending end of the reinforcement must be at least 12 diameters. You cannot bend reinforcement, one end of which is embedded in concrete. Well, in private construction you won’t find 25 reinforcement, so this is more of a theory.
The hacks find a way to deceive here too - they heat the rods over a fire, autogenous, for easier bending. Some even file with a grinder. As you yourself understand, such reinforcement is no better than laying it in a “mesh”.