Plastic pipes are light, durable and practical to use - they are very often used in repair work and plumbing.
Do you know where else they can come in handy? If after carrying out the work you have small pieces of plastic pipes left, find a use for them by making an original and useful craft from them.
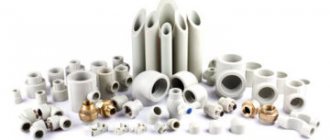
What types of plastic pipes can there be?
There are different types of plastic pipes:
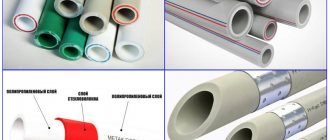
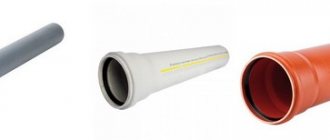
- Polyethylene - PE. They don't like high temperatures. Easily deformed even when exposed to sunlight. Such pipes are suitable for crafts that will act as a kind of decor.
- Polypropylene - PP. The highest quality, have high strength and rigidity. In terms of cost - the most expensive. You can make crafts from polypropylene pipes, but you should take into account the load that they will have to withstand.
- Polyvinyl chloride - PVC. Resistant to chemical attack, have low flammability. Optimal in the ratio of cost and quality. Crafts made from PVC pipes can withstand higher loads than those made from polypropylene or polyethylene.
- Profile - have a cross-section different from round (rectangle, triangle, rhombus, star). Square pipes are especially popular today. They are often used in the assembly of air ducts, ventilation, furniture production, construction, agriculture, etc. Profile pipes have no restrictions in color, which makes it possible to assemble particularly interesting original crafts from them.
What it is
A screen can be called a structure containing various hidden elements. With its help, you can organize skits, performances, use it for a puppet theater, conduct a master class in a kindergarten, and much more.
Handles rails for furniture: sizes, installation options, photos in the interior
In addition to its entertainment function, a screen or decorative fence is actively used for the development, education and upbringing of children. Believe me, any teacher in the kindergarten will only be glad if something similar appears at her disposal. These are truly multifunctional products that, with imagination and experience, can be used for a huge and varied range of applications. Using medical-themed covers, you can organize a lesson on taking care of your health. By stretching thematic canvases, it is easy to stage different performances or stage a whole performance.
Officially, such screens are called nothing less than a developing subject-spatial environment. There is even a state educational standard that it must meet.
Don’t worry, if you have ordinary polypropylene, verified dimensions and the right tools, it will be difficult to violate these standards.
But it is still important to remember that we are talking about a product for children, not adults. Leaving the kids alone near the screen, the teacher or parents should have no reason or reason to worry about their safety
All this is spelled out in the requirements and standards. In relation to the screen they are:
- Safety. We are talking about the stability of the structure and its strength;
- Transformability. The ability of the screen to change its appearance through simple movements;
- Availability. This is not about price, but about the ability of each child to carry out certain actions;
- Variability. That is, the ability to change covers and contents;
- Content and richness. Here, I think, everything is clear;
- Multifunctionality. In fact, a combination of all the previous points.
Such a decorative partition has excellent developmental functions, it allows you to concentrate and hold the attention of children, develop their intelligence, thinking, show ingenuity, learn something new, develop creatively, etc. A screen also becomes an excellent way to zone a room when conducting quizzes, skits, various kinds of events, so that children are not distracted by other things
A screen also becomes an excellent way to zone a room during quizzes, skits, and various events so that children are not distracted by other matters.
Methods for connecting plastic pipes
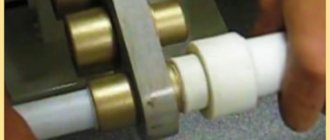
- With installation of rubber seal. A rubber seal is installed at the end of the socket pipes, resulting in a neat and airtight joint. To do this, the bell of one of the pipes and the smooth part of the other are carefully treated to remove various types of contamination. After this, a chamfer is removed from the smooth end of the pipe at fifteen degrees and a mark is applied to serve as a guide to the depth of insertion of the pipe into the socket. After processing the o-ring of the socket and the smooth part of the pipe, they are connected;
- Glue. After removing the chamfer from the connected ends, marks are placed on them indicating the depth of the fitting. After which their ends are degreased with methylene chloride and covered with glue. The pipe is inserted into the fitting (or socket), turning it about a quarter of a turn - this allows you to evenly distribute the glue over the surface. For a better connection of the elements, it is recommended to press them tightly together for about a minute. Excess glue should be removed from the surfaces immediately after making the connection, after which the part should be left until it dries completely.
- Flange - made using additional elements - fittings. The ends of the pipe sections are pre-cleaned. A flange is installed in place of the cut, followed by a rubber gasket - it is then pushed onto it. The connection itself is made by tightening it with bolts with a mating flange. The advantage of a structure assembled in this way is that it can always be disassembled.
Having understood the technology for connecting plastic pipes, you can start making crafts from them. In this case, you should first prepare a sketch of the product or drawing that you plan to obtain as a result and determine the length of all the segments you need.
Peculiarities
Metal pipes are made from different raw materials:
- cast iron;
- carbon and stainless steel;
- brass;
- aluminum and other composite materials.
Their cutting is carried out using a mechanized or automated method using various equipment. The use of a machine for cutting and trimming pipes allows you to cut pipes more accurately, quickly and efficiently in comparison with manual cutting.
A distinctive feature of the products of the first group is their versatility. They are comfortable and light weight. This allows them to be used in different conditions, in addition to the workshop, during pipeline installation and repair. They are easy to install on pipes by one worker.
In addition, they provide for easy adjustment of the pipe diameter. Essentially, these are mobile or portable units, which, depending on the type of cutter, can be:
- oxygen gas;
- plasma;
- water jet.
Models may have auxiliary rotating devices to make pipe cutting easier. Analogues of mechanical cutting are needed to cut and obtain the ideal chamfer, which is characteristic of new factory pipes. These devices do not generate sparks during use, so they are used in work with oil and gas pipelines, in which open flames are unacceptable. They are equipped with a mechanized trolley to allow movement around the pipe using a chain.
Interior decor elements made from pipes
You can decorate the interior of your own house or apartment with homemade crafts. They will look organic and beautiful, and will also become the highlight of the interior.
Organizer
A very simple craft. To assemble it, you will need to prepare a certain number of pipe sections of arbitrary length and either fasten them together or glue them to a stable base. The resulting structure can be painted in any desired color or left as is.
Mirror frame
Take pieces of plastic pipes of unequal diameters, a sheet of cardboard, a jigsaw, glue and the mirror itself. Having marked its outline on cardboard, cut the number of pipe sections you need and lay them out so that the space allocated for the mirror remains free.
Coat the places where the pieces come into contact with each other thoroughly with glue and let the resulting frame dry for a day.
Coffee table
Prepare several pieces of equal length for the legs and several for the base. Carefully consider the size and design of the structure to be assembled, be sure to first draw it on paper, and only after that prepare the necessary elements and begin to fasten them together.
Decide what your table top will be made of. Most often, it is made of glass or durable plastic.
Remember that the resulting structure must support not only the weight of the tabletop, but also what is placed on it, so when assembling, give preference to the most durable methods of making connections, such as adhesive or flange.
Clothes hanger
Its design can be very diverse. The simplest option is one with a support in the form of legs, made of the same plastic pipes. Attach any number of hooks or partitions to the support, and you will get a convenient and useful item in everyday life.
If you install a tubular frame on a metal base with or without wheels, you can get a small mobile wardrobe, on the upper partition of which you can easily hang clothes on hangers.
And by connecting several small pieces of pipe together you can get a convenient vertical and compact hanger.
Shoe shelf
When assembling it, it is recommended to use pipes with a diameter of at least 150 mm. Cut lengths from 25 to 30 centimeters (slightly longer than the length of the shoes) and attach them to a wall or stable base, first securing them with glue.
Pots for flowers and vases
Pipe sections of various diameters can be adapted for them. “Live up” your homemade pot or vase with unusual stickers or colorful designs, and they will add a special “zest” to the interior of your home.
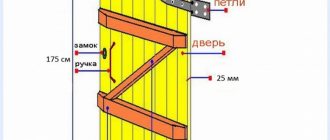
Making your own screen
An ideal option for independent creativity would be to make your own screens from wood and fabric. This classic model will look perfect in any interior. You can assemble it easily and quickly if you use the tips and recommendations on how to make a screen with your own hands.
The essence of the work is that you need to stretch a piece of textile onto a wooden frame. The product model can be any: book, folded or single-screen.
The process of creating a screen begins with preparing the essentials:
- bars in the amount of 12 pieces measuring 170x2 cm and 12 pieces measuring 60x2 cm;
- piece of fabric;
- paint and varnish products;
- glue;
- decorative elements;
- power tools;
- fasteners;
- sandpaper.
Next you need to act in accordance with the step-by-step instructions:
- Using a ruler and pencil, mark the bars to assemble the frame.
- In the designated places, make cuts up to half of the wooden parts.
- Using a chisel and hammer, make a depression in the cut area.
- Assemble the wooden parts into the frame, first smearing the joints with wood glue.
- After the glue has dried, sand the finished frame with sandpaper and varnish.
- To strengthen the structure, fix the joints of the frame with screws to the metal corners.
- After making the frame, you can prepare the textile part of the screen. The fabric cut must match the size of the frame with allowances for hems. If it is not possible to use a whole piece, you can create a patchwork composition.
- Using a furniture stapler, secure the fabric to the frame, starting from the top. To prevent the fabric from sagging in the future, it must be fixed with tension.
- The structural parts covered with fabric must be connected with furniture hinges, piano hinges or textile elements.
Piano hinges or fabric connections allow the product to be folded in any direction.
Crafts from plastic pipes for children
Making different crafts with children is not only fun, but also important. After all, in the process of making them, children acquire new skills and learn important fundamentals.
Playpen
Assembling such a craft is very simple. True, for this you will need a large number of small sections, so it is easier to first purchase whole pipes and cut them according to the pattern you have come up with.
After all the necessary parts are ready, you can begin assembly, connecting the vertically located partitions with horizontal sections at the top and bottom.
Swing
To assemble a swing, it is better to choose a reinforced plastic pipe that can withstand such a heavy load. Before you start working on a craft, it’s better to practice on something simpler.
Swings made from pipes can be very different. Their most common option is in the form of small hanging sofas, often found in country furniture stores. Their price is quite high.
Familiarize yourself with their design, take the dimensions you need, come up with and draw a sketch, and start assembling.
Football goal
The craft is suitable for those who have space at their dacha to create a small football field. The craft consists of a number of elements assembled into a rectangular frame. For greater realism, you can buy a mesh and stretch it over the finished structure.
Play complex for cats
A play complex for cats is assembled from tubes and plastic bars. After making the structure, each part is covered with thick fabric or rigid cord, which will later be used as a scratching post. The complexity of the design depends on the patience of the owners and the activity of the pet. You can build a simple house with a horizontal ladder, a lounger and hanging toys. Some don’t stop there and assemble real cat palaces with “hammocks”, a complex system of transitions, “booths” and wheels for running, like hamsters in cages.
Crafts from pipes for the garden
Every owner tries to decorate a summer cottage beautifully. Some people buy special decorative elements for this purpose. But this is completely optional. After all, you can make the decor yourself.
garden arch
Assembling a garden arch involves bending some of the elements that form it. We suggest doing this by heating the pipe at the bend with a gas burner. When heated, plastic can be deformed quite easily, allowing it to be given the desired shape.
If you don’t want to waste time bending pipes, you can make the connection at an angle. Having assembled two arched openings, fasten horizontal sections between them - greenery will subsequently curl along them. The finished arch must be firmly fixed in the soil.
Alcove
To minimize the number of connections when making this craft, it is recommended to choose longer pipe sections. Shape two pipes of suitable length into an arc shape and secure them to the ground.
Choose the distance between them so that the table and other pieces of furniture that you plan to install in it can easily fit in the gazebo. After this, all you have to do is cover the arches with awning fabric and the gazebo is ready.
You can also assemble a gazebo in the shape of a house, but then you will have to fasten the individual structural elements together.
Greenhouse
Assembling a greenhouse from pipes will undoubtedly be more difficult than a gazebo or arch, and it will require an order of magnitude more material. You choose the size of the future structure yourself, while the procedure should be as follows:
- Determine the installation location of the structure;
- Level the ground in the area that will serve as the floor of the greenhouse or make a deck from boards. In this case, it is recommended to choose boards 20 centimeters wide, always impregnated with an antiseptic;
- Pieces of reinforcement are fixed along the long sides of the improvised floor; the height of the part rising above the ground should be from 50 to 70 centimeters;
- Place a pipe on the reinforcement, and, giving it an arched bend, fasten it on the opposite side to the same piece of reinforcement. Select the distance between the installed frame parts to be from 70 to 80 centimeters;
- When all the arches are ready, install the central stiffening rib - it will allow the structure to stand level without falling to one side;
- Decide where your greenhouse will have doors and windows and prepare openings for them;
- Cover the structure with the selected covering material;
- Doors for your greenhouse can also be assembled from pipes.
Vertical beds
They are made from pipe scraps by cutting out large holes in them for placing seedlings, and small ones for draining water.
After this, all you have to do is fill the “pots” you made with soil and place them one above the other on a stand. By the way, it can be made from a similar material.
Longer pieces are suitable for seedlings of garden strawberries. Place them vertically, after making holes for planting seedlings and laying a tube with a smaller diameter inside.
The presence of small holes in it will provide the strawberries with regular watering.
Irrigation system
Assembling the irrigation system is very simple. Assemble a craft from several pieces of plastic sewer pipes, giving the structure any desired shape. After completing the assembly, make small holes in the pipes and connect a watering hose to the system.
The crafts options proposed above are only a small part of where plastic pipes that are not useful to you in work or repair can be used.
Of course, there are many more options for assembling crafts. Try to imagine, create, create and delight your loved ones and friends with useful homemade products.
Advantages and disadvantages
Often in residential areas there is a need to organize the home space in such a way that it best suits the needs of all family members. This is precisely the task that screen partitions serve: if you correctly design the division into zones, the room will visually become more comfortable and spacious.
The advantages of wooden partitions are undeniable:
- ergonomics - if the partition is not used, then it can always be folded like a folding accordion, in which case it will take up very little space;
- mobility - if you wish, you can always move the partition from one place to another;
- low price - the cost of a finished partition will be much lower than the cost of creating an additional wall, and if you have certain skills in working with wood, you can always make it yourself;
- a wide selection of design solutions - you can always choose the screen option that will harmoniously fit into the overall interior of the room;
- the possibility of increasing working functionality - for this you just need to add shelves or pockets to the partition;
- variety of types, sizes and shapes.
Do not forget about the advantages of wood itself:
- this is an environmentally friendly material, thanks to which a room with such a partition will be safe for household members;
- wood lends itself well to any type of processing, so the screen partition can always be decorated with decorative carvings, which will give the room an individual style and create its own atmosphere of comfort;
- the tree can easily support attachments weighing up to 100 kg;
- In case of any decorative damage, the partition can be easily repaired: to do this, you just need to rub the damaged area with sandpaper and varnish it.
However, screens also have their drawbacks, namely:
- limited zoning - the allocation of functional zones occurs exclusively visually, so the screen cannot in any way prevent people from entering the fenced space;
- weak stability - this parameter directly depends on the opening angle of the doors, so maximum stability can be achieved if the angle is 90 degrees;
- low sound insulation.
Wine shelf
The manufacturing method is exactly the same as in the case of a shoe rack. The difference is the required pipe diameter. To make such a craft from plastic pipes with your own hands, you will need pipes of a certain diameter so that a bottle of wine can be placed inside them. Pencil and hacksaw.
If the shelf is supposed to be suspended, it would not be a bad idea to strengthen it with chipboard, making a support out of it. Place the elements of a kind of shelf on the support.
The pipe sections, as in the case of making a shoe rack, are placed on top of each other, connected with glue or another means. When the entire product is ready, you can stylize it by painting it in any color or adding patterns.
If space allows, you can allocate an entire wall for such shelves. It will look very beautiful and original, and bottles of wine will always be at hand, carefully organized.
Note!
Crafts made from polymer clay | Step-by-step master class on creating beautiful craftsDIY epoxy resin crafts - options for original crafts, step-by-step instructions for pouring and making them yourself
Lego crafts: step-by-step master class on creating simple DIY crafts + original versions of Lego products (photo + video)
Recommendations
DIY crafts made from sewer pipes can be used not only in the interior of your home, or in the garden on your property. You can do this for sale, creating unique, beautiful, designer products. You can also make a unique and useful gift in this way, which will remind you of the giver for a long time.
Canopy
A canopy is made in the same way, for example, for a car. However, in this case it is better not to bend the pipes, but to install them vertically. This way it will be possible to achieve greater stability. Place 4 columns on one side and the same number on the other. Connect them together with crosshairs made of shorter pipes.
Connect horizontally along the top perimeter using pipes and adapters. As a roof, you can use the same awning fabric that is used to create a gazebo.
It is worth noting that such a canopy is only relevant in the warm season. In winter, if there is strong wind, the awning can be blown away if it is not firmly attached to the ground.
Alcove
These outdoor structures require good materials for construction, and PP blanks are ideal for this situation.
The design configuration can be anything, here everyone can realize their fantasies.
Video: making a gazebo yourself
158 Canopy made of PVC pipes and curtains for the bathroom.