Restoring furniture with your own hands at home is a fun and creative activity that allows you to give new life to your favorite items. At the same time, self-restoration helps you save a lot of money, because the services of professional furniture makers can be so expensive that it would be easier to buy a new cabinet, armchair or sofa.
You should only contact specialists when you want to restore expensive furniture or valuable, antique interior items - here, independent restoration by an inexperienced craftsman can only do harm. You can restore old furniture or something that was bought in a regular furniture store with your own hands - below we will talk about some of the tricks of this process.
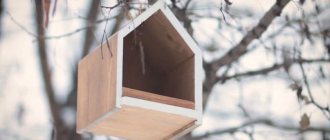
DIY furniture restoration
Features of furniture restoration
There are two types of this process: partial or complete recovery. The second process will take quite a lot of time and effort and will require certain skills. This includes work such as reupholstering upholstered furniture and replacing springs. It is better to entrust such work to professionals.
Partial restoration of wooden furniture is available to novice craftsmen and even those who have never picked up tools.
Definition with necessity
To figure out what furniture can be restored. You need to understand that the costs of specialists will be appropriate for antique furniture. It is better not to take risks with it to avoid harm.
Ordinary old furniture that has lost its former attractiveness and was purchased at a shopping center can be restored manually yourself.
Furniture inspection
A visual inspection will begin the process of restoring furnishings.
If there are traces of fungus or mold on the wood, all measures must be taken to prevent the development of this process. To do this, infected areas are either permanently removed or carefully treated with special means.
If the varnish is being removed, a disinfectant should be applied to the cleaned surface.
Disadvantages of restoration
It is preferable to leave it to specialists to give new shapes to old furniture or work on small details. A person without experience who does not know the nuances of work can completely ruin items.
Saving personal time. By handing furniture over to professionals for restoration work, you can forget about it and wait for the finished result.
DIY work requires an investment of energy in your free time; evenings and weekends will be devoted to the process. If you don’t treat your business as a hobby, then soon the activity will begin to burden you.
Eurobook sofa - 130 photo recommendations on how to make and assemble a comfortable and compact sofaAssembling furniture with your own hands - 105 photos and a detailed video of how various furniture elements are assembled
Do-it-yourself bookshelves - ideas for building shelves and shelves quickly and easily from scrap materials (155 photos and videos)
Allocation of special territory. Giving new life to old furniture is a dusty task. Chemical compounds, sawdust and dirt will fill the room.
It is necessary to allocate space for freedom of action. It is advisable to carry out work in non-residential areas: street, garage, workshop.
If restoration work is carried out in an apartment, then one room should be completely circled, and the floor should be covered with cellophane or paper.
The benefits of restoring furniture yourself
Restoring Soviet furniture, of course, will not bring a lot of money, but furnishings from the Russian state can bring good money.
Restoring chipboard furniture with your own hands will help save the family budget from unnecessary expenses.
During such actions, you can gain amazing experience, acquire new knowledge, and try yourself as a real designer.
As scrap materials, you can use leftover wallpaper, fabric, leather, wood and other materials that you would hate to throw away.
Note!
DIY feeder - step-by-step instructions for creating a feeder + detailed diagrams with photo reviewsDo-it-yourself rugs - TOP 120 simple patterns with master classes on how to make them yourself + photo reviews of finished rugs
- Do-it-yourself dolls: a master class on making a beautiful doll. Simple instructions with photo examples of ready-made options
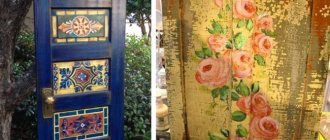
Decoration
To decorate furniture, you need to decide on the theme in advance. This solution has many advantages: saving money, creating an individual style, and choosing your own design.
To have an idea of the possibilities of decoration, let’s understand the techniques and consider design ideas:
- A stencil is an excellent option for a children's room - decorating furniture with stencils of butterflies and animals. The idea is very simple to implement and does not require any skill. All you need is to purchase or make a stencil yourself. To achieve a beautiful effect, it is better to use contrasting colors;
- Decoupage - a technique that involves gluing the top layer of a napkin onto a prepared surface. If the chosen plot is made in light colors, it is necessary to paint the furniture white in advance;
- Craquelure - you can reconstruct furniture by giving it an aged effect. For this, craquelure varnish is used, which is applied in 2 approaches after painting the products;
- Mosaic is considered a complex decoration option, but the result will delight everyone. Glass tiles are used for mosaics;
- Appliques or stickers are an affordable and simple decoration method. Such products can be used to seal defects that cannot be restored;
- Painting – after applying the first layer of paint, the furniture is painted to taste. These can be ornaments, landscapes, silhouettes - it all depends on your imagination.
Old furniture restored with your own hands gets a new life. Such a product will serve in the house for a long time, delighting family members with its beautiful appearance.
Stickers
Craquelure Stencil Decoupage
Mosaic
Types of jobs
There are several sequential types of furniture restoration work:
- A visual inspection will help determine the quality and quantity of damage.
- Disassembly will make it possible to remove interfering elements.
- Cleaning will remove dust, grease stains and small dirt.
- Minor repairs will help to cope with refinishing, repairing cracks and chips.
- Decoration work includes updating the veneer, painting, painting, and applying new patterns.
How to create "cracks"
It is not so difficult to achieve the effect of antique noble furniture; for this, one-step craquelure is used, which stimulates cracking of the surface layer of paint, and the color of the “substrate” appears through these cracks.
One-step varnish can be bought in stores for artists (but they usually have small volumes, 0.25 liters, and are more expensive) or ordered in online stores (liter packages are also available).
To get the “pseudo-Provence” effect, as if this buffet had lived for a long time, you need:
- wait until the bottom layer of paint dries (before applying it, complete all stripping, priming and putty work);
- Apply a layer of one-step varnish.
The thicker this layer of varnish, the thicker the cracks will be. If you need thin cracks, you need to apply a thin layer of varnish.
- As soon as the varnish layer dries, apply paint.
ELIZAForumHouse Member
Do not miss the moment of applying the top layer of paint; as soon as you feel that it has dried out, immediately apply the paint (if it dries out, there will be no cracks or there will be few and not everywhere where you applied it).
- Take a flat brush and apply the top coat of paint.
Important : the second coat of paint can only be applied by brushing it over the varnish once.
ELIZAForumHouse Member
It will not work to move a brush with paint over the varnish several times - the paint will stretch, curl up and not paint over!
What else you need to consider: when restoring old furniture, acrylic and water-based paints are usually used. Usually, before applying varnish, the first layer of paint is removed a little. This is especially recommended if the bottom layer of paint is dark, brown, and the top layer is light: light green, pink, blue, etc. If there is too much dark color, the furniture will look dirty rather than aged. It is better to paint with three layers of base paint, and carefully, without fanaticism, remove excess with sandpaper and water.
Cleaners
As a suitable remedy, you can use store-bought drugs or use ancient recipes. But before starting a minor restoration, you need to test the product on a small, inconspicuous surface.
A universal remedy for any type of furniture would be table vinegar or pickled cabbage brine.
Natural wood will clean well with crushed baby soap, oil or lemon juice, and a weak solution of ammonia.
Note!
DIY satin ribbon bows - step-by-step instructions for creating unusual bows + detailed diagrams with photosDo-it-yourself rack: step-by-step instructions with photos and descriptions on how to make an unusual rack
Corrugated paper flowers: TOP 100 photos of ready-made options + instructions on how to make them yourself
Polished furniture will be more happy with raw potatoes, laundry soap, vegetable oil, a mixture of vinegar and olive oil.
For upholstered furniture, use gasoline (will deal with greasy stains), a combination of ammonia with acetic acid (remove juice from fruits and vegetables), laundry soap (will remove traces of coffee and chocolate), salt and ice (will help get rid of red and white wine stains) .
Disassembling items
The very first step will be to disassemble the furniture. The work process will be much simpler if you disassemble it as much as possible. Remove the doors, unscrew the handles, take out the shelves, preferably unscrew the frame parts.
But don’t get carried away; parts stuck to the glue should not be disturbed. There is a risk that during assembly it will not be possible to repeat the fastening of the elements. It is advisable to remove all fittings.
To simplify the assembly process, you should photograph the fastening points in advance. Label the accessories and put them into bags.
Scratches
Special means for repairing minor damage include a special furniture pencil or touch, wood wax or stain.
Among the folk remedies are walnut kernels, flaxseed oil, mayonnaise, homemade mastic made from wax, alcohol and turpentine. Iodine and tea leaves will help slightly disguise scratches.
Using wood stain
The wood surface should be painted with stain in the same way as with regular paint. The only thing is that this impregnation dries very quickly, so you should work just as quickly, but carefully .
Before completing the work, you must not allow the stain layer to dry, otherwise a seam in this place will be clearly visible, different from the rest of the surface. That is why you should not put a lot of solution on the brush.
To paint a wooden surface with stain, use:
- Paint brush.
- Foam roller.
- Automatic or manual sprayer.
The stain is applied parallel to the direction of the wood grain and therefore should not be applied to another section unless the first is finished. In the place where the two sections are connected, it is necessary to ensure that the applied layers of impregnation do not overlap each other.
Thanks to stain, wood acquires a refined and excellent color . In addition, it protects and enhances the wood grain. After the planed plank floor is laid, it is necessary that it is always clean, otherwise, after applying the stain, all the stains will begin to stand out.
If there are greasy stains on the floor, the stain in this area may not be absorbed into the wood. If the wooden parquet is in good condition and there is no need to restore or putty it, then covering it with such impregnation is an excellent solution to renew the old parquet.
If you need to get a new shade, you can mix several stain colors. You need to stir carefully so that splashes do not fall on the floor, as such stains will subsequently stand out very strongly. It is recommended to mix only compatible components.
Chips
Such damage will require somewhat greater effort.
Note!
DIY family tree: instructions for creating a family tree + DIY design ideasDo-it-yourself sun lounger: photos with instructions for creating sun loungers + detailed diagrams of the stages of work
Do-it-yourself aroma diffuser for the home - instructions for creating an aroma diffuser. Step-by-step instructions, diagram + recipe
Before purchasing the necessary products, you can try to disguise the chips using dyes. They become felt-tip pens, tea leaves, iodine solution.
Decorative corners, protective profiles, furniture putty, special hard wax or furniture edges will help you cover the damaged area more reliably.
Kitchen 2021: 5 key trends
We tell you what kitchen design to choose today so that it is relevant tomorrow
Sand the surface
Your product should be completely covered with small scratches. To do this, use fine sandpaper, but if one of your friends has a sanding machine, it’s time to remind these friends about yourself.
Prepare for painting
To do this, you need to remove dust and degrease the surface: wipe it with a damp cloth, and then with a cloth with degreaser or alcohol. The remaining glue from the film will also have to be sanded off and degreased. After this, you need to putty the products: remove all holes from old handles, shelves and fasteners, cracks and irregularities. After this, sand and degrease the surface again.
Apply primer
To ensure that the paint adheres to the surface, cover the surface with primer. Choose an unscented primer, such as Otex Akva from Tikkurila, it doesn't smell! Liquid, water-based, dries quickly. Prime in two layers, allowing each layer to dry.
You can paint it!
Latex matte paint of different colors, for example, Luxens, is suitable for painting furniture and doors. It’s convenient to buy paint at Leroy Merlin and tint it right there. There is also a good color palette of ready-made paints there.
To paint you will need brushes, foam rollers and lint rollers. To protect painted furniture, apply wax or oil with foam rubber or rags.
Apply the paint in 2-3 layers, allowing each layer to dry completely.
Damage to the varnished surface
Repairing damaged paintwork at home will not be difficult if you understand what kind of varnish was used by furniture craftsmen when creating a specific piece of furniture.
A 10% alkaline solution will help determine this (it will dissolve alcohol-based varnish), acetone (it will cope with nitro varnishes). If the surface remains unchanged, the varnish is based on polyester substances.
The cracked coating is removed using solvents or sandpaper, and the free space is varnished in several layers. In order not to damage the still good areas, apply a layer of Vaseline to them, cover them with paper or paste over them with masking tape.
What materials and tools are needed?
Of course, the exact set of tools will depend on the piece of furniture you will be restoring. But there is a universal list of tools that come in handy during work. So, in many cases it is more convenient to use an electric tool rather than a manual one, so it would be advisable to borrow such devices from friends in advance or even rent them.
Professional tools not only save effort and time, but also give better results. Those planning furniture restoration may need the following:
- jigsaw;
- grinding (orbital) machine;
- a screwdriver with a good long-lasting charge;
- construction hair dryer;
- a powerful construction vacuum cleaner (to prevent dust from spreading throughout the room).
Popular models of construction vacuum cleaners
Achieving a smooth surface by hand is time consuming and difficult, so it is better to use a grinder
Advice! In addition to large tools, you will also need smaller accessories: brushes and rollers, spatulas of different sizes, sandpaper of different grits. Do not forget to purchase protective durable gloves, as well as a respirator that will not allow toxic fumes of varnishes and paints to enter the respiratory system.
In addition to tools for restoration, consumables are also needed - all kinds of removers for varnish surfaces, furniture wax, sealant or wood putty (compositions that fill cracks or chips), as well as paints and varnishes: enamels, paints, waxes or impregnations.
The modern market offers hundreds of types of finishing coatings for furniture
Note that furniture finishing can be purchased without any problems in any store, but restoration accessories (special pencils, adhesives, furniture edges) are best looked for on specialized online sites.
In addition, on advertisement sites in your city you can find a seller of the material you need - often people sell surplus or goods that do not suit them in color or texture.
Almost any furniture product can be ordered in the online store
Decoupage
This type of decoration will give the furniture, after restoration with your own hands, an antique or very modern look, depending on the wishes of the owner. The work will not be particularly difficult even for a novice master.
Using the decoupage technique, you can elegantly transform a small area or beautifully decorate the entire surface.
The simplest option would be to simply glue the selected image to the desired location and then cover the design with a layer of varnish.
More advanced masters use reverse, artistic or volumetric techniques, deco patch, and different types of craquelure.
Pasting with film
Another simple option for restoring outdated items is to cover the surface with film. This material today is available in various colors, textures, it can be matte or glossy. It is better to choose an option that matches the rest of the color of the furniture in the room.
Let's consider an algorithm on how to properly restore old furniture with your own hands using film:
- All fittings on the product are unscrewed to create empty surfaces for work;
- The entire coating must be clean: first it is better to wash it with vinegar and a cloth, and then treat it with non-abrasive detergents;
- If necessary, the surface of the furniture is cleaned with sandpaper;
- The film should be cut with a margin: take 1 cm more material along each edge;
- Before applying the film, the furniture panel is sprayed with water - this must be done to increase sliding;
- After the protective paper has been removed from the adhesive layer, the film is applied to the furniture. Reconstruction using this method involves the use of a cloth: with its help it is necessary to smooth the film from the center to the edges to remove air bubbles;
- If a bubble suddenly appears, carefully pierce it with a needle to release the air.
After the film has been applied to the furniture, take an iron and iron the shield through the fabric for better adhesion. The final stage is finishing the product and installing new fittings. A photo of furniture restored using film is presented below.
Clean the coating and repair cracks
We prime the coating
Apply the film and remove the air with a roller
Inlay
This type of transformation will require a lot of perseverance, patience, and the finest tools. The materials most often used for inlaying wood are pieces of the same or different-colored wood, glass, stone, and plastic.
Photos of furniture restoration will demonstrate a wide variety of models that have received a second life thanks to very simple techniques.
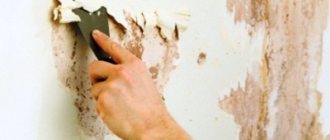
Removing the top layer of varnish
To remove paint and varnish material, use sandpaper, a hair dryer or varnish remover. A smooth surface should be achieved using any convenient method. Methods can be combined. The main thing is to come to a result.
Don’t forget about your health and use a respirator, gloves and goggles. Since the work is very dusty, particles of chemical compounds will fly in the air.
Photos of DIY furniture restoration
Craquelure
Here there is a combination of two methods at once: decoupage and varnishing. Furniture is thus finished in an antique style. To do this, apply a varnish layer and leave it until completely dry, then apply craquelure varnish on top.
After drying, small cracks form, very similar to antique ones. At the last stage they can be gilded with gold paint.