How comfortable can a house be that has a roof without a ceiling? You can understand and appreciate the benefits of such a solution only after living for several days in a building without an attic. A traditional rural barn was always built without a ceiling; the high roof provided good air flow, so the supplies and utensils inside the room did not rot from moisture, but did not dry out either.
House without a ceiling under a roof
Compared to a building built according to a traditional design (with a ceiling and an attic), a house without a ceiling with a warm roof even visually gives the impression of power and comfort. The reasons are simple:
- There is much more free space, air exchange (natural ventilation) is better, in general, a one-story house without an attic is like a medieval castle - strong, impregnable, reliable;
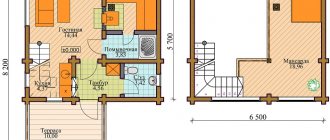
- The volume that appears under the roof is often used to create a second level or an open mezzanine floor.
But a house without a ceiling also has weaknesses:
- Less durable rafter system - horizontal loads are minimized by the introduction of transom beams;
- Without a natural thermal barrier - a ceiling - a one-story house without a ceiling is always colder, and this requires additional thermal insulation.
Home and Garden
Stylish and comfortable home
Has anyone done an open top without a ceiling?
We are building a house. I would like the ceiling to be unusual, open top - without a ceiling. So that the ceiling beams can be seen.
But with our climate, perhaps it will be too cold?
What can you say, has anyone done an open top without a ceiling?
Information about this community
- Placement price
50 tokens - Social capital
11 381 - Number of readers
- Duration
7 hours - Minimum bet
50 tokens - View all Promo offers
From a heat point of view, this is not a significant difference, but from a design point of view, it is an order of magnitude more complex.
It's one thing to insulate a ceiling, and a completely different thing to insulate a roof. Walling up load-bearing structures—rafters—is a very daunting task. Just a little flaw in the design, they will start to rot, and you won’t even know about it.
In general, I personally, having built more than one building, would not complicate the design so much for the sake of the surroundings. Beams can be extended into the interior in less critical solutions.
Ceiling-roof installation and insulation
It is a common misconception that a roof without a ceiling retains heat in a building worse. But this design property depends on the selected roof slope angle and the design of the ventilation system.
Correct calculation of the pitched roof will help to minimize the heat transfer of the roof.
The high ridge and steep slope angle of the roof slopes make heat retention under the roof ineffective, but the minimum slope angle makes the very idea of building a house without a ceiling untenable. Therefore, when developing a housing project without an attic, you should entrust the calculations to specialists. How warm a house without an attic will be depends on the correct results of calculating the roof slope angle.
The installation diagram for a roofing pie without an attic and ceiling includes only one seamless layer of thermal insulation materials, and this is the basic principle of insulating the roof of a house without a ceiling. Mineral wool, penoplex or sprayed thermal insulation materials are used as insulation. It is with their help that it is easiest to obtain a seamless coating.
Starting points in the insulation scheme:
- A vapor barrier layer is installed between the roof and the thermal insulation. The material is attached to an additional frame, a gap of 25-30 mm is left between the frames - the vapor barrier is laid into it. This ventilation corridor removes condensate formed from water vapor that rises from the rooms upward to the roof;
- From the inside, the thermal insulation layer is also protected by vapor barrier materials for the same purpose - removing water vapor to the outside;
- A vapor barrier film or membrane is attached over the entire surface of the roof, which makes the design of a house without a ceiling as efficient as possible. If there is no ceiling surface, then the insulation can be fixed everywhere - from the walls to the ridge, in a continuous, seamless layer. This effect is ideally provided by polyurethane foam, which is sprayed onto the most difficult surfaces without breaking.
Important: if a roof without an attic is illuminated all day, then another layer of vapor barrier is laid under the external heat insulator - foil.
How to protect the attic floor from moisture
Thermal insulation in its structure is a multi-layer cake. One of its layers is a vapor barrier film, which should prevent moisture from penetrating into the structure of the structure.
To protect the insulation from fumes, a vapor barrier film is installed in front of the insulation layer (from the side of the living rooms). The vapor permeability of the film should exceed that of thermal insulation - this will allow you to quickly remove moisture that has entered the insulation through the protection.
The result of water exposure to floor elements
There are 2 reasons for vapor deposition on floor structures. The first is as a result of the release of household fumes and their diffusion through the ceiling. The second is the occurrence of dew due to the difference in temperature inside the room and the unheated attic.
A vapor barrier is installed on the ceiling if it is expected that the attic will be unheated. The rest of the space is not subject to insulation, because... it is uninhabited. But the protection of slopes and rafters is necessary, these are:
- waterproofing - to eliminate external influences from the street.
- natural ventilation - from condensation that appears due to the difference in temperature outside and in the house. According to the standards, the total area of all ventilation openings must be at least 1/300 of the floor area or roof projection (horizontally). If ventilation is arranged correctly, in winter the difference in temperature in the attic and outside will be no more than 5-6 degrees.
Choice of insulation
It is easier, faster and cheaper to equip the internal insulation of a finished rafter system than to lay thermal insulation materials during the installation of the roof frame. The process will consist of fewer operations, less building materials and time will be spent.
Mineral wool
When laying mineral wool, it is necessary to use a membrane. This protective material is designed according to the nipple principle - it conducts moisture only in one direction. So, mineral wool, membrane film, and what else? It is necessary to isolate the insulation from moisture from the outside, and this will require laying a waterproofing layer - a material that does not allow moisture to pass through at all. This is necessary to extend the life of the insulation, prevent it from rotting, deforming and caking.
Laying of mineral wool in the cells of the rafter system is carried out so that there are no air gaps or cracks between the sections of the heat insulator and the wooden elements. On both sides (inside and outside) the mineral wool is covered with vapor and waterproofing. A ventilation gap is installed outside under the roof so that moist air from the house is vented outside.
Penoplex
Penoplex is similar to polystyrene foam, but is much stronger than it. The advantage of using penoplex when insulating the roof of a house with a warm roof is that no auxiliary building materials are needed - no films, no membranes, no second frames. Penoplex has proven itself to be excellent for both external and internal roof insulation.
Plates (sheets) are laid in the spaces between the rafters on mounting foam or special glue. Working with foam is much more convenient and faster, since you can immediately foam the space between the foam boards and other cracks in the structure. In addition, the thickness of such a layer will be much less than the thickness of the thermal insulation layer made of mineral wool.
Spray insulation
Liquid polyurethane foam is applied with a spray or atomizer. This insulation is becoming more and more in demand, as it allows you to fill any cavities - even the most complex geometry. The disadvantage of application is expensive material and equipment. In addition, due to the tightness of the coating (which is a definite plus), an unexpected problem arises - the moist air from the house has nowhere to go. Therefore, the ventilation system must always be in working order - both the supply circuit and the natural one.
Ignoring the problem of arranging ventilation (it is needed for any insulation options), insulation with polyurethane foam is the most effective solution. A minimally thin layer, maximum heat retention, long service life, high permeability into any cracks make polyurethane foam an ideal insulating material.
It is unlikely that you will be able to apply such a layer yourself due to the complexity of the process and the need to use professional equipment. Therefore, you will have to turn to specialists.
Which development option should I choose?
To make the best choice for your future private home project, you should always follow common sense and the advice of professionals. In order for the house to be built in strict accordance with the project, it is recommended to choose, including the design stage, at which you can provide for all your wishes. When carrying out construction work according to a clearly defined project, with correctly selected building materials, it is much easier to achieve savings and rational spending of the budget.
By turning to the services of professional construction companies offering turnkey construction of cottages, the owner of the site will be able to avoid all the mistakes and hidden shortcomings both in the construction of a house with an attic and in the construction of individual housing with a second floor.
The choice of the optimal development option is always determined by a combination of many factors, which only professionals can take into account. Experienced specialists will help every customer who contacts them make the right choice between a house with an attic and a house with a full second floor, taking into account all the wishes of the customer and his financial capabilities.
Did you find this article helpful? Please share it on social networks: Don't forget to bookmark the Nedvio website. We talk about construction, renovation, and country real estate in an interesting, useful and understandable way.
Interior finishing of ceiling-roof
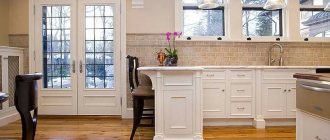
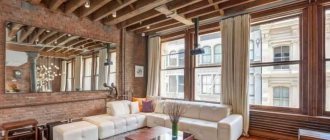
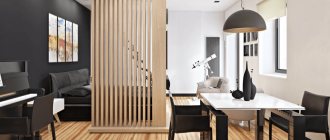
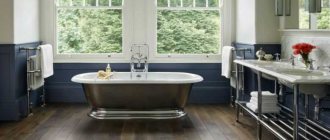
If your house has a roof without an attic, then this is a good opportunity to experiment with design and interior design. Due to the fact that the internal height of the rooms becomes larger, a feeling of large volumes and unlimited space appears. Designers recommend decorating such rooms in light colors.
Traditionally, wood or plasterboard is used to finish walls and roofing surfaces from the inside. There can be many design styles from Tyrolean to Empire. Surfaces can be covered with decorative plasters, wallpapered, painted, varnished over stain, wood burned to highlight the texture of the material. Powerful rafter beams create a visual feeling of being in an ancient castle, emphasizing the grandeur and monumentality of the building.
In summer, a house with a warm roof without a ceiling will keep it cool, which is why this original solution is often used in the construction of dachas and country cottages.
The interior of the premises when arranging a roof without a ceiling should focus on conservative design. High-tech or minimalism will be inappropriate, but Russian classics, art nouveau or Bauhaus are well adapted to wooden structural elements. Moreover, wood should predominate in everything, from the design of walls to the finishing of stairs and internal roofing surfaces.
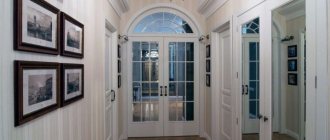
And the main advantage from the point of view of comfort is that a roof without a ceiling is that in such a house you can not limit the number of windows. The amount of natural light flux will be limited only by the length of daylight hours. After all, windows can be made not only in wall openings, but on gables and on the roof itself, and all the sun's rays will enter the room.
Advantages of two-story cottages
In some cases, building a two-story house can be cheaper than building a one-story building. Proponents of this point of view cite the following advantages of the second floor in a private house as arguments:
- the possibility of arranging terraces with a French window and creating a comfortable place to relax;
- rational use of land on a small plot, allowing you to get a spacious residential building and free space that can be used for outbuildings or for planting plants, creating an impressive landscape design;
- reducing roofing costs by reducing its total area during the construction of the second floor;
- the opportunity to save on the foundation by strengthening it by arranging the basement;
- the use of wooden floors allows you to save on waterproofing and flooring. Wooden floors can serve as the front layer of the floor covering, providing natural air exchange due to its structure.
The construction of two-story cottages is best suited for plots of irregular, narrow shape, small plots, lands located in urban areas and densely built-up areas.
Hip roof design with rafters supported on floor beams
A hip roof is a hip roof. This design is a more functional solution for arranging a gable roof. Hips are the inclined triangular planes on the roof surface.
Triangular inserts make the slopes on the sides of the roof into isosceles trapezoids, adjacent to the upper ridge beam with their bases.
Advantages of the hip shape:
- Attractive design, original and always unique roof design style;
- High mechanical strength of the rafter system. A hip roof can withstand any load - the weight of precipitation, wind, vector compression-tension forces due to temperature changes;
- Inside such a structure, you can always organize a mezzanine level - a kind of suspended attic.
Please note: the high price and complex construction process leave almost no choice for the homeowner when trying to save money - you will still have to turn to a construction company, to professionals. Complex calculations, painstaking assembly, the need to test the structure - all this can only be done by highly specialized specialists.
Calculation
Before starting work, you need to make a design calculation. It makes no sense to calculate the cross sections of all elements. In most cases they can be accepted constructively:
- Mauerlat - 150x150 mm;
- racks - 100x150 or 100x100 mm depending on the cross-section of the rafters;
- struts - 100x150 or 50x150 mm, taking into account ease of connection with the rafters;
- puffs - 50x150 mm on both sides;
- purlins - 100x150 or 150x50 mm;
- overlays with thickness from 32 to 50 mm.
Calculations are usually performed only for rafter and slope legs. It is necessary to select the height and width of the section. The parameters depend on:
- roofing material;
- snow area;
- pitch of the rafters (selected so that it is convenient to lay the insulation; for mineral wool, there should be 58 cm of clearance between the elements);
- span.
You can select the cross section of the rafters using general recommendations. But in this case it is recommended to make a small reserve.
The calculation is usually performed for rafter legs
If you don’t want to delve into the intricacies of calculations, you can use special calculators.
If you plan to make a warm roof, then the height of the cross-section of the legs is selected taking into account the thickness of the insulation. It must be mounted so that it does not protrude above the supporting beams. You also need to take into account that for mineral wool a ventilation gap of 2-4 cm is made between it and the coating. If the height of the rafters is not enough for this, provision is made for installing a counter-lattice (counter battens).
Rafter system
The correct composition of a warm pie
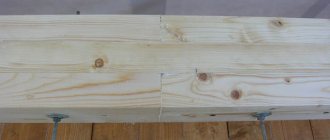
I-beams - methods of fastening to walls and to the ridge
I-beams are used in the construction of frame construction projects and in the installation of non-standard floors. In our case, this is a house without a ceiling. Why I-beam? Because such a connection is distinguished by high strength and rigidity of the structure. And wood is easily processed by hand or with power tools. In addition, most of the elements can be assembled on the ground, and each node can be lifted separately for subsequent fastening in the overall rafter scheme.
The most common methods of attaching rafter legs to the walls of a building:
- On the Mauerlat. Before attaching the rafter legs to the mauerlat, a groove is cut from the bottom of the leg so that the beam does not slip off the beam. A counter groove is also made in the Mauerlat so that the elements fit into each other;
- Fastening to floor beams on a tooth with an emphasis or on a tooth with an emphasis on a tenon. The rafters are fastened in one tooth with a steep slope of more than 35˚. A tooth and tenon are cut out at the bottom of the rafter, and a socket is drilled or cut into the beam to the size of the tenon with a depth of ≤ 1/3 or 1/4 of the rafter thickness, otherwise the structure will be weak. The insertion is made with a distance of 250-400 millimeters from the end of the beam, so that unexpected chips or cracks do not appear. The possibility of moving the connection to the side is eliminated by the simultaneous creation of a tooth and a tenon;
- Fastening using tightening and timber. The structure consists of a beam (board) that fastens the opposing rafters together while rigidly fixing the upper ends of the rafter legs. This method provides a triangle without spacers; the corners of the triangle are attached to the walls;
- Fastening to the upper ends of the walls. The method uses floor beams, which are installed together with rafter legs perpendicular to the surface of the walls. The method is good for arranging light-weight mezzanine attics;
- Fixation to the top harness. The fastening of rafter legs and beams is used only when the walls are in absolutely reliable condition, since the load from the rafters on the walls will be of a point nature, and therefore will be many times higher at each point than when using the Mauerlat. Floor beams must have a cross-section of at least 50 x 150 millimeters. The roof overhang is ensured by the beam extension length of at least 550 millimeters.
Country house with attic
An attic is an attic space that is converted into living space. First, you need to plan everything well, create a project for a cozy house with an attic. The roof needs to be constructed in a certain way so that there is enough space for rooms underneath. The height of the attic space should be no less than human height. The optimal option is 2 meters 20 centimeters.
The outer attic wall consists of the main parts:
- inclined;
- vertical.
The vertical one is made from the basic materials that were used to build the house. Inclined - made of rafters and existing internal cladding. Their ratio is determined by the building design.
If the attic floor is planned to be built under a gable roof, this must be taken into account when determining the height Source prefabeko.pl
Connection of rafters at the roof ridge
- The rafters are connected end to end. The upper end of the rafter leg is cut at an angle equal to the slope angle of the roofing surface, then the trimmed beam is rested against the other leg of the rafter system. This beam should also have a corner cut at the angle of the slope, but in the opposite direction. It will be easier and faster if you create a template from plywood or cardboard in advance, since you will need to make a lot of identical cuts - according to the total number of rafters in the structure. Sometimes, in order to ensure the required tension at the stop, the rafters are cut immediately when assembling the structure. In this case, two beams are sawn through with one cut, so both cuts fit as tightly as possible to each other. The next operation is to connect the rafters with long nails, staples, clamps or other hardware. When implementing this connection method, you can additionally use steel or wooden overlay plates. They are fastened with bolts on nails, which are driven into the joint;
- The rafters are mounted on the ridge run, so high reliability of fastening is ensured. Almost all operations repeat the previous method, except that the ridge beam is mounted differently. The installation of support beams is often required, which limits the possibility of free use of the under-roof space. And externally, the beam system does not look very attractive. But this solution allows you to mount each pair of rafters immediately at the site where the system is assembled, without preliminary preparation or preparing a template. With this installation, the upper end of the rafter beam will rest against the ridge, the lower end will rest on the mauerlat;
- The rafters are fixed to the ridge with an overlap. The fixation is similar to the technology of the previous solution, but the upper end of the rafter leg is attached with an overlap, and not end-to-end. The rafter is adjacent to the mauerlat and the ridge not at the ends, but at the sides. Fastening is carried out using bolts or studs.
Types of attics
When carrying out work, everything depends on the method of using the under-roof space. There are three of them:
- Cold attic. Such an attic is not heated, and air does not flow into it from the premises. In this case, the room temperature is assumed to be +5 degrees Celsius.
- Warm attic. The presence of a warm attic is typical for multi-apartment residential buildings. All ventilation ducts with heated air open into the attic space, increasing the temperature in the room.
- Attic. The under-roof space becomes a full-fledged living space and is heated like all the rooms of the house. In this case, we recommend that you read the article on attic insulation.
In a wooden or any other private house, it is correct to use the first or third option.
This is how you can transform your attic, turning it into a residential attic:
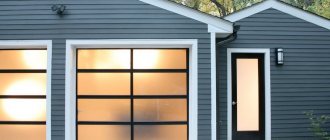
What is a flat roof?
So, what acts as the load-bearing base of a flat roof:
- Reinforced concrete slab.
- Roofing sandwich panels.
- Reinforced steel corrugated sheet.
And thanks to the fact that they learned to make a flat roof “breathable”, i.e. with internal ventilation, it has now become possible to use completely non-breathable waterproofing - roofing felt similar to it.
Any roof that we call flat actually still has a slight slope: to one side or specifically towards the drainpipe.
Here is the simplest example of a flat roof for a private home:
Advantages of a flat roof compared to a pitched roof
Among the advantages it is worth noting the following:
- Cost optimization - the area of a flat roof is smaller than a pitched roof, which allows you to save money on the purchase of materials and speed up installation.
- A horizontal structure is easier and cheaper to repair and maintain.
- A flat roof can be made usable by creating a relaxation area or a green area on the roof.
- On a horizontal surface it is more convenient to install and maintain modern equipment - air conditioning systems, solar panels, antennas.
- Unlike a pitched structure, a flat one is lighter and does not create additional load on the foundation and walls of the house (due to the absence of a rafter system).
- A horizontal structure is most resistant to gusts of wind, while a pitched structure may suffer from strong winds.
- A pitched roof is more difficult to seal - there are many connecting joints and corners through which cold air and moisture enter the attic.
Each type of roof has its own pros and cons, design features, so it is better to choose the appropriate option individually.
conclusions
Houses with a flat roof have their pros and cons. But with proper design, selection of suitable and high-quality materials, taking into account natural and climatic features and strict adherence to installation rules, you can easily avoid possible shortcomings during operation, building a cottage cheaper and faster. It is very important to trust installation work to experienced professionals.
Render House has been working on projects of varying complexity since 2001, guaranteeing the high quality of the materials used and the work performed.
Entrust the construction of a house with a flat roof to professionals, and we will foresee possible shortcomings and build a reliable, comfortable home for your family. You can evaluate the finished projects of our architects here. If the client wishes, we will make changes to the selected proposal or create a completely individual project.