Pros and cons of ceiling plaster
Finishing the ceiling with plaster has the following advantages:
- leveling with such a solution helps eliminate small differences in height;
- the composition can correct cracks, chips, and tile seams;
- the coating is durable, monolithic;
- the environmental friendliness of the material allows the use of plastering in bedrooms and children's rooms;
- the mixture is applied with a reinforced mesh and without a frame;
- the coating is repairable;
- the cost of the type of finishing is lower than the cost of installing a stretch ceiling;
- durability of processing;
- the work can be done independently;
- the composition forms a seamless coating;
- the material is universal for use in finishing concrete, wood, and brick surfaces;
- resistance to mold and mildew;
- possibility of re-painting;
- finishing the ceiling with this mixture will reduce the height of the room slightly;
- plaster is available in a wide range of colors and textures, etc.
The list of material shortcomings:
- there is a limitation on the thickness of the plaster layer (no more than 5 cm);
- in the presence of large differences in heights and unevenness, material consumption may exceed the norm;
- When applying textured coatings, it is necessary to follow the exact sequence of actions.
Conclusion
Using wooden shingles for plastering work reduces costs. It is not difficult to work with it, the main thing is to choose the right strips and fill them onto the surface. When applying the solution, its maximum thickness must be observed, otherwise it will cause rotting of the load-bearing structures.
The video in this article will provide an opportunity to expand your knowledge on this topic. If you have any questions while reading the publication and after it, please ask them in the comments, we will be happy to answer them.
To level the ceiling surface and prepare it for finishing, traditional plastering is still used. Plastering a wooden ceiling is relevant in private buildings made of wood materials. Compared to other methods of leveling the ceiling surface, plastering offers many advantages. The cost of the plaster mixture is much lower than the price of drywall and materials for making the frame. The main advantage of leveling with plaster is maintaining the height of the room.
How to plaster ceilings - choosing the right mixture
Before plastering the ceiling, suitable compositions are selected.
Standard requirements for plaster for finishing the ceiling:
- the material must have good adhesion to the surface;
- the solution should be easily applied in an even layer and smoothed out;
- the characteristics of the plaster mortar must be maintained until hardening (hardening earlier than the specified period, delamination is unacceptable);
- when choosing a mixture, the temperature and humidity conditions of the room are taken into account; gypsum plasters are not suitable for bathrooms and toilets;
- when decorating country cottages in which there is no heating in winter, it is recommended to choose façade and universal compositions for exterior and interior decoration;
- The consumption of mixtures differs for different types of materials, information for calculations is indicated on the packaging;
- When performing complex repairs (removing chips, roughness, bulges, etc.), leveling starting mixtures and finishing decorative plasters are used.
Based on the type of binder component, the compositions are divided into the following types:
- cement;
- gypsum;
- clay;
- polymer;
- silicone;
- acrylic, etc.
Manufacturers offer the following options for ceiling finishing materials:
- ready-made mixtures;
- compositions for self-preparation.
Factory products are offered by manufacturers in the form of solutions in containers or dry powder with fillers for dilution with water. The advantage of ready-made products is the availability of the necessary proportions and quick preparation of the solution.
Mixtures for self-production are more difficult to work with; the advantage is their affordable cost.
The size of the fractions for finishing the ceilings, the basic components (clay, sand) and fillers that impart elasticity to the material are determined in advance.
Cement based
Cement plaster mixtures are distinguished by their affordable cost, strength, wear and frost resistance, versatility in use, durability, and resistance to temperature changes. The coating has water-resistant characteristics and is easy to clean. Cement plaster has good adhesion to different types of substrates and is resistant to mechanical damage.
The material is well applied to concrete surfaces and is used to correct unevenness and chips. The ceiling is also leveled with plaster along the beacons in the bathroom, toilets and other rooms with a high level of air humidity. The composition is fireproof, environmentally friendly, and can be prepared in large quantities during finishing work.
The list of disadvantages of the material includes instability to vibration loads, prolonged hardening, and if the temperature and humidity conditions are not observed, cracks may form during drying. The specific gravity of cement plaster is higher than gypsum mixtures, so the thickness of the applied coating should be small.
Other ingredients are added to the cement composition to change the technical characteristics. To increase plasticity, lime and polymer components are included in the mixture. In decorative cement products, the binder may be white Portland cement.
The most popular cement-sand compositions for leveling. The ratio of cement and sand differs depending on the purpose of the material and is 1:1 or 1:4.5. For finishing ceilings, compositions with medium proportions of cement powder are recommended.
When finishing smooth ceilings, it will be necessary to increase the adhesion characteristics of the base and perform reinforcement with synthetic or steel mesh, or place beacon strips. If there are large unevennesses, the ceiling is leveled with primers before applying the cement mixture.
Gypsum based
Plastering the ceiling with a gypsum composition is carried out in rooms with a stable level of air humidity. Gypsum plasters harden quickly and acquire a durable texture. The material is characterized by its low specific gravity, plasticity, and environmentally friendly composition.
The versatility of use allows you to apply gypsum mixtures to ceilings made of different materials. The plaster has good vapor permeability, low thermal conductivity, is repairable, and does not shrink after drying. The material is affordable. Gypsum can be used as a binder in solutions with the addition of lime, polymer ingredients, and cement powder.
Gypsum mixtures are prepared in medium portions, because the composition hardens quickly. After applying the material, no additional leveling of surfaces with putty is required. Finishing with such solutions is aesthetically pleasing and can be done quickly.
It is important to take into account the instability of gypsum materials to high humidity and low frost resistance. The coating is not suitable for finishing unheated country houses.
The composition is not recommended for finishing ceilings that can withstand mechanical loads and are located in rooms with high traffic.
Clay based
Leveling the ceiling with plaster yourself using such mixtures is carried out for surfaces made of different materials. The plaster is affordable, environmentally friendly, and allows you to maintain a comfortable microclimate due to its high vapor permeability.
Clay mixtures are optimally used for decorating wooden ceilings. By adding fillers in the form of granules and sawdust, additional insulation of the room can be provided. The high plasticity of the material makes it easy to level surfaces and correct chips.
However, it is important to take into account the long drying time of the clay coating, instability to high humidity, and alkaline chemicals. The permissible layer thickness for this plaster is 10 mm.
Modern compositions
Modern building mixtures are used in the finishing of ceilings:
- polymer;
- acrylic;
- siloxane;
- silicone;
- silicate, etc.
Polymer materials are characterized by high strength, good elasticity and adhesion to different substrates, and durability after hardening. Polymer mixtures are easy to apply, resistant to vibrations, possible shrinkage of the building, and withstand high humidity and cleaning with chemicals. However, the material has a high cost. The composition is applied in a thin layer (up to 3 mm), so it is suitable for leveled ceilings.
What characteristics should you pay attention to when choosing
When choosing the right plaster mixture for the ceiling, you should pay attention to the main characteristics of this building material:
- Chemical composition - there are two types of aggregates for plaster - cement and gypsum. In the first case, the hydraulic binder hardens in wet conditions and is characterized by increased durability and reliability. Gypsum compounds are easier to apply. To achieve increased weather resistance, you should opt for a synthetic binder.
Cement plaster
- Scope of application - when purchasing, you should read the instructions on the packaging - the product should be recommended for installation on the ceiling.
- The minimum permissible thickness of one layer - the consumption of the mixture and, accordingly, the cost of finishing the surface of the floor slab depend on this parameter.
- Special characteristics are porosity, on which the heat and sound insulation properties of the mixture depend.
Gypsum plaster
- Hardening time and strength gain - when drawing up a calendar schedule, this characteristic affects the timing of finishing work.
In addition to the basic properties, attention should also be paid to the adhesion indicator, the size of the solid aggregate, the possibility of applying a textured layer and the thixotropy of the binder.
What plastering work is done - tools and materials
Before plastering the ceiling, you need to prepare the following tools:
- a set of spatulas of different sizes made of metal and rubber;
- construction trowel;
- brushes;
- rule;
- roller;
- sheets of sandpaper of varying degrees of grit;
- construction mixer or electric drill with an attachment;
- serpyanka;
- trowel;
- construction cord;
- lighthouse strips;
- containers for solution;
- ladder;
- protective equipment (rubber gloves, mask, respirator, goggles), etc.
In the list of materials:
- plaster (ready-made or in the form of a dry mixture);
- primer;
- putty, etc.
How to remove plaster from a ceiling
Do-it-yourself ceiling plaster for painting is carried out after removing old finishing materials. Cleaning is necessary if the previous coating crumbles, is unsteady on the base when tapped, there are cracks, or mold.
Work is performed in the following ways:
- standard manual;
- mechanized.
Standard manual
When performing work using the standard method, a chisel or spatula is used. A hammer and hatchet may be required.
The work is carried out in stages:
- The edge of the old plaster coating is pryed up with a tool, then the material is removed in pieces.
- The gypsum plaster mixture is removed after moistening the ceiling with warm water using a roller.
- The softened composition is removed with a spatula or scraper.
- It is prohibited to treat drywall with water; work on removing the old composition is carried out using a dry method.
- Materials that are securely fixed are removed with a hammer or chisel.
Mechanical approach
The mechanical option involves removing the old coating using a hammer drill or an electric drill with a special attachment. When working on small areas, you can use a grinder. First, using a grinder, cracks are marked on the old layer. The material is then removed with a tool. Work is carried out in a respirator from a stable support (construction ladder, stepladder, pedestal).
Solution application technology
Before starting work, the wooden base is coated with a primer or sprayed with water to improve adhesion to the plaster. Since any wooden ceiling is not ideally even, the plaster mixture is applied in three stages. First of all, fill the voids and unevenness of the base with the solution. The first layer does not need to be carefully leveled because it is intended for rough leveling. It is enough to remove only large influxes.
While the first layer has not dried, proceed to the next stage of plastering. To apply the second layer, you can use the throwing or spreading method manually, using a machine or a construction gun. This primer layer is well leveled, controlling the thickness by level or beacons. Sometimes it is necessary to apply a second leveling layer, which will be thinner and smoother than the previous one.
Important! The final result depends on the quality of the main leveling layer.
The third layer is applied after the previous layer has set. Features of the manufacture of the covering layer depend on the finish used:
- If you decide to make relief plaster, then the textured composition simultaneously serves as a covering and finishing layer. The relief pattern is formed immediately during the work process.
- Finishing made from piece materials (panels, tiles, stone) is attached to a well-leveled primer layer, that is, a covering layer is not needed.
- For pasting with thin wallpaper or painting, the covering layer must be of high quality. To do this, the applied solution is well leveled, smoothed and subsequently sanded.
How to properly plaster a concrete ceiling with your own hands (what is the sequence)
Novice craftsmen are interested in how to properly plaster a ceiling. First, an action plan is drawn up.
According to the rules, the following steps must be observed:
- surface preparation;
- mixing plaster mortar;
- plastering (the required number of layers is performed);
- drying;
- grinding;
- decorative finishing or painting.
For the ceiling, it is important to calculate the thickness of the plaster layer in accordance with the base material, the level of surface curvature, and the type of mixture used.
The standard layer thickness, taking into account the composition, is as follows:
- cement mortar - 10-50 mm;
- gypsum - 15-25 mm;
- clay-sand - 10-35 mm;
- gypsum-sand - 10-25 mm (when using reinforced mesh - up to 35 mm);
- clay-cement-sand - 15-35 mm;
- decorative plaster - 10 mm.
Depending on the base material, the coating thickness is:
- flat concrete base - 2 mm;
- concrete surface with height differences with reinforcement - up to 20 mm;
- brickwork - 5 mm;
- brick bases when leveling - 20-25 mm;
- brick with reinforcement - up to 50 mm;
- aerated concrete - 2 mm (for unevenness - up to 8-15 mm);
- wooden surface when applied in 2 layers - 15-20 mm;
- drywall - 1.5-10 mm.
If the planned thickness of the plaster is less than 6 mm, the work is carried out without beacons. Before painting and gluing wallpaper, the ceilings are rubbed and sanded.
Surface preparation system
Before leveling the ceiling with plaster, you need to prepare the base.
The work is carried out in stages:
- Remove old paint, wallpaper, fasteners (nails, screws and other steel elements) from the ceiling.
- Old whitewash and plaster are removed.
- Dust is removed from the ceiling.
- Cracks and tile seams are opened and cleaned with a stiff brush.
- Traces of mold and mildew are removed with a damp sponge, and surfaces are treated with antiseptic compounds.
- After cleaning, a deep penetration compound is applied to the area.
- After 24 hours, the ceiling is covered with cement mortar, in which the reinforced mesh is fixed.
- After drying, a second cement layer is applied to the reinforcing mesh.
Primer
The ceiling is primed using products suitable for the base. Smooth concrete surfaces are treated with Betonokontakt primer mixture. For porous areas, deep penetration soil is used. The material is applied in 2 layers using a roller. Each primer is allowed to dry for 24 hours.
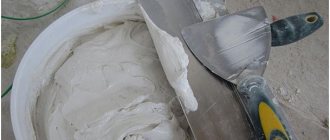
Preparation of ceiling plaster mixture
The solution is prepared before starting work. The prepared compositions are mixed in containers and water is added if necessary. Dry materials are diluted with water in containers taking into account the proportions specified by the manufacturer. Stirring is carried out with a mixer until a homogeneous consistency. The solution is infused for 20-25 minutes, then mixed again. With the mechanized plastering method, the composition is poured into a special compartment in the unit, and mixing is performed automatically.
Installation of beacons and their thickness
Plastering the ceiling along beacons is necessary in the presence of unevenness, chips, and cracks.
The work is carried out in stages:
- The ceiling is first marked and a cord is hung to check the plane.
- Nails are driven into the corners along which the cords are pulled.
- Then the beacons are fixed at intervals of 1-1.5 m.
- You can fix the elements onto the solution, leveling them with a spatula.
Plastering the surface on the ceiling
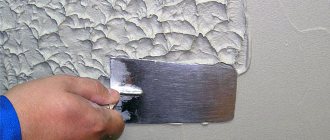
Plastering is performed using different technologies depending on the design solution. The composition is applied by throwing it with a trowel or spreading it. When plastering without beacons, the solution is distributed with a spatula in an even layer. The first coating is dried, then the next one is applied. After the mass has hardened, rub the surface with a damp sponge in a circular motion.
How to apply the final plaster layer to the ceiling
Ceiling plaster for painting is carried out with a mandatory finishing layer, because... the surface should be smooth. The presence of small cracks and irregularities that will appear after applying the paint is not allowed.
The finishing layer should be thin (about 3 mm) and is done with a covering or a special finishing mixture. The composition for this stage should be more plastic and liquid in consistency. The work is carried out with a spatula or trowel. The tool is held at a slight angle when applying the mixture.
After hardening, the covering is leveled with a grater, and the remaining material is removed. Movements with the tool are performed first in a circular manner, then in a straight line without pressing firmly. The ceiling is dried and sanded with sandpaper.
Preparing the surface for work
First, check the evenness of the ceiling and its horizontalness. The base is cleaned of old finishing and carefully leveled. If there are protruding bars or boards on a wooden surface, they are cut off. Significant voids are filled with scraps of boards.
Next, the base is impregnated with an antiseptic primer. A deep penetration antifungal composition for working on wooden surfaces is suitable for this. You can use a universal mixture instead. We apply the primer in several layers, and each layer must dry before applying the next.
Step-by-step instructions for a beginner on plastering a ceiling
Experts recommend that beginning craftsmen perform the work step by step.
At the first (preparatory) stage, the following actions are carried out:
- Furniture is removed from the room, old finishing materials are removed.
- The surfaces are covered with film.
- The room is de-energized.
- Dirt and mold are washed away.
- Antiseptic treatment of the areas is performed.
- Cracks and seams are opened, repaired, and sealed with primer.
- The reinforced mesh is installed, secured with a solution, and dried.
At the second stage, the following work is performed:
- Surfaces are primed with a roller and brush.
- After drying, the next layer is applied.
- These places are dried and checked with a level for any unevenness.
At the third stage, beacons are installed:
- Marking is carried out, checking possible height differences on the ceiling.
- Fixation of beacon strips in the corner areas.
- Placement of the remaining guides with the required pitch.
- The solution on which the elements are attached is dried.
At the fourth stage of work, the solution is prepared using a construction mixer and infused. If necessary, color is added to the mixture.
At the fifth stage, the ceiling is plastered using beacons or without planks:
- First a thin layer is applied.
- Then the bulk of the plaster is distributed on top and leveled.
- Excess composition is removed with a spatula.
- Smoothing is done according to the rule.
- Finally, the surface is glossed with a spatula.
- The beacons are removed from the solution.
- The grooves are filled with plaster mixture and the surfaces are leveled.
- Final polishing is performed.
How best to level a ceiling with plaster
Ceiling leveling technologies differ depending on the quality of the surfaces:
- smooth, without defects;
- with differences in height, roughness, bulges or depressions.
Relatively flat ceilings
Smooth surfaces can be prepared for plastering without the use of beacons. The coating is carried out in 2-3 layers. Some areas can be treated with more leveling solution. The final layer should be of uniform density.
When applying plaster with a thickness of more than 1 cm, reinforcement is required. Fiberglass or metal mesh is fixed to the ceiling before plastering and covered with plaster.
How to plaster ceilings with large irregularities
When processing ceilings with uneven surfaces greater than 2 cm, it is necessary to install beacons. The plaster material is applied in a dense layer that protrudes above the beacon strips. Then the mass is leveled over the surface using a rule. Finally, the material on the ceiling is sanded.
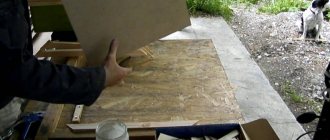
What is shingles?
The material consists of narrow planks with a thickness of two to five millimeters, their length can be up to 4 m. Inch boards or veneer of aspen, pine, spruce, and larch are cut into shingles. Coniferous wood species are used as raw materials, since they contain a large amount of resinous substances. Resins are a natural antiseptic and will not allow putrefactive bacteria and moldy fungi to appear and develop during operation.
Plaster slats are made from third-grade wood, their price is low, so it is much more profitable to buy ready-made slats. Since making shingles for plaster at home using a circular saw is a long and thankless task. As they say, “the game is not worth the candle.”
Some features of plastering other ceilings
When plastering, the characteristics of the materials are taken into account. Treatment of ceilings made of wood, plasterboard, and insulation is in demand.
Plastering wooden ceilings
Wooden ceilings are being prepared for plastering. You will need to fill 2 layers of shingles or fix a reinforced steel mesh with cells measuring 10x10 cm. Without preparation, the plaster coating will crack and remain unstable on the wood. Each layer of solution is dried. The materials are applied in stages, then leveled with a spatula.
How to plaster a plasterboard ceiling with your own hands
Before plastering the plasterboard ceiling, the seams are covered with sickle tape, and the surface is leveled with a primer. Carefully handle the heads of screws, nails and other metal fasteners that may appear after painting or gluing wallpaper. The layer of plaster coating should be no more than 15 mm.
Plaster on ceiling insulation
Plastering on ceiling insulation is carried out in 2 stages. First, the base is primed. A liquid plaster solution is applied on top, onto which a painting mesh is fixed and pressed into the composition. The mesh sheets are overlapped. The first coating is dried, then the next layer of a denser solution is applied. The material is leveled using the rule and rubbed after drying.
When is puttying needed?
Ceiling putty has a different composition than plaster mortar. The putty mixture is fine-grained, and the plaster has large grains in its structure, therefore, using putty, a smoother and more uniform surface is achieved.
Important! Putty mixtures are used for fine leveling of walls and ceilings. After the putty has dried, the surface is sanded, making it perfectly smooth and even.
Puttying a ceiling that was previously plastered is necessary before pasting it with thin paper wallpaper or painting it with interior paints. The putty is applied in 2 layers, but before that the surface is primed. After puttying, the ceiling surface needs another grinding and primer treatment.
Application of decorative plaster (how to make the ceiling unique)
Finishing with decorative plaster allows you to increase the aesthetics of the ceiling in the room.
The work uses techniques for finishing other surfaces:
- imitation of “wet silk”;
- under a stone;
- Venetian plaster;
- "bark beetle", etc.
First, the ceiling is leveled, plastered with a starting mixture, dried and sanded. At the final stage, a decorative layer is applied. For each technique, the number of coatings and texture reproduction are provided. After treatment, the surfaces are dried.
If the decorative mixture is not tinted, the next step is sanding and painting the ceilings. Some techniques (“wet silk”, textured textures) use waxing.