Lately you can often hear statements that our environment is bad, which is why people have become sick more often and more seriously. In order to somehow protect yourself, you need not only to lead a healthy lifestyle and eat right, but also to make your apartment safe.
In the construction industry, finishing material such as gypsum plaster is now becoming increasingly popular due to its high environmental friendliness. This mixture is often used for interior decoration of ceilings and walls, and is especially good for those who like to do everything with their own hands.
This plaster consists of the main component - gypsum, additional in the form of light fillers and high-quality modifying additives, which help the solution to better adhere to the base.
Tools and materials for work
For plastering you will need the following tools:
- spatulas of different sizes;
- plaster ladle or trowel;
- the rule is either a meter-long wooden strip and a building level;
- grater and grater;
- lighthouses;
- bucket for water, shovel, mixer for mixing.
If the amount of work is large, you can use a concrete mixer to make the mixture.
Preparing the walls
Plastering walls with your own hands begins with preparing the surface. The work depends on the wall material.
- Excess mortar is removed from the brick The smoother the surface, the less plaster will be required. The wall is cleaned of dirt and dust, and then treated with a primer: it prevents the absorption of moisture from the plaster.
- The concrete wall is being cleaned. Protruding irregularities are cut off or knocked down. There is no need to prime, as concrete does not absorb water very well. It is recommended to apply notches - grooves 3 mm deep and 15 mm long.
- A wooden wall is primed twice, as it strongly absorbs moisture and has poor adhesion. Then stretch the metal reinforcing mesh and attach it to the screws.
If the wall is being plastered again, you need to remove the remnants of the old coating completely.
How to make decorative putty: simple techniques
If Venetian or Moroccan plaster requires skill and time, then some reliefs can be made with your own hands very quickly. This does not require expensive materials; ordinary putty and simple devices are sufficient.
Curly roller
With the help of structured rollers you can cover even a large area in a short time. Their surface can be rough, fleecy, with a geometric or naturalistic pattern, for example, wood or leather.
Homemade devices are also used. To make them, ordinary foam rollers are converted into structural ones - they are wrapped with ropes, plastic film, a pattern is applied to the surface using a silicone glue gun, etc.
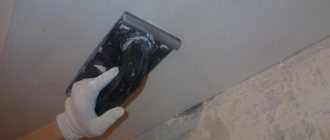
When forming a decorative coating, a layer of putty 1-3 mm thick is applied to the wall. The roller is moistened with water and rolled over the damp surface in a certain direction or randomly.
Processing continues until a characteristic uniform pattern appears on the wall. After drying, the surface is lightly sanded and painted as desired.
Masking film
This is a simple and inexpensive way to create an interesting “crinkled” pattern on the wall:
- Tint the putty for the base layer in the chosen color and apply evenly to the surface.
- Cover the putty with masking film, smooth it with your hands and form a relief. Additionally, treat with a roller.
- After 24 hours, carefully remove the film, wipe the surface with a grout mesh, remove dust and prime.
To secure it, tinted azure is applied. To emphasize the relief, excess from the protruding parts is removed with a plastic spatula.
Using a stencil
Stencil plaster requires painstaking work and considerable patience, which is why master finishers charge a lot of money for the work. But you can do something similar yourself.
You will need a thick stencil, which you can make yourself or order from a workshop. The surface of the wall must first be primed with a high-quality primer and puttied to match the finish. The base can be perfectly flat or with some deviations (for subsequent filling with Venetian). A little Marrakech on the plaster will only decorate it.
The stencil is glued to the wall using masking tape. The slots are filled with a modeling mass of a different color from the base. You can use a solid color mixture and then paint the reliefs or cover them with gold. After the putty has dried, sand off the burrs and finish the wall completely.
"Fur coat"
The mixture for this plaster is made on an acrylic base with the addition of sand and ground rocks. They give the surface its characteristic “fur” appearance.
Compositions for “fur coats” are plastic, easy to apply, and not prone to shrinkage and cracking. You can tint the entire mass at once or paint the surface after the solution has dried. The pre-treatment primer should contain quartz to ensure good adhesion of the materials.
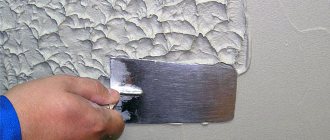
To apply the “fur coat” you will need a trowel and a metal grater. For the first layer, the mixture is distributed evenly over the wall with a thickness of no more than 1 mm.
Next, the desired drawing is formed:
- A portion of the solution is applied to the spatula and lightly smoothed with a trowel.
- The spatula is applied to the surface, pressed and torn off. Movements are made chaotically.
- Begin processing each subsequent section before the already applied putty dries, in order to avoid the visibility of joints.
- After the plaster has dried, remove sharp ridges with sandpaper.
The coating can be washed, repainted, and damaged areas can be repaired.
Purpose and advantages of beacons
Lighthouse – metal profile . The element is mounted vertically along the wall. The craftsman applies a layer of plaster to the level of the lighthouse and levels it out. It's much more convenient.
Beacons can be removable or non-removable . The first ones are less than 6 mm in diameter. After plastering, they are carefully removed from the still fresh mass, and traces of them are rubbed off with a trowel. A profile with a diameter of more than 6 mm is left in the wall.
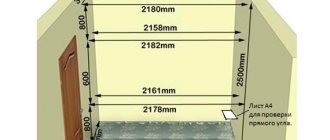
Beacons are attached according to markings. The first profile is fixed at a distance of 20 from the edge of the wall. The rest are mounted at a distance of 1.1–1.2 m. They place the profile on the plaster. A thin layer of plaster is applied to the marked places on the wall and the beacon is pressed into it. A level is used to check the verticality of the element and compliance with already installed beacons.
To prevent distortions, measurements are taken vertically, horizontally and diagonally.
Specifications
The quality of mixtures using gypsum binder is regulated by GOST 31377-2008 . According to this document, the main indicators of dry material include:
- humidity: moisture content is allowed no more than 0.30% of the total mass;
- maximum size of granules (grains);
- volumetric weight: 800-1100 kg/m3 (loose) and 1250-1450 kg/m3 (compacted).
Properties of the prepared solutions:
- water consumption when mixing - 0.6-0.65 l/kg
- mobility: the ability to spread under the influence of its own weight; according to GOST 31376, the diameter of the melted sample of the prepared solution (~600 g) should not exceed 165 mm (±5);
- setting time - at least 90 minutes for machine-applied mixtures and 45 minutes for manual plastering;
- complete drying time - after 5-7 days; this indicator depends on the additives in the mixture and differs among different manufacturers; You can find out exactly how long it takes for the plaster to dry in the instructions on the package;
- ability to retain moisture without allowing it to drain: at least 90%;
- consumption for a layer of 10 mm is 8.5-10 kg/m2 (manual application) and 7.5-9 kg/m2 (machine application).
Properties of gypsum plaster in hardened form:
- compressive strength - 2.5 MPa;
- surface adhesion force - 0.3 MPa;
- density - 950 kg/m3;
- vapor permeability - 0.11-0.14 mg/ppa;
- thermal conductivity - 0.25-0.3 W/m*C;
- shrinkage - does not shrink
Although the vapor permeability (the ability to transmit water vapor) of plastered surfaces is not regulated by GOST, it is also an important technical characteristic that determines the scope of application of the plaster.
When purchasing gypsum mixtures, you should pay close attention to their shelf life. Due to their ability to easily absorb moisture, they cannot be stored for longer than 6 months from the date of release. After this period, their properties change, they begin to clump, and high-quality leveling of walls with them becomes problematic. It is also necessary to pay attention to the tightness of the packaging, which protects against excess moisture - you should not purchase plaster in torn bags.
Mixing the solution
It is convenient to mix the plaster with a construction mixer.
Prepare the solution according to the instructions. To do this, pour water in the specified volume into the dry mixture and stir. It is better to add water several times. On average, 5 kg of plaster requires 1 liter of water. The composition for spraying and covering is made more liquid.
If a ready-made cement-lime mixture is used, the preparation technology is the same. The factory product is in hydrated form. If the mixture is made independently, the lime mortar is prepared in a 1:1 ratio separately and kept in a container until thickened for several days. The component is then added to the cement mortar.
Only slaked lime is added to the plaster mass.
Construction dry mixtures
Often, builders do not want to bother with preparing homemade solutions for plastering walls. It is much easier for them to buy a ready-made mixture based on Portland cement, which is called dry construction mixture and has been actively sold in the markets for many years. This product contains various additives that make the finished plaster plastic, durable, and more sticky relative to the working surface.
Dry mixtures for external plaster
Decorative mineral plaster for exterior use
Advantages of dry construction mixtures:
- they are elastic, which makes them resistant to temperature changes and changes in weather conditions;
- practically not deformed;
- do not need reinforcing mesh;
- economical, as they allow you to prepare the right amount of solution without excess;
- diverse, which makes it possible to select a specific mixture for each type of work;
- “breathe”, allowing air to pass through, and are not destroyed by moisture.
The recipes for these mixtures are developed in special laboratories, thanks to which the proportions of the components included in them are verified very accurately. Due to this, the compositions in a diluted state are as uniform in consistency as possible. Having thinned this plaster, you can immediately begin work.
Preparation of the solution
Plaster application technology
Plastering is carried out in stages: spray, primer and covering. This allows you to simultaneously level the walls and achieve high mechanical strength.
Splash
Spraying is carried out after the primer mixture, if used, has completely dried. Prepare a more liquid solution than the main one. The step-by-step instructions are simple.
- The sand-cement mortar is applied with a trowel and a sharp movement of the brush. You can take a ladle.
- The layer is applied thinly; there is no need to level it. Its purpose is to improve the adhesion of the base surface and fill the smallest pores.
If there are large defects on the wall, they are filled with cement mortar before spraying.
Priming
After a couple of hours, a primer, main layer is applied. The order of work is as follows.
- The wall is moistened with water before plastering.
- The viscous solution is applied manually with a spatula, from bottom to top. Layer thickness – from 5 mm. If there are large differences in height, joints, rough seams, it is better to apply several primer layers. Excess solution is collected in a bucket. The wall is leveled with cement mortar in 1 pass.
- Throw the mixture onto the area between the beacons. When it is filled, they stretch it out as a rule. The rule rests on the side beacons, forming a flat vertical surface.
- On the first pass, the rule is moved in a zigzag manner. If cavities appear that are not filled with plaster, add mortar and smooth the wall again - now moving in a straight line.
- Excess solution is collected in a bucket and can be used.
If the layer of plaster is applied very thick - more than 3-5 cm, a reinforcing mesh is installed.
Finish
To cover, the solution is made more liquid. Its task is to smooth the surface. Apply the finishing layer after the previous one has dried.
- Apply the composition from top to bottom, level with lateral movements. Use a wide spatula.
- Layer thickness – no more than 2 mm.
- The dried covering is leveled with a trowel.
If the wall is being prepared for painting, it is recommended to putty it.
Application
Leveling walls with gypsum plaster
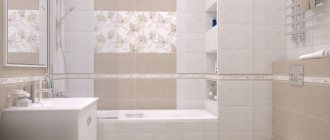
Gypsum-based plaster is used for interior work in rooms with minimal humidity.
It is intended for leveling walls and ceilings and is a preparatory stage for decorating a room.
Gypsum-based plaster perfectly removes all uneven walls and reduces putty work to a minimum.
Recommendations for beginning craftsmen
Plastering is a multi-stage and rather lengthy process. To avoid mistakes, you need to follow the recommendations.
- Plastering is carried out only at temperatures above +5°C . Otherwise, the composition dries unevenly and cracks.
- When working above +25°C , the surface must be moistened with water more often.
- For finishing aerated concrete or wooden walls, it is better to use gypsum compounds.
- Porous materials - slag concrete, wood - draw moisture from the plaster. Priming is required.
- Expansion joints are formed at the joints with door jambs and window frames . For this purpose, expansion rails are installed.
You can begin further finishing work only after the plaster has completely dried.
What's included
The main component of this type of plaster is building gypsum - calcium sulfate hydrate, obtained by firing gypsum stone and crushed to a powder state. The following may also be added to the composition:
- fillers that reduce weight and increase the thermal insulation properties of light plaster: perlite, vermiculite, foam glass or expanded polystyrene;
- plasticizers and retarders;
- additives that increase the whiteness of the surface - salts of various metals (zinc or titanium white) or lime;
- components that increase their strength;
- additives that regulate the setting time of the solution and its hardening time.
Gypsum plaster is an environmentally friendly material and is absolutely not hazardous to health. Moreover, due to its hygroscopicity, it is able to “breathe”, that is, absorb excess moisture and, on the contrary, release it, thus regulating the microclimate in the room.
A separate type of gypsum plaster is gypsum polymer. It is used for leveling brick and concrete surfaces. In some cases, gypsum polymer compositions can also be used for exterior finishing work.