The desire of developers of new types of plumbing fixtures to reduce their weight as much as possible is fully justified by the desire to facilitate installation and reduce the load on the base. Specialized markets offer a wide range of products, the installation of which you can easily handle yourself.
However, the lightness deprived the container of an important quality - stability. A bathtub frame that you can build with your own hands will help you avoid tipping over.
We will tell you in which cases you cannot do without additional support, indicate suitable materials for assembling the frame, and provide tips on choosing the type of structure. Step-by-step instructions with photo accompaniment will help you make a reliable frame for any bathtub.
Prerequisites for the construction of the frame
Steel frame for bathtub
A bathtub frame is especially necessary when choosing a bowl with an unusual configuration. Multi-sided, round, oval models are difficult to secure. The wide sides of the product are fixed to a special frame, this ensures a stable position.
The frame is mounted to the walls or made in the form of a separate platform. Use a ready-made design or make it yourself. To install a heavy cast iron model, the support is made of bricks.
The frame for a steel bathtub makes it stronger and more reliable. Such products are thin-walled, the thickness of the sides is half that of cast iron models. The base is made of wooden beams, plywood or metal profiles. This robust structure consists of vertical and horizontal supports.
Installation of the frame provides:
- even distribution of bowl weight;
- preventing deformation of the walls of the font;
- preservation of enamel on the surface.
Acrylic products are more elegant and require reliable support that will protect them from load and deformation. The material is much inferior in strength to metal and cast iron. The bottom of the structure bends easily.
A frame for an acrylic bathtub is simply necessary, especially for thin products. The more elegant the model, the stronger the support should be. If the bathtub has an unusual configuration, a special platform is required for support.
Frame made of wooden blocks
Lumber is less suitable for use in conditions of high humidity than metal profiles, so it is recommended to pre-treat them with an antiseptic or oil-based impregnation. A wooden frame for a bathtub is assembled with your own hands from bars with a cross-section of 50×50 mm. Arrangement of a wooden frame and installation of a bathtub is carried out using a similar technology, let’s consider the main points:
- The frame is mounted on leveled, pre-primed walls.
- For additional rigidity and strength of the structure, horizontal slats are supported by vertical posts.
Wooden frame. - After constructing the frame, the timber is covered with a liquid waterproofing compound. If the walls behind the bathroom are not tiled, it is also recommended that they be treated with waterproofing.
Frame waterproofing.
After the waterproofing has dried, the bathtub is installed and connected. Under it, for greater stability, a support is built from brick or other piece of building material, while the junction with the bottom of the equipment is foamed. Then the frame under the screen is assembled and it is sewn up.
Materials for homemade frames
Wood frame
The stable frame for the bathtub is made by hand. This will save money and create a more reliable design. The material chosen is durable and affordable.
The most common types:
- Wooden beams are low cost, durable, and easy to process. Disadvantage: rotting due to moisture. To protect the surface, it is treated with a special moisture-resistant compound. Oak, cedar, alder, and larch are used.
- Galvanized profile, used for plasterboard construction. Does not withstand heavy loads, plays the role of decoration. The weight of the product falls on the legs and wooden beams.
- Iron profile pipe holds a font made of any material. Even a non-standard cast iron product. To make such a frame you will need special equipment and welding skills.
- The brick reliably strengthens the product and is used as a stand for cast iron bathtubs. To carry out masonry, you must have certain skills in construction.
The appropriate material is chosen depending on the type of product, wall thickness, and personal preferences.
Acrylic, steel, cast iron – choosing a frame?
Frame for acrylic bathtub “Neptune”
If for cast iron and metal legs and a one-sided or double-sided frame (side and end) are enough to cover them with tiles, then for acrylic this will not be enough. Metal is a strong and rigid material, so the bottom and sides always remain safe there, which cannot be said about elastic acrylic .
In the photo above you can see the factory metal structure, which strengthens the bottom of the container well. But at the same time, such a frame gives almost no rigidity to its sides, since all support is limited to vertical supports in the corners.
Of course, the instructions from the manufacturer say that this is a reliable means of protection against faults, but in reality this is not the case. More than once I had to be convinced of the opposite in practice. Especially when such a plumbing fixture was used by obese people with limited physical capabilities.
Due to frequent and strong pressure on the middle of the side, it cracked at the corners and the supports did not help. Therefore, I dare to assure you that the corner is the weakest point.
I do not recommend using such a frame without additional fastenings - the corners here are not secured at all
Therefore, it is better to make a frame for an acrylic bathtub with your own hands. Or add jumpers made of a metal profile to the factory one, which will at least fix the sides - the ends are not necessary - no one is leaning on the lapel. There are two types of frames sold in stores - prefabricated and all-welded, and here you will need to decide for yourself which one is better.
Excellent factory frame for an oval acrylic bathtub
When purchasing a ready-made structure, you should pay attention to the fact that if you place an acrylic bathtub on a frame, the sides must be firmly supported. That is why you should take into account the number of support points .
This is especially true for containers with a non-standard configuration - angular, oval, round, or without a clear geometric shape at all. In any case, the bathtub frame should allow the possibility of strengthening the cuffs yourself.
The base and frame must be reliable, regardless of the bathtub configuration
It should be noted that factory-made and even home-made all-welded structures are always weaker than prefabricated ones. Since assembling a frame with bolts means making the connections comparable in strength to solid metal. A bolted connection is always stronger than a welded seam, especially since in such cases it is possible to adjust the legs in height.
Own production
It’s clear that you will assemble a frame from a profile, but first you need to decide what it will be like - wooden, steel, or it will be CD and UD for drywall.
Progress of work on the construction of a wooden frame
In cases where you doubt the strength or usefulness of the factory design, and also if they do not suit you in size or configuration, then you should figure out how to make the structure yourself.
Making a frame for an acrylic, cast iron or steel bathtub with your own hands will not be difficult, if it is, of course, quadrangular and has straight lines:
- you essentially need to make two frames of the same size, connect them at the height of the container so that the top frame fits under the sides. And on the bottom it is necessary to make jumpers to support the bottom;
- then put it all on six legs - four in the corners and two in the middle;
- the main disadvantage of such a structure is that the legs here cannot be adjusted, which means you will need a perfectly flat floor for installation;
- and since wood is afraid of moisture, the structure will last much less than the bath itself. And yet, all wooden elements should be treated with an antiseptic to protect the frame from rotting; this measure will extend the service life of the tree;
Making your own frame for an oval bathtub
- You can also make a frame from wood for a container that has an uneven configuration, for example, oval, as in the top photo;
- to do this, you will need to assemble a regular structure, but make a lid on its upper frame with a cutout to fit the size of the bathtub, securing it from below with bars;
- moisture-resistant plywood with a thickness of 14-16 mm is suitable here;
Bathtub lined with plasterboard for further tiling
- for a steel or cast iron bathtub with smooth or rounded edges, it is very convenient to use a galvanized profile for the manufacture of the frame, which was originally intended for the installation of plasterboard structures (I have already mentioned this);
- with vertical loads it is of little use, but as a lathing for installing drywall under tiles, it is an almost irreplaceable thing;
- in addition, the UD guide can be bent, repeating the line of the side - to do this, you just need to cut the side shelves and the base in the right places;
All-welded construction - built to last!
- Of course, the most rigid structure will be a steel hollow profile, as in the top photo;
- the essence of its assembly is absolutely the same as the arrangement made from wooden blocks, only wood screws were used to fasten the joints, and welding was used here;
- again, there is a problem that to install it you need a completely flat floor, since the height of the legs is not adjustable;
- therefore, finishing with ceramic tiles along the screed is needed;
Brickwork is a popular solution
- but, be that as it may, most often they use brickwork, while a CD profile or a 50x50 mm wooden block is screwed onto the wall under the side;
- If previously the top two rows of masonry had to be trimmed or hemmed, then the sides of modern bathtubs allow you to raise the masonry in a quarter-brick without any trimming, that is, 65 mm wide.
Construction methods
There are different frames for installing a bathtub:
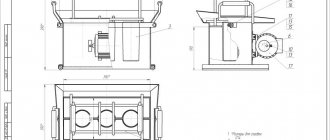
- In the form of a stand on legs made of metal profile. Rectangular pipes are used. The structure consists of several elements that support the bowl. The set includes legs that can be used to adjust the height. Only the bottom of the bathtub is installed on the support.
- Flat frame with legs - this option is more complex and durable. The bottom rests on a profile stand, the base corresponds to the bottom of the bowl. Transverse ribs add stability. Vertical elements support the sides. Used for bathtubs of complex shapes and corner models.
- A fully welded frame is the most durable. It is a three-dimensional design that holds the bowl securely. It has several support points, distributes the load from the bottom and sides of the product. The stiffening ribs are located in the areas of the main load.
When choosing the type of support, consider:
- bath dimensions;
- configuration;
- wall thickness.
The thinner the structure, the stronger the support should be.
For a standard rectangular model, a regular frame will do. The supports differ in the thickness of the metal and the manufacturer. If the bathtub has a complex shape with hydromassage, a reinforced frame will be required. High-quality supports are made of thick, durable metal with an anti-corrosion coating.
Dependence of the complexity of a structure on its shape
It is clear that the more complex the shape of the bowl in plan, the more work an independent craftsman will have to do.
According to the degree of complexity, the arrangement methods can be divided into the following options:
- Regular rectangle. Its construction will not cause difficulties, especially if the frame is installed in a niche or in a corner formed by two adjacent walls.
- Triangle with a curly outer side . Similar designs are suitable for corner baths. The sides converging at right angles are usually located in the corner of the room, the frame is constructed along the outside, and includes several interconnected frames.
- Oval . It is arranged along the contour by installing a large number of frames or broken strapping. Although there is a simpler method.
To ease the effort when installing oval and fancy-shaped bathtubs, a rectangular structure with gypsum fiber lining is constructed.
A hole is cut out in the horizontally laid top sheathing panel for the bowl so that its sides rest completely on the frame.
Image gallery
Photo from
Arrangement of an oval bath
Specifics of frame construction
Forming a hole for the bowl
Template for marking the hole on the panel
Most homemade products do not require repeated assembly/disassembly. They are arranged in a non-disassembled form, although sometimes the possibility of dismantling and subsequent construction in a new place would be very useful for those who like to move frequently.
The frames supplied with acrylic bathtubs can be easily disassembled and reassembled many times. They include, as standard, a welded frame and adjustable supports in the form of steel threaded rods with plastic attachments. They come with fasteners and instructions with a detailed step-by-step description of the actions.
Assembling the finished support
All-welded construction
Plumbing stores sell factory frames designed for each model.
Ready-made supports are distinguished:
- prefabricated;
- whole-welded.
How to assemble a finished frame for an acrylic bathtub is described in detail in the instructions. The kit includes the necessary fasteners.
To assemble a standard design:
- They disassemble all the elements and check their presence.
- Prepare tools: drill, screwdriver, screwdriver.
- The bathtub is turned upside down and the frame is put on top.
- Before screwing in the fasteners, mark and make holes to prevent the material from cracking.
- The bowl is inserted into the base and leveled using a building level.
- The bathtub is fixed in the frame.
After this, a siphon and mixer are installed, and the product is connected to the sewer.
If the design is not satisfactory, it is made with your own hands from wood, galvanized profile, or iron pipe.
Finishing work
In order to reduce the noise level (the pillow partially performs this function) from water entering the bathtub, insulation, for example extruded polystyrene foam, can be inserted into the frame. It is cut to dimensions 2-3 mm larger than the frame cell and inserted flush with the outer edge of the beam. Don’t forget to leave room for an inspection window, which you can buy in a store or do it yourself. The inspection window should be located so as to provide access to all communications.
Let's start installation:
- As a base for ceramic tiles, you can use moisture-resistant plasterboard sheets (2 layers) or cement-bonded particle board, or other moisture-resistant sheet materials.
- We lay the tiles on the base using an adhesive mixture.
- We grout the tile joints using sealant.
Preparatory stage
The frame for an oval bathtub is made by attaching it to the wall on both sides. First, calculate the height of the platform. To do this, measure the distance from the lower edges of the side to the floor.
It is necessary to calculate the load on the structure. The weight of the product filled with water and the weight of the person are taken into account. The choice of material, the number of stiffeners, and wall thickness depend on this. Next, you need to do the following:
- Boards for the base are laid around the perimeter and screwed to the floor.
- Install the racks, attach them to the base and to the wall.
- Another board is placed on top of the racks.
- Lay a sheet of chipboard or plywood and screw it around the perimeter to the frame.
- A hole is cut in it for the bathtub.
- A template is used to mark the hole.
- Cut it out using an electric jigsaw or a hand saw.
Plywood is used with increased water resistance, 15 mm thick.
The racks are nailed to the bars, and not to the base, this will simplify installation. For convenience, metal corners are used.
Metal profile frame
The most popular option for a homemade frame when installing a bathtub is from a profile for plasterboard systems. Galvanized profiles have good strength, rigidity and durability, and are suitable for construction under steel and acrylic bathtubs.
The installation of the frame is carried out after preparatory work: leveling the walls, laying out sewer and water pipes.
Let's look at the main stages of constructing a frame using the example of installing an acrylic bathtub.
Equipment preparation and marking
At this stage, the bowl is turned over and profiles for attaching the legs are screwed to it, using the self-tapping screws included in the kit: for these purposes, the bottom is specially reinforced with plywood. Then screw legs are installed on the profiles. Also at this stage, the drain-overflow system is assembled and installed.
This is interesting: Installing a cast iron bathtub. Features and nuances of professional installation
Next, the bathtub is brought into the bathroom and adjusted to the level by adjusting the legs. Marks are placed at the bottom edge of the side for mounting the frame.
Then the bowl is taken out of the room, after which they begin to assemble the frame structure.
Frame installation
The arrangement of a metal frame consists of the following operations:
- The profiles are cut into segments according to the markings, and holes are drilled in them for fastening to the wall.
- Sealant is applied to the shelf adjacent to the wall, after which the profiles are screwed to the wall according to the previously applied marks. In brick and concrete walls, holes are pre-drilled and dowels are inserted; in partitions made of gypsum boards, self-tapping screws hold well without dowels.
- Also at this stage, the side posts and the bottom guide for the screen are installed.
- Sealant is applied to the upper shelves of the profiles, after which the bathtub is brought in, installed and connected.
The next stage is the construction of a stand to support the bottom of the bathroom. For this purpose, bricks, cinder blocks, and lightweight concrete blocks are used. They are installed in several rows and secured with ordinary cement mortar.
Important! The bottom of the bathtub should not rest on bricks or other support: a gap of at least 5 mm is left, which is filled with polyurethane foam. To prevent the bowl from lifting when the foam expands, it is filled with water or loaded with improvised means.
When the foam hardens, install a frame structure for the screen and cover it with plasterboard.
Profile construction device
Profile frame
A profile frame for a bathtub is the most popular option.
For production use:
- square pipes;
- U-shaped section;
- corner.
Algorithm of actions:
- Measurements are taken.
- The design is designed to ensure proper weight distribution over the entire frame area.
- Cut the profiles to the required length and fasten them together.
- The pipes are laid on the floor and welded or bolted.
- The frame frame is welded to the corners of the floor base.
- A platform made of bricks, boards, and sand is installed under the bathtub.
- Rubber is used for shock absorption so that the product does not wobble.
- The gaps between the bathtub and the floor are filled with polyurethane foam.
The edges of the metal parts are sharp and can damage the bowl. The profiles are in contact with the bathtub with the back side. Drywall and tiles are laid in the same plane.
How to do a frameless installation yourself
Simplified installation technology allows you to complete the job without turning to a plumber for help.
Preparation
Frameless bathtub installation.
The first stage is turning the bowl over. The factory package of the acrylic bathtub includes metal slats. They are fixed horizontally across the bottom with self-tapping screws from the same set. By using longer hardware, you can pierce through a plumbing fixture.
Using nuts, legs, pre-adjusted in height, are installed on the transverse profiles. The inlet pipe of the sewer drain should be located below the siphon outlet.
If you plan to install a decorative screen that hides communications, a guide is fixed on the side to secure it. It is difficult to perform this procedure after the installation is complete.
The last stage of preparation is assembling and connecting the drain-overflow system.
Bath installation
For correct installation you need to follow the algorithm:
- in the bathroom the bathtub is connected to communications;
- diagnostics of the drainage and tightness of the drain pipe is carried out;
- the gap between the side and the wall is filled with sealant;
- the bath is weighted with water or several sandbags;
- a support cushion of brick or cinder block fixed with cement mortar is constructed under the bottom;
- the gap between the body and the masonry is filled with polyurethane foam.
A filled bathtub will not be able to rise due to the expanding foam that fills the intermediate surface, securing the support.
After the time required for the liquid compounds used in the frameless installation of the acrylic bath to harden, you can begin finishing. Most craftsmen install a screen made of plasterboard sheets, plastic panels or other materials with increased moisture resistance on the outside.
Assembling a timber base with your own hands
Ready-made frames are not always suitable for installation. A DIY wooden bathtub stand is more durable. This is the simplest and cheapest option. You will need a beam with a cross section of 40 x 40 mm and a sheet of plasterboard.
Prepare a set of tools:
- drill;
- hammer;
- wood drill;
- hacksaw;
- screwdriver
The wood is treated with a special impregnation that protects it from moisture.
Procedure:
- They take measurements and cut parts. The upper and lower parts follow the shape of the bathtub.
- To begin with, lay out the support perimeter. This is a flat frame with stiffening ribs.
- The prepared parts are screwed to the floor with dowels.
- The corner posts are secured carefully; the main load falls on them.
- The stand is nailed to the wall along the entire perimeter.
- The upper support panel completely repeats the assembly of the lower one.
- The profiles are secured using self-tapping screws.
- Additional load-bearing walls strengthen the structure. They are installed every 0.5 m, along the longest side.
- One stand is placed on each side in the center.
After this, communications are connected, the frame is covered with plasterboard or a plastic screen. Decorate with ceramic tiles or panels.
What shape does a bathtub frame come in?
They can be roughly divided by type of material (wooden, metal, brick) and by shape (for corner, rectangular, round bowl). The main property of such a box is its strength and ability to withstand extremely high weight loads (the weight of a bowl of water and a person). The second condition is that the base material must have a protective coating that protects it from high humidity, direct ingress of water and not deform from temperature changes. The shape of the frame should copy the geometry of the bowl as much as possible and ensure strength.
Installation on bricks
Bath on bricks
This is a reliable way to install a bathtub. The brick base does not deform or deteriorate from moisture. This stand differs from a wooden and metal frame. Installation features:
- Two brick supports are placed at a distance of 50–60 cm from each other.
- The width of the structure should not be larger than the bathtub.
- The stand follows the shape of the bowl.
- The part on the drain side is 1.5–2 cm lower to ensure water drainage.
The bowl is placed on the finished supports and firmly fixed to the wall. The gap between the brickwork and the bottom is filled with tile adhesive or polyurethane foam.
Instructions for arranging a frame made of wooden blocks
The technology is similar to the previous version.
The differences are due to the characteristics of the material:
- the preparatory stage consists of treating the lumber with an antiseptic or oil impregnation;
- during the preparation process, the walls are leveled and primed;
- horizontal bars are fixed on vertical supports, increasing the rigidity of the structure.
The final stage of installation is treating the wood with a waterproofing agent. The walls adjacent to the bathroom are coated with the same composition. If used for tile cladding, additional waterproofing is not required.
Bath installation
When the frame is completely ready, install the bowl on it:
- A cement pad is poured onto which the bottom rests.
- Carefully lower the bathtub into the hole on the frame.
- Then connect the water supply and sewerage.
The sides of the frame are covered with panels made of thick plywood, chipboard or flat slate. The shields are secured using screws with anti-corrosion coating. Tiles are glued onto the resulting walls. The gaps between the tiles, floor and frame are sealed with sealant.
For convenience, doors are made to provide access to the pipes in case of leaks and blockages. Detergents are stored under the bathroom.
The service life of the product depends entirely on the reliability of the installation. The frame for the bathtub must be solid and very durable. It is up to the buyer to choose a ready-made design or make it yourself. You can call a specialist and entrust the installation to an experienced specialist.
Assembling a factory kit for an acrylic bathtub
Installing a frame under an acrylic bathtub.
The factory package includes a prefabricated structure. It outperforms the homemade version in terms of the possibility of repeated dismantling and installation without damaging parts.
The assembly is performed according to the following algorithm:
- The welded frame is fixed to the bottom of the bath. The structural elements are laid out on the floor. The number and type of parts are checked against the list included with the kit.
- Vertical racks are installed. Studs with screwed nuts are inserted into the corner holes of the frame and screwed into the plastic legs. A small gap left during fastening between the frame and the supports will allow you to set the required height of the frame structure.
- The design is adjustable horizontally. The procedure is carried out at a building level.
- The frame is connected to the bathtub with self-tapping screws. First, a reinforced plate is fixed on the bottom of the container. After this, the embedded fragments located in the corners are fixed.
- Legs are mounted on the frame. Fastening is done with studs that are screwed into special holes. Use a ruler or tape to adjust the required height. Nuts are used for effective fixation.
- At the final stage, the bath is turned over to its original position and moved to the installation site. Areas for fixation are marked on the wall. The factory package of the acrylic bathtub includes several fastening plates that secure its sides. For plumbing products of standard shape, there are 4 clamps in length and 2 in width.
This is interesting: Installing a cast iron bathtub: professional DIY installation
In some cases, the finished structure is supplemented with homemade elements that increase the stability of the support. To create a reinforced frame, an additional stand is constructed from large-sized timber, brick or foam concrete blocks.
Making a frame for drywall on the wall
Drywall is mounted on the wall to level the surface and hide communications - pipes, wires, ventilation systems. The frame for plasterboard on the wall can be made from a metal profile or wooden blocks.
For a wooden frame you should prepare the material:
- Treat each block with an antifungal compound;
- Dry all wooden frame elements;
- Remove unsuitable bars that have knots, cracks, material with defects can break and damage the frame;
- The size of the block must be at least 30 mm by 50 mm, while the drywall is screwed onto the wide side of the block.
If the frame on the wall is made of profiles, then you should use exclusively wall racks and profile guides. They are specially reinforced with an additional stiffening rib. Guides are attached to the ceiling and floor, which serve as a frame for the frame. Rack profiles are attached to the guide profiles in increments of at least 60 cm.
Upon completion of the installation of the frame, you can lay communications and insulating materials into the body of the frame and cover the wall with gypsum plasterboard sheets.
Functions of the frame stand
A do-it-yourself bathtub stand is an operation that often has to be considered if you plan to purchase a new structure, but not a cast iron one. The latest massive products stand firmly on their feet due to their considerable weight.
Steel and acrylic products already have a serious drawback: these containers without water are easy to accidentally move, and, “floating,” to turn over. This is the main reason for the need for a frame. The material for the stand can be wood, metal or brick. It all depends only on the desire of the owners to engage with this or that “applicant”.
The ability to cover the unpresentable appearance of the bathtub from the outside, to hide the supports, which can hardly be called attractive, is another advantage of the frame. The shape of the bowl does not play a role here: you can veneer a product of any configuration almost without problems, since the frame greatly facilitates such work.
In this case, metal and acrylic bathtubs are joined by cast iron structures, the appearance of which is also not ideal. However, they no longer require the most reliable stand, since the owners have a different goal - to get a chance to fit the “mighty” bowl into the interior of the room, and not to give it strength.
Another potential use of the frame is to lift the bathtub to a greater height. The reasons for this decision are the need to form a sufficient slope for draining water, and the desire of the owners to make a podium near the jacuzzi.
Recommendations for selection
An important point: the correct choice simplifies installation and increases the comfort of use.
By what criteria are bathtubs classified?
| Parameter | Meaning and tips for choosing |
| 105x70, 120x70, 130x70, 140x70, 150x70, 160x70, 170x70, 170x75, 180x80. Choose the length and width of the bath taking into account the size of the room and the height of the residents. Try to ensure that the product is adjacent to the opposite walls as closely as possible, this will greatly simplify the installation process. |
| 110, 120, 123, 136, 150, 170, 195, 210, 240. Volume directly depends on depth, and this parameter affects the height of the edge. If elderly people or children live in the house, then you should not buy a large bathtub; it is difficult to get in and out of. In addition, a large volume will require significant losses of hot water. But, on the other hand, the more water, the longer the comfortable temperature remains. |
| On bolts or double-sided tape. The first option is used by serious manufacturers; bolt-on mounting is more reliable and in most cases does not require additional reinforcement or installation on bricks. Legs with tape are a budget option and are not stable. The legs can help level the bathtub horizontally; to increase the reliability of fixation, installation on brick linings is recommended. |
| All steel bathtubs are covered with enamel. But the quality of the coating is different. Domestic manufacturers cover the worst. Insufficient enamel thickness and poor quality of the composition in terms of physical strength reduce the service life. As a result, there is a need to restore the enamel (long and unreliable) or replace it. |
We invite you to familiarize yourself with the best acrylic bathtubs made in Russia
Choose the size of the bath responsibly, taking into account the characteristics of the residents and the room. Poor quality enamel can be recognized by several signs.
Run your hand over the surface. The surface must be perfectly smooth. Roughness or “sea waves” indicate a violation of the annealing conditions. Such a coating will quickly get dirty and requires constant cleaning. View the coating from different angles
If the standard thickness is not observed, then in some places the shade of white changes. Pay attention to the area of the bottom near the drain. There are cases when the drain is in the same plane or protrudes slightly above the surface
In this bath, the water will not drain completely; a small amount will always remain near the drain. After drying, calcium is deposited in these places, and over time it acquires a yellow tint.
The best manufacturers of steel bathtubs
Kaldewei Asymmetric Duo steel bathtub
Bathtub Roca “Swing Plus”
steel bath
It is necessary to take into account the ratio of strength and quality of the bathroom, as well as the number of support points for the frame. It is believed that the thinner the bathtub, the better support it needs. A fully welded product indicates a lack of strength. It is desirable to have 4 points. If the font has an unusual design, then a special platform is needed, since a standard frame will be unreliable.
Characteristics
There are many options for round baths, each of which has its own characteristics, ranging from size to internal arrangement. Thus, after going through all the possible options, you can choose your “ideal” barrel sauna.
The smallest bathhouse, located horizontally, is 2 meters long. Its design implies the presence of 1-2 rooms. You can undress here at the entrance if the bathhouse has a porch with a canopy. The weight of such a building is about 1.5 tons.
The largest barrels reach a little over 6 meters. There can already be up to 3 rooms: a dressing room (with a well-thought-out resting place, a table, clothes hangers, benches), a wash room (with a shower or water containers), a steam room (with comfortable benches and loungers); or in the case of a sauna, the washing room can become a relaxation room. On average, the length of each room will be 1-2 meters.
Classic round baths can be of the following sizes - up to 2, 3, 4, 5, 6 meters in length, about 2 meters in diameter (1.95 m is the internal diameter). Quad and oval baths may have slightly different parameters: 4x4, 3x6. Almost any bathhouse can accommodate comfortable sun loungers with a width of 500 mm.
In two-meter baths there is only one room. In the three- to four-meter ones there are already two – a small locker room and a steam room. The largest ones have space for three rooms.
As for height, even tall people can take a steam bath in this type of baths. The ceiling height is more than 2 meters.
The classic shape of a barrel bath is a circle, or rather a cylinder, located horizontally.
Less common are oval, square or rectangle shapes with rounded corners. In addition, there are options for baths with a semicircular top and rectangular bottom.
The entrance to both oval and quad baths can be from the front or the side. The entrance can be framed by a canopy or equipped with a gazebo. And the barrel sauna can be additionally enclosed in the frame of a gable roof.
Double-rounded baths have a rectangular outline. Vertical barrel baths are most often round-shaped buildings, less often oval or rectangular with rounded corners.
The main performance characteristics of a bathhouse depend on the materials from which it is made. The bathhouse is built from wood, or rather, specially processed profiled timber with a moongroove or tongue-and-groove fastening. The following types of wood are usually used for construction:
- Oak is a very high-quality material that becomes even stronger when exposed to water. It has excellent properties and can serve for many years. It has a beautiful structure, but is very expensive.
- Linden is an excellent material for a bathhouse. Known for its medicinal properties. Unfortunately, poorly treated wood of this species is easily susceptible to rotting and other negative effects.
- Aspen is an analogue of linden. With its help you can also create a favorable microclimate. But unlike linden, it is more resistant to harmful effects.
- Larch is a material that does not rot, and therefore will last a very long time. True, the price for round timber of this breed is quite high.
- Cedar is the only conifer that is highly recommended as a building material. It can also be used to create a healing microclimate. It has a beautiful unique structure. It has one drawback - it is quite expensive.
- Spruce, pine and other conifers are not recommended as building materials for baths. This is due to the fact that when exposed to high temperatures, wood is capable of releasing resins, which can cause burns. However, this effect only occurs from temperatures exceeding 100 degrees. Moreover, if such wood has undergone good chamber drying, then this process is minimal.
- Alder and birch are not suitable for building a barrel sauna, as they get very hot.
It is worth noting that it is possible to use several tree species in construction. For example, the floor is larch, the top is linden, and the trim is aspen. This solution will help save a little on construction.
In addition to wooden elements, you will need ties, which are made from iron tape (strip), or steel hoops. Of course, metal corners, screws and other fasteners will be needed.
Advantages and disadvantages
- The water remains warm for a long time (loses 1 degree in half an hour), which is ensured by a high level of thermal insulation.
- The products perfectly absorb sounds, so drawing water does not cause discomfort.
- Low risk of injury due to non-slip surface.
- Acrylic has antibacterial properties that ensure hygiene.
- Possibility of installing additional massage attachments.
- Convenient price range (the cheapest models will cost from 5 thousand rubles).
- Light weight (the average product weighs from 15 to 45 kg).
The disadvantages of acrylic bathtubs include mechanical fragility (under the influence of heavy objects the surface can bend or crack); low resistance to high temperatures and heavy loads, which threatens deformation; sensitivity to abrasives and household cleaners.