12406 0 0
Che Guevara December 10, 2016
You can line the well with wood yourself.
A beautiful well on the site is always pleasing to the eye. Today, it has become fashionable to decorate a well with wood, decorate it with stone, and also build heads in different styles. I will tell you about the simplest and most affordable ways to equip your own source of drinking water.
How to build a canopy for a well
These designs have no restrictions. They can be round or rectangular, have one or more slopes. The canopy is installed directly on the house or in the ground, concrete, brick, or other foundations. So, in order to build such a superstructure, we will analyze in detail the following step-by-step master class:
- We are preparing the base. The pillars can be installed on a columnar, strip, or monolithic foundation. Since the upper part is light in weight, there are no strict requirements for the base, and two profile pipes or rounded logs are sufficient for support.
- After installing the supporting pillars and corrugated pipes in their upper part, you can install a finished metal roof and build a frame with your own hands. To do this, we attach the boards of the supporting frame to the vertical posts in the upper part.
- Let's start assembling the roof truss. It is better to assemble it on the ground and install it ready-made.
- After installation, we cover the truss with OSB boards.
- We cover the roof with metal tiles, corrugated sheets, and other materials.
- We sew up the gables with clapboard and plastic.
Cladding of the above-ground part of the log house
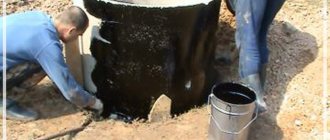
What we habitually call a well frame has, in fact, been made of concrete rings for a long time. The top ring protrudes from the ground and looks unpresentable
It is especially important to line it when an open type well is being built, since in closed ones the ring is hidden behind the walls of the house. But even in closed structures, successful design of the log house can give completeness to the entire structure
Wooden traditions
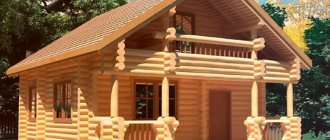
To give the house above the well a purely rustic look, a frame is laid around a concrete ring. It is not necessary to adhere to the traditional square shape - the log house is made both hexagonal and octagonal. It is brought above the level of the rings and covered with a wooden flooring, in which a hole is cut with a door for a bucket.
House for a well in the form of a log house
For a Russian-style estate, a log house made of round logs is the most suitable option. If the buildings follow the traditions of Scandinavia, then rectangular timber or clapboard cladding would be acceptable.
Lining the well with clapboard
Stonework - a journey to the land of the elves
The well with stonework carries a European flavor. It will look fabulous on a site with a small wooden house and a garden in the spirit of Provence or next to a brick cottage in the English style.
Covering a concrete ring with stones is not difficult; it requires diligence, cement mortar and the stone itself. You can use large cobblestones, pebbles, flagstone, and flagstone looks especially picturesque if it is laid flat. Along with stone, facing bricks and tiles imitating natural masonry are used.
Stonework in the design of a well
In open wells, it is necessary to line the upper edge of the ring and secure a wooden or metal lid (door) to it.
Metal, but not plastic
There is nothing that prevents the use of non-traditional materials in the design of the upper part of the log house, from metal profiles to plastic. And if plastic could be immediately rejected as a short-lived material that cannot withstand low temperatures, then metal sheets can lead to interesting ideas. Of course, it will be necessary to build a wooden frame under such cladding.
Lining the well with metal
Recommendations for finishing and video tutorials
Before lining the well, the surfaces need to be prepared. To do this, all dirt and dust are removed. You can apply a primer. The main thing is that it is an antiseptic. Mold, mildew, and microorganisms will ruin not only the appearance of the well, but also the water if they get inside the shaft.
It is better to think about how to line the well before the blind area is laid. Dismantling soft and pouring concrete will require additional costs. Those who veneer with wood should understand that within a few years the lining will have to be replaced. Paint doesn't last forever either. And lovers of sophistication should consider the option of lining with fresh flowers.
Everyone who has a garden plot wants to see it beautiful and well-groomed. Many people put a lot of effort and time into this, but the result is worth it. If there is a well on the territory, then it is always a source of pride for a good owner. To make it look attractive, it can be decorated with wood, siding or natural stone (read about various design options for a well here). The last option is the most preferable, as it has a number of advantages.
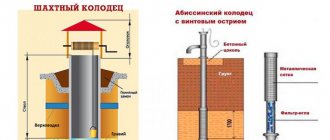
When is a bottom filter needed?
To determine whether you need to make a bottom filter for a well with your own hands, you should, after a thorough inspection, determine the rock that forms the bottom of the structure. In addition, it does not hurt to find out the direction of the aquifer.
There are several possible options:
- The bottom is formed by dense clay, and springs flow from it. This rock does not dissolve or mix with water, so the well will be clean. This is one of the few cases when the filter can cause harm by blocking the outlet of the springs.
- At the bottom there is soft clay, which is actively washed away by water. In such a well, the water below will be cloudy. You can collect clean water from above, but the best option is to fill the bottom with crushed stone or pebbles. A layer of about 20 cm can prevent active erosion.
- If there is sand at the bottom and water seeps into the well and does not bubble up, then installing a bottom filter is a must. Otherwise, with any movement of water, the sand will be washed away and fill the bucket. The pump cannot be placed here either, since all its elements will quickly become clogged.
- At the bottom there may also be floating sand - sand that has become fluid due to saturation with groundwater. In such a well, it is most difficult to obtain truly clean water - you will need a bottom filter and additional protection in the form of a wooden shield.
How to improve a well from concrete rings with your own hands
You can consider the finishing process using stone cladding as an example. For this you will need:
- a solution consisting of sand and cement with a volume of up to 4 buckets;
- Master OK;
- putty knife;
- container for cement-sand mixture;
- stones are approximately the same size, preferably small ones.
Do-it-yourself well lining with stone.
The algorithm of actions is as follows:
- Mix the solution using a concrete mixer or by hand.
- Apply the solution evenly to the top concrete ring. To ensure that the layer is the same everywhere, you can use wooden slats.
- Level the walls with a spatula.
- After the mortar begins to set, begin framing it in a circle with stones, lightly pressing them into the mortar.
The main criterion when choosing materials is their resistance to moisture and temperature changes.
After a day, the solution will dry completely, and the work can be considered complete.
Peculiarities
The design of the well must meet certain requirements. Firstly, it must be in harmony with the surrounding landscape and the exterior style of a residential building, and secondly, if it is used for its intended purpose, as a source of water, it must be protected from possible ingress of sewage, sediment and other contaminants. Finishing can be done using stone, wood, brick, flowers. In the end, the well can simply be plastered or painted.
If the well is planned to be decorated with wood, then it is better to choose hard species that are not afraid of the negative influences of the environment. In any case, the selected material must be wear-resistant, insensitive to temperature changes and precipitation. If, upon completion of finishing, it is plastered or painted, its service life will increase and it will retain its attractive appearance longer. You can build a house over the well itself - this will further decorate it and protect it from precipitation.
How can you close a well?
The well shaft must be kept closed to protect the water from debris, sediment and other contaminants. In winter, this helps prevent ice from forming. Either wooden houses or covers can be used as protection. The latter are a more modern and practical option, while the former are used mainly for decoration.
You can make a well house with your own hands.
Lids are made from the following materials:
- Metal. These covers are strong and durable. For convenience, a handle is attached to them, and forged decorations are used for decoration. The metal cover must be primed and treated with an anti-corrosion agent on both sides.
- Plastic. The lids made from it are light, comfortable and durable. Fixation to the well neck is carried out using fasteners.
- Concrete. Such covers are cast using a mold, laying reinforcement mesh. To prevent the material from crumbling on the sides, it is edged with sheet metal.
- Tree. Traditional material for lids. They are made from boards and then painted or varnished.
Original ideas for building and decorating a well house can be made with your own hands using standard construction tools.
Design options
Once the base of the structure is made, it can be designed in various ways. As a result of the correct choice of the way in which this should be done, the well will acquire not only practical significance, but also aesthetic and design value.
Roof finishing
The roof can not only be made from neat, beautiful boards, but also decorated with carved wooden parts.
Unusual options for this part of the structure may also be used. One of these options involves a folding design made of thick glass. It is structurally made in the form of a cover over the well, which opens on door hinges mounted on the well frame.
You can provide a semicircular metal roof, decorated with curlicues made of metal.
Decorative finishing of a well with forged elementsSource dozor.spb.ru
It is possible to design this part of the well in the form of a hexagonal pointed structure.
Sometimes when choosing what to cover a well with, a soft roof can be a good choice.
Concrete ring frame
Using a stone around the concrete ring, create a beautiful stone wall that completely hides it. This can be done in various ways. For example, an imitation of a small door made of wood in a stone fence may look beautiful.
It is possible to use logs in the form of a log house in a folk style. Sometimes such a frame is made not quadrangular, but hexagonal.
An option can also be used when, using wooden planks coated with varnish, a design is made that resembles a wicker basket. To do this, they are laid out horizontally at each level so that they look like a polygon. In this case, at each next level above the corner there is a flat part of the board.
Decorative finishing - a well in the form of a basketSource stroim-dom.radiomoon.ru
Using an unusual gate shape
This part can be made, for example, in the form of a steering wheel of a sailing ship, or simply in the form of a wheel with spokes installed perpendicular to each other.
Additional finishing
Since the soil almost always remains moist along the entire perimeter of the well, a ground cover should be constructed. It can be done in 2 ways - pouring and pouring concrete. It is worth deciding in advance what the well will be covered with.
The choice should be made in favor of materials that cannot absorb moisture. It is better if they divert it effectively. Pebbles, crushed stone and gravel are most suitable for this purpose. Such stones may vary in color.
It is important to use stones when finishing the soil around the structure. This will not only remove moisture, but also make the appearance of the well more interesting.
Examples of decorative wells in the country
Some design examples:
- Wooden tower. The head is decorated with boards and metal hoops, which makes it look like a wooden barrel. A gable roof is installed on top on carved pillars. Additionally, you can decorate the composition with flowers in wooden vases, decorative figurines of gnomes or fairy-tale animals.
- Decorative crane. The traditional well design is without a canopy; a long lever is used to lift the water. Its support can be made from a tall wooden figurine of a bird or animal. The upper part of the well is designed in the form of a wicker basket.
- Sailing ship. The rotating lifting mechanism is equipped with a wheel stylized as a ship's steering wheel. The well itself and its top cover are finished with deck boards.
- Ceramic jug. The design is in the form of a jug, the surface of which is lined with ceramic tiles or natural stone. The hole for water intake is covered with a lid.
- In the style of minimalism. This fashionable style trend today involves the absence of decorative elements. The head of the well is trimmed with plastic panels. The supports are made of forged metal. The roof can be covered with colored polycarbonate.
The design of the well should be in harmony with the landscape of the site and the style of the house. If the building is covered with siding, then a well in the old Russian or medieval styles will look alien. In this case, it is better to choose plastic and metal for its design.
How to cover the seams in a well so that they do not leak
How to cover the seams in a well is a pressing question for its owner
If a well is built from reinforced concrete rings, sooner or later water begins to leak through the seams between them and cracks appear in the walls.
This can happen very quickly if workers did not pay enough attention to sealing joints during construction or if the soil on your site is very mobile. How to cover the seams in the well in this case and how to do it correctly?
Installation of open well finishing
Installation of the finishing of an open well with a lid begins with the manufacture of a canopy. Wooden beams, steel angles or metal pipes can be used as load-bearing elements of the canopy. To cover the canopy, you can use any available roofing material: boards, plywood, plastic, galvanized iron sheets.
When using large covering elements, for example, slate or tiles, the load on the rafter system and support posts of the well should be calculated taking into account the weight of snow in winter and the strength of the winds in the region.
After making the canopy, you need to install the stands. They can be made from wooden beams, logs or an H-shaped metal profile corresponding to the load of the section. The racks can be dug close to the concrete ring of the well and subsequently covered with some kind of decorative finish.
If the racks are made of wooden beams or logs and are themselves a decorative element, they can be installed on the outside of the decorative finish of the well pipe. The distance between the supports must correspond to the length of the canopy; this must be taken into account when designing and manufacturing it.
The lower part of the racks must be treated with moisture-proof and bactericidal compounds before being buried in the ground. The racks must be dug strictly vertically and plumb. After which the finished roof is installed on them and the gate is mounted.
The open-type country well is also equipped with a sealed lid. It can be made of metal, plastic, waterproof plywood. If the weight of the lid is large enough, then it can be divided into two sections (shutters) and equipped with handles for opening. The edges of the sections or covers can be attached to the support posts using metal permanent door hinges.
To decorate the walls of the well, materials such as:
- brick - facade decorative;
- stone - artificial or natural;
- siding panels;
- clapboard;
- tiles - ceramic or clinker;
- corrugated sheeting;
- large pebbles.
If desired, you can create a combination of different facing materials. The main thing is that the decoration of the well fits harmoniously into the overall line of landscape design.
Installation process
All work performed during the installation of natural stone is carried out using a specific set of materials. To begin installation, you should use the following kit:
- Adhesive composition for ceramics, used for exterior decoration.
- A level that ensures even installation of each part.
- A tile cutter that cuts artificial stone quickly and conveniently.
- A spatula that allows you to apply the solution to the surface.
The principles of installing artificial stone on a well house are very similar to installing natural agglomerate.
Material selection
A variety of materials are used for cladding. The main requirement for them is to withstand temperature changes and be moisture resistant. Materials meet these requirements to varying degrees. Some require additional protection, others do without it.
Tree
For cladding, different types of wood are used: logs after rounding, edged boards, slabs, beams. The highest quality material is logs, but well-treated boards and beams will last no less. The most moisture-resistant are larch, cedar, birch, oak, aspen. Nevertheless, these rocks and others are treated with anti-rot and insecticides before installation.
The advantage of wooden structures is that it is not necessary to repeat the configuration of a round well. You can make a square or polygonal cladding. It harmoniously combines with elements of wood carving, which gives the design an expressive Russian style.
A well lined with wood.
Stone
Stone finishing is a spectacular but expensive option. For cladding, granite, sandstone, and pebbles are used, laid on cement mortar. If there is wild stone in the area, you can collect cobblestones. The best material is flat, medium in size (10 cm). Properly laid walls around a well will last for decades, because the stone is not afraid of heat or cold, rain and snow. Installation may seem difficult for masons without experience, so it is better to hire a professional.
Plaster
Concrete rings are plastered if the surface is of poor quality. After drying, finishing is carried out. This can be whitewashing, painting or decorative plaster. The disadvantage of this option is that it is not durable. After some time, defects will appear and you will have to update or redo it.
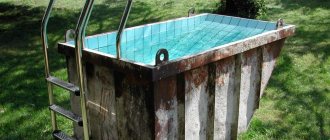
Tires
An almost free method, the implementation of which will require used car or tractor tires. Tires with a larger diameter are difficult to find, so in most situations they are limited to a maximum size of 17″. This is enough for a well made of a narrow pipe.
Finishing the well with tires.
Ceramic tile
The original surface is created using ceramics. Mosaics are glued onto concrete rings; tiles can be used for rectangular wells. A variety of surfaces allows you to choose an acceptable option. The tiles can be smooth and corrugated, shiny and matte, with patterns, imitation of natural stone. It can decorate any surface.
Siding and plastic panels
Plastic materials are fixed to a frame made of metal profiles or wooden slats. Installation is simple, you just need to cut the material to size and connect it using the locks available at the ends. The elements are fastened to wooden sheathing with staples using a stapler, and to metal sheathing - with self-tapping screws. The option is inexpensive and installation takes little time. Installation with glue on a thoroughly leveled and primed surface is possible.
Lining
The lining looks good when finishing a well. Installation is no different from installing plastic panels. You will also need to build a frame and secure each element with screws. They are connected to each other by locks: the tenon is inserted into the groove.
The correct technology requires that before installation the lining is treated with anti-rot and anti-beetle agents and is varnished. If the last operation is performed after installation, the locks will remain unprotected on the inside, which will soon begin to deteriorate.
Design options
There are several design options for a well house. Their shape depends on the original design of the well and the materials used. Based on their shape, all houses can be divided into several types:
The easiest to build is a roof house, which is represented only by a triangular gable roof.
A beautiful house for a well will add a touch of originality and style to your suburban area
More difficult to build are houses in the full sense of the word, which have the appearance of a quadrangular frame and a decorated roof. In the option where the well is made not of logs, but of concrete rings, the base can have a round shape.
A house for a well in the form of a quadrangular frame and a decorated roof
House for a well with carved decorative elements
House for an open well
Well house with a log-frame base
Beautiful house for a well, decorated with flowers
Even typical log cabins can look completely different thanks to different shaped roofs. They can be either gable (symmetrical or asymmetrical), or in the form of a pyramid with a different number of sides, or in the form of a cone.
House for a well with a gable roof
An oriental style roof looks very stylish
Spectacular house for a well with a roof in the form of a hexagonal pyramid
The drawing of the well house, as well as its further construction, will depend on the chosen configuration. The dimensions of the well house should always correspond to the structure of the well itself: a series of concrete rings or a log structure. A roof that is too small will not protect the water in the well from dust, debris and other unnecessary things, and a structure that is too large can make the well inconvenient to use.
If you design a house for a well, focusing on the other objects of the suburban area, you can achieve the creation of a holistic composition
The dimensions of the well house must always correspond to the structure of the well itself
Old-style well house
Various options are being considered as materials for houses:
A wooden well house is valued for its environmental friendliness, affordability, beauty and durability.
The most popular material for wells is wood
Beautiful wooden house for a well with carved elements
Houses for wells made of stone combine especially well with other similarly designed buildings on the site
Stone for wells can be natural or artificial
Stone wells take on a medieval look
Some well owners prefer to use galvanized steel to create a house. Such buildings are quite simple to carry out, but they are not always pleasing with their appearance. It should also be taken into account that a galvanized well house without additional insulation will not be able to protect water from freezing.
A well is not only a place to store water, but also a magnificent decoration of the site
A well house with a brick base will last a very long time
House for a well with a base of concrete rings
Any well is worthy of decoration in the form of carved elements on wooden products, ceramic sculptures on stone buildings, or an interesting design on galvanized structures.
House for a well in a rustic style
Well house with antique design
This is interesting: Examples of design of country wells - we look carefully
What materials are best suited for decoration?
The choice of material depends, first of all, on the goals and preferences, as well as on the overall design of the site. If you want to make a well in an old style, then wood is best. To create a durable cladding, you should use brick or stone. Unusual decoration can be done using flowers. Or you can combine different options, creating a unique finish.
A well can become a decoration for a personal plot; it is enough to improve it.
Design features
The finishing of the structure is selected depending on the style of the entire site and should be combined with the exterior of the main building. It can be made from the following materials: savage stone, wood, concrete, plastic, brick, plaster, using other raw materials. The main thing is that the building material is wear-resistant and does not deteriorate due to temperature changes.
When considering the design of the structure, you should pay attention to the need for periodic maintenance of the well, namely cleaning and disinfection. Accordingly, access to the head should be made free, and decorative elements should not interfere with the implementation of auxiliary work
Ordinary facing materials can look rather dull, so wells are often painted with multi-colored paints, decorative painting is done, which you can freely do yourself, even if you have no painting talents, just use stencils. In addition to painting, you can use floristry and create a composition of flowers around it.
If practical application is being considered, then it is necessary to protect it from the entry of sewage, for this purpose the head is made higher, a blind area is poured around it, it is covered or a roof is installed.
Species diversity of wells
Currently, there are several main, most popular and popular types:
- ascending key;
- descending key;
- mine wooden;
- mine concrete;
- mine brick;
- mine stone;
- pipe structures;
- drilling or pipe structures.
A variety of materials can be used for arrangement, including:
- clay;
- wood;
- rubble stone;
- cobblestones and boulders;
- brick;
- flagstone;
- gravel or crushed stone;
- concrete solution;
- reinforced concrete.
Most often, wells or wells on a site are the best option for water production in the absence of centralized communications , so it is very important to determine what types of water supply sources are suitable for each specific site. When choosing, you will need to take into account the type of soil, the depth of the aquifer and other important factors.
The process of creating a straight filter with a wooden shield
The sequence of manufacturing a well bottom filter is as follows:
- A shield is made with a diameter corresponding to the size of the well. The shield will require durable boards in which holes are specially drilled to ensure water circulation.
- At the bottom of the shield, a 5 cm high beam is attached - these will be the “legs”.
- The finished shield should be lowered to the bottom of the well, and a layer of large stones should be placed on top of it. This is how the shield is secured.
- For the first layer of the filter, river pebbles or gravel are used, for the second - pebbles, but of a smaller size, for the third - quartz sand, and for the fourth - shungite. The optimal thickness of each layer is about 150 mm, but the upper layers can be smaller, up to 5 cm. Thus, the bottom filter will take about half a meter of the entire well depth.
It is quite possible to make such a filter for a quicksand well with your own hands. Do not forget that the bottom filter requires cleaning and rinsing every 6 years. As for the shield, it is necessary in cases where there are quicksand below or the speed of water inflow is very high. It is recommended to make it from wood with antibacterial properties - for example, juniper, oak is also suitable, but you can also use a metal mesh with cells no larger than 2 * 2 mm.
Clay castle
Clay has always been an excellent sealant and barrier to water
- The well is dug from the outside, freeing 3-4 rings or about the same number of meters, filled with clay, and compacted well.
- The clay should be free of sand and soil to prevent water from reaching the well.
- You can fill the recess with cement mortar, which is prepared in the following way.
- Tools and raw materials are being prepared. Mixing container, cement, sand, electric drill or shovel, water.
- One part of the cement is diluted in a container with water and thoroughly mixed until a homogeneous cement laitance is obtained. Add 3 parts of fine, dry sand to it and mix it just as well with a shovel or drill. If the waterproofing work was carried out correctly and in compliance with all recommendations, then the taste of drinking water will be excellent.
How to make a water supply mechanism
There are 2 types of structures that can be used to manually raise water. It is worth highlighting the following:
- "crane";
- "gate".
You can make a “crane” for your own well, but it will require a lot of space. It is quite difficult to install, so it is rarely used. But to install the “gate” you will need 2 pillars; they need to be dug into the ground immediately after the well is brought to the surface. In order to prevent rotting, it is useful to coat a wooden post with a special compound. It can be replaced with resin.
First, the pillars are coated 2 times with a liquid composition, and then 1 layer of thick resin is applied. The pillars should be made of coniferous trees, then they will not require repairs for a long time. This material is less susceptible to rotting.
It is quite easy to make a concrete head with your own hands and equip it with a wooden roof. If the well shaft is made of brick or monolithic structures were used in construction, then they may contain embedded parts. For example, a sewer can be made of concrete rings with factory-installed embedded parts. They can be used to securely fix supports. The step-by-step instructions are as follows:
- It is necessary to measure the stand welded to the embedded reinforcement. The plate must be bent to its size.
- Using long self-tapping screws, the timber must be attached to the plate. Self-tapping screws can be replaced with nails. If there is no plate, then instead you should put a piece of pipe with a square cross-section. It is selected taking into account the size of the timber.
- In order to install pillars for a well with your own hands, you need to dig holes. Their diameter depends on the diameter of the pillar. The depth of the pit is 1.3 m. Before installing the pillars, you need to prepare the bottom of the pit. First you should pour sand, forming a pillow. It is enough to make a layer 20 cm thick; it needs to be compacted well. Then the bottom must be covered with a piece of roofing material, overlapping the walls. It is necessary to pour a 30 cm layer of concrete at the bottom of the hole. Ruberoid is required so that water does not escape from the concrete into the sand.
- The pillars must be completely covered with antiseptic impregnation. When it dries, the end is wrapped with waterproofing material. You can replace it with roofing felt. The pole is placed in the hole, and the vertical installation is adjusted using a plumb line. Then it is fixed with spacers and the hole is filled with concrete mortar. Allow 2 days for the foundation to dry, then proceed to further work.
The well gate is made of smooth logs and is a rotating drum. It is best made from hard wood. Ash is perfect, but you can use beech or more expensive oak. To remove friction, the drum needs to be made 40 mm less than the distance between the supports.
Making a gate for a well with your own hands is quite simple. You need to find a central point at the end of the drum and make a hole 50 mm deep. The hole must be drilled on the other side as well. Through holes of the same diameter should be made in the gate posts. They need to be strengthened; for this you can use steel bushings. After this, a handle is attached to the collar. Since high-quality drilling is quite difficult to do, it is easier to order the gate from a workshop.
At the last stage of arranging the head, it is sheathed. If the log house is made of calibrated logs, then it already has an excellent appearance. It is enough to make a roof, equip the source with a mechanism for raising water, and hang a door. If desired, the structure can be decorated with carvings.
The head of the manhole does not require decoration; the space around the shaft can be filled with concrete mortar.
Drinking water well heads made of other materials require additional finishing. The easiest way is to sheathe the surface with a board; you can use clapboard or material that imitates timber.
First you need to make a frame by purchasing a beam with a section of 50x100 mm. The structure, made for the well with your own hands, should be attached to the gate posts; it can be fixed to the concrete wall of the shaft. Next, the frame needs to be sheathed and the missing elements attached to the gate posts. The casing can completely cover the head, imitating a well house. The door will be on the roof.
https://youtube.com/watch?v=e7-qcjc0ZiA
If you wish and have free time, you can cover the head with a well house in the form of a mill. There are a lot of design options, so it’s worth choosing a drawing in advance
It is important to take into account the landscape design of the site and the style of other buildings
The head of a concrete well can be lined with ceramic mosaic. A house made of natural stone looks impressive.
Advice from professionals
To line a well with stone with your own hands, you will need to know the procedure. The technology is quite simple, but when designing the design, certain rules must be followed. For example, you can use almost any natural stone. It is usually assembled with your own hands, but you can also buy it. It is better to choose flat stones that have dimensions from 8 to 12 cm. Such indicators will allow them to better adhere to the surface of the walls of the structure.
Cement for the mortar should be used grade M400. You will also need quarry sand for the solution. PVA glue must be added to the water with which the composition will be diluted. This will make the solution more durable and strong.
You should not lay out all the stones at once. The lower ones can float under heavy load. For this reason, no more than 15 stones should be laid at a time. After each installation, you must wait until the stones are fixed. This approach will result in an even and balanced finish.
In addition, it should be noted that the line solution must be removed without waiting for it to dry. This is due to the fact that it will be quite difficult to wipe it off afterwards. The seams should be rubbed down immediately. To do this, you can take a thick sponge or spatula.
After finishing the well, it should be treated with a special varnish. This will give the surface shine and a wet stone effect. Thanks to this design of the well, garden paths will look effective in the garden area.
Selection of finishing materials
The work can be done using different building materials. Each of the selected options has its positive and negative qualities. In order not to make mistakes and make the right decision, it is necessary to evaluate the components used.
Tree
Wood can be called a classic material; it is suitable both for finishing mines and as a basis for the head, well pillars, and roofing. With its help, decorative finishing is performed, for example, carving, painting, complemented by a pattern or image.
Wood cladding has its own characteristics:
- The material is inexpensive. It can be found at the market, in construction stores, and at sawmills.
- Raw materials are amenable to processing. Allows you to create beautiful structures that will harmoniously fit into the overall style of the dacha. A tool for the job can be found in almost every home.
- For landscaping, you can use ready-made finishing products, for example, imitation timber (false), lining, blockhouse. Such components can significantly reduce the time spent on work and get excellent results.
- The design can be additionally decorated with original carved elements.
- It is better to install a roof over the shaft, which will protect the recess from precipitation, leaves, and other foreign objects. In addition, it is an excellent decorative element.
Decorating a treasure trove with wood is an excellent option. However, the building material has two important drawbacks - poor resistance to humid environments and is a good food source for pests. Therefore, before using raw materials for cladding, it must be treated with special varnishes and antiseptics.
Brick and its varieties
There are several types of such building materials - silicate, ceramic, raw. The building can be finished with any of the above. For example, red brick will give the object a bright color and will look good on a summer cottage. A universal material is the version made of baked clay. You can either cover the finished head with it or completely build it.
To build a brick well or its cladding, you must adhere to certain rules:
- The arrangement is made only from raw materials that have a solid structure.
- The material absorbs moisture, so the surface must be periodically treated with water-resistant varnishes. Apply a layer of plaster, when it dries, additionally rub in cement.
- For work, it is advisable to use the same building material that covers the outside of the house.
- The masonry is made in both round and square shapes. The first option uses less raw materials.
- The width of the masonry should not exceed the size of two bricks (25 cm).
Stone
Stone structures are popular. Decorating a building with such material costs much more than the options considered. But the result is worth it. The result is a stylish structure with increased wear resistance.
The main characteristics of such cladding are as follows:
- For work, you can use both natural and artificial stone.
- Small rounded stones and large cobblestones are used for decoration.
- The material is used to finish the shaft and head.
- If the work is done efficiently, the building will last for decades.
- To emphasize the structure, you can lay a path to it from the same building material, and install a roof covered with metal tiles on top.
Finishing materials and their combination methods
In addition to the options listed, you can use plastic or siding. Registration is completed quite quickly. Porcelain or ceramic tiles look good. It can be smooth or rough, matte or glazed, antique. Separately, we can distinguish clinker tiles, consisting of burnt slate clay. Over the years, this material does not change its external structure, is resistant to moisture, and resembles brickwork.
If you choose the option of conventional painting and plastering of the structure, then you do not need to use wood, brick or stone for cladding. It is enough to clean the surface of the concrete ring, plaster it, cover it with a layer of primer, and paint it. Also, plaster is often used for brick buildings, and painting in its pure form is often used for wooden ones.
Metal and forged elements are mainly used for posts and roofing. Often combined designs are made, for example, barrel heads made of wooden slats, tied with metal rings.
Features and application in design
A well in landscape design can perform several functions, so it is used not only for decorating the area. This design is most often a source of clean fresh water. To hide wells or mines that are drilled in a summer cottage, they are improved by constructing a well frame, allowing not only to give a spectacular appearance, but also to protect drinking water from clogging.
In addition, the structure can be erected to disguise some technical elements on the territory, for example, sewer hatches, storm drains, water barrels. An excellent reason for construction is the need to store equipment for maintaining the site or to hide numerous hoses for watering.
Did you know? In Ancient Rus', wells were made in the shape of a bottle, because they accumulated water very well. But over time, it was decided to build a high above-ground part, because if a person fell into a well of the original type, it was impossible to get out of it.