Where does the renovation of any room begin? Of course, with ceiling repairs. This article will discuss how to repair the ceiling in an apartment with your own hands.
The ceiling needs to be repaired every 10 years, since during this time more than one layer of water-based paint or lime accumulates on it. Over time, it begins to fall off and small cracks appear. Repairs may also be required if you find that the joints of the ceiling tiles are uneven or the seams are too visible.
Ceiling finishing options for renovations
Depending on the chosen design of the room, the types of ceiling repairs in the apartment may differ significantly. This can be either the simplest and most laconic finishing option, or a complex multi-tiered design. When choosing a specific option, what matters is the height of the room, its area, the number of window openings, as well as the type of lighting that the owners want to install.
The most commonly used options for repairing ceilings in an apartment are:
- painting;
- whitewash;
- pasting with wallpaper or decorative materials;
- suspended structures;
- stretch fabric.
Of course, in each case there are both positive and negative sides. In addition, not every type of finish is acceptable in a particular type of room. The cost of repairing the ceiling on your own, as well as the level of complexity of its implementation and the list of works depends on which option you choose.
Any repair work on ceilings requires preliminary preparation of their surface. If you plan to paint, whitewash or wallpaper, then the surface of the ceiling must be thoroughly cleaned, the peeling coating must be removed, the seams and joints must be primed and sanded. In this case, it is necessary to achieve a perfectly smooth surface. For stretch and suspended ceilings such thorough preparation is not required. It will only be enough to remove the peeling coating so that it does not damage the suspended structures.
Wood and materials made from it
The ceiling can also be finished with wood. These can be either suspended structures or, for example, lining that is attached to slats. It could even be laminate, that’s possible now. Slatted ceilings can also be made of wood.
Cleaning the ceiling
If we are not talking about a new building, where the ceiling does not contain remnants of the old finish, then you need to start repairing the ceiling with your own hands by cleaning it.
Until recently, the most popular ceiling design options were whitewashing, painting or wallpapering. Removing the remnants of such finishing is very simple. To work, you will need a paint roller with a long rod, which is well moistened with water and wrung out so that it is sufficiently wet, but no water drips. Then they begin to gradually roll the surface of the ceiling with a roller, gradually increasing the pressure. When the water from the roller is absorbed into the ceiling, it must be re-moistened and the same steps repeated on the next section of the ceiling. Thoroughly wet wallpaper or old plaster is cleaned with a spatula down to a layer of putty or concrete.
Please note that if old putty is found under the wallpaper, you need to make sure that it is held firmly. Otherwise, it also needs to be cleaned with a spatula, and then a new layer must be applied.
How to finish the ceiling yourself?
Probably every apartment owner, especially a man, likes to solve household chores on his own. Just finishing the ceiling, think about it. In fact, there may be some problems with this. Painting or whitewashing won't even make you strain, but preliminary leveling of the surface for further processing - here you can stop for a very long time.
You should not level the surface yourself if you do not have experience; use the help of friends and acquaintances. Oil-based and water-based paint are the best options for painting. If you decide to glue wallpaper, then you can’t do without an assistant, because the panel in the glue weighs a lot. If the pasting is done using ceiling tiles, then you can do it yourself. Lightweight material, each component is attached one after another.
Hanging and hemming sheets save a lot of money, but not extra time. Unless you are a master at installing such structures. The only disadvantage of installation is that it will take a long time if you do it yourself. We strongly recommend installing suspended ceilings with professionals. Although, with some patience and skill, you can handle this on your own.
How to remove old paint
In some cases, oil or water-based paints were previously used for minor ceiling repairs. To remove them from the ceiling surface, you will have to work hard. There are two approaches to removing old paint: chemical and mechanical.
Mechanical cleaning involves using a spatula or sandpaper. This creates a large amount of dust, and it takes a lot of time. The chemical method is the use of special reagents; they are sold in any hardware store. After applying the chemical composition to the ceiling surface, it may take about 12 hours for the old paint to soften. The soft loose paint will then be easy to remove.
Any decorations and decorative parts, as well as polystyrene tiles, must be cleaned with a spatula with a metal blade. If a little glue remains on the surface of the ceiling, it must also be thoroughly cleaned. Upon completion of the work, you should have an absolutely clean surface.
If you plan to overhaul the ceilings with your own hands in an apartment where suspended or tension structures were installed, they must be very carefully and carefully dismantled so as not to damage them. If, of course, they are intended to be reused.
Tree
There is stable demand for wooden ceilings. It gives housing a natural flavor and homely feel, responding to many design ideas. The ecological material protects well from noise and cold, and has a decorative appearance. However, owners should be prepared to regularly treat it with antiseptics to prevent the appearance of fungus. Lining and boards are susceptible to fire and do not like moisture.
Laminate
On the ceiling surface, this flooring resembles a wood base, promoting a cozy atmosphere and retaining heat. The variety of colors, presentable appearance, resistance to mechanical stress are its obvious advantages, but water has a destructive effect on it.
Cork
Rolled cork covers the joining seams, while tiles make installation easier. Products stand out:
- Naturalness.
- Excellent heat and sound insulation qualities.
- Good quality.
The environmentally friendly material has one drawback - repairs will cost a pretty penny.
Bamboo
Adherents of eco-style will appreciate the bamboo panel, which is produced in square slabs of 60 cm or panels with parameters 100x190 and 120x240. Additionally, you can decorate the ceilings with the stems of these tropical plants. The finish has an exclusive appearance, strength, durability and naturalness. The high price is justified by hand weaving.
PVC film
This spectacular seamless stretch covering can fabulously transform your home. It falls into the middle price segment, is not afraid of water and protects against flooding, but does not tolerate low temperatures. The collection is rich in colors and configurations, matte, glossy, satin offerings; photo printing can be used.
It should be remembered that when cleaning, do not use abrasive agents or hard sponges - this will lead to damage.
Textile
A very colorful variation of finishing the ceiling with fabric that does not interfere with the circulation of air flows and is resistant to temperature fluctuations. The rich interior uses draperies, cascades, and tents, turning the upper section into a work of art. Minuses:
- difficult to clean;
- decent price;
- moisture damage;
- damage at a single point will cause a complete replacement of the entire structure.
The fabric canvas can be equipped with artistic painting, the main thing is to maintain harmony with the walls so that there is no dissonance in the setting.
Let's start priming
Before repairing the ceiling, its surface must be primed. They proceed to this stage immediately upon completion of cleaning of the old finish. Priming should begin with seams and joints. In these places, the gypsum or plaster mortar must be held firmly and reliably. If this is not the case, then the joints are cleaned and filled again with gypsum cement mortar or a special building mixture with fiber inclusions. When the solution dries a little, the surface is cleaned, leveled and left until the mixture dries completely. Only after this can priming begin.
A deep penetration primer is used so that the materials for repairing the ceiling, which will be applied later, firmly adhere to the surface. The primer can be applied either with a brush or with a roller. It is important to protect your eyes and skin from contact with the primer mixture. When the primer layer is completely dry, you can begin further finishing.
Removing cracks
One of the main stages of ceiling repair is sealing cracks. You should not treat this with disdain - simply covering up the crack will not be enough. It is necessary to approach this issue more seriously.
Make the cracks wider and deeper so that the repair compound “lies” well in it. You can deepen and expand the damage to the ceiling using a chisel and hammer.
After the work has been done, it is necessary to clean the cracks. Then use a primer to help the future repair compound adhere better to the surface. Only after all the work has been done can the gap be filled with a repair compound. It must be applied with pressure to seal the crack completely.
We apply plaster and putty with our own hands
If the apartment's rough ceiling consists of concrete slabs, then their surface is not ideal. Therefore, further plastering or puttying is a mandatory stage of repair, especially if further whitewashing, painting or wallpapering is planned. What to choose - plaster or putty - depends on the preferences of the owner and his construction skills.
The plaster has a fairly large mass, and it must be applied in a layer of 2-3 cm. However, plastering work is quite simple to carry out, and further leveling does not cause problems. As for putty, after application it shrinks, so to get an even surface, you need to apply several layers. This requires some skill and time. However, as a result, you can get a perfectly smooth surface with a small mass and a minimum layer.
Which material to choose
There are quite a lot of options for how to inexpensively and quickly update the ceiling surface. Everything will depend on the materials used. Both the price and the time spent on repair work may change.
Polystyrene tiles
One of the simplest, fastest and cheapest finishing options. It can be glued directly to the ceiling, provided that the old coating is held strong enough. If the previous finish is not very durable, it will need to be removed.
All work can be done alone, and such an update will take very little time. The downside is that there is not a very large selection of finishing options. Also, you will need a relatively flat surface for gluing parts, since strong differences in height with such a finish will be very noticeable.
Painting
This way to get a new and beautiful coating will be optimal if the ceiling was also painted last time. All actions can be reduced to a banal repainting of the entire surface.
The easiest way is to repair the ceiling with water-based or water-dispersion paint. They are inexpensive, easy to lay on a plane, and with even floor slabs, the alteration will take one to two days at most.
The disadvantages of this method include the need to have a beautiful and even ceiling initially. If there are defects larger than a centimeter and deeper than one millimeter, they will be visible even after painting, so you will have to first level the entire plane, which leads to an increase in cost and more time.
Plastic panels
Another inexpensive and very easy way to get a new ceiling covering. In terms of time, this option will be more expensive, since you will have to build a sheathing to attach the plastic panels.
Among the positive qualities, it is worth noting the ability to hide almost any flaws on the floor slab. The panels will hide everything, even very serious defects. Also, the advantages of this option include the fact that the plastic is insensitive to moisture, which means it can be used in rooms with high humidity.
The appearance of the coating, after such repairs, turns out to be quite beautiful, and its cost will not go beyond reasonable costs. Such finishing takes more time, but only because of the need to make a frame.
The disadvantages of this option include the fact that when a ceiling is repaired with plastic panels, it is necessary to construct a frame or lathing to secure them. This will not only require additional costs, but will also take more time. However, the existing advantages in the form of ease of installation and low cost of such finishing outweigh the negative aspects.
Tension coverings
Oddly enough, this method can be considered not too expensive, and at the same time quite fast. Time is needed only for the production of the canvas itself, which will be stretched.
In terms of price, this finish can be compared to a good plasterboard construction, but it can also be installed faster, and it looks much better than all other “quick” finishing options.
If about a week is allocated for repairs, then it is quite possible to complete it within this period. Sometimes, a company needs less time to produce a canvas for a standard room. Installing the canvas takes half a day, so everything will go very quickly.
The downside is the inability to do everything yourself. You will still have to order the canvas from a company that does this. It is also better to entrust the installation of the canvas to specialists. And the cost of tension coverings will be higher than that of alternative methods of updating ceilings.
Whitewash
This option is more suitable for use in old houses and apartments. Nowadays you don’t see a whitewashed ceiling very often. However, if the previous renovation was carried out using whitewash, then the best and cheapest option would be to whitewash it again and that’s it.
You just need to know exactly what the whitewash was used before - lime or chalk. These two materials are not “friendly” with each other, so they won’t fit on top of each other. For chalk it is necessary to whiten only with chalk, and for lime - with a lime composition.
If the floors are even and do not need leveling, then the result can be very surprising in its quality. In the photo, the ceiling repair was done with your own hands and the quality of the coating does not raise any complaints.
In terms of cost, whitewashing will be one of the cheapest ways to give a surface a great, fresh look. It will also take a little time. Everything will depend only on your dexterity and skill.
There are several disadvantages - a lot of dirt, especially if you have to remove old whitewash, you need a very smooth surface of the ceiling to get a decent result.
Technology of using plaster
If plaster was chosen for the work, then the following materials and tools will be needed: Betonokontakt primer mixture, dry plaster, for example the Rotband brand, beacons with fasteners, a 1.5 m long rule, a hammer drill and a building level.
The technology for making a ceiling in an apartment using plaster looks like this:
- You need to step back 15-20 cm from the wall and put a mark for the first guide. On the opposite side, at the same distance from the wall, you need to place a second mark for the guide. Between these marks we mark a line using painter's thread.
- Having retreated 1.25 m from the first line, we apply markings for the next guide in the same way.
- Based on preliminary markings, holes are drilled for installing fasteners.
- The guides to the ceiling surface are fixed with self-tapping screws. The horizontal lines are controlled by the building level. If necessary, you can slightly unscrew or screw in the screws to adjust the position of the profile.
- The fixed guide profiles must be additionally fixed with a thick plaster solution and left until completely dry.
- At the final stage, the gaps between the guides are filled with plaster and leveled using the rule.
It is worth noting that repairing walls and ceilings with your own hands in terms of applying plaster is very similar. The only complication when working with the ceiling is that it is not very convenient to work above your head. However, after the plaster solution has completely hardened, the surface becomes smooth, and putty and finishing materials can be freely applied to it.
Precautionary measures
Gypsum dust, construction dust, cement dust are a kind of abrasive for the skin that promotes the development of bacteria and infection. This dust will also be harmful if it gets into the eyes and respiratory system. If the ceiling was flooded from above and not only with water, but also with sewage, you will have to remove the red stains, and this is done with the help of rather aggressive chemicals that are very toxic and contain volatile compounds.
It is difficult to carry out repair work, since you will be under the ceiling almost all the time, standing on shaky surfaces. At the same time, your arms, back, and legs get tired. Therefore, before you begin, take care of safety precautions and protective equipment.
- A headdress is required.
- Clothing should be made of dense materials.
- The sole should not be slippery.
- Safety glasses, or at least a cap with a visor.
- Gloves and respirator
- Reliable and stable sawhorses, on which you will feel confident when standing.
Method of applying putty
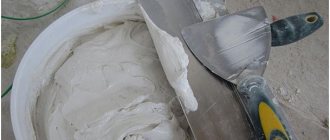
Let's look at how to repair the ceiling with your own hands, if you use a putty mixture for this. Puttying takes significantly more time than plastering. Although the goal of both processes is the same - leveling the surface. In addition, the puttying technology is somewhat different from working with plaster. In this case, the worker will need two spatulas (narrow and wide), a painting mesh, a mixing container, as well as two types of putty - the starting “Isogypsum” and the finishing “Satengypsum”. The surface is pre-treated with the Betonkontakt primer mixture.
Let's describe how to repair a ceiling using putty:
- The thoroughly cleaned and primed surface must be examined for the presence of potholes or level differences. In these places it is necessary to apply the starting putty in several layers. This material practically does not shrink, and its layer in some places can be 5 cm. For work, it is most convenient to use a wide spatula or a rule.
- A painting mesh is placed into the wet starting putty. This simple method of reinforcement makes the ceiling surface more durable. The mesh needs to be slightly pressed into the surface of the putty, for which purpose a wide spatula is passed over it with some pressure.
- If there is no need for additional leveling of the surface, repairing the ceilings in the apartment before painting can be done with finishing putty. It is applied to the surface with a wide spatula, removing excess. If desired, you can use a painting mesh for reinforcement.
- When the first, main layer of putty is completely dry, you can apply the finishing layer, leveling it until smooth.
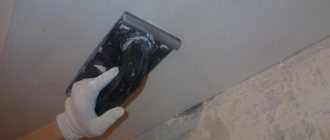
The final cleaning of the surface until smooth is carried out with special graters and emery. It removes the slightest nicks. After this, the final decor can be applied.
Alternatively, the ceiling surface can be covered with plasterboard panels. The joints and irregularities between them are filled with a putty mixture, and then the ceiling is decorated according to your choice - painted, whitewashed or wallpapered, or a decorative finish is made.
Preparing and leveling the ceiling
Next, repair work is built based on what you need. If you plan to level the ceiling, then do it using a gypsum mixture or plaster. But before leveling, be sure to prime the ceiling, as mentioned earlier. This will provide better grip. To level the ceiling you will need a bag of plaster and putty. The consumption of materials depends on the area of your ceiling. When you come to the store, choose the appropriate packaging volume. If in doubt, check with sellers to determine how much plaster and putty will be required for your area.
Tools used in work
- plaster trowel;
- two spatulas - large and small.
Take your choice of tools seriously. You should not save, but it is better to purchase high-quality spatulas and trowels, because the final result of your work will depend on this.
1. trowel; 2. spatula; 3. plaster spatula 350 mm
It is better to choose the main (large) spatula with a size of 35 cm; its length is approximately equal to the length of the arm from the elbow to the fingertips. It is more convenient to use and easier to manage.
Applying plaster
Dilute the dry plaster mixture with water according to the instructions on the package and mix well. For more thorough mixing, you can use a low-speed drill with a mixer attachment.
Advice! Prepare the plaster in small portions, because... it hardens very quickly and becomes unsuitable for work.
After applying each layer, the surface is left to dry for a day. At this point, the rough leveling of the ceiling is completed and you can begin working with putty. It will help smooth out all minor unevenness.
Applying putty
Putty is used for fine finishing of the ceiling. It is used after rough leveling of large cracks, irregularities, depressions and surface differences with plaster. The same rule applies here as with plaster - after applying each layer, a day must pass before applying the next one.
Important! Putty, unlike plaster, is applied only in a thin layer. It does not withstand application thickening of more than a few millimeters.
After the putty has dried, the ceiling can be sanded to a perfect shine.
Types of putty according to degree of readiness:
- There are dry putties. They are sold packaged in bags. They must first be diluted with water and mixed;
- Ready-made putties, usually sold in buckets. As mentioned earlier, we recommend using ready-made putties, because... they are easy to work with.
It is advisable to use polymer putty for painting. She has the longest “lifetime”, i.e. after application, it can be stretched for a longer time, which means it is possible to work and level the entire surface thoroughly before the composition begins to dry. It also has a very fine grind, which will have a positive effect on the final cleaning of the surface.
The putty is chosen relative to the base on which it will be applied. Construction store consultants will also help you with the selection.
Important! Finishing work is always carried out in well-lit rooms. Use lamps or spotlights.
After plastering is completed, the ceiling must be covered again with a layer of reinforcing primer. Application should be uniform over the entire surface. Use a paint roller for this, and a brush for hard-to-reach places. When covering highly absorbent surfaces, several coats may be required. After applying the primer, the consumption of subsequent materials, as noted earlier, will be greatly reduced. The primer also acts as an antiseptic. If you are quite satisfied with the ceiling, then proceed to its immediate finishing.
Coloring
When deciding how to repair a ceiling with your own hands, you turn to painting as a finishing method quite often. This popularity is primarily due to the availability of paints and varnishes on the construction market, as well as the ease of performing the work. Moreover, in some areas, such as kitchens or bathrooms, painting is a practical and convenient option. Mandatory conditions for high-quality ceiling painting are careful preparation and leveling of the surface. Otherwise, all irregularities will be visible.
Most often, water-based paint is used, less often - oil-based paint. Before use, just stir the paint thoroughly and, if necessary, dilute it until the desired thickness and color are obtained. After this, you can finish the ceiling - repair the ceiling by painting. To work, you will need a brush and a paint roller with a long rod. Painting begins from the wall, where a narrow strip is worked with a brush. For the central part of the ceiling, use a roller.
Sometimes an already painted surface needs a do-it-yourself cosmetic repair of the ceiling. In this case, the ceiling is examined for the presence of blisters and peelings of old paint. Defective areas are cleaned with a spatula and then painted again. In this case, a full repair will soon be required. However, if the old paint layer is holding up well, you can simply refresh the appearance of the ceiling by applying a new coat.
Recommendations
When choosing, consider the temperature and humidity conditions of the room. In the kitchen, bathroom, and toilet, it is advisable to use whitewash, paint, and plastic. An unheated attic or open terrace should be covered with moisture-resistant paint, wooden slats, and metal modules. A country house can be decorated with reed mats, which will give it an exotic touch.
Ultra-modern trends give preference to a glossy surface that visually rushes upward and plays with reflections of light. Porcelain tiles on the floor will reflect objects as if in water, which promises style to the environment. Careful thought out of ceiling finishing options that integrate into the overall design of the apartment is a guarantee of an inimitable, comfortable interior and a reflection of the good taste of the owners.
Whitewash
The process of how to repair a ceiling using whitewashing is somewhat different from painting. The fact is that in this case it is not paint that is used, but quicklime, which needs to be diluted, filtered and applied to the ceiling surface. For work in this case, a roller, brush, spray gun or vacuum cleaner is suitable.
Please note that a brush and roller will not give a sufficiently even layer of whitewash. A better job will be done using a spray gun and a vacuum cleaner. Although the appearance of a whitewashed ceiling blends harmoniously with any interior, it needs periodic updating, at least once a year. However, the cost of materials is quite affordable, so this type of repair will not be too expensive. The surface of the ceiling that is planned to be whitened must also be properly prepared - cleaned and leveled.
Conclusion
Repairing the ceiling is not a difficult job, but it is a responsible one; if you miss something, problems will appear very soon, so follow all the recommendations and use only high-quality materials. The video in this article will tell you about some of the nuances in more detail, and if you don’t understand something, then ask in the comments.
Did you like the article? Subscribe to our Yandex.Zen channel
October 28, 2021
Ceiling installation, Ceiling operations, Ceilings, Construction and repair
If you want to express gratitude, add a clarification or objection, or ask the author something, add a comment or say thank you!
Pasting wallpaper
To apply wallpaper to the ceiling, the joint efforts of at least 2 people will be required. This is quite a difficult job, since you will need to hold the wallpaper above your head and join it correctly. To work, you will need glue, selected wallpaper, a roller, a construction knife, as well as a glue bucket and dry rags.
The wallpapering technique looks like this:
- after thorough preparation of the surface to be glued, it is necessary to prepare the glue in accordance with the manufacturer’s instructions;
- wallpaper is cut into panels of the required length, parallelly joining the pattern on adjacent sections, if necessary;
- A cut piece of wallpaper is spread on the floor, glue is applied to the back side with a brush and it is allowed to lightly saturate the wallpaper;
- in the meantime, glue must also be applied to the surface of the ceiling along the entire length of the panel;
- then a piece of wallpaper is rolled into an accordion and pasted onto the surface of the ceiling, gradually straightening it out;
- using a roller, remove all air bubbles from under the canvas, and wipe off excess glue with slightly damp rags.
All other sections of wallpaper are glued in the same way. If there is a decorative pattern on the wallpaper, you should make sure that it matches the adjacent canvases. The room is closed and the wallpaper is left to dry for a week.
Lighting options
The type of ceiling determines which lighting option to choose.
- With suspended plasterboard ceilings, you can install chandeliers and lamps of various sizes on a hook or anchor fastenings. Spotlights are installed in the structure, but their placement must be thought out in advance, before the start of repair work. You can also make the backlight using LED strip. Multi-level structures often use several lighting options.
- For suspended ceilings, a chandelier or spotlights are appropriate. But it must be remembered that the material can deform when heated. Therefore, places for installing lighting fixtures are thought out in advance. The best option is LED lamps, which do not heat the film or fabric, eliminating its deformation.
- A chandelier goes well with painted, whitewashed or wallpapered ceilings. In this case, recessed lamps are difficult to install, so it is better to avoid them.
view album in new window
view album in new window
How to stick polystyrene tiles
Compared to wallpaper, the process of covering the ceiling with polystyrene tiles is much faster and easier. You can do the job alone. You will need tiles, acrylic glue, painting thread, a spatula, a construction knife and a mounting gun.
The working method is as follows:
- Calculate the center point of the room by drawing two diagonal lines from the corners of the room. Through this point, draw two lines perpendicular to each other between the walls.
- You should start gluing the tiles from the center of the ceiling. Glue is applied to the tile along the edges in a dotted line and a little in the center, after which it is applied to the ceiling. The angle of the tile must strictly coincide with the lines on the ceiling.
- All other tiles on the ceiling surface are glued in the same way. If the tile does not fit completely at the edges, it is cut to the required size.
- Finishing is done using decorative skirting boards or borders.
In this material, we looked at how to make ceilings in an apartment with your own hands, using several of the simplest methods. We hope the information will be useful to you. As for suspended and tensile structures, they are a separate topic for description.
Suspension and tension systems
This type is convenient because there is no need to refine the surface. It masks defects and communications, is aesthetic and durable. Fastening occurs on fasteners and hangers to a frame made of a metal profile or wooden slats, on which the coating is fixed. Determine the lighting scheme in advance. Cons: expensive installation and reduced room height.
Drywall
Using common materials, designers turn the most ambitious ideas into reality, equipping the ceiling with straight lines, smooth curves, geometric shapes and curly details.
An LED strip around the perimeter creates a “floating” effect. Further finishing work takes place with the participation of wallpaper, coloring agents, etc. Before this, the joining sections are puttied.
The disadvantages are its impressive mass and fear of humidity.
Note!
How to update the tiles in the bathroom without changing them or removing them: step-by-step instructions, stickers, painting, decor (140 photos)
Do-it-yourself Venetian plaster walls: types, application instructions, photos of beautiful wall decoration, colors
- How to unclog a toilet if it’s clogged: step-by-step instructions, a review of the most effective methods for removing a blockage with your own hands
Ceiling slats
The budget version uses plastic, aluminum, and steel cladding panels. They can be fitted tightly or with a small gap with decorative inserts. Advantages:
- easy installation;
- creation of curved configurations;
- strength.
The disadvantages include possible deformation and difficulty in removal. In addition, plastic is flammable and releases toxins.
When choosing steel, the severity will increase and corrosion is possible, but there is definitely no risk of fire for residents.
Cassette
Previously, offices and commercial premises were decorated with cassette ceilings, but today they are not abandoned in residential buildings. The top is finished with square plates of:
- Metal.
- Glass.
- Plaster.
- Mineral fiber.
- Tree.
Matte, glossy, mirror, metallized surface can be solid or perforated. Glass fixtures hide lamps that provide soft, diffused light. Closed and open models are available. Advantages:
- fragmentary replacement in case of damage;
- accessibility of communications;
- additional ventilation;
- ecological composition;
- moisture resistance.
For some users, ceiling heterogeneity in the grid pattern is considered a negative characteristic.
Grilyato
Lattice structures were invented by the Italians and look like a cellular lattice made of aluminum or glass. Light non-standard items contribute to an exclusive interior. In industrial styles, they occupy a leading position and come in standard, multi-level, profiles of different heights, blinds, and with cells of various sizes. The advantages are presented:
- Light weight.
- Fire safety.
- Long-term operation.
- Visual effects.
- Experimenting with lighting.
- Simple dismantling.
The only thing is that the base, which is visible through the gratings, must be pre-treated.
Mirror systems
A non-trivial solution visually expands the boundaries of space, adding zest to the decor. Execution happens:
- tiled, using fragments of mirrors;
- rack, plastic elements have a coating;
- tension, where the gloss of the film has reflective properties;
- polystyrene - large tiles are glued onto a smooth surface.
Excellent play of light, combination with other materials and universal application are the positive characteristics of the method. But it is worth noting the complex sanitary treatment and weight of the models.
Coffered ceiling
The luxurious design looks aristocratic. This beam structure, in which certain recesses are embedded, is made of natural wood. Labor intensity and considerable cost force us to resort to alternatives from plasterboard, MDF, and polyurethane. The devices are characterized by durability, good acoustic properties and premium appearance.
Disadvantages: high cost and difficulty in mounting.
Ceiling design in loft style
The loft style has earned its place of honor among the most popular styles today. It is characterized by industrial motifs, rough finishing or lack thereof. Concrete ceilings will not only be appropriate here, but also the most beneficial. The room looks more damp and the renovations are unfinished. This is the effect designers strive for.
Lamps designed in the appropriate style will help to emphasize the ceiling material:
- incandescent lamps without shades;
- lamps - fans;
- lamps reminiscent of street lighting fixtures;
- in the style of industrial chandeliers;
- halogen lamps.
The loft style is not characterized by hidden communications, beams, or ceilings.
For a living space, leaving a concrete ceiling completely unfinished is not entirely correct. Therefore, the ceiling is still covered with transparent varnish in order to highlight it favorably.
Advantages and disadvantages
A concrete ceiling in the interior has a number of pros and cons.
Advantages
- Unusual appearance. A spectacular and uncharacteristic texture for a classic upper finish immediately highlights the interior, making it more interesting and textured. And the room does not have to be decorated in a loft style: it can be modern minimalism, eclecticism, or hi-tech. Concrete can fit even into the classic or Scandinavian style.
- Versatility. This material goes well with any other: from warm wood to elegant stained glass. In general, in contrast with the brutal canvas, any familiar texture (plastic, metal, fabric, marble) will sparkle in a new way. You don’t have to think about the harmony of materials: even contrasting combinations of cold and warm, industrial and homely will look interesting.
- Saves effort. If you like concrete in its pure form, you don’t have to think about plaster, paint and additional decorative finishing of the ceiling covering - it will be enough to fix what is already there with a protective varnish.
- Specifications. They are also worth attention because this material is fireproof, durable and environmentally friendly. It stays cool for a long time in the summer and is not afraid of fungus.
Instagram @flackstudio_
Instagram @cartelledesign
Instagram @pradesign
Instagram @mart_da.spb
Instagram @cuubstudio
Project of Aida and Ilya Tversky. Photo: Natalya Gorbunova
Project of Aida and Ilya Tversky. Photo: Natalya Gorbunova
Flaws
- Regardless of whether you are planning a classic loft or another design, concrete will play a major role in it. It might get in the way.
- Without a primer, it will absorb moisture and react to temperature changes. This problem is mitigated by appropriate processing of the canvas.
Instagram @a_gorskaya
Instagram @artcreatework__spb
Instagram @yousupova.design
- Decoration
Concrete wall in the interior: 10 stylish options for different rooms
Installation of tiles on a concrete ceiling
Due to its low cost, quick installation and the ability to quickly repair in case of damage, this finishing method has become very popular. Options with different patterns and textures are sold. Expanded polystyrene tiles are attached with special glue.
Installation of tiles on a concrete ceiling
Before starting work you need to know the following:
- gluing begins from the center of the ceiling;
- immediately assess where large defects are located and calculate the placement of the tiles so that the entire part completely covers the defect;
- Whole tiles will have to be trimmed when the distance to the wall becomes small. Before gluing, markings should be made in advance so that for the most part whole tiles fit. Trimmed options are best placed in places where they are least noticeable (under a curtain, doorway).
Despite the fact that the tiles are glued easily and quickly, one cannot help but note the disadvantages:
- fragility;
- lack of a single canvas, which is not always aesthetically pleasing;
- rarely used in modern interiors;
- not resistant to fungi, mold;
- lags behind at high humidity.