Properly equipped ventilation of the basement floor, during the operation of the latter, relieves people from contact with dampness, mold, and a number of other pathogenic organisms and gases. Therefore, the presence of a hood can be ignored only in exceptional cases.
It is important to understand that creating such a system requires certain knowledge and skills, even if specialists are involved in the work.
Let's look together at the methods of ventilation and the intricacies of its arrangement.
Features of foundation ventilation
When building private houses, it is important to create a ventilation system not only for living rooms, but also for roof and basement spaces. Without ventilation, building materials quickly deteriorate. They begin to rot, become moldy and deteriorate from exposure to moisture. This impact can occur in any part of the home. High-quality ventilation in the foundation of the house solves these problems. For any foundation, the need for ventilation is related to the service life of the home itself. Without its organization, the integrity and stability of the structure will decrease several times.
Foundation ventilation is required when building a private house
What should be the vents in the foundation and how to position them
Ventilation holes in the foundation are made of round or square cross-section. If desired, it can be triangular or any other shape. If only they were large enough in area to effectively remove moisture from the subfloor.
Dimensions
The dimensions of ventilation holes in the foundation are regulated by SNiP (SNiP 31-01-2003). Paragraph 9.10 states that the area of the vents must be at least 1/400 of the total area of the subfloor. For example, if you have a house measuring 8*9 m, the underground area is 72 square meters. m. Then the total area of vents in the foundation should be 72/400 = 0.18 sq.m. or 18 sq. cm.
The same paragraph of the standard specifies the minimum ventilation area - it should not be less than 0.05 sq.m. If we translate into dimensions, it turns out that rectangular holes should not be less than 25*20 cm or 50*10 cm, and round ones should have a diameter of 25 cm.
Larger holes can be made
In multi-storey buildings this is done, but in private buildings such holes look too large. Usually they are made two times smaller, while increasing the number of vents so that the total area of the vents is not less than the recommended one.
How to position
Make vents in the foundation 15-20 cm below the top edge of the tape. If the base is low, a recess is made in front of the vent - a pit. But ventilation of the underground is required.
The vents in the base are placed evenly on all sides of the foundation opposite each other. This is necessary for the foundation ventilation to work properly. The wind, “flying” into one hole, will fly out into another, taking with it water vapor and radon.
Place the vents in the foundation opposite each other
The distance between two adjacent vents in the basement is about 2-3 m. If there are any partitions inside, at least one vent is needed for each “room”. It is also necessary to make vents in the partitions themselves to allow air masses to move and form a draft. This is exactly what we need. In order for movement to be more or less free, the area or number of holes in the internal partitions must be larger and better, if it is 2-3 times larger. You can make several holes the same size as in the base, or you can make one, but wide one. The second option, by the way, is preferable - the resulting passages can be used to service the underground.
Preparing the cellar for permanent use
The installation of ventilation in the basement intended for storing food does not end with installation work. To ensure a normal microclimate in the cellar, it is necessary to dry it well, check the efficiency of the system and follow certain rules during further operation.
Ways to dry a new room
Before you start drying the cellar, you need to check the efficiency of the installed system. This is due to the fact that moisture must be removed during drying and the easiest way to do this is through an exhaust pipe. To test, roll up an old newspaper and wait for it to burn about a quarter of the way through.
After this, extinguish it so that it continues to smolder. If the smoke from the newspaper is freely removed through the hood, then the system is working normally, if not, then you need to once again check the correctness of the calculations and the height of the outlet of the pipe head.
Drying should be carried out in the warm season, before storing food in the cellar for storage. The essence of common and accessible drying methods is to increase the indoor air temperature, which will provoke increased air exchange and removal of evaporated moisture through the hood.
Moisture-absorbing materials
It is possible to use hygroscopic substances, such as quicklime, calcined table salt or expensive technical silica gels that actively absorb moisture. These are very time-consuming methods and also require additional financial costs.
Flame at the entrance to the exhaust pipe
If you light a large candle or a simple alcohol lamp and bring it to the exhaust vent, the air will begin to heat up and the circulation will increase. Dry and warm air coming from the street will begin to warm up the cellar, actively absorb moisture and go outside. However, more than one candle is required and the process takes several days.
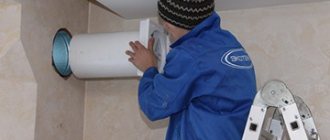
Using a Heat Source
Warming up the cellar room is much faster if you install a heat source of any type. This could be a brazier, a stove, an electric heater, or even a simple gas burner. The use of a flame makes it necessary to solve the problem of effective removal of combustion products, so they are usually lowered down on a suspension.
Drying using a broiler.
Electric heaters of any design are safer due to the absence of carbon monoxide, but will require payment for electricity. Therefore, the choice of heating method is yours. You can also read about the fight against dampness in the basement in this article.
Tools and materials
The need to use certain tools depends on at what stage of construction the ventilation is done. The choice is also influenced by the material from which the foundation is made. The set of tools given below will help you organize a ventilation system even if the construction of a brick, monolithic or wooden house has already been completed.
- Hammer.
- Sledgehammer.
- Long drill for metal work, 12-14 mm long.
- Drill for wood covering. Its length should slightly exceed the width of the foundation of the house.
- Straight and semicircular chisel.
- A pipe having a diameter from 110 to 130 mm.
- Grilles (needed to protect vents in the basement or foundation from rodents).
- Sand.
Ventilation device
How to properly organize ventilation in a wooden subfloor?
- A space of 1.5 to 5 cm in size is responsible for air circulation in the finished floor. It must be left between the thermal insulation layer and the decorative coating.
- Ventilation of the space between the ground and the subfloor is carried out through special holes in the base. Calculate the number of vents, taking into account that there are 2 of them for every 4 meters of the base. Their area should be equal to 1/400 (1/100 - 1/150 - for radon hazardous areas) of the area of the internal space of the subfloor.
- The center point of the vent hole should be 30 cm above the ground level.
- In cases where the house is located on a hill, the holes can be made 2 times smaller. If the house is built in a lowland, then 2 times more, that is, one every 2 m.
- If the house has intermediate walls, then one hole should also be made at their base for every 2 m.
What are the consequences of lack of air circulation?
Constant or periodic renewal of air in an underground room is necessary for:
- Normalization of humidity;
- Enrichment of air with oxygen;
- Maintaining optimal temperature.
Of course, the main purpose of cellars and basements is to store food supplies. Moisture is a constant companion of any underground room, and for most vegetables and fruits it is an undesirable factor for long-term storage.
In the air space of even a spacious basement, harmful substances accumulate over time. Unfortunately, when storing vegetables and fruits, unpleasant odors may appear. Ensuring healthy breathing for a person and opening access to fresh air from outside is one of the main tasks of ventilation in the cellar.
Another value of the basement is the presence of optimal temperature at any time of the year. Effective cellar ventilation is almost the primary component here. Coolness in the sultry summer and comfortable warmth in the winter will be the key to food safety in your basement, and fresh air and optimal humidity will be its helpers.
Correct location
How to properly ventilate a strip foundation?
Vents are installed in the foundation fifteen to twenty centimeters below the top edge of the tape. In the case of a low base, a pit is provided in front of each vent.
Ventilation holes should be located evenly on all sides, opposite each other. Air flows. Those entering one vent will exit through the one located opposite, carrying away radon and moisture.
When forming vents, an interval of two to three meters is observed. If there are walls inside, then at least one vent is provided for each compartment. Ventilations are also installed in partitions so that air flows create a draft.
In a word, it is recommended to adhere to certain rules:
- from the corner section of the foundation to the outer vent should be no more than 0.9 m;
- the number of equipped vents is always even;
- the choice of height above the ground is always individual, but the recommended height is at least thirty centimeters to eliminate the possibility of flooding the basement in the spring.
Construction of vents
Ventilations are installed during the construction of the foundation of the house. At the same time, depending on the design of the foundation, various methods of installing vents are used.
So, for example, in the case of using a strip concrete foundation, the installation of vents is carried out by installing special embedded elements, formwork or reinforcement, depending on the size of the vent.
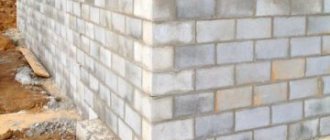
In brick foundations, halves of bricks are usually used to install vents. And when building a foundation from concrete blocks, blocks with holes or shortened blocks are used.
If the foundation of the house was built without vents, vents can be installed later. However, this is a rather labor-intensive operation that may require special equipment and tools.
Video description
The need for vents and the intricacies of their design are described in more detail in this video:
Radon
Another serious reason to vent is the accumulation of radon gas in an unventilated basement, which, sometimes very actively, is released from the soil. If the gas has nowhere to go, it begins to leak through micro-cracks into the living space.
Radon is a natural gas characterized by radioactivity and is dangerous to human health.
See also: Catalog of companies that specialize in foundation repair and design.
How to make perfume
How to make an outlet in the basement of a private house? Making perfumes yourself is quite possible, and you don’t have to involve specialists. Natural ventilation will be sufficient; forced ventilation is rare in basements. The most important thing is to make the right calculations and correctly use the outlets that already exist.
Even at the stage of constructing the foundation, the builder must attend to the issue of arranging ventilation ducts. If you have a strip base, which is most often the case, install the embedded parts immediately after installing the reinforcement.
Embedded parts are usually made of metal, but they can also be made of plastic. But in this case, you need to fill them with sand and close them tightly so that they do not deform during the process of pouring concrete.
Ventilation of the foundation in a private house can be represented by rectangular vents made of wood. When building a brick plinth, sometimes you will have to install half, leaving a hole. The same applies to monolithic blocks. You can also use multiple blocks with through holes. This way you will lose less in the strength of the foundation.
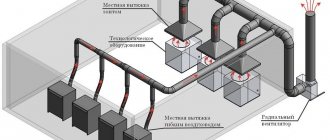
Existing forced exhaust systems in the kitchen
A recirculating hood passes air through a filter and returns it back to the room.
Forced exhaust (ventilation) differs from natural exhaust in that it is more efficient at removing contaminated air. Based on the method of processing air masses, the models on the market are divided into two types:
- Units equipped with filter elements that pass air exhausted to the street through them.
- Exhaust devices operating on the principle of recycling (reuse).
In the first samples, the air after cleaning is not retained in the room and is discharged outside. Models of the second type contain built-in carbon filters, after which the cleaned masses are returned to the kitchen. To increase the efficiency of ventilation, the location of the hood above the gas stove is important. First of all, this concerns the height of its removal from the heating plane. According to regulatory requirements, this figure for gas stoves should not be less than 75 cm. This distance will protect the unit from thermal radiation and will not affect the operation of heating equipment.
Construction of a shallow strip foundation for a house without a basement
To protect the basement of a house from groundwater
Usually
two lines of defense are used:
- Installation of ring drainage around the basement walls at the level of the base of the foundation. The drain intercepts most of the water that tends to flood the basement.
- Waterproofing basement walls and floors. Waterproofing protects the basement from moisture penetrating from the ground through the capillaries of the walls and floor.
The reason for the appearance of groundwater in the basement may be:
- Incorrect installation, clogging or untimely pumping of water from the drainage system around the basement.
- Incorrect design or damage to the external waterproofing of the walls and floor of the basement.
Often, in order to save money, developers refuse to install drainage around the basement. Waterproofing alone, without drainage, usually cannot protect a basement from water.
In a basement without drainage, there may be no water for several years, and then suddenly it appears there. This has changed the hydrogeological conditions around the basement, which may change over time. Or water has found a hole in the waterproofing of walls and floors.
The size of the vents and their number
Many people ask the question “What should be the size of the vents and how many of them are needed?” It is reasonable. If you make large holes, then it will be cold in the basement or underground, and if you make small ones, then the effect will be minimal.
Therefore, it is necessary to find a middle ground so that the underground space is warm and dry.
According to building codes, the total area of all vents must be at least 1/400 of the floor area. Thus, a foundation measuring 5x8 m on the inside should have ventilation holes with a total area of 0.1 m2.
Ventilation holes can be of any shape. As a rule, they are made round or rectangular.
For clarity, let’s calculate the number of vents for a 5x8 m house, which we discussed above. We know that the total area of the vents for such sizes should be 0.1 m 2.
We will make holes along the short side, i.e. 5 m. The maximum distance from the corners is 1 m. For every 2-3 m there is one vent.
We find that at a distance of 1 m from the corners there should be one ventilation hole, for a total of two. There is still 3 m left. We place another vent on this segment.
Thus, we got three vents on each side, respectively, on two sides there are only six of them.
If we divide 0.1 m2 by 6, we get the required area of one ventilation hole.
For those who decide to make round vents, let us remind you how the area of a circle is calculated:
S = πd 2 /4, where π is a constant equal to 3.14, and d is the diameter of the circle.
For example, let's calculate the diameter of the vent if its area is 0.017 m2.
From the formula we find the diameter:
d = √4S/π = √4*0.017 m 2 /3.14 = 0.147 m. If we convert everything into centimeters, we get 14.7 cm.
We think there should be no issues with determining the area.
How to make vents in the foundation?
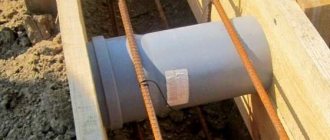
When pouring concrete, the pipes must be closed on both sides to prevent concrete from accidentally getting inside.
If you forgot to make ventilation at this stage, you will have to sweat and drill them after construction is completed.
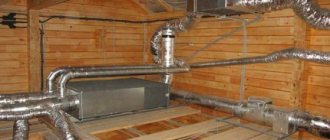
Instructions for installing ventilation from plastic (sewer socket) pipes
Plastic ventilation pipes are best located inside the walls enclosing the cellar. Installation in the ground outside of building structures is possible, but can lead to a violation of the integrity of the system in the event of swelling, movement and simple subsidence of the soil a year after completion of construction. Such work should be performed when constructing basement walls.
An example of the location of the vents.
Supply pipe.
The location of ventilation pipes inside the cellar is allowed if the system is installed in an already constructed structure. In this case, holes are punched in the ceiling, pipes are installed, and all cracks are sealed with cement mortar coated with bitumen mastic. To do the installation yourself:
- calculate the required diameter of the air ducts;
- draw a diagram of the location of the installation sites and determine the locations of possible turns, with bends of 15, 30, 45 or 90 degrees;
- Based on the diagram, equip each line with materials, keeping in mind that the length of plastic pipes can be 0.5, 1, 2, 4 or 6 meters;
- assemble the entire pipeline, using a special lubricant and a grinder with a metal cutting disc to facilitate the work;
- place bends where the line turns;
- lower the assembled air duct into the prepared channel, connecting it with installed bends;
- attach louvered grilles to the wall at the holes;
- install visors or deflectors on the heads.
The fan should not be installed in a stationary position, as it will interfere with the free circulation of air. Alternatively, swivel hinges are attached to its body, on which it is placed in the working position, and when not needed, it is moved to the side. Another method involves installing studs on which the fan is fixed if necessary.