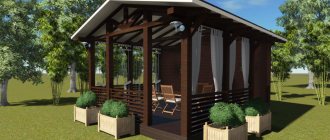
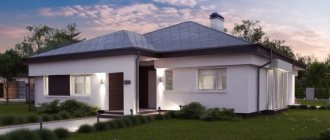
The two-story gazebo design is a unique and interesting solution that will decorate your summer cottage and add more space for relaxation. Such a structure is extremely rare in dachas and villages; usually something similar can be found at recreation centers.
With a circular lift to the second tier
The essence of a two-story gazebo is the presence of an open terrace on the second floor - for sunbathing, drinking tea and admiring the sunset. Or organizing additional space with a protective roof for privacy.
Depending on the owner’s hobby, on the second floor you can organize a fish dryer, a place to use a steam generator, a point with a telescope, and the like.
A gazebo with two floors can easily be implemented on a regular site near a country house. There are quite a lot of design options, so you can get an idea for your own construction without any problems.
After looking at photographs of two-story gazebos, you will be able to independently draw on paper a project for your future construction, and then begin construction. Below are various options for two-tier structures that can serve as a prototype.
Peculiarities
There are a variety of designs for two-story gazebos. There are designs that have very unusual shapes. It is impossible to cope with the construction of such structures on your own; you have to turn to specialists.
The situation is completely different with designs characterized by simple shapes (rectangular, square, and so on). It is quite possible to build such a gazebo with your own hands, you just need to understand the basics of construction and take into account certain recommendations.
To create a drawing, you will need to turn to professionals or draw it yourself. You can use a single-story structure as a guide. It will only be necessary to increase it by adding a second floor.
We should not forget about the interior design: the gazebo should be as comfortable as possible, because you will spend a lot of time there with family members and friends.
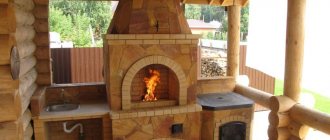
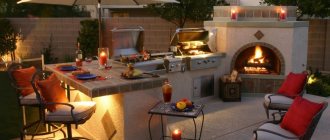
A barbecue can be installed in the gazebo. In some cases, a small extension is built for it. However, difficulties may arise with smoke in the main room, so many people prefer to place the barbecue not inside the structure, but next to it. The device for frying meat can be protected from wood using corrugated sheets.
Design examples
A very convenient option when the staircase leading to the second floor of the structure is located on the street.
A log gazebo looks very beautiful; such a structure will become a unique highlight of your site.
Some people prefer space: such a gazebo is suitable if you are not trying to save space on the territory.
A very attractive option for many owners of summer cottages is a 2-story structure with a stove complex.
We should not forget about the design. In appearance, this building looks quite simple, but the pleasant color gives it individuality and makes it more interesting.
Such designs are suitable for people who strive for originality and do not think about saving space on the site.
An interesting version of the gazebo is presented in the following video.
https://youtube.com/watch?v=bjs0q6LQY44
Disadvantages of two-level gazebos
When constructing a two-story recreation structure, there is a need for additional construction work and manipulations.
- Particular attention will have to be paid to the foundation, since the entire structure will have quite a lot of weight.
- And additional and durable strengthening of floors, load-bearing beams and supports will also be required. The gazebo must be stable, able to withstand the load of garden furniture and a considerable number of people.
- A gazebo with a barbecue will require additional installation of a chimney.
- If the building is intended to be used throughout the year, you will have to spend time, effort and money on building a fireplace, chimney, and insulating walls and ceilings.
Rarity
If an ordinary gazebo is not something out of the ordinary in summer cottages, then a two-story structure is a rarity.
You can expand the functionality of a garden gazebo by installing a two-story structure. This approach opens up a number of possibilities that are difficult to implement in a single-story design.
Firstly, a two-story gazebo will save space on the site.
Secondly, with the construction of the second floor, it becomes possible to create an additional resting place, separated from the main part, and equip an observation deck there to admire the beauty of the landscape, or organize a place for sunbathing, just sitting on the sofa, in soft armchairs with loved ones or guests.
Foundation for a gazebo with a second floor
Proper foundation design will ensure the stability of the structure, the ability to resist moving soils and, as a result, durability. When creating a foundation, it is necessary to take into account that the building will have a much greater mass than a one-story building. Therefore, the mass of the object must first be calculated. This will help when choosing the appropriate type of foundation.
However, if we talk about two-story gazebos made of wood or on a metal frame, then a deep, heavy monolithic foundation will not be needed in any case. It is only needed for objects made of bricks or blocks.
At the same time, it is difficult to call a brick or block gazebo just a gazebo. It turns into a small country house, the construction of which is not always justified.
At the same time, construction from wood or metal elements has many advantages over heavy brick buildings. Such objects are several times cheaper, they are easier to decorate, giving an attractive appearance. In addition, wood or metal will last no less than brick or blocks.
Therefore, you should consider the main options for foundations for two-story gazebos built from wood or brick:
Pile-screw. It makes no sense to distinguish it from the pile type of foundation. It is the pile-screw technology that combines all the advantages of constructing pile foundations and an affordable price. The pile-screw option is excellent for sandy or heaving soils, which are so characteristic of the European territory of Russia. Such a foundation consists of piles screwed into the ground until they reach solid ground. Accordingly, there is no need to carry out excavation work to level the soil level. It is enough to simply use piles of different lengths. This will provide a level and solid base for a two-story gazebo. In addition, the piles are covered with a protective layer that protects them from rust formation and exposure to slightly aggressive soil environments;
Columnar type. This option is convenient for DIY work. A two-story gazebo with your own hands is quite possible. In addition, a two-story gazebo with a barbecue, built with your own hands, will save a lot of money. Winter two-story gazebos or summer buildings need a solid foundation. To install a columnar foundation, you need to dig holes about 1 meter deep. You should start with the main 4 holes located in the corners of the building. The remaining holes need to be dug in 1-meter increments over the entire area of the gazebo.
At the bottom of each of the pits you should make a sand cushion 10-15 cm thick. It is recommended to pour this cushion on insulating material. You can use roofing felt. It will protect the foundation from moisture. When the insulation and sand cushion are ready, you should lay out the brick cabinets. In order to save money, you can use used bricks or even halves. The strength and load-bearing capacity of the gazebo will not suffer from this. The resulting pedestals should be approximately 50 cm above ground level. When the solution dries, it will be possible to lay the floor and arrange the main structure of the gazebo.
It should be noted that both technologies provide equal strength and durability. It all depends on the availability of available material and your own skills.
How to build?
Foundation
You can build a lightweight structure with one floor on a flat surface and not attach it to the base, but for a two-story gazebo you will need to build a foundation
.
When installing a frame structure, vertical posts should be installed. The ideal option for such a structure would be to use a point foundation
. The cost of such work is relatively low, and moreover, you will need to spend a minimal amount of time on it.
The optimal cross-section of foundation supports is 0.4x0.4 m (or so). It is recommended to choose solid blocks or bricks to create the base
.
Monolithic pillars
Foundation supports can also be monolithic. The design will be more durable, but this option is more expensive. You can pour the foundation directly into the ground (if the walls of the hole are strictly vertical and the hole itself has the correct geometry). The pillars are brought to the surface by 0.2 m, no more
. However, for greater reliability, many prefer to use formwork.
- Dig a hole about 0.3 m deep. The formwork box will need to be installed around the perimeter of the excavation. Then take polyethylene and cover the hole and formwork with it. It will prevent the penetration of ground moisture and prevent liquid from escaping from the concrete.
- The reinforcement cage must be lowered into the column. You should immediately make formwork for each support. The concrete will have to harden to a certain extent. It is necessary to wait until it hardens, and this is one of the disadvantages of this method.
- Usually the formwork is removed a week after pouring. Installation can continue in approximately two weeks.
Fastening
If the foundation is monolithic, then special units can be provided to secure the wooden columns. If you have cast a rod into the foundation, make a hole in the vertical beam and place it on the support. After this, you will only need to take care of additional fastening.
Additionally, you can secure the frame using wooden dowels, struts, brackets or steel angles
. When installing vertical elements, you need to constantly check whether they are level.
For structures with one floor, one post is usually enough, but for two-story structures it is recommended to install 2-3 posts in the corners
. This way you will make the gazebo as stable as possible. The distance between the vertical elements depends on the size of the gazebo, as well as on the type of structure.
The height of vertical posts varies. You can install a vertical element along the entire height of the structure: it will be a solid column. This is a rather difficult option for doing construction work yourself. You can choose another method: how to build up the vertical elements of the 2nd floor onto the racks of the 1st
.
Having installed and secured the pillars of the 1st floor, begin to install the floor beams, which should be located between the floors. They are held in place by a cross strap. You will also need to take care of additional fastening. Craftsmen use a variety of methods that allow them to reliably connect various elements. This is, for example, the use of hidden spikes that prevent the beams from moving.
A two-story gazebo in the country is a comfortable and functional place to relax in the fresh air. Such a building is built taking into account the number of people in the family and the area of the land.
354ec586628604fbf0158db776e10243.jpe
Project of a two-story wooden gazebo with barbecue and barbecue
A two-story gazebo has the following advantages:
- Multifunctionality - this design is large in size, so it can be divided into several zones. Experts advise dividing the space of the gazebo into two floors into a summer and winter zone. You can make a separate children's corner.
- Aesthetics - such buildings decorate the dacha.
- Space saving - in a small area you can build such a spacious structure as a two-story gazebo with an open terrace.
- Complete rest - the structure in question will allow all family members to enjoy the sunrise and sunset.
It is built according to a previously prepared project. You can use ready-made ones or prepare projects yourself. You must first decide on the functionality and season of use (all year round or in summer) of the building.
Roof truss system.
The second floor can be left as an open terrace, then the height of the racks will be equal to the height of the railings. This option is convenient for those who like to sunbathe or watch the night sky. If the project includes a full second floor, then the roof of a two-story gazebo can be one, two or four slopes.
Also read: The main advantages of wrought iron gazebos
However, the load on a single-pitched roof in the event of snowfall in winter will be quite large (this applies more to harsh regions), and the rafter system of a hipped roof system will most likely have to be assembled on the ground and will be quite difficult to lift to a height. Thus, the best option would be a gable roof.
Posts are attached to opposite sides of the top frame (their height is determined by calculating the desired roof slope), a beam is attached to them, forming a horizontal edge of the pitched roof (ridge).
Next, the rafters, made of boards 50x100 mm, are fastened at the desired angle to each other at one end, forming an incomplete triangle and are fastened with the help of cuts with the fastened ends to the ridge, and the free ends to the upper frame of the second floor.
Then the rafters are sheathed in increments necessary for laying the roofing. Thus, the frame of the two-story gazebo, built with your own hands, is ready and you can begin finishing work.
Materials
To build a 2-story gazebo, you can use blocks, brick, wood, and metal. An open terrace on an additional floor is the simplest option. In this case, you won’t have to worry about installing the roof, you will only need to make the floor as resistant to liquid as possible
. The staircase of a 2-story gazebo is an element that is quite difficult to create, but this task can be made easier by installing a flight of stairs outside rather than indoors
. It turns out that you can enter the stairs directly from the street.
The use of timber is the simplest and most economical financial option. This is not a brick, for which you need to prepare a heavy foundation, and not metal, which in principle is quite difficult to work with.
To carry out construction work, you will need to prepare a variety of materials:
- Fundamental basis
. If, in terms of geology, the situation in the area is quite acceptable, you can opt for a columnar foundation. Various options are allowed: you can use monolithic pillars, concrete blocks (quite light), clay bricks. - Tying and installation of vertical elements
. Glued laminated timber is a very good option for installing load-bearing posts. Relatively inexpensive planed timber can be chosen for the interfloor space and lining the lower part. For the top, you can use 10x15 cm timber. - Beam floors
. A block with a cross section of 10x15 cm is also suitable for them. - Various parts of the roof
. Boards measuring 5x15 cm are suitable (if you want to use regular rafters). Thicker sloping rafters can also be used (if you are going to build a hip roof). Ondulin or metal tiles will be an ideal option for roofing. - Fencing
. At least the 2nd floor of the structure must be fenced. You can decorate the gazebo using decorative grilles.
Preparatory work
A gazebo is built with your own hands from various materials (stone, brick, wood). The choice of material depends on the following factors:
- the load that will be exerted on the structure;
- average number of vacationers;
- dimensions of the structure;
- the presence or absence of an equipped open terrace;
- open or closed gazebo;
- form of construction.
To make a rectangular two-story gazebo for the dacha, we use wood as a base - beams and tongue-and-groove boards. For the roof you will need to buy metal tiles. The lower trim is made using untreated beams with a cross-section of 120x150 mm, and the top - from similar elements with a cross-section of 100x100. Sanding bars (100x100) can be used as stands.
Frame diagram of a rectangular two-story gazebo
To make the railings you will need lumber. The floor will be constructed from tongue and groove boards. To sheathe the ceilings, we use wooden lining. The rafters will require beams (50x150 mm). We will lay the sheathing from edged boards. You can make the stairs yourself from polished beams or buy them ready-made.
A wooden gazebo with 2 floors is assembled on a flat area. To do this, we use free-standing pillars or reinforced concrete strips. Since the weight of the structure being erected is small, it is possible to arrange a shallow foundation. If you plan to build a gazebo with a terrace, then the foundation and roof are waterproofed. The tools you will need are a level, a tape measure, a concrete mixer, an angle grinder, buckets, and a shovel.
Return to contents
General rules for drawing up drawings
Drawing up drawings of a gazebo for a summer house will allow you to accurately plan the location of various important structural elements - lamps, doors, windows, perhaps, or. In addition, accurate diagrams and sketches will help determine the amount of building materials needed.
How to make gazebos with your own hands (drawing, photo)
There are rules for drawing up drawings with your own hands that should be followed:
- First of all, you need to measure the space on the site allocated for. The dimensions of the structure in the drawing should not exceed its area.
- Next, a sketch is drawn.
A sketch of a wooden building or its 3D model clearly shows how it will look in the end
- Then the frontal and profile projections of the building are drawn, indicating the dimensions. For complex structures with barbecues or massive furniture, you will also need to attach a plan (projection from above) to the set of drawings.
- Next, a separate diagram of the foundation is drawn, which can be.
Columnar foundation diagram
- After this, walls and large elements (barbecue, table, etc.) are drawn. At the same stage, you should note the locations of windows and doors.
- Then, on the finished drawing, mark the dimensions of all frame and cladding elements.
Drawing of the frame of a summer building with the indicated dimensions
- At the next stage, a roof diagram is drawn up with dimensions and angles.
- The locations of the lamps and the electrical wiring diagram are noted.
- If necessary, draw a barbecue with a foundation and a chimney (oven, barbecue).
- Next, you will need to “arrange” the furniture on the plan.
The plan should also include furniture
If it is planned to build a closed structure, it is necessary to indicate the location of all ventilation openings.
Independent design
When building a closed winter gazebo, special attention is paid to its layout. This is explained by the fact that snow will accumulate on the roof of the building. This design requires insulation and glazing. Tasks of designing an open and closed gazebo for a summer residence:
- location of the structure;
- options;
- degree of illumination;
- material calculation;
- type of construction;
Drawing with dimensions for building a gazebo - presence of foundation;
- walling;
- roof installation.
To independently carry out the above tasks, experts advise using various computer programs. With their help you can create 2D and 3D drawings. The last image allows you to look at the future structure as realistically as possible. But 2D drawings are easier to work with. Beginners can use programs such as HomePlanPro and ArConHome. The user can choose for himself the optimal ready-made template for future construction. In this case, individual sizes are specified and suitable consumables are determined.
The following computer programs can be used to design a gazebo:
- GoogleSketchUp - great opportunities open up for the user in planning a future design.
This is what a designed gazebo looks like in GoogleSketchUp.
To automatically create a three-dimensional model, the user needs to use simple tools (shapes, two-dimensional lines, abstract forms). Beginners can prepare a project using such a program using built-in tips. - AutiCAD - you will need professional skills to use it. With its help, the user will be able to design certain structural elements with a terrace (stairs, columns, windows).
- 3D Studio MAX is a professional program for architects that helps create a report on the quantity of consumables and creates a detailed design of a gazebo for a summer house.
Return to contents
Construction of the second floor
The construction of the upper floor of a two-story structure begins with the installation of the ceiling. To do this, beams with a cross section of 100×100 mm are laid between the two shortest sides, the pitch should be no more than 50 mm. They are attached to the base using anchors, further strengthening the place of the bundle with metal plates and corners. After this, roofing material or an alternative waterproofing material is laid on top of the ceiling. At the end of the installation, a fencing barrier with a height of about 50–100 cm must be secured around the perimeter of the structure; in this case, decorative railings are considered the simplest solution.
Find out more about the features of a terraced landscape.
Ideas and their implementation
So, you’ve decided to build a two-story gazebo with your own hands and don’t know which option to choose?
Such an interesting building, which we see in the title picture, was undoubtedly developed by the designer and designed together with the terrace (see Terraces and gazebos: organizing recreation on a country site) as a single whole. It has an unusual streamlined shape and is hardly suitable for independent construction.
- But gazebos that have regular geometric shapes at the base: square, rectangle, polyhedron - are quite within the capabilities of any person at least a little familiar with the basics of carpentry. Your task: to find a suitable project in order to at least decide how your building should look in the end.
Two-story gazebos: project
- Unfortunately, there are no ready-made drawings on the Internet, which means you will have to either draw them yourself or contact specialists. In terms of dimensions, you can completely focus on a one-story gazebo, only by increasing its height. Although, if desired, you can also increase the area of the first floor.
For our part, we will try to provide theoretical assistance in the matter of building such a gazebo. You can get practical recommendations by watching the video in this article.
What to build from
Like any other building, a two-story gazebo can be built from wood, metal, brick or blocks.
The simplest option is an open terrace on the second floor. In this case, there is no need to install a roof; you just need to make sure that the interfloor ceiling is sealed and the floor of the upper floor is moisture-resistant.
- The second most complex element of a two-story gazebo is the staircase. But this task can also be simplified by doing it not inside, but outside. That is, you can go up to the second floor directly from the street. Otherwise, the construction of a gazebo in two tiers will not be too different from the traditional one.
Spacious gazebo on two floors
- It is easier and cheaper to use timber for construction. In any case, this is not metal that needs to be welded, and not heavy brickwork that requires a solid foundation (see DIY foundation for a gazebo: choose the right one and do it). So, we will take as a basis a wooden frame gazebo, similar to the one we see in the photo above. What will you need for this?
The set of materials will be something like this:
| Construction phase | Basic materials |
| For the foundation | Subject to normal geological conditions in the area for a frame gazebo, a columnar foundation is sufficient. To do this, you can use: clay bricks, lightweight concrete blocks, or make the pillars monolithic by pouring them using formwork directly into the ground. |
| Vertical posts and trim | To install load-bearing posts, it is better to use laminated veneer lumber with a cross-section of 150*150 mm. It is better to tie the lower perimeter and the interfloor part with lumber of the same section, and you can use cheaper planed timber. To tie the gazebo along the upper belt, you can take a beam of a smaller cross-section: 100*150 mm. |
| Beam floor | The floor beams are mounted from the same material as the top trim: 100*150 mm. |
| Rafters and other roof elements | The dimensions of the rafter system elements (see Rafters for a gazebo: installed according to the rules) depend on the roof structure. If these are ordinary rafters, then take a 50*150 mm board; in the hip roof design there are also slanted rafters, which should be twice as thick. Metal tiles or ondulin are ideal as roofing materials. |
| Filling fences | At least one floor (second) in such a gazebo must be fenced. 100*75 mm bars are perfect for installing parapets. If you want to make decorative trellises (trellises), you will need 20*40 mm slats. |
DIY installation
In order to make a gazebo with your own hands at the dacha, you need to follow the order of the stages of work. This will allow you to avoid making mistakes during installation and get the expected result in the end.
Frame and floor
You need to start with the frame and floor. If the structure is wooden, then beams for the base will also be suitable. The floor will also be made of wooden planks. It is better to make the basis for the beams and floor from concrete. It is enough to fill the screed with a thickness of several centimeters. It will be the best and most reliable option, and will last a long time. Before work, you need to carefully choose the location for installation, think several times before making a decision. The site also needs to be cleared and leveled for pouring the foundation. In such a structure it is not recommended to combine metal and wooden parts.
As practice shows, even if you protect a wooden base with roofing felt or bitumen, when the wood comes into contact with concrete, it will begin to rot over time. The result is the subsequent destruction of the structure. Therefore, it is necessary to avoid this initially.
To complete this task you should:
- concrete the profile pipe (it should be 30 centimeters higher than the concrete);
- drill holes for screws in the pipe;
- push wooden posts into the pipe;
- We fix the post in the pipe with screws.
If the owner plans to install a small light gazebo, then installing a brick fence for the enclosure is not necessary. You can get by with a fence made of eurolining 90 cm high. This is quite enough. The lining is secured to the longitudinal bars. This design will help hide from the sun and wind. The fences for its walls are attached to the supports with screws.
a077b140507576f61f73e37491d5f7dd.jpe
d0224b6f01087e81de60de5b78615285.jpe 16bcfcd28c6e00ae1b16ecea9fa62c19.jpe 602019930b2e4c67d8a5c859567bd3d3.jpe
As an alternative to lining, you can use polycarbonate. It is also easy to install and is resistant to high temperatures and wet weather. For the roof frame it is better to use 50x50 centimeter timber. From such timber it is necessary to create a base on which the sheathing will be installed, and then the roofing material. Slate, metal tiles and ondulin can be used as a roof.
Roof installation
When designing a roof, you need to calculate it in such a way that at the end of the roof there is no need to cut off the last sheet. To do this, measure the height of the roof and subtract the overlap of the sheets over each other. Making a gazebo at home is easy. It is enough to choose high-quality material.
For example, for slate, each sheet of which has 8 waves, the length of the gazebo will be a multiple of 1 meter, and the length of the slopes will be 1.75 m
When considering coating options, special attention should be paid to polycarbonate
It has the following advantages:
- An excellent option for lightweight gazebos, as it weighs little but is a very durable material.
- Fences are made from polycarbonate.
- It is a translucent plastic of low weight.
- A metal profile is often used together with it.
Polycarbonate is a material with good elasticity. It can be easily bent. Because of this property, it is often used when installing an arched roof. To create one, you need to weld strips of steel 50 mm wide. First, they need to be installed on the support strips, and then holes must be drilled to secure the sheets.
Gazebos are also sometimes covered with metal tiles. OSB sheets are installed under it. They do an excellent job of holding the tiles on the roof. Basically, such sheets have a thickness of 10-12 millimeters. This material has fairly good strength and rigidity.
Bottom trim (grillage) and installation of frame racks.
The grillage and frame racks are made of wooden beams 150x150 mm, all wooden elements must be pre-treated with antiseptics (special impregnations).
We lay the beam of the lower frame on the foundation columns, having previously covered them with several layers of roofing material. We fasten the timber by cutting from the end part of the half-tree and laying its ends on top of each other. We fix the structure on the foundation columns using anchor bolts.
It is quite difficult to erect single-piece frame racks on two floors without professional skills, so it is better to use a sequential extension of the second floor to the first.
We install the frame racks strictly vertically (check with a plumb line), fix their position using wooden struts or metal brackets. We make a rigid fastening using metal corners and wood screws. We fasten on all sides. When calculating the height of the racks, do not forget to take into account the height of the finished floor and ceiling cladding.
Step by Step Actions
- We first prepare the columnar foundation. To do this, we dig out a pit, arrange and compact “pillows” from consumables.
Installation of the foundation for a two-story gazebo - Then reinforcement, mortar pouring and waterproofing work are carried out. On the resulting base we lay a frame made of beams that have not been sanded. An insert is used to connect them. To ensure such a docking, you will need to make recesses for 1/2 of the element.
- The next stage is the installation of vertical racks. In this case, a step of 1 m is observed. We first fix the racks with braces. Then the interfloor lining is laid from beams of a smaller cross-section. The components are connected using a similar method. To strengthen the resulting structure and prepare the basis for the future plank covering, floor joists are installed on all floors.
Scheme for installing vertical gazebo posts - Then we install racks of another level according to a similar principle described above. To move around the second floor, experts advise installing a temporary floor. We lay the final strapping on the finished posts. It will combine the individual elements of the 2nd floor. To join the beams we use the scheme described above.
- For better fixation of the racks, experts advise using metal corners. We fix the pillars on all sides. In this case, the installation of products is carried out from below and from above. Taking into account the shape of the roof, the rafter system is assembled. Its elements must be installed in the same plane. Otherwise the coating will not be even.
- If the rafter joists are installed, we fill the sheathing (step 300 mm). At the same time, we leave a space from the bottom bar (2.3 cm). This technology ensures that the first wave of the structure is laid on the board.
Project of a two-story gazebo with wooden latticework - The next stage is the layout and fastening of metal tile sheets. This process is carried out so that the capillary groove is on the left. We install skates at the top junction of the canvases.
Translation of an idea into a project.
When it comes to independent construction, ordering complex drawings from specialist developers is not rational in terms of high financial costs.
Especially if you are building a gazebo of the correct rectangular shape, then it is enough to look at ready-made similar projects on the Internet and, using their example, develop your own vision of the future two-story “brainchild”.
Then make a simple drawing with the expected dimensions of the gazebo. In addition, consider arranging it with additional elements (stairs, fencing railings, cladding, roof shape, etc.). Based on the calculations carried out, it will not be difficult to determine the necessary materials and their quantity.
Also read: Gazebo with summer kitchen and barbecue
By length to width ratio
2 by 2
The smallest version of the gazebo, which is designed for a maximum of two people. Sometimes in such buildings they don’t even put a table, but limit themselves to chairs or a bench.
2 by 3
Another extremely small class of gazebos. Seats about 3-4 people depending on the size of the table and chairs. The rectangular shape allows you to sit with increased comfort (compared to the previous version).
With figures at the entrance
3 by 3
The most popular format of gazebos, in incredible demand. Nine squares completely covers any need for a family dinner or relaxation with friends.
Classic sizes of a summer gazebo
There are many options for purchase on the market, but you can build a similar gazebo with your own hands. More details in this publication - https://besedkis.ru/razmer/besedka-3-na-3.
3 by 4
A rectangle with an increased area, where vacationers can now comfortably turn around. Several times I have seen reviews from people who spoke positively about the dimensions of 3 by 4. The area is just a few meters larger, but the increased capacity is immediately felt.
3 by 4
3 by 5
An even more elongated seating area, in which you can put a barbecue or a small stove.
Due to the large length, the corners of the gazebo remain free. Therefore, the entire interior can be moved all the way to one corner, and the means for frying meat can be placed in the second. There is a choice of grill, tandoor, smokehouse.
3 by 5
3 by 6
And here God himself ordered a brazier to be placed, since it would be difficult to communicate at such a great distance between people in different corners of the table.
With barbecue
And yet, if you don’t need a barbecue inside the gazebo (many people have subjective reasons for this), then you can install a rectangular table. Alternatively, you can install a TV or speakers for music at the end.
4 by 4
The gazebo is medium in size, but for a summer cottage it can already be called quite large. More construction resources will be needed, and the structure itself will be heavier.
4 by 4
Therefore, before construction, find objective reasons to build such a large recreation area and overpay for scale. If they are not there, then give preference to the classics - 3 by 3 meters.
4 by 5
The presented building is at the psychological mark of 20 square meters, after which the gazebos can already be called really large. A rectangular shape will accommodate more people, although from an aesthetic point of view it does not always look better.
4 by 5
4 by 6
As mentioned earlier, it is in elongated gazebos that it is more convenient to place a place for cooking on coals. Sometimes part of the building is fenced off and a utility block is obtained, in which you can make a warehouse for equipment or an outdoor shower.
4 by 6
5 by 5
I have never seen such large sizes on a classic summer cottage, but at recreation centers they can be found everywhere. The large capacity and open type of structure are perfect for large groups of vacationers.
5 by 5
In the evening, however, mosquitoes begin to bother us. To do this, you can use a mosquito net to hide from annoying insects. This is especially true on the banks of reservoirs or in forests.
5 by 6
Quite a rare aspect ratio in a gazebo, but it exists. If large squares do not evoke any positive emotions in you, then give preference to these sizes. If desired, the width can be expanded even further.
5 by 6
6 by 6
We will stop at a huge recreation area, the size of which is more reminiscent of a tennis court, where you can easily have a wedding or celebrate a holiday with a corporate circle of colleagues.
6 by 6
For a dacha, “this” is not considered, since the house on the site itself has approximate dimensions. Against the background of such a gazebo, it will look ridiculous.
Varieties
There are not many varieties of 2-story gazebos. The main options: with a roof, open and with barbecue. From an aesthetic point of view, a gazebo without a canopy is a priority. The open terrace on the second floor is a place where you can relax from the hustle and bustle of everyday life and enjoy the scenery. Typically, the first tier is used as a cooking area, and the second as a lounge area. The only drawback of the building is the lack of reliable protection of the upper floor from precipitation. It is unlikely that the second tier can be used in bad weather, but for the winter it is advisable to cover it with something.
A closed-plan gazebo is more difficult to build, but the structure itself, as well as its guests inside, is provided with reliable protection. The roof will protect the second tier from precipitation. In addition, such a building looks more impressive. Construction will require more material and a stronger foundation. It is better to entrust the drawing to a professional.
A functional addition to the gazebo is a barbecue. There are immediately a lot of options for spending your holiday. You can install a barbecue inside the main structure by making a compact extension. On the other hand, the fireplace for roasting meat can be located next to the gazebo. No special construction skills are required. We just buy a barbecue and install it in a free space. If you decide to place the frying device indoors, you will need a chimney vent.
You can put a barbecue in the gazebo
Multifunctionality of two independent areas
In general, a two-level gazebo is a fairly multifunctional structure. It can combine:
- projects with a regular gazebo and an open terrace on top, where you can sunbathe in the sun, breathe fresh air and admire the stars;
- fireplace or stove for cooking, barbecue and dining area on the second floor;
- downstairs to receive guests, and upstairs - only a family vacation spot;
- divide zones into adult and children's;
- division into winter and summer terraces, open and closed, etc.
Second floor of a two-level gazebo
That is, two-level gazebo designs can have many variations. And its final configuration completely depends on the wishes of the owner. Just like the geometric shape, material of manufacture, location, roof design.
Brick house - more difficult work
You can draw designs for simple wooden structures yourself. Whereas, a brick gazebo is a more complex structure that requires some architectural knowledge and a certain skill. For example, a building with a barbecue on the ground floor and a recreation area above requires a competent smoke removal system and air supply to the fireplace.
A house for year-round leisure needs high-quality thermal insulation and an autonomous heating system, which can also be done with your own hands, but will require more skills and knowledge. The same applies to gazebos with their own water supply and sewerage.
You should also not forget about such a mandatory attribute of a two-story structure as a staircase. It can be installed outside or inside, with or without railings, made of stone or wood.
Thematic material:
Ladder
Installation of the stairs is considered the last and one of the most important stages in the construction of a two-tier building. This object can be installed both inside the gazebo and outside. In this case, the last option is the most profitable. It not only allows you to create a comfortable staircase width and step height, but also makes it possible to avoid cluttering the internal space of the gazebo.
Did you know? The tallest building in the world is considered to be the Burj Khalifa skyscraper, located in Dubai (United Arab Emirates). Its height is 829.8 m, which is an absolute record.
Most often, wood or metal is used to construct this object. At the same time, metal structures are most preferable for external stairs. You can make a staircase of any complexity yourself, but it is recommended to purchase a ready-made structure consisting of several modules. This will greatly simplify its construction and also protect it from all sorts of difficulties during further operation. In this case, it is recommended to pay attention to models with a step height of 17–25 cm; with other ranges, the rise will be more difficult and not comfortable.
Wooden gazebo - not so difficult
There are many ways to make gazebos with your own hands. For example, building a structure made of wood is not so difficult. Especially if a person has carpentry skills. Creating a simple quadrangular structure from timber is not difficult and will not take much time.
You just need to take into account that a multi-level building, in any case, will be quite heavy and somewhat unstable. This requires a solid foundation. For a wooden terrace, point supports are suitable, but a stone or brick building requires concrete slabs or a reinforced strip foundation as a base. But doing this yourself is not at all difficult if you have already encountered laying the foundation for any structure, such as a fence or outbuilding.
To begin with, they dig metal supports into the ground, make formwork around them and fill them with concrete. After it hardens, you can continue working: make the bottom frame, lay the floor boards, build walls. If there is supposed to be an open area at the top, without a roof, then before building the second floor it is necessary to very carefully insulate the floor. To do this, several methods of waterproofing are used, laying it both under the floor of the second level (on the ceiling of the first) and on top of it.
Decorating a garden terrace
Any gazebo should be not only functional, but also beautiful. It will become a real decoration of a personal plot and its main highlight if properly decorated. But this is the part of the work that everyone can do. And a good owner not only can, but must do the decor with his own hands, only in this way will the summer house in the garden acquire individuality and emphasize the character of the family.
You can use the following as decoration elements:
- Various plants and flowers. These can be trees, shrubs, perennial flowers, as well as climbing crops and vines that can cover the wall of the terrace or create the necessary shade. They can also be placed indoors. To do this, use different flowerpots, flowerpots, multi-level shelves with flower pots.
- Textiles in the form of curtains, pillows, mats, rugs and tablecloths can completely transform the interior in an instant, quickly change its style, if necessary, and making them with your own hands is very simple.
- Forged, carved, openwork decorative elements on doors, windows, walls will decorate the gazebo both outside and inside.
- Lighting is also designed not only to give light. Various flashlights, LED strips, sconces and lamps will become a decorative attribute in skillful hands.
Whatever projects are brought to life: be it single-story gazebos, multi-story, simple or complex, square or round, with or without a roof, the most important thing is to put your soul into them, to convey the mood. Then the terrace will become a favorite vacation spot for the family and the envy of the neighbors.
Create a drawing
A detailed drawing is the first thing that should be started long before the construction of the gazebo begins.
First of all, not only the harmony and proportionality of the entire structure, but also the correctness of calculating the volume of building materials depends on its details. This often does not require special knowledge and skills, since in the construction of small architectural forms it is permissible to do this schematically. A correct drawing must describe:
- general site plan;
- the foundation of the building and its shape;
- the shape of each side of the structure, including the roof;
- frame diagram;
- all supporting structures;
- position of window and entrance openings.
In addition, the correct project always contains information about the materials used, their characteristics and methods of fastening individual elements. At the same time, maximum scrupulousness at the planning stage allows you to take into account all the nuances, as well as avoid all kinds of unforeseen difficulties.
Important! The main drawing, as well as additional images, must be made to scale relative to the future structure. This is the only way to correctly recreate the circuit in real life, without any errors or inaccuracies.
Foundation part
If a light one-story gazebo can be assembled on a flat area (see Platform for a gazebo: how to organize it correctly) and not attached to the base in any way, then a two-story building, in any case, must be installed on a foundation. For a frame gazebo, the main load-bearing structures of which are vertical posts, a point foundation is simply an ideal option - both the labor intensity is low and the price is quite reasonable.
As a rule, foundation supports have a cross-section of 40*40 cm or close to it. If these are brick pillars, then their cross-section is the sum of the length and width of the brick: 25 12 cm = 37 cm (one and a half bricks). When cinder blocks or expanded clay concrete blocks are used for this purpose, one block with a typical size of 390*188*190 mm is laid in length. In the example below we see exactly this option. It is better to use solid bricks and foundation blocks.
Gazebo base: bottom frame on a columnar foundation
To be needed for construction
To organize effective construction, it is necessary to prepare wooden beams with the stated dimensions of 10x10 or 15x15. If desired, you can use logs, which allows you to build a chopped structure. As a rule, specialized OSB boards or classic type of boards are used for flooring. There are solutions using high-quality concrete screed or the use of decorative tiles - what to choose depends on the personal preferences of the owner of a country house and financial capabilities in particular.
To build a roof and walls, you need to use boards with different parameters. In order to organize high-quality cladding, you can use logs or OSB boards. The best solution would be to use wood. This is due to the lack of complexity in performing the work, which allows construction to be completed in the shortest possible time.
To organize the effective construction of the type of gazebo in question, it is necessary to prepare the following types of tools:
- classic saw;
- standard hammer;
- screwdriver;
- specialized construction level;
- standard tape measure and pencil for measurements;
- twine and wooden pegs for marking.
In the case of using concrete and tiles, the list of required tools expands significantly. For example, you need to additionally purchase a specialized solution, a spatula. It is recommended that you first read the instructions for leveling the floor.