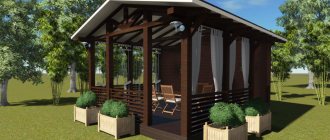
A beautiful summer gazebo in the country where you can relax with the whole family is a great solution, but if you add a stylish technical unit to this structure, it will become much more practical. Let's look together at why the Russian people fell in love with this model of a summer residence so much, and at the same time I will tell you from what materials and how to build a gazebo with a utility block with your own hands.
A gazebo combined with a utility block is many times more practical than a regular canopy.
Advantages of combined construction
Saving free space is the main goal of arranging a gazebo with a utility unit under one roof.
The implementation of such a project promises a lot of other pleasant bonuses. The second most important factor influencing the decision to buy a barn combined with a gazebo is reducing construction costs. The utility room does not have to be used only as a shed; there are a lot of interesting ideas that will make the garden area more beautiful and your vacation more comfortable. For example, a gazebo would be very useful when the utility room is equipped with a shower. It is equally practical to have a place to store firewood next to the recreation area, which will always remain dry regardless of the weather.
Any foundation should be thoroughly waterproofed. For this, roofing felt, roofing felt, and bitumen mastic are used. They are laid on top of the supports so that the wooden structural elements do not have direct contact with them.
Now the bottom trim is made - a square of timber, with a cross-section of 15x15 centimeters. Wooden beams are laid on supports and secured with anchor bolts. Logs are laid on them - transverse beams to support the floor. For them, a beam measuring 10x10 cm is sufficient.
It is important to remember that all wooden elements must be thoroughly treated with antiseptic solutions and special impregnation against insects and mold. After all, the future gazebo with a utility block, built with your own hands, will be located in the open air and will feel the influence of weather conditions. The treatment should be done at the preparatory stage, before actual construction.
After installing the logs, the frame beams are fixed strictly vertically. They should be located in the corners of the structure and in places where the project involves openings for doors and windows. For beams, you need 2.5-3 meter pieces of timber with a cross section of 10x10 cm. Here it is better to use wooden bevels for greater rigidity of the entire structure. They are placed diagonally between the vertical posts.
The frame is completed with a top frame made of a 10×5 or 15×5 cm board. It is needed to stiffen the frame and to connect it to the roof. The rafters will rest on these boards.
Action plan
Having understood the functional purpose of the utility unit, you should consider a number of the following questions:
- Choose a suitable place for construction.
- Decide on the size of the building.
- Come up with your own or choose a floor plan from a construction company.
- Clarify the complexity of construction work (foundation, insulation, interior decoration, communications).
- Select high-quality building materials.
Wooden garden utility blockSource paneldomstroy.ru
Having some construction skills, you can independently develop a simple project and implement it. To implement complex projects for a utility block with a shower and toilet, it is advisable to contact a construction company.
Materials for arrangement
The house itself for household needs is easy to build with your own hands from the following materials:
- Metal – experience with welding machines and manufacturing forged elements is required. Such structures are good because they are light in weight, do not require a foundation, and can be moved, if necessary, to another location. Outbuildings combined with a summer veranda made of openwork forged metal look very organic.
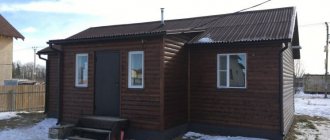
- Wooden gazebos with a shed or kitchen will fit perfectly into any landscape design of a dacha. Those who have even the slightest experience in carpentry can make them with their own hands. Wood is a natural, warm and fairly light material that does not require a solid foundation or complex maintenance.
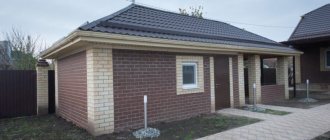
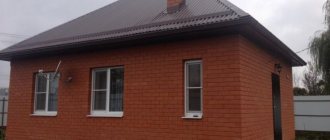
- Brick or stone structures are the most capital and heaviest. It is better to create their project after the house and other related extensions have been built. Then the barn will correspond to the general style of the yard and will not disturb the harmony with its appearance.
Wood is the main material required to build a barn with a gazebo. But each stage of arrangement has its own needs. So, in order:
- Foundation. If a columnar foundation is chosen, use an asbestos-cement pipe, which is filled with concrete, bricks or stones. The design of a strip base for a barn with a gazebo includes a standard set of cement, sand, crushed stone and reinforcement. Don't forget about the formwork.
- Floor covering. A 38 mm pine board is ideal for flooring.
- Walls. The frame of the barn with a gazebo is built from timber with a section of 150x150 or 100x100. It all depends on the size of the combined structure under one roof. Wooden lining is used for cladding. A wooden sheathing will add a decorative touch to the gazebo. Quite often there are projects where a barn and a recreation area under one roof are made of rounded logs. It is not often that combined buildings are decorated, where the walls of the utility block are brick and the open gazebo is made of wood.
- Roof. The rafter system requires boards, the thickness of which is determined taking into account the roof structure. Ondulin and metal tiles are suitable as roofing materials. Numerous color options for the roof of a barn with a gazebo will allow you to create a single architectural composition with the main structure.
We suggest you read: How to plaster a stove in a bathhouse and how to do it correctly ||
Is it necessary to plaster the steam room? Also, do not forget about ordering window frames, if any are provided for in the barn design, and other small details, in particular insulating materials for the foundation and roof.
Examples of projects
When choosing the most suitable option, you need to choose the one that suits you for financial reasons and at the same time is suitable in terms of quality. Here are a few different examples of buildings of this type.
Simple option
If you want to choose a relatively inexpensive option, you need the walls to be made in the form of a wooden frame covered with clapboard. In most cases, the roof is made of a gable roof, common to both the bathhouse and the utility block. In this case, it is recommended to choose a project with a minimum number of premises.
One of the possible options could be a house with two doors, where in one room there is a steam room, a toilet and a relaxation room, and the other is intended for household purposes. Source anticafe-sandbox.ru
Unfortunately, apart from cheapness and simplicity, it is difficult to find advantages in this option. In this case, the walls are short-lived and will have to be replaced after a few years. Due to poor thermal insulation, it makes no sense to heat this house in winter.
Weak moisture insulation will lead to rust on metal objects in the utility room Source pinterest.com
Since in most cases it will be necessary to heat water using wood, the bathhouse with the barn must be supplemented with a woodshed.
Compact project
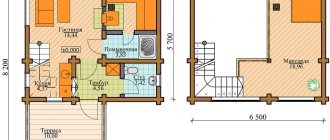
If a building is made of timber, this will give it durability and reliability. A project can be made by including the bare necessities. Here's what it might look like, for example.
Project of a utility block with a bathhouse and a relaxation room Source 2proraba.com
If you build walls from brick or cinder block, and then cover them with wood, the quality of such coatings will be no worse than wood, and the strength, reliability and durability will increase many times over. The bathhouse and barn will last for many years under one roof.
Bathhouse with utility block 4×8
The combination of a bathhouse and a utility room can be made into a comfortable place to relax.
Let's consider the following project.
Household projectSource highlogistic.ru
It can include a kitchen and a sofa in the rest room. If there is heating, you can not only wash or cook in such a house, but also receive guests or live for some time.
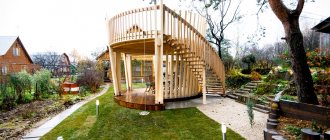
Of course, this is only one of the possible options. There are projects where such a house has a second floor, where, for example, there may be a workshop or a bathhouse, a utility block and a veranda under one roof.
Option of a utility block with a bathhouseSource assz.ru
Projects in which the house is built at an angle are also popular. Thus, a bathhouse and a barn located under one roof are more compact compared to the linear option.
Roof structure
Typically, the construction of a combined facility is planned in advance. It is extremely rare to find structures where a gazebo is attached to a finished barn or vice versa. The original idea of locating two functional areas under one roof has numerous design options.
The most common solution is a quadrangular structure, where there is a utility block and a gazebo under one roof. The reason for the demand is the simplicity of arrangement and maximum capacity. For the same reason, an object with a square platform is being built.
A hexagonal or octagonal gazebo can outshine the classical approach in architectural aesthetics. An exquisite gazebo, under the roof of which there is room for a shed, will become a remarkable element of landscape design.
Size
The range of sizes for a shed and gazebo under one roof is enormous. The choice of dimensions is influenced by three main factors:
- Availability of free space.
- Purpose of the building. Will it be just a gazebo, or do you want to put up a barbecue? It’s one thing to store just tools in a shed, it’s another to equip something like a summer kitchen.
- The planned amount of expenses also matters.
The minimum dimensions, where there is room for two zones under one roof, are 3x4 m. Then everything depends on the needs of the owners. There are projects 6x8 m, 4x10 m and many other options. For orientation, the nice and roomy gazebo shown in the photo below with a shed under one roof has dimensions of 4x6 m. The approximate cost is 215 thousand rubles.
You can find a more modest option when an object with an area of 15 m2, that is, 3x5 m, will cost 165 thousand rubles. Naturally, if we talk about direct costs, it will be cheaper to do it yourself. But... time is also a valuable resource, not to mention experience.
The choice of roof configuration is largely influenced by the size of the gazebo with the shed and the construction budget. Here are the possible options:
- Single-pitch. The main advantage is the ease of construction with your own hands and the savings in materials. Disadvantage - not suitable for regions where there is a lot of rainfall. In winter, if the snow is not cleared off, the roof of the gazebo with the barn may become deformed.
- Gable. The problem of a pitched roof is absent here if you choose the appropriate angle of inclination. An obstacle to erecting a gable roof over a barn with a gazebo can be the complexity of arranging the rafter system.
- Hip. A barn with a gazebo, topped with a hip roof, is extremely rare due to the complexity of construction. Typically, this solution is used on buildings with a large utility area.
- Combined. The project is interesting from the point of view of architectural value, when a gable roof is installed over the barn, and a gazebo is located under a gable roof.
We suggest you read: How to make a ceiling in a wooden house
Wooden boards for rafters must have slots where they connect to the timber. If the project involves installing a pitched roof, you can make the vertical posts on one side longer, thereby ensuring a slope of the roof. In any case, you need a pitched roof so that snow melts off well and water does not linger.
It can be covered with any roofing materials: bitumen shingles, metal sheets, slate, wood, metal tiles.
The project may also take into account joint construction under one roof or the implementation of two different coverings. For example, a change house is covered with tiles, and a gazebo is covered with wooden blocks.
Some typical projects
This section will look at various designs for a one-car garage. Each of them has its own characteristics. Positive and negative sides.
Garage with attic
If the plot is small and does not allow you to conveniently place a residential building and a garage, then this is not an insoluble situation. A good option in this situation might be to build a garage with a residential attic.
At the same time, there is space for a car on the ground floor, and there is a living area under the roof.
The attic can be intended not only for housing. Some owners have a utility area here. For example, under the garage roof you can arrange a place to store a variety of household equipment.
They also build those that actually have a second floor where you can live.
When you need a garage for a summer residence, this type of project is not widespread. However, it also has its fans. First of all, this is due to their main advantage: they save space on the existing site. The area that such a building will occupy is half that of a house and garage built in the usual way.
Garage with a residential atticSource www.argust-stroi.ru
Such houses are popular among those who garden. After all, such a structure, among other things, will allow compact storage of garden tools.
However, garages of this type have their disadvantages:
- When such a country garage project is used, you often have to use stairs
. This is not for everyone. - There may be difficulties with heating
, because not only the home needs to be heated, but also the garage. - is imperfect sound insulation
here . If a car is not only kept here, but also work is carried out, the noise will penetrate into the residential area.
Garage combined with bathhouse
This combination may seem unusual, but it has significant advantages:
- The construction of a building that will perform both of these functions will significantly reduce the cost
of building materials. - The presence of a bathhouse will solve problems with heating
the building. - Since in both cases you need to carry out appropriate communications
, you can
save
money by doing this.
However, there are points that need to be paid special attention to. Project of a garage with a saunaSource yovape.ru
Project of a garage with a saunaSource yovape.ru
When constructing a garage, the project must take into account:
- Between these rooms there must be high-quality moisture insulation
. - Since the temperature conditions of these two rooms are very different, it is necessary to ensure reliable thermal insulation
.
In some cases, such a project may be a good choice.
Garage with basement
Often it is used not only as a room for a car, but also for other purposes. If you provide a basement in it, it can be used for the following purposes:
- store supplies
in it , including food. - set up a workshop
in this room . This is especially beneficial in situations. When it is impossible to find a place for its arrangement outside the walls of the garage. - This can be additional storage space
. - a recreation area
in the basement .
A garage with a basement will allow you to store more necessary thingsSource territoria.by
When arranging, it is important to pay attention to the following nuances:
- Installation of high-quality ventilation
. - Warming up an underground room is more difficult
than a normal one. - There is a danger of groundwater entering here, so it is necessary to provide waterproofing
.
Having a basement provides additional opportunities and does not require additional space.
Simple garage
One of the most common standard projects includes a minimum number of additional features. There is only room for the car and a small space around it.
Regular garageSource souo-mos.ru
Although this is a relatively simple project, it is important to pay attention to the features of such buildings:
Good ventilation is important. If it is not there, moisture will accumulate inside the garage and condensation will begin to settle.
If this is allowed to happen, the result may be rust formation on the car. To protect against adverse weather conditions, how the roof is constructed is important. It should not allow moisture to accumulate or snow to accumulate on it. Although you can enter through the entrance gate, some standard models include side doors and windows. If such a possibility exists, it is advisable to install electricity into the garage. It can be useful for car repairs and other work.
The main advantage of such a garage is its relatively low (compared to other options) price and ease of operation. Source oooarsenal.ru
Foundation for a gazebo-shed made of wood
If the location of the dacha is an area with sandy soil and low groundwater flow, supports in the form of piles or pillars are sufficient for the base of the cabin. They are placed in the corners of the future structure.
For a do-it-yourself pile foundation, it is very convenient to use an asbestos-cement pipe with a diameter of 15 cm. A sand cushion is poured into the prepared holes in the ground and compacted. Then a piece of pipe of the required size is inserted and reinforced with metal pins. Fill the support 1/3 of the length with concrete and lift it slightly so that the solution gets under the base of the pipe, then it will stand firmly.
Technology for installing piles under the foundation
You can insert metal reinforcement or anchor bolts inside to connect to the beam if the project involves a heavier structure. Or make columnar brick columns at the corners of the building. For a dacha with heaving wet soil, you need a strip foundation; it is more reliable.
The easiest way is to install sand concrete blocks as a base. To do this, remove the turf to a depth of about 30 cm and fill it with 15 cm of sand and compact it. Place blocks on top in several rows on top of each other. This method is suitable only for good soils, without excess moisture, and for buildings on a hill. Then they will fully support the weight of a summer house made of timber.
Installation of piping on a columnar foundation
How to build a gazebo in 3 steps
It is best for a home craftsman to build a gazebo with a utility block made of wood or metal. You need to start from the availability of tools and skills, so if you don’t have a welding machine and you don’t know how to cook, then forget about metal.
The collapsible version (with studs and bolts) is suitable for a simple canopy, but it is difficult to assemble the room in this way. But anyone who owns a hacksaw and a hammer can build a frame from timber and cover it, for example, with planed boards, so we will talk specifically about this option.
In this case, there is no point in pouring a strip foundation or a reinforced concrete slab under the entire structure. These types of foundations are installed under brick or stone structures. For a wooden canopy, it is enough to arrange a row of pillars and install a frame on them.
It makes sense to pour a foundation slab only if the floor in the gazebo is planned to be made of concrete.
The pillars can be made square or round; personally, I prefer to fill round pillars, because it is simpler, faster, and most importantly, more reliable. Although the technology for arranging the pillars is the same in both cases.
Scheme of a square pillar for a gazebo.
- First, arm yourself with a garden drill and make holes 50-70 cm deep at the nodal points of the structure. Typically, the pitch of the pillars is 1 meter. By the way, if you decide to make square pillars, then they are buried there by 35-40 cm, this is due to the fact that they are larger in area;
- Now pour 10-15 cm of sand and gravel mixture into the bottom of the hole and compact it well;
- According to the diameter of the hole, roll up a pipe from roofing felt and insert it into the hole;
- Tie the reinforcement cage and insert it into the center of the hole;
The easiest way to make formwork is from roofing felt.
- There should be a long reinforcing rod or threaded rod in the very center. We calculate that after pouring the concrete, this rod will stick out from the post by 30 - 40 cm, and we will fix the floor frame to it;
- Further along the level (the same in all pillars) we pour concrete and wait a couple of weeks until it gets stronger.
It is advisable to install a pin in the center of the post.
Foundation diagram for a brick barbecue or oven.
The simplest design of a gazebo with a utility block.
For intermediate floor joists, timber no thinner than 50x100 mm is taken; the joists themselves are installed in increments of 30-40 cm.
The supporting frame is fixed with studs to the foundation pillars.
Now we install vertical racks for the walls. It is also advisable to make these racks from 100x100 mm timber. There is an interesting point here, professional carpenters join beams by cutting, in different ways, I recommend that you use metal corners and other similar fittings, it’s much easier and faster.
It is more convenient to join the timber using metal fittings.
What the roof on the gazebo should be like - everyone has their own opinion, but if you have never installed a rafter system, then I advise you to go with the lean-to option.
Frame diagram for a lean-to gazebo.
The most you can still try is the simplest gable design. Believe me, hip, hip, multi-level and other complex types of rafter systems are beyond your power.
The gable rafter system is relatively simple.
When the rafters are installed, an under-roof sheathing is placed on them; the frequency of this sheathing depends on the type of roofing material. The most economical would be to use corrugated sheets or asbestos-cement slate; the lathing is placed under them in increments of 200-300 mm.
Roofing made from corrugated sheets is inexpensive and can be installed quickly.
Step No. 3: cladding
Since we are talking about a summer gazebo, the cladding will accordingly be light. The simplest option is to take a planed board 20-30 mm thick and cover the frame with it. To make the structure look more original, the board can be filled not in the usual smooth way, but in a herringbone pattern, as in the photo below.
The herringbone cladding looks original.
Equipment options
Arranging a barn and an open area under one roof suggests a lot of interesting ideas for the internal use of the area. Here are possible combination options:
- The gazebo is combined with a storage shed for tools, firewood and other utensils. One of the most common project solutions.
- The open area is complemented by a miniature summer kitchen.
Attention! Often the recreation area is equipped with a barbecue or grill. In this case, it is worth carefully considering the protection of the combined building from fire, since the presence of fire always increases such a risk. The implementation of the project is complicated by the need to install a chimney. - Expensive and labor-intensive projects propose creating a single complex under one roof with a bathhouse, gazebo, barn or guest house.
- Sometimes the bathhouse is supplemented with a canopy intended for parking a car.
The proposal to place a toilet in a barn from the point of view of the aesthetic appearance of the building sounds ridiculous. What kind of rest in the gazebo can we talk about if there is a latrine behind the wall under one roof?
In winter, it is recommended to cover the open gazebo with film to protect the interior space from excessive precipitation. It is rare to find all-season combined structures under one roof, equipped with sliding windows. This solution allows you to relax in the gazebo in the fresh air in the summer, and use a heater during the cold season during a picnic.
Conclusion
I tried to talk about the most popular options for sheds with a utility unit and give the most economical assembly schemes. The video in this article shows alternative options. If you have any questions, write in the comments, I will try to help.
A gazebo equipped with a utility room can be used for both summer and winter.
Related article: Load on loggia and balcony
Location on the site
When choosing a location for a barn project with a gazebo under one roof, you should pay special attention. The following recommendations will help with the correct location of the building on the site:
- The gazebo, intended for pleasant relaxation and eating, is installed away from the compost pit and toilet.
- It is advisable that the building does not shade the beds.
- Convenient ways of approach are thought out in advance. Arrangement of the path is one of the important stages of the project of erecting a barn with a gazebo under one roof.
- The blind side of the gazebo on the north side will protect vacationers from the cold wind. It is behind it that it is better to plan installation under one roof of the barn.
- If the problem of sun protection is acute, a site should be allocated for the building near trees, which will provide life-saving shade in the heat.
We suggest you read: Attach a gazebo to the barn
Bathhouse + utility room
The steam room and utility block are built on the same foundation. An extension with communications is being built nearby. In order for the complex to be not only effective, but also safe, a number of requirements are imposed on it:
- It is advisable to make separate entrances/exits.
- A separate water supply line will be very useful. Standard capacity is often not enough.
- A joint roof is more efficient.
- Sewer outlets for utility units and bathhouses must be different.
If you or your guests are used to spending more than 2 hours in the bathhouse, the extension can be equipped as a kitchen block. And turn the rest room into a real living room.
Finishing
Wooden gazebo-sheds require good regular care. The paint layer should be renewed every six months. You can impregnate the wood with heated drying oil, which is applied in two layers. Cover the top with oil paint or leave it in its natural form. To prevent the wood from rotting, it is better to install a house made of timber for the household needs of a dacha on a special platform - a flat platform made of concrete, boards, or paving slabs.
Pots of flowers on the windows, a wall of green climbing plants, and garden furniture will help you decorate your home built by yourself.
A veranda for a summer residence made of timber, combined with an outbuilding, will become a place for relaxation from garden work and simply for pleasant time with the family.
It is clear that building from timber is not as simple as it might seem at first glance. It will take time, material costs and physical strength of the owner. But the site will acquire such a necessary structure for a dacha, such as a change house with a veranda, built under one roof. In addition, any work done with one’s own hands warms the soul and increases self-esteem.
Construction
The process is shown in this video:
Foundation arrangement
First, you need to make markings according to the project. If wood is chosen as the wall material, a columnar foundation will be sufficient.
To do this, holes 1 meter deep are drilled across the area of the site using a hand-held gas drill, into which ready-made concrete blocks or asbestos-cement pipes are mounted and then filled with concrete. At this stage, the main condition is to maintain a single level above the ground surface - about half a meter.
Walling
If you purchased a sauna with a utility block made of wooden beams, it is enough, following the instructions, to assemble the already fitted bars in the correct order.
In the case of erecting a frame-panel building, first a frame is built from timber, which is subsequently sheathed on the outside and inside with OSB slabs with thermal insulation placed between them - foam plastic or mineral wool.
The wall construction stage usually involves the simultaneous arrangement of internal partitions, installation of door frames and windows, and organization of the ceiling.
Roof
First, a frame is made from a wooden beam, onto which the roofing material is attached - ondulin, metal tiles or any chosen analogue.
When installing a roofing covering, it is necessary to provide high-quality waterproofing that prevents the penetration of atmospheric moisture into the room and a vapor barrier that prevents the wooden roof structures from becoming damp from the inside.
It is also necessary at this stage to lay a chimney pipe from the heater stove. It is better to organize a chimney on the basis of a stainless pipe, since classic asbestos-cement pipes today do not meet fire safety and sanitary standards. When overheated, they can easily collapse and during operation they release many harmful carcinogenic substances.
Internal electrical wiring in wooden structures is best done with a double-insulated cable (in a steam room - in a heat-resistant sheath).
The construction of a bathhouse combined with a utility block on a summer cottage will allow solving several problems at once: organizing a wonderful place for health procedures, getting rid of the need to erect separate building buildings.
It will also allow you to create additional rooms that can be used for receiving guests, as a summer kitchen, or for storing any household materials.
And if a heating system and reliable thermal insulation are organized, such a building can be used for full-fledged living in the winter.
When space on the site is limited, when the arrangement of the dacha does not involve the construction of a permanent house or a project for it is just being created, a gazebo with a utility block is needed.
The outbuilding itself is indispensable on any suburban area, especially where there is a vegetable garden. Most often, it is built with your own hands, since it is not a complex structure. And also, the owner himself knows better what purpose such a barn should serve and what size and shape it will be.
The utility block is often made in the form of an individual structure with one function - storage of garden tools. This is appropriate when the area of the dacha is large and there is no need for other additional household structures.
Most often, the project is carried out combined:
- change house, shower, toilet;
- barn, summer kitchen, carport or firewood;
- utility room, bathhouse, rest room;
- a room for tools, a gazebo, a stove and much more (there can be infinitely many combination options).
The most common project is to combine a cabin with a veranda or gazebo. They are built under one roof or have individual roofs, are made of various materials, and have their own design features.
Foundation for a gazebo-shed made of wood
When the barn with a gazebo under one roof is ready for use, it will be useful to worry about the decoration and internal arrangement of the site. First of all, furniture for relaxation is installed. The material of manufacture depends on the capabilities of the owners, but the main factor of choice is resistance to the negative factors of open space. There are several solutions; we will briefly describe the advantages and disadvantages of each:
- A wooden table surrounded by chairs or benches. High aesthetics due to compatibility with the material used to make the gazebo is the main advantage of this choice. The main thing is to worry in advance about protection from bad weather and pests using various impregnations. If the gazebo needs to be emptied for the winter, problems may arise with moving and storing the furniture.
- Rattan artificial or natural. Rattan furniture has a huge number of advantages. The only reason to refuse to purchase a gazebo with a barn is the high cost of the products. There are simply no other arguments.
- Plastic. Lightness, cheapness, ease of maintenance and many other advantages are overshadowed by an unaesthetic appearance, which will spoil the entire effect of a gazebo with a barn under a common roof.
In addition to furniture, it is worth considering the landscaping system. If there are no tall trees near the gazebo with the barn, and there is a need for shade, vertical gardening with the help of climbing plants will help. If there is no shading problem, hanging flowers in hanging pots or flower beds are used to decorate the recreation area with the barn.
The decision to build a shed under the same roof as a gazebo has many advantages. Saving free space and consumables, reducing time and labor costs for arrangement will result in a spectacular building that will become a worthy object of landscape design.
Tags: gazebo
« Previous entry
Benefits and advantages of construction
In order to effectively save free space and compact placement of residential and functional buildings on the territory allocated for housing, the garage can be located in close proximity to the house.
The practical, joint placement of two buildings, which are united by one roof, has its advantages and benefits for homeowners and vehicle owners, the main ones include the following opportunities:
- reduction of financial costs for construction. Capital construction of separate buildings will require significant financial investments, compared to the expensive, complex construction of combined buildings;
- ease of use and time saving. Getting into the garage, which is located next to the home, is much easier than other outbuildings located on the territory; you can get into the car directly from the house;
- functional use of the territory. In the free territory of the adjacent area, various buildings for recreation and leisure are located, due to the compact design and combination of the garage and the house.
The disadvantages of such a design solution include the possibility of cold penetration from an unheated garage or the noise of a running engine, which may disturb the residents of a private house.
It is very simple to get rid of such disadvantages; it is enough to take measures to arrange a heat and sound insulation system, using modern and effective insulating materials, or install heating in the garage.
Stage III. Making a Mauerlat
If the walls of the barn were made of brick, concrete, blocks or other similar moisture-transmitting materials, then the rafters of the gable roof should rest on these walls through a special wooden block. It is called Mauerlat.
Otherwise, damp walls that are wet from rain will transfer moisture to the wooden elements of the roof. As a result, they will rot, collapse and warp the roof. We don't need this, do we?
But the main task of the Mauerlat is to evenly transfer the load from the roof to the walls of the barn. A Mauerlat is not always needed: the simpler and smaller in size your outbuilding is, the more simplified its construction will be. And if the barn is large, but its walls are made of timber or stone, for example, then you should not worry about the point pressure of the roof rafter system.
You can connect the rafters to each other and to the Mauerlat either using special metal fasteners or by cutting.
That's all the wisdom of building a barn rafter system.
Some useful tips
- If you plan to make a roof from galvanized iron, then you can do without lathing. For a 3x6 shed, 2 sheets are enough, but they need to be laid with an overlap.
- When covering a shed with edged boards, an overlap of about 25 mm should be made. To prevent unpainted areas from appearing after the wood dries, it is better to paint it before covering it.
- Paint consumption, if applied in 2 layers, is about 15 liters for a barn dimensions of 3x6 m.
- On average, it takes 7 days to build a shed of this type.
- The installation of a single-slope structure requires 30% less money than for a 2-slope structure.
- If one wind direction prevails at your dacha, then the option with a pitched roof suits you more than others.
Building a simple shed with your own hands is a feasible task. The main thing is not to forget to step back the legal 3 m from the neighbor’s fence and 5 m from the road, but there are no other restrictions.
Let's sum it up
In the article we told you which roof is best for a barn. According to our own rating, slate, corrugated sheeting and metal tiles are best suited for the roofing of a utility block, but ondulin and roll roofing are not the best choice due to their short service life and low strength.
As for the type of roof, you should choose between single-pitch and gable. The first one is easier to install, the second one can better withstand wind and snow loads. But a flat roof is not an option for a barn, since in this case you will have to make a powerful and expensive foundation for it.
In addition, we have provided instructions for installing a shed roof, which we hope will make your job easier.
Preliminary work
An important step in creating a frame shed with a pitched roof with your own hands is planning future work. Designed drawings help determine the required amount of building material, calculate the approximate duration of the entire process, etc.
For a shed, wood, plastic or metal are usually used. To build a structure of standard dimensions 3x6 m, it is enough to find:
- Wooden beams and boards that will serve to create the sheathing.
- Suitable raw materials for creating a roof
- Materials for waterproofing;
- Substances for creating concrete mixtures;
- Fixing elements such as nails and screws;
- Ruberoid for forming a coating.
After acquiring an approximate list of such materials, you can proceed to the construction of a utility block.
How to determine the difference in wall height?
Rafters are the basis for any roof, and they are made from pine and spruce without knots.
Before. How to use beams: They are well treated with antiseptics against various insects, as well as special impregnations that give the wood greater strength, fire and moisture resistance.
The rafter system for a shed roof is called a sloping system, and the first thing you need to do during construction is to calculate the level of difference in the walls of the building that will be needed for the slope.
To do this, let's use a function from trigonometry and open a simple school textbook:
So, the magnitude of the difference of all walls is equal to the width of the garage multiplied by the tangent of the angle of inclination of the barn roof.
Let your garage be 5 meters wide, and the slope you need is 25 degrees. So, we determine the difference in walls = 5, multiply by tangent 25, we get 2.33 m, which means that the front wall of the barn should be exactly 2.33 meters higher than the back wall.
Gable roof construction technology
In order to build the structure, you need to perform the work in this order:
- Installation of wooden beams.
- Installation of rafter legs.
- Installation of the ridge. The cross-section of the beam is at least 5×15 cm. Thus, the structure will be reliable.
- Installation of sheathing. For a soft roof it is continuous, for a regular roof it is staggered.
- Finally, the roof is covered with roofing material.
This is where the main question arises: which roof is best for a shed? Let's look at the most popular options, and you will make the decision yourself.