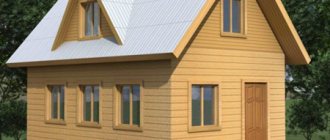
If you are the happy owner of a summer house or a private house with a small plot, then you can set up a bathhouse in an old barn. It will give the whole family good health and wonderful relaxation after a hard day at work. Also, if the need and desire arise, you can make good money by setting an hourly wage and letting your neighbors, acquaintances and other people steam there.
We will equip an old barn, which we do not use, with a concrete floor as a steam room. The barn can be built from wood, brick, foam block or shell.
Are planning
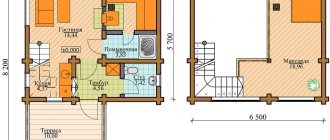
We will allocate a considerable area of the barn for the steam room, approximately 6 square meters. m, this will be a small steam room; when calculating, take into account that there should be at least 2 sq. m per visitor. m. If you have a small family, then 6 sq. m will be enough for you, but if you plan to make money in the future using a steam room, then the area will accordingly be needed more.
Don’t forget to plan in advance the location and number of shelves, and determine the most advantageous place for the stove; the convenience of staying in your bathhouse from an old barn, which you will make with your own hands, depends on the layout.
Start
If you have a plan, you can work. However, building from scratch would be easier. Besides the clutter, the barn was a pitiful (heartbreaking) sight. The floor is earthen. After the hurricane, the root of the tree was still sticking out somewhere in the middle. Accordingly, the walls were rotting. The only thing that was tolerable was the roof, recently covered with ondulin, but it was also double. Why double? So when it happened...
Bath floor
It is worth laying structural tiles on a concrete floor in a barn; the surface of such tiles is a little rough, as if a little abrasive. And it is almost impossible to slip on such tiles. It is also worth making grates from boards, which we will lay on top of the tiles for comfortable movement around the bathhouse, because wood does not heat up as much as tiles and will not burn your feet when walking.
Be sure to weigh the pros and cons and decide whether to install a water drain in the floor. If you want to take a steam bath with a park, then your DIY barn sauna will need to be thoroughly wiped with a dry cloth and ventilated.
Cost calculation
The cost of a bathhouse with a utility unit consists of many factors, and it can fluctuate in different regions of Russia. If we average the price range, we can say that a standard structure with an area of 18–20 square meters will cost, depending on the materials used, the following amounts:
- from unprocessed logs - 500 - 600 thousand rubles;
- made of brick (gas block, foam block) - 900 thousand - one million rubles;
- from laminated veneer lumber - 1100 - 1200 thousand rubles;
- from rounded logs - 500 - 600 thousand rubles;
- from profiled timber - 400 - 500 thousand rubles;
- from simple timber - 300 - 400 thousand rubles.
The building, erected using frame-panel technology, will cost about 800 thousand rubles. Arranging a strip foundation for a building will require additional financial investments of approximately 200 thousand rubles.
Steam room materials
We recommend making a bathhouse from aspen boards, the thickness of which is at least 6 cm, and spruce beams. You should choose a dry tree, because dry wood retains its shape better and is much more durable than raw wood.
We construct the frame of our bathhouse from beams, it is not a complicated work at all, and then it is difficult to attach the frame to the floor. But this can be done with a little effort. We will carry out fastening by drilling aligned holes in the floor and beams, into which we will insert long screws, and do not forget to lay waterproofing between the floor and beams.
It is very important to install steam and waterproofing boards on the walls, which should be sheathed with boards. For these works, it is better to use aspen boards, having previously made grooves along the boards, which will serve for better adhesion of the boards to each other.
When driving nails, you should drive them as deep as possible into the wood, because the temperature in the steam room is high, and you can get burned by touching the hot head of an iron nail.
Reconstruction plan
Provides for the arrangement of a bathhouse on the basis of the specified barn, which will be visited by 4 people once a week, with an estimated water consumption of 55-60 l/person:
- A metal sauna stove using wood fuel, dry weight 210 kg, equipped with an open hot water tank with a capacity of 270 liters, welded from structural steel grade st.3. Filling will be done via a hose. Heater of non-flowing type, combined basket filling: gabbrodiabase 70% + quartzite 30%, total weight 60 kg
- The steam room and washing room, due to the presence of an open hot water boiler and the small area of the room, will be combined and located on the available 2/3 of the area. The dressing room will take up 1/3 and will also be used for storing brooms and an operational supply of dry firewood;
- The sewerage system, due to the moderate drainage of moisture by the soil, will be represented by a water ladder, a drainage plastic sewer pipe with a diameter of 110 mm, and a hole 150 cm deep with a diameter of 1400 mm, dug at a distance of 4 m from the building’s base line. The walls of the pit will be lined with recycled truck tires, size 530/70R21, which in metric terms is 1300x530-533mm. The approximate capacity of the septic tank is 2.3 cubic meters gross;
- Due to the poor condition of the floors, the old structure will be dismantled and a new one erected viz. Under a 100 mm thick concrete pad reinforced with a metal mesh, foam plastic is laid on top of a layer of waterproofing, with a sewer pipe with a drain and branches laid. The pipe is put into an insulating casing. The thickness of the finished screed floor is 35 mm. Thin ceramic tiles with a textured surface are laid on it in order to minimize the risk of injury as a result of visitors sliding on a wet surface;
- Under the sauna stove, it is necessary to organize a foundation base, untied from the main tape. We covered the rules for laying a foundation when we told you how to build a sauna stove yourself.
By the way! In principle, due to the fact that the weight of the equipped furnace is relatively small, and our project is distinguished by the most economical approach to the development of funds, you can try to avoid the use of expensive reinforcement in favor of reinforcing the concrete mass with basalt fiber. Plastic fiber works somewhat worse due to the weak adhesion of cement to polypropylene. Basalt fiber can increase impact strength by 230%, abrasion resistance by 150%, improve bending strength, compression, torsion, axial tensile strength by 50-80%. The limit of crack resistance and water resistance increases by 80% and 25%, respectively. All of the above arguments can be taken into account when reinforcing a concrete floor base with fiber.
- The old blind window must be dismantled and a metal-plastic hinged window installed with a ventilation function, since the presence of an open water heating tank causes high humidity in the room, and at the same time, increased requirements for the organization of ventilation.
We provide electricity to the bathhouse
To illuminate your bath, you will need a special double-insulated cable and a lamp that is resistant to high temperatures. The switch should not be ordinary, but moisture-resistant, it should be located at the entrance to the steam room, as required by fire safety rules.
The wiring should be deepened into the walls so that the cable does not interfere, and then the bathhouse will look better and neater.
Additions:
- all boards used for lining the bathhouse must be made from deciduous trees;
- do not skimp on wiring materials, cables, lamps, switches and sockets. Buy high-quality and moisture-resistant ones, because the life and health of your family and guests who will visit your steam room depend on it;
- lamps must be made of heat-resistant glass, since the temperature in the bathhouse sometimes rises above 100 °C;
- Many people like to plunge into a cool pool after a hot bathhouse. But if you can’t afford such luxury, build a small pond in the yard, or place containers with cool water, for example, barrels, into which you can happily plunge after warm and pleasant bath procedures.
And in winter, water procedures can be replaced with snow rubdown:
- Be sure to ensure that the water in the barrels, pool or pond does not stagnate. Disinfect containers with water. Especially if other people are bothering you;
- Over time, you will be able to expand the bathhouse, add a relaxation room, and use it to earn money. After all, this is a good idea for business.
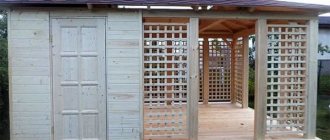
Barn + gazebo with one roof
To build a combined type shed, you will need basic knowledge in the field of construction and a clearly planned project. But you can use standard drawings. They greatly simplify the selection of designs for a personal plot.
Depending on the type of structure, country pergolas are divided into summer and all-season. The second type of gazebo requires additional insulation. In winter, the seating area is covered with polyethylene, which will protect the interior from moisture and premature corrosion.
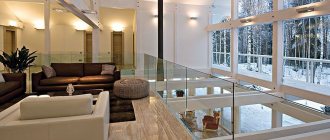
All-season structures are often equipped with glass windows, and a heater is installed inside. Even in cold weather, relaxing in such a pergola will be pleasant and comfortable.
conclusions
Now you know how to make a bathhouse from a barn with your own hands, it is not such a difficult task. By taking a steam bath, you get a lot of positive emotions, while seriously improving your health.
Yes, building a bathhouse is quite a labor-intensive process, and if you complete the job you started, you and your family will be happy, and if you approach this business with creativity, use your ingenuity and imagination, you can make good money.
So that it doesn't drip on your head
No matter what drawing you draw, the requirements for any type of woodshed are the same. Freshly cut firewood should dry well in it, and dry firewood should not get wet in the rain and snow. This means that it is necessary to ensure good airflow (ventilation), but protect the structure from dampness. And direct sunlight.
The latter seems strange, but experienced people confirm: firewood that has been lying in the sun for a long time does not burn well in the stove and produces little heat. Provide lighting. It will come in handy in the evening.
The approach to the woodshed should be convenient and clean. If you are not confident in your design talents, place the woodshed on the back side of the house so that it does not become an eyesore. Choose a site for construction on a level and dry place.
How to make a budget sauna in the country - remodeling an old house with your own hands
I recently came across some very interesting material on creating a budget sauna with your own hands. How to make a bathhouse out of a summer house. Moreover, the author made the sauna not from scratch, but from an old country house, of which there are many in our areas.
The most ordinary house turned into a fairly comfortable sauna inside. See how the construction process took place.
Inside the house, everything was the same as in all similar buildings... In ours, too, there was something similar, apparently something in common with all the summer residents of the perestroika era. A craving for organizing a junk warehouse or something...
The bottom frame of the house was completely rotten, since the previous owner built the house on a couple of bricks, which safely sunk into the ground. This is a very common problem with such country houses.
It was decided to raise the country house. To do this, all the walls were first secured from the inside with boards so that the house would not fall apart. They were fastened along the lower perimeter and along the diagonals.
The house was lifted with a five-ton jack. After the structure was raised, all rotten parts of the structure were sawed off. Then a new harness was placed underneath. Cement was poured into tires - this is an option for creating a foundation.
This is what the house looked like after it was raised and the bottom frame was made. A small shed was built to the side for household needs.
Then we started on the interior decoration. The walls were insulated and the subfloor was laid. At this stage, I had a question: why did they put solid OSB on the floor? How will the water drain? Or do they just steam in this steam room and wash off the sweat somewhere outside, in a shower stall? Okay, let's move on...
The next step was to attach a foil vapor barrier to the walls and ceiling so that the heat would not escape, but would be reflected back into the steam room.
Next, the walls are covered with clapboard nailed onto bars to ensure air circulation between the wood and the foil. In addition, wood also creates a natural microclimate in the room.
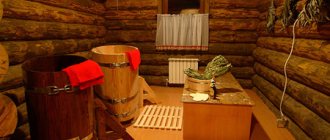
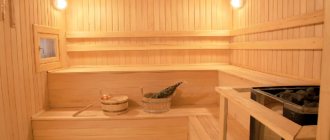
This is what the steam room looked like after it was lined with clapboard. Very nice and fresh, it seems to me, considering how the house was originally.
In the same way, only without a vapor barrier layer, they lined the rest room with clapboard.
All electrical work was carried out under the paneling, in corrugated pipes.
Don't forget about supply and exhaust ventilation.
The ventilation pipe sleeve itself was made of metal foil.
A decorative cap was attached to the ventilation hood. Supply ventilation was also provided along the walls.
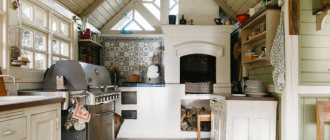
A wooden table and stools were placed in the recreation room. Linoleum was laid on the floor from the remnants of renovations in the apartment.
An electric heater was installed in the sauna as a heating element. Also in the steam room they made shelves with two tiers - the top one is hotter and the bottom one is cooler.
Share link:
The nuances of roof construction
In case of combined construction, the roof must have a solid structure. Its separation can lead to a rapid breakdown of the integrity of the building. It is better to use a 2- or 4-slope roof, since it has a large area and high stability that can withstand such a complex structure
Before you start building the roof, it is important to decide whether an attic or attic is required, since this part of the house must be built immediately
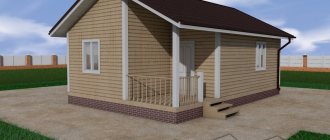
Example of an extension with a pitched roof
An example of a bathhouse extension with a pitched roof
What is important to remember when building a common roof:
it is important to accurately calculate the height of the roof of the bathhouse and residential building; be sure to make two chimneys - separately for the house and the future bathhouse; A system of ebb tides and reliable snow holders is immediately installed.
An example of a bathhouse under one roof
When constructing a bathhouse as an extension, the roof can be single-pitched or gable. When arranging a lean-to structure, the highest roof, exactly the bath roof, should be adjacent to the wall of the house and go under the main roof. Ceilings to strengthen the structure should be constructed from 10x10 cm timber or boards laid on edge with the same width. Then a sheathing is attached to the bottom and top of the beams, on which heat and vapor insulation is applied. Roof rafters should be installed so that the roof slope angle is 20%. Then the roofing material is laid, and the remaining gaps and cracks are sealed using polyurethane foam.
Example of an extension with a gable roof
The material for the roof can be anything, depending on the wishes of the owners. However, it is economically beneficial to use metal tiles or galvanized profiles. These materials require the creation of a simple frame with wooden joists. Bitumen or ondulin roofs will require not only professional installation, but also the creation of a special surface. But outwardly they look more respectable and impressive.
Arrangement of the foundation and installation of formwork
During construction, formwork is used. To prepare the building element, it is necessary to pour the concrete mixture and separate it with boards. After a certain period of time, the concrete mixture will take the desired shape. Formwork panels are made of wood or metal, polystyrene foam. In this case, the removable type of formwork is used repeatedly.
See also: Features of manufacturing a strip foundation for a bathhouse
If you are converting a one-story house into a bathhouse, a wooden type of formwork is used. The system includes panels that are fastened together by connecting elements - struts, spacers, pegs. Guides and boards allow you to hold the boards in the required position. During the installation process, the following points should be taken into account:
- Fastening of elements is carried out using a level. This prevents the foundation from tilting.
- Any gaps on the panels or minor defects should be corrected before use.
- The minimum thickness of the board is 0.5 cm. Due to this, rigidity and strength of the form can be ensured. Pegs and beams are 5 cm thick.
- Pegs and struts are fixed at a short distance from each other.
The ideal cost option is wooden boards and beams with dimensions of 50 by 50 mm or 50 by 200 mm. First, the pegs are installed in the ground along the entire perimeter of the future structure. The boards are fixed on the other side of the pegs. When attaching the boards, the main side must be flat and without distortions.
See also: Foundation slab for a bathhouse
The evenness of the fastening and the location of the elements is checked with a level. The next stage is pouring the concrete mixture between the boards. The formwork is removed only after the concrete solution has completely hardened. The recommended curing time for the concrete mixture is 28 days. In some cases, it is possible to remove the formwork system earlier. But you should make sure that the concrete has hardened.
Examples of finished structures
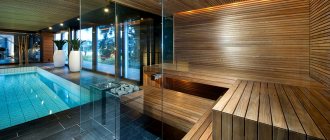
This is what a high-quality, solid bathhouse in a garage can look like. Almost all surfaces are made of smooth, light-colored wooden boards. A stone wall separates the steam room from the main part of the stove; only the container with the heating stones is brought outside. There is only one lamp - a diamond-shaped one, above the front door (which is lighter than the walls surrounding it).
Here is another example - with a stove located in the steam room itself. The walls around it are decorated with stone, the substrate is also made of stone, and the rest of the room is decorated in a more familiar way - with boards. The main structure is made in the form of steps; an imitation of a log house is used around the entrance door.
A visual representation of the bathhouse project in the garage basement can be seen below.
How to combine or attach: project
Today there are many ready-made projects for country saunas/baths combined with a utility unit. They differ in overall dimensions, number of interior spaces, materials used and, as a result, complexity of implementation and final cost. But it’s quite possible, with some skills, to create your own.
When designing such structures, some construction nuances should be taken into account:
- materials used for the construction of walls and decoration of premises must ensure safe operation of both the bathhouse and the utility room;
- Separate entrances to premises for various purposes must be provided, which will allow for both simultaneous and separate operation;
- Depending on the purpose of the sauna extension, additional points must also be taken into account. For example, if there is a shower compartment, you need to provide a cold water supply and drainage. And the sewer system, when equipping a room with a toilet, must discharge wastewater into a septic tank.
Under the same roof
The utility block can act as a utility room, workshop, country shed, woodshed, summer kitchen - this department has many purposes. The roof in the combined structure must be common in order to prevent the penetration of atmospheric moisture into the premises and, as a result, the occurrence of dampness and the appearance of mold colonies.
Mold not only spoils the appearance of interior decoration, contributes to the accelerated destruction of building structures, but is a source of allergens and toxins that are very harmful to health, which can negate the healing effect of a steam procedure.
With toilet
Such a building is one of the most successful and functional building structures.
There are two options for organizing a toilet under the same roof as a sauna room:
- Dry toilet. The simplest method is to install a dry closet, which requires regular emptying of the storage tank. Instructions on how to use a dry toilet for your home are given in this information.
- Sewer system. This method is more labor-intensive, but removes many of the limitations associated with the use of a dry closet.
A prerequisite for the construction of a bathhouse with a toilet room is the need to organize a reliable heating system capable of maintaining the indoor temperature at a positive level in the most severe frosts.
With a woodcutter
The simplest of the combined structures. Provides for the presence of an additional room under a single roof used for storing solid fuel - firewood, coal, necessary for the operation of heating boilers. Such a utility room can be added if necessary. Or use a barn located near the bathhouse.
what can be done from an old bathhouse, replacing the lower crowns
Repairing a bathhouse most often involves restoration work. If structural elements cannot be restored, they are replaced. The bathhouse is a specific room due to the constant presence of moisture. In about 10-15 years, repairs will have to be done regardless of what materials the building is constructed from.
Bathhouse renovation inside
The interior of the bathhouse is no less subject to wear and tear than the façade. The first thing to disappear is the wall and ceiling cladding and flooring. If restoration is not done in time, moisture will penetrate to the thermal insulation and structural elements of the building will begin to disappear under it.
Repair of bath walls
The reconstruction of the bathhouse begins with the removal of all furnishings. The walls are examined to determine the degree of damage. They are revealed not only by visible defects. If there is an unpleasant smell of rot or dampness in the steam room of a bathhouse, most likely the lining is being eaten by a fungus. The lining is carefully dismantled, taking care not to damage the foil vapor barrier.
After dismantling the cladding, the frame is examined. If moisture gets under the lining, the timber will also be rotten. The sheathing is replaced with a new design along with thermal insulation and foil vapor barrier. The use of old insulation for restoration is excluded. When dismantling the sheathing, the mats are severely damaged. The new frame is covered with clapboard. Other rooms in the bathhouse are undergoing partial renovations. Due to the lower moisture concentration, the cladding lasts longer. Restoration is aimed at partial replacement of individual damaged planks.
If during the inspection before repair no damage to the cladding was detected, but a large loss of heat was observed, the thermal insulation of the walls must be restored. To get to the insulation, you need to dismantle the lining.
Important! It is necessary to remove the lining as carefully as possible. After the restoration of the thermal insulation layer, it will have to be put back in place.
Old thermal insulation and vapor barrier are removed. The walls of the bathhouse are examined for the presence of cracks. Identified defects are puttied or caulked. New thermal insulation is placed in the cells of the sheathing, covered with foil material, and the lining is secured.
During repairs, it is important not to forget to leave a ventilated gap under the cladding. This is provided by a counter-lattice attached to the sheathing on top of the vapor barrier. The exterior restoration of the bathhouse is carried out in a similar manner, only non-foil material is used for vapor barrier.
During wall repairs, the windows and doors of the bathhouse are carefully inspected. They may be intact, but the frames become deformed due to exposure to moisture and temperature changes. Cold air enters the bathhouse through the cracks. Bent frames are replaced; they cannot be restored; the gaps are caulked with tow.
Bathroom ceiling repair
A major overhaul involves the restoration of all elements. The ceiling wears out faster than the walls, as steam constantly accumulates at the top. The area near the pipe is exposed to elevated temperatures. The facing material is deformed and cracks appear.
Repairs begin with the passage of the pipe. At the same time, the condition of the roofing is assessed. Do not throw away old insulation from the ceiling. An additional layer of insulation is laid between the sheathing, covered with foil insulation, the counter-lattice is returned to its place and the sheathing is secured.
Bathroom floor repair
The flooring comes into most contact with water. In theory, the flooring should rot before the wall cladding. However, there are many positive factors. The floor is laid in a bathhouse from boards 50 mm thick. Hardwoods are most often used. The boards are well impregnated with antiseptic. All factors help the flooring last longer. A big plus is good ventilation of the underground space.
Restoring the floor involves dismantling all the boards. The underground space of the bathhouse is cleaned of dirt, and the functionality of the sewage system is checked. The boards are inspected. Undamaged flooring elements are dried, cleaned, and treated with an antiseptic.
Advice! If the boards are badly rotted and there is no replacement, the flood floor is replaced during repairs with another type of wastewater drainage.
How to change the bottom crown of a bath
Excessive dampness affects not only the finishing materials, but also the building itself. A rotten log house requires replacing the lower rims of the bathhouse with your own hands with new elements. A wooden wall rots faster in three cases:
- low foundation;
- lack of foundation;
- poor waterproofing between the lower crown and the foundation of the bathhouse.
There are three options for replacing crowns:
- It is more convenient to replace the crown by completely dismantling the walls of the bathhouse. Additionally, the opportunity to repair other areas is provided. To get to the lower crown using this method, you need to disassemble and rebuild the entire bathhouse. Repairs are costly and require large labor costs and capital investments.
- The most acceptable way to replace the crown is to lift the entire frame using car jacks. A minimum of 4 lifting mechanisms will be required for uniform lifting. If you lift each corner of the bathhouse in turn with one jack, the frame will warp and the weak crowns will be damaged.
- Spot replacement is based on repairing a separate section of the crown. A piece of log or timber is cut in place of the rotten piece. The restoration method is simple, but the lower crown of the frame becomes weaker due to loss of integrity. After repairs, new joints appear. If they are poorly insulated, the crown will let cold into the bathhouse.
The best way to replace the lower rims of a bathhouse is determined by the owner, soberly assessing the situation and taking into account his own strengths.
How to make a new one from an old bathhouse
If there is an old bathhouse in the yard, restoration is easier than building a new building. A major overhaul involves replacing all damaged elements.
Reconstruction of an old bathhouse
They begin repairing an old bathhouse with their own hands by conducting a thorough inspection. The following building elements are inspected:
- On the walls, check the condition of the cladding, vapor barrier, and insulation. In some places, areas will have to be opened to get to the crowns and assess their condition. Carefully check the bottom and corner joints.
- The rotted lower crown of the bathhouse indicates problems with the foundation. The base is inspected for the presence of waterproofing. If during the inspection large cracks, subsidence or destruction of the foundation are revealed, the old bathhouse will have to be dismantled and rebuilt.
- The condition of the bathhouse ceiling is assessed by cladding, vapor and thermal insulation. At the same time, the roof, roofing covering, and the condition of the chimney duct are inspected.
- Doors and windows are checked for cracks. Wooden frames are deformed by changes in temperature and humidity.
- The floor is subjected to a final inspection. They are trying to get to the drain, checking the functionality of the sewer system.
Based on the results of the audit, a repair plan is drawn up for a bathhouse that has not been used for its intended purpose for a long time.
Bathhouse repairs begin if the building itself is in satisfactory condition. The following elements are subject to restoration:
- Walls. First, get rid of the cracks. With old insulation there will be large heat losses. After restoration, the wall is covered with new thermal insulation.
- Windows and doors. In the bathhouse, frames suffer from steam and temperature changes. Restoration of a deformed structure is impossible. It is wiser to install plastic windows and doors in all rooms of the bathhouse. This option is not suitable only for a steam room. Due to the high temperature, a new wooden window and door are being installed here.
- Interior decoration. This repair item includes cladding, steam and thermal insulation of walls and ceilings. In the aggressive environment of a steam room, materials disappear over time and must be completely replaced. Inside other rooms, the finish lasts longer. A repair option is possible here. Replace damaged cladding elements, add insulation, and attach a new vapor barrier.
- Floor. In the dressing room and washing room, the floors are often tiled. The coating is not damaged by moisture. The tile may burst if struck by a heavy object. A damaged coating element must be replaced. The wooden flooring of the steam room can be repaired. Rotten boards are thrown away, but good ones are cleaned, dried, treated with an antiseptic and reused.
- Sewerage. During floor repairs, the drain is cleared of accumulated dirt.
The final restoration of an old bathhouse is the treatment of all wooden elements with protective impregnations.
The video shows the details of the restoration of the interior decoration of the bathhouse:
Bathhouse from an old house
Owners of private courtyards are interested in the project of converting a hut, a house that has served its intended purpose, into a bathhouse. Restoration of an old building begins with the installation of communications. To organize the drainage, the old floor is torn off. A trench is dug from the side of the building and the street, and a sewer pipe is installed under the foundation. The underground space is filled with concrete screed.
Simultaneously with the sewerage system, a water supply system is laid inside the bathhouse. If the walls of the old house are not wooden, you can install hidden wiring. The cable is hidden in grooves. If the durable wall material does not lend itself well to cutting grooves, the wire is laid on top in a metal corrugated sleeve.
Ventilation holes are cut out on the walls below the ceiling and above 30 cm from the future finished floor. You must immediately decide on the location of the stove. While there is no lining in the bathhouse, a hole for the chimney is cut in the ceiling and roof. You can immediately put the pipe outside. The passage in the ceiling and roof is framed with non-combustible material.
After laying communications, restoration continues with cladding of walls and ceilings. The process involves attaching the sheathing. Basalt wool slabs are placed between the frame elements. The insulation is covered with foil waterproofing on top, and a counter-lattice is nailed onto which the cladding is attached.
Advice! If external cladding and wall insulation are required, a ventilated facade is made on the old house.
The floor in almost all rooms of the bathhouse is easier to fill with concrete screed and lay tiles. For heating, electric mats are embedded under the floor covering. Inside the steam room there is only a wooden floor.
Simultaneously with the arrangement of the floor, a foundation is erected under the stove. A concrete slab or brick-lined area will do. The walls around the stove are covered with sheet asbestos and metal on top. A similar reflector is mounted on the ceiling around the chimney.
The final part of the restoration of an old house for a bathhouse is the manufacture of sunbeds, benches, and a font. Furniture is installed in the rest room, decorative elements are hung on the walls.
The lower rims of the bathhouse have rotted, what can be done?
The first and second crowns from the foundation of the bathhouse quickly rot. If the wood has completely deteriorated, it cannot be restored. The crowns can only be replaced. It is very difficult to lift with jacks or disassemble the frame. It’s easier to initially take measures to prolong the life of the lower crowns:
- The wooden frame of a bathhouse is often placed on a strip foundation, on top of which a plinth is laid out of brick. To prevent the brickwork from drawing moisture from the concrete strip in contact with the ground, the surface of the foundation is lubricated with hot bitumen and a strip of roofing material is glued on.
- A similar layer of waterproofing is installed on the surface of the brick plinth. Wooden crowns will not come into contact with the brick and draw moisture from it.
- Rainwater can stagnate on the roofing material under the lower crowns. Low tides help prevent puddles from accumulating. Wooden or metal strips are attached around the perimeter of the log house to the lower crown. Water at low tides will flow to the ground without harming the crowns.
- Ventilation ensures accelerated drying of the lower rims of the bath. The basement is equipped with air vents. Small windows in the foundation bring fresh air into the underground space, and steam escapes through them.
To ensure that the lower crowns last a long time, they are made from hard wood. Larch is considered the best option. If such crowns could not be obtained, boards are placed under the frame of the bathhouse. They will be the first to come into contact with water. The boards are then easier to replace than the entire crown. For the lining, hard types of wood are also used: larch or oak. Protective impregnation extends the service life of the crowns. Sometimes owners use used motor oil. This option is not very good, since it is only suitable for crowns located below the bathhouse floor level. If oil gets into the steam room, chemical fumes with an unpleasant odor will appear. In addition, machine oil does not saturate wood well and does not provide reliable protection for the crowns.
The best impregnation is considered to be the drug “Senezh”. The composition is applied to the crowns in two layers. After drying, apply three more layers of hot drying oil. The crown must be covered without leaving any missing areas, otherwise there will be no sense in the treatment.
Conclusion
Repairing a bathhouse and the crowns of a log house requires a lot of labor and capital investment. Before starting work, it is important to correctly assess the condition of the old building. Sometimes it is cheaper to build a new bathhouse than to restore a completely destroyed building.
Submit Comment
Reconstruction of a panel house into a bathhouse is carried out after completing a whole range of works. First of all, it is necessary to understand that all wooden bath structures, both old and newly installed, must be treated with antiseptic compounds to protect them from rotting. 1. Insulation of walls and ceilings indoors. As insulation, as well as vapor and waterproofing material, for internal walls and ceilings, you can use reflective thermal insulation with a foil surface, for example “Penotherm® NPP LF”. It is mounted with foil inside the room directly on the wall and ceiling of the steam room and shower using a construction stapler, while the seams are carefully taped with metallized tape. To ensure the removal of condensate, a small outlet of the material sheet is made at the junction of the wall and the floor. A wooden frame made of 20x30mm slats is attached to the reflective coating, the size of which will provide the necessary air gap between the interior wall decoration and the vapor-proof material. Internal finishing, for example lining, is attached to the frame (lining must be made of hardwood). In the case of insulation of external walls, mineral wool slabs with a waterproofing device are used. 2. Installation of spillways. When installing floors in the washing and steam room, it is necessary to ensure normal drainage of used water and drain it into an absorption pit. For this purpose, a concrete underlying layer is placed in the bathhouse on the ground with a slope of approximately 1º towards the pit, from which wastewater flows through the drain hole into the sewer pipe, and from it into the drain hole. The sewer system must be equipped with a ventilation riser, which, to simplify the design, can be mounted on a drain pit made of asbestos-cement or metal pipe with a diameter of at least 100 mm, the upper end of which is equipped with a cap or deflector. 3. Installation of floors. The next stage in the reconstruction of the building is the installation of a plank floor, using for this purpose edged boards, which are fixed on the joists to drain water with a gap of 3-5 mm from each other to ensure normal drainage in case of severe swelling. The logs are laid on support posts using waterproofing. Floors made of solid coating are made on the same principle as a drainage base, but the pit must be located in the room itself, so it is covered with a drainage grate. 4. Interior arrangement of the bathhouse. Benches, other furniture and bath equipment are made from planed boards without any finishing. The most important element of the bath is the shelf, the shape and size of which depend on the size of the steam room and which is usually placed in 2-3 tiers along the wall without windows. The dimensions of the upper tier of the shelf are larger than those of the middle and lower ones. It is recommended to take the height of the lower shelf or bench-stand equal to 200, the middle shelf – 500, the top – 900 mm. 5. Ventilation of the bath. To ensure good ventilation in the bathhouse, it is necessary to make a small rectangular or round hole in the wall above the top shelf. It is closed with a removable plug or a sliding wooden flap. 6. Bath heating device. For heating and creating steam, stoves of various designs are used, but mostly these are heater stoves. The principle of their operation is based on the use of granite stones as heat accumulators, which are heated by the hot gases escaping from the firebox of the furnace. Thus, the water and stones are heated at the same time. The heater stove is designed for burning wood (preferably birch) in a long-term mode. The stove-heater must be positioned so that it simultaneously heats all the rooms of the bathhouse - the steam room and the washing room with the dressing room. The foundation of the furnace is laid with a depth of at least 500-600 mm from rubble concrete or red brick. Between the foundations of the furnace and the walls, leave a space of 60 mm and fill it with sand. The chimney pipe is laid out of brick with a channel 190×190 mm or a metal pipe with a diameter of 150 mm is used for this purpose. You can also use electric stoves to heat the bath. They are environmentally friendly, hygienic, safe, and also feature adjustability using built-in or remote control panels, depending on the type of stove.
Added: 02/14/2012 00:44
Question:
Good afternoon I have an old house. The floor of the house is not residential at all. I would like to make a bathhouse, but the walls there are covered with clay. Do I need to remove clay from the walls in the steam room or is there another way? Thank you!
Nikolay, Kursk region, Ponyri village.
Answer:
Hello, Nikolai from Ponyri!
You didn't describe the problem quite accurately. Namely, what the old house itself is made of. You can coat walls made of completely different materials with clay.
I can only assume with a small degree of confidence that your house is adobe, or at best wooden with shingles on the walls.
If the house is still made of wood, then you can remove the layer of clay down to the wooden base of the walls (this will not work in adobe). But be that as it may, a steam room can also be built on clay walls.
To do this, you need to build a reliable frame from a wooden block and also securely attach it to both the walls and the ceiling of the steam room. Fill it with foil or foil insulation with a metal base facing the steam room room.
Then cover the walls and ceiling with aspen or linden clapboard. Particular attention should be paid to the floor of the steam room. It is necessary to insulate the bottom of clay walls in any available way from the possibility of moisture, which can cause their destruction.
As a result of all such manipulations, steam from the steam room will not be able to penetrate further than the surface of the foil.
And you can use the bathhouse. It’s clear that this is not top-notch, but it should be enough for your lifetime.
It's my opinion.
Good luck!
About choosing a place
Before starting construction, it is necessary to determine where the house will stand. It is important to pay attention to the following points:
- A trailer bath should be located away from a residential building. It is necessary to retreat from the fence, green spaces, and wells.
- Fire safety is important, so the house should be located on the site in accordance with the rules. Their list is contained in SNiP 30-02-97; The document indicates safe distances for the location of the building. The developers of the standards also paid attention to the materials used for the construction of the building and fence.
- Environmental regulations must be taken into account. The distance from the bathhouse to the forest is at least 15 m, to tall trees - at least 4 m, to the bushes - 1 m. To a well or well - at least 12 m. From the reservoir to the bathhouse you should retreat 20 m.
- It is important to take into account the wind rose. The building must be erected in such a way that the smoke from the stove does not carry away towards residential buildings.
- The location of the bathhouse is influenced by the landscape and soil on the site. In case of hilly terrain, the building is erected on a hill, then the drainage will be good. If the site is adjacent to a reservoir, then wastewater from the bathhouse should not flow into it. The building must not be located in a flood zone.
- The bathhouse should be visible from the windows of a residential building - in the event of a fire, the owner of the site will take timely measures to extinguish the flame.
- If you plan to make a recreation area around the building, it is worth allocating land for it in advance.
It is best to develop a construction plan immediately after acquiring the site, then the house and bathhouse will be built in the most convenient place.