In ancient times, our ancestors built their homes in the form of tents. We used natural materials for this: wood, stone, animal skins, etc. The modern tent house is a more fundamental structure. It has several varieties and is endowed with certain technical properties.
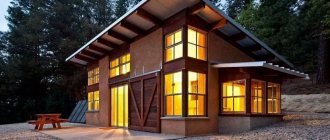
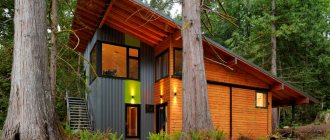
Ready-made house project with a hip roof
Two-story houses
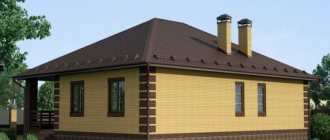
By installing a hip roof, the owners of a private two-story house receive a beautiful and practical roof, under which an additional floor appears for living.
Photo: eaglemetalsmfg.com
A hip structure is a variation of a gable roof, in which two slopes are trapezoidal in shape, and the other two are triangular.
All slopes of a hip or half-hip roof usually have a steep slope, so this design can withstand heavy rains and snowfalls. Such roofs are given a colorful eco-ambiance using natural coverings: reed (reed), tile, slate or metal.
One of the varieties of hip roofing is a half-hip Dutch roof with truncated triangular slopes. The photo shows a private house of modern design with bitumen roofing, creating the illusion of natural tiles.
See also: Beautiful roofs of private houses: photos, design options, views
Valuable advantages of the half-hip rafter system
Many people find the design of a house with such a truncated roof quite attractive. Although they were originally built based on the climate, today both the Danish and Dutch roofs are already classics of architecture. Moreover, in conditions of dense urban development, shortened slopes to some extent solved the space problem.
From the beginning, half-hip roofs were high enough to withstand bad weather. Today these conditions are no longer necessary. But even with a low ridge height, the design and installation of such roofs is still quite labor-intensive.
This type of roofing in its classic versions is still most popular in Denmark and Holland. However, the half-hip roof has several subtypes and modifications that are far removed from the frame according to the Danish or Dutch scheme:
Of all the types of hipped roofs, the Dutch half-hip roof is considered the most perfect and thoughtful. It combines all the advantages of both hip and gable rafter systems, but at the same time is devoid of their disadvantages.
So, for example, a gable structure is considered too simple and primitive, but underneath it you get quite spacious attics, which have at least two vertical walls, which is quite convenient. But there is little space left under the classic hip roof, and besides, all the walls are sloping.
Under the half-hipped roof (Danish or Dutch) in the attic there are already vertical walls on which you can install not attic windows, but ordinary windows. At the same time, the top of the house will not lose either its functionality or appearance.
The problem with hip attics is that no matter how cozy the space under the roof turns out to be, the inclined walls psychologically “put pressure” on a person, and not everyone is comfortable being in such a room.
That is why it is extremely important when at least two planes look more familiar. In addition, this also matters for windows: despite the highest quality waterproofing, roof windows are often prone to leaks. What can we say if you opened the window and forgot about it, and it started to rain outside.
In a Dutch roof, two hip parts are “cut off”, only slightly overhanging from above. In the Danish one, on the contrary, the hip part on both sides begins below the ridge element, and small pediments are formed on top. They are often used to furnish a window, and the space underneath is extended to the floor by a plasterboard partition.
In a word, the half-hip roof differs from the classic four-pitched roof in that its triangular slopes seem to open up most of the pediment. In both types this happens in different ways: in Dutch roofs the lower part of the fountain opens, while in Danish roofs the upper part opens. Thanks to these differences, such a roof is divided into two types according to its design: gable half-hip and four-slope half-hip:
The rafter system of a half-hip roof is called both the most complex and the most perfect. It was invented and implemented for the first time 300 years ago on the coast of the Baltic Sea, which was dictated by the humid and snowy climate.
Half-hips are not necessary for the sake of aesthetic effect, although that is important. Such elements effectively cover the ridge from the wind, thereby significantly reducing the wind load on the entire rafter system.
It is not surprising that half-hip roofs were usually previously built on houses that were located in the steppes or on the windy coast. That's why when building a home, it always makes sense to first learn about the wind and snow loads in your area. The fact is that when choosing a roof shape, these parameters are usually placed within a fairly strict framework, but it’s not at all bad if one of the recommended options turns out to be the Danish shape. It looks great on the house!
The main difficulty of installing a half-hip roof is that even with the most meticulous approach and accurate measurement of all the details, it often turns out that something has to be trimmed and adjusted. Here the entire rafter structure is assembled like Lego, and the parts do not always fit together.
Absolutely accurate dimensions can only be achieved in the factory on specialized lines for the production of rafter frames. Therefore, it makes sense to order ready-made trusses so as not to worry about the geometry of your roof. In the case of a gable roof, small errors will not play a special role, but with a hip roof, individual elements may not converge at control points, which will entail many problems.
In addition, a half-hip roof has a lot of seams and joints between slopes, and these are potentially weak points for leaks or damage to the integrity of the roofing covering. Therefore, you will have to work hard to achieve absolute tightness of the entire roof covering on such a roof.
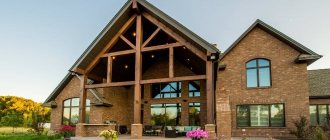
One-story houses
Photo: dallasmetalroofs.com
A laconic silver galvanized seam roof will successfully complement the design of a one-story house with facades made of variegated red brick.
All types of hip roofs look much more original than a conventional gable roof, but the costs of materials and installation will be impressive. Especially if the cottage consists of several living spaces, and the roof itself is complex in configuration, as you see in the photo.
A hip roof allows you to significantly expand the useful space of the house and equip a comfortable bedroom, office, library or nursery in the attic.
Photo: muellerinc.com
Hip roofing demonstrates increased strength under significant wind loads. If you live in a flat region and your house is located in an open area, then such a roof will be the best option.
Compared to a gable structure, a hip roof is a more rational option for arranging an attic: both with dormer windows and with window openings in the plane of the roof covering. It is precisely this, more economical option with windows embedded in the slopes that is shown in the photo of a wooden house with a slate hip roof.
See also: Beautiful brick cottages: 60 photo ideas
Construction technology of hip roof structures
First of all, the hip roof is calculated. That is, they determine the number of necessary elements, their dimensions and cross-section. This is an important point on which the load-bearing capacity of the entire roofing structure will depend. Here, they mainly take into account the size and shape of the house, snow and wind loads in the region where construction is taking place, as well as whether living quarters will be organized under the roof.
In fact, this is a complex process that requires knowledge and experience in performing calculations. Today on the Internet on various construction portals there are special online calculators with which such calculations can be made. Some of them, according to experts, can calculate the simplest options quite accurately. But the final calculation must still be done by a professional - not a single calculator will “tell” what formulas and errors are included in it.
Now we move on to analyzing the rafter system of the hip roof. In this design, both hanging and layered rafters can be used.
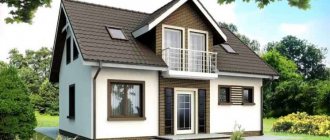
Mansard roofs
A hip roof with an attic is ideal if you want to rationally use the roof space.
The tandem of dark-colored hip and half-hip roofs beautifully sets off the white facades of the half-timbered structure.
Arranging an attic with dormer windows will allow you to place several bright and spacious living rooms under the roof.
An attic can be provided not only under the hip roof of the main building, but also above an extension to the house, for example, above a garage.
If you decide to build a budget house in the English style, then it is best to use clinker or decorative stone to decorate the facades, and cover the hip roof with a material that imitates ceramic tiles.
See also: Beautiful mansard roofs of private houses: photos, design examples
What is a hip roof
Many can say that a hip roof is exactly the roof shown in the photo above. That is, these are four identical triangular-shaped slopes. In fact, the figure shows the classic version of the roofing structure of this modification. But this is just one example. And at its core is a square-shaped house.
If we talk about tent structures, they got their name due to the fact that all the roof slopes rest on one point, like a tent. And there may be several stingrays, but not less than four. For example, if the building has a round shape, then the roof structure can be constructed from five or six slopes. And this is not the limit. It’s just that the more slopes, the more complex the design. And since many private houses have a rectangular shape, the classic model is most appropriate here.
The tent-type roofing structure is designed and formed on the principle of symmetry. That is why it is erected over buildings of the appropriate shape - round, square, hexagonal, octagonal and so on. In general, there is no problem in erecting it over a rectangular building, as shown in the first figure, but it is structurally difficult, so most often in such cases, preference is given to a hip roof.
Hip roof over an octagonal-shaped building Source landshaftdesign.org
Structural elements of a hip roof
The construction of a hip roof consists of several standard elements. Next we will deal with the classic modification.
- The ridge of a hip roof . It should be noted that there is no ridge as such, in the classical sense of this design, here. There is a so-called ridge knot. This is the connection point of the upper ends of the rafter legs. It is the ridge knot that forms the peak of the tent structure.
- Stingrays . In our case there are four of them. They are formed by rafters and frames. The latter are still the same rafter legs, only their upper ends rest not on the ridge unit, but on the main rafters. That's why the sprigs have a shortened length. Their number is determined by the size of the slope. The larger the area, the more roof racks will have to be installed to ensure the required load-bearing capacity of the roof.
- Stingray overhangs . They can be formed by the rafter system by extending the rafters beyond the walls of the building. Or with the help of fillies - these are short rafters that are attached to the main elements of the rafter system in order to lengthen them.
Structural elements of a hip roof Source obustroeno.com
See also: Catalog of companies that specialize in roof repair and design.
Advantages of a hip roof
The tent-type roofing structure is quite complex to design and difficult to install; in any case, it is a labor-intensive process. But architects and designers say that hip roofs have quite serious advantages over other structures. It’s not for nothing that they are so popular among country developers. What are these advantages:
- Excellent aerodynamic qualities . They allow a roof of this shape to cope not only with strong winds, but also with hurricane gusts.
- A hipped roof structure can be erected at an angle of inclination of the slope within 20-50 ° . This solves the problem of clearing snow from the roof. That is, at this angle, snow precipitation does not linger on the roof. This means that it is not necessary to clean the hip roof in winter.
- It is easy to organize an attic under this type of roof . True, since such a roof does not have gables, you will have to install attic windows. However, installing windows of this type is not a problem today, so this cannot be considered a minus in modern construction.
- The original shape always stands out among other types of roofs.
Gazebo covered with a hip roof, original version Source nkkconsult.ru
Roof with dormer window
Most often, dormer windows in the attic are covered with a gable roof - this design harmonizes well with the hip roof of the house, provided that the parallel slopes have the same slope.
The contrasting finish of the dormers allows them to stand out against the background of the roofing.
To make the attic more comfortable, dormer windows are often combined with balconies.
Dormer windows can play the role of an expressive accent on the roof, especially if they have a semicircular shape.
Dormers of varying sizes on the gables are a distinctive feature of European-style hip roof and mansard houses.
Arrangement of the sling system
This seemingly complex configuration at first glance is actually assembled no heavier than a children's construction set. The rafter system of a hipped roof is a skeleton made up of different rafters: ordinary, sloping, diagonal, spigots, tie-rods, struts. The use of a sprengel increases the strength of the mowing slings. Other design details that provide the required strength and reliability are also extremely important. It is recommended to consider them in more detail:
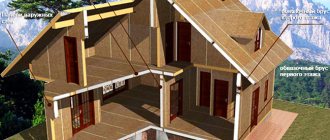
- Mauerlat. Strong adhesion of the rafters to the load-bearing walls is ensured by the Mauerlat. It is a powerful beam attached to the upper edges of the walls, which forms a supporting frame that is not interrupted anywhere.
- Sloping legs. These are rafter pairs; they are installed obliquely at the point of contact of the slopes from both types of walls. Their rafters will be longer than those from which the slopes themselves will be made.
- Horse. The rafter legs of the hip ones are articulated at the top with a bar called a ridge purlin or ridge. It creates rigidity of the rafter skeleton; the racks will rest against it with their upper ends. The ridge is usually a block measuring 10x10 centimeters.
In order to clearly imagine how to properly make a hipped roof, it is proposed to construct it according to the following steps:
Mauerlat gasket. Load-bearing walls are reinforced with concrete screed and reinforcement. When pouring, steel rods are immersed in it with a projection of up to 10 cm to the surface. The Mauerlat “sits” on them. The ends of the mauerlat bars are fastened by splicing using the “half-tree” method.
Laying the beds. Next, prepare supports for the racks; assemble the beds from horizontal bars measuring 10x10 cm or double boards.
Arrangement of racks and ridge. First, the supports are strengthened under the tops of the sloped legs, then the racks are secured under the rafter pairs. The installation step is identical to the step of the rafter configuration.
Construction of rafters. The assembly of rafters begins with the head pairs with a known pitch. The top of the beam is cut at the required angle and connected to the ridge. The lower section forms an overhang and is attached to the Mauerlat. At the end, external rafters are formed.
Lathing. It is needed to create a base for attaching the roof covering and to give the rafter structure perfect rigidity. The sheathing is obtained by installing edged boards 2.5 cm thick and 10 cm wide between the rafters.
Insulation. The top of the sheathing is covered with a layer of thermal insulation. Foam slabs or basalt slabs are the recommended material for this.
Roofing covering. Its installation begins from the bottom up, using fasteners designed specifically for the selected material. The worthy result of considerable work will last a long time, living under such a roof will be cozy, warm and safe.
Houses with a bay window
A bay window often becomes not only a spectacular facade element, but also allows you to create a cozy and well-lit area in the living room, dining room or bedroom.
To cover the semicircular bay window protruding beyond the facade, hipped and conical structures are used, which are in perfect harmony with the hip roof.
The bay window often serves as a kind of “core” on which all the floors of the house are “strung,” as in the photo of this modern cottage with a cascading hip roof.
Rectangle or square
It doesn’t matter what kind of house it is, frame, aerated concrete or brick, first of all you need to pay attention to the shape and size of the box. This plays a significant role in determining the type of hip roof.
If the box is a square, then a hip roof would be the ideal option. It is often chosen for large houses measuring 10x10 or 12x12. Although, it looks no less attractive on small buildings measuring 8x8. And if you want to lengthen the square house, under the overhang of the hip roof, you can organize the construction of an extension with a pitched roof. Even if the house box is not square, you can still build a hip roof, the main thing is that the building has the correct polygon shape.
A hip roof will not work for a rectangular house. Here you need to choose a preference between other types of hip roofing.
Hip hip roofs
Hip-type hipped roofing is a traditional option for English Tudor-style houses. This architecture is distinguished by a harmonious combination of brickwork, half-timbering and natural roofing in the form of ceramic or slate tiles.
In addition to the impressive hip roof, English Tudor architecture is characterized by multi-level triangular gables with large arched windows.
The pediments are located both along the axis of the building and asymmetrically; they play the role of a striking element on the facade of the building.
The most difficult thing in arranging a hip roof is the articulation of roofing structures covering several residential volumes in the case of a complex house layout.
The roof of the gazebo in the photo is a classic version of a four-slope hip structure with two trapezoid slopes and two triangle slopes. This roof is optimal for various outbuildings: pavilions, garages, summer kitchens.
Advantages and disadvantages of a roof with four slopes
It is customary to highlight the following pros and cons of a hipped roof:
Pros:
- aesthetics;
- high level of resistance to natural phenomena due to smoother contour lines and aerodynamic features of the hipped roof design;
- better water discharge and faster drying time;
- high thermal insulation qualities;
- frost resistance;
- The hipped roof type is the best option for tall buildings. This roof looks miniature and neat.
The downside is that it is more difficult to build a hipped roof. Accurate calculations and thorough knowledge of engineering technologies will be required. It also takes longer to install.
Gable half-hip roofs
A gable roof with a half-hip configuration became a successful architectural solution for the design of a colorful house with arched windows and a semicircular terrace on the attic floor.
Soft roll roofing under tiles is a budget solution for installing a gable roof.
Half-hip roofs look noble and stylish in a European way, especially in combination with vertical landscaping of facades.
The photo shows a gable roof with half-hips and dormer windows in the Danish style.
See also: Cottage interior design: 60 photos in a modern style
Advantages
The advantages include:
- Lack of vertical end walls and pediment.
- Best wind resistance.
- Less susceptible to destruction than other types of roofs is the eaves area.
- High rigidity thanks to angular ribs.
- You can install overhangs that protect the walls and façade from weather influences (rain or snow).
- Aesthetically attractive appearance, solidity, solemnity.
Broken hip roof
Due to additional edges and planes, hip-type broken roofs not only give a private cottage an original look, but also improve the roof’s resistance to negative climatic influences.
Soft rolled tiles are a modern roofing material, optimal for installing a broken-shaped roof due to the ease of installation on the bends of the slopes.
Metal tiles look great on cascading roofs, emphasizing the non-triviality of roofing forms.
Small bends of the hip roof along the edge of the slopes are a practical solution for regions with heavy snowfall. Such a roof reliably protects the attic floor from precipitation and promotes the gradual melting of snow.
Briefly about the main thing
A hipped roof is a roof formed by joining 4 slopes. There are two main modifications of it - tent and hip. The main advantages of roofs of this type are the absence of gables, a minimal slope angle and an attractive design. Disadvantages are associated with the complexity of installation, small under-roof space and high consumption of roofing material.
There are 4 types of roofs with 4 slopes:
- Classic hip ones.
- Tent.
- Dutch half hips.
- Danish half hip.
Each of them has its own design features, construction technology and specific operation. The installation of a 4-pitched roof begins with design. It includes the choice of the type of structure, the angle of inclination of the slopes, calculation of loads, area and selection of coating material. The installation technology includes 4 main stages - the creation of floor beams and mauerlat, the formation of support girders, the production and installation of rafters, and covering with roofing material.
Ratings 0
Hip roofs from Onduvilla roofing
The colorful Onduvilla with brown tiles effectively completes the image of a house in a classic style.
The red hip roof from Onduvilla with natural tiles harmonizes well with the facades of a soft peach shade.
The house design, built in Burundi, features Onduvilla hip roofs over the main building and porch.
Types of hip roofs
For those who are faced with construction for the first time, it is necessary to explain that a hip roof is an ordinary hipped structure.
However, depending on the complexity of the forms, it is divided into the following types:
- The tent structure consists of four identical slopes, each of which has the shape of an isosceles triangle. From above they converge at one point. The hip roof is only suitable for the box of a square house.
- The half-hip design differs in that the slopes cover only part of the pediment. This roof is ideal for rectangular buildings.
- A broken structure can have many slopes of different sizes, connected to each other at different angles. Such a roof is appropriate for a large house, but its construction is very difficult.
Each type of roof is individually selected for specific house sizes, guided by complex calculations.
Roof made of Onduline roofing
The hip roof made of red Ondulin has become an interesting accent in the architecture of a private country-style cottage built in Turkey.
Wavy Ondulin looks great on hip roofs - a two-story house in the Philippines with light facades and a brown roof is a prime example of this.
See also: Ondulin: Beautiful photos of house roofs, types of roofs
Photos of roofing options for private houses
The structure of the rafter frame of 4-pitch roofs allows the construction of practical and reliable roofs with various combinations of hip and side slopes of different configurations with other types of roofs. As a result of architecture, aesthetic forms of the roof are achieved, giving special beauty to the entire external appearance of the building.
In many countries, there are structures made from full and truncated hip slopes in combination with gable roofs, etc. Here are some examples.
The four-slope roof includes a built-in gable roof of the attic gable and facade (on the left), a bay window roof canopy with vents (almost in the center of the facade) and a side hip with a half-hipped slope above the glazed attic showcase.
Semi-hipped roof covered with reed mats. This roof gives the house a fabulous look. A quite suitable illustration for the fairy tales of the Brothers Grimm, Andersen and the Harry Potter series.
This is an example of country estates, where the hip roof of the cottage adjoins the gable roof of the garage. The general appearance of the house construction is distinguished by the beauty of the strict lines of the facade architecture in a combination of gray and beige. The imagination of architects in this regard has no limits. A huge number of photos with beautiful 4-pitch roofs are published on the Internet.
Metal roofs
The hip roof looks very nice in the case of a rectangular house layout with clear axial symmetry, emphasized by a pair of bay windows along the front.
An obligatory element when installing a metal tile roof is snow retainers that prevent avalanches from falling off the roof.
Victorian manor houses with hipped roofs are a traditional version of English architecture. Moreover, the hip roof covers not only the house itself, but also extensions: a porch, veranda or garage.
The brick cottage for two families attracts the eye with its originality: terracotta-red facades, a hip roof made of black metal tiles and white architectural decor.
The hip roof of this brick cottage is effectively combined with a hip roof over the garage and a conical roof over the bay window.
See also: Beautiful interiors of cottages: 60 photos inside country houses
Design Features
In a full-fledged drawing of a hipped roof, the following structural elements must be indicated:
- Maurlet, which is a timber frame located on the load-bearing walls of the house.
- Lezhny – longitudinally laid beams that complement the wooden “foundation”.
- All rafters that are located diagonally, forming the slope of the future roof.
- Wind beams connecting rafters to each other.
- Struts protecting the rafters from sagging.
- Various reinforcing supports: trusses, racks, crossbars, tie rods.
When planning this roof, it is important to strengthen it in every possible way after the foundation has been erected with various ties and struts, which increase the strength and stability of the structure.
Step-by-step instructions for installing the Mauerlat
- On the top row of masonry you will need to form formwork from boards. It is filled with concrete to fix the reinforcement that will be required to attach the Mauerlat.
- After the concrete has hardened, waterproofing should be done using roofing felt or bitumen mastic.
- The timber is impregnated with an antiseptic, and holes are drilled in it for the reinforcement.
- The mauerlat beam is fixed with anchor bolts.
Further installation of the hip roof will require strict adherence to the instructions.
Device
The basis of the hip roof consists of the following elements:
- The ridge is the top of the roof and the support for the rafters.
- Hips are triangular slopes above the end walls.
- Slopes - 2 trapezoidal slopes, starting from the ridge and ending with an overhang.
- Ribs are the junction of trapezoidal slopes and hips.
- Rafter system - there are 3 types of rafters: diagonal, intermediate and short rafters. We talked in detail about the preparation and installation stages of the hip roof rafter system here.
- Elements that strengthen and form the roof - trusses, struts, racks, sheathing, etc.
Read more about the construction of a hip roof here.
Construction technology
A do-it-yourself hip roof will require a competent step-by-step approach and serious effort.
Work must begin by creating a mounting base called a Mauerlat. It performs the function of distributing the roof load along the entire perimeter of the load-bearing partitions.
Experts advise using hardwood as support materials, for example, pine beams with a cross-section of at least 150 by 150 mm. During the work process, the beam is sawed off and secured in the corners with a groove connection. To obtain a reliable connection, it is convenient to apply preliminary markings to the timber.
Installation stages
Sequence of hip roof assembly:
- Construction of the Mauerlat. This concept hides an ordinary wooden beam, the cross-section of which is 100*100, 100*150 or 150*150 millimeters. An important feature is that the timber must be solid, knots and cracks are unacceptable.
- Mauerlat fastening. It is connected along its entire length not end-to-end, but into an overlay, after which the corners are secured with metal corners, plates and brackets.
- Installation of the ridge, racks and side beams. The ideal width to height ratio is 1:2. Thus, the beams will practically not deform and will last for many years. The rafter beam is selected in a similar way.
- Installation of rafters and cutting them to height. Installation of slanted rafters with a large cross-section.
- Installation of ordinary rafters. Corner rafters must have a large cross-section, since they have an increased load and must cope with it efficiently.
- Installation of the remaining rafters. All of them must be solid or special linings must be installed at their joints. The wooden elements are overlapped using metal corners. At the junction of all the elements, it is necessary to install support notches that strengthen the roof structure.
After this, all that remains is to choose the type of roof and begin the final work. It should be noted that the process of assembling a roof frame is labor-intensive and requires special knowledge and skills, so it is better to hire professionals.
About change houses, storage of materials and physics
Termit.spb
...A few words about the change house itself: if you decide that you need a change house, and you will live in it for some time (the time of year does not matter), never buy ready-made ones! In the summer it will be hot in such houses, even with a split, but in the winter (what am I talking about), in the fall, you will simply freeze. If you want to live and build in comfort, make a change house yourself, with insulation, at least 100 mm thick, with films and taped seams. Remember, warm air will find somewhere to go.
Lumber with natural moisture, imported in advance, dries out when properly stored, which affects both the work and the result. Instead of a “small pile” - a retreat from the ground and storage of wood through spacers for ventilation and drying. As for blackening, it is not so critical; in unfavorable conditions, namely, under a well-ventilated roof, the fungus will stop developing.
To save on a crane or accessories, Anatoly advises using a hoist (electric winch). And if there is no electricity at the site, blocks will simplify lifting loads. One block reduces the weight of the load by half, two blocks - by four times. If you apply knowledge of physics, you can really make your physical work easier.
Preliminary preparation
To achieve a good result, you will need a competent and detailed calculation of the hip roof, as well as installation experience.
You will need a diagram of the overlapped structure and mathematical calculations based on the well-known Pythagorean theorem.
Calculate:
- the height of the ridge (h = bx tgα/2, where b is the length of the wall between the rafters at the end, and α is the angle of the slopes);
- rafter length (e = b / 2 x cosα);
- the area of each slope.
For standard projects, it is easy to use ready-made calculation coefficients and construction reference books. When calculating the gaps between the rafters, you should take into account the type of wood and the thickness of the material.
Based on the results of the calculations, you will need to make a drawing for subsequent marking. Often, ready-made drawings of a hip roof with standard dimensions are used.
Based on the drawing, it is easy to make a preliminary calculation of the consumption of building materials.
Calculations
In order to calculate the roof area in square meters, you need to take into account:
- The length of the slope from the eaves to the ridge.
- Area, taking into account the chimney pipe and skylights.
- Overhangs, paralets and firewall walls.
- Junctions of sheets (in the case of roll roofing), as well as standing seams.
If the roofing material used to cover the hip roof is metal tile, then the length of the slopes must be reduced by 0.7 meters.
Calculating the area of a hip roof is very difficult and it is not recommended to do it yourself. It is best to involve professionals who can accurately calculate the area using a computer program and take measurements.
For maximum accuracy, the roof is conditionally divided into several parts, after which the area of each of them is calculated and finally summed up. This method is optimal because it is simple and reliable, and the possibility of error is completely eliminated.
Correct calculation of the area affects not only the strength and reliability of the structure, but also the cost of construction, since the required amount of all materials is calculated: wood, roofing, etc.
It is also important to take into account the technical parameters of the coating, its thickness and length. All this directly affects the weight of the roofing and the ease of its installation. For example, ceramic tiles are heavy, it is necessary to create rafters and install sheathing, but for flexible tiles all this is not required, since they are relatively light in weight.
Marking and cutting rafters
To mark the rafters, Anatoly uses a “large mark with two rulers”; if the plans include only your own roofs (house, outbuildings), such a device can be made from ordinary plywood. If you do roofing work professionally, it is better to use hard wood: beech, oak, hornbeam, mahogany. For the convenience of working along the edges of the rafters, a small keel is made at the end of the screed to fix the ruler on the workpiece.
Dimensions of the fry:
- Length – 800 mm.
- Width – 50 mm.
- The first bar is 400 mm.
- The second bar is 300 mm.
The marking set is complemented by a small mark for sloping rafters, and a regular square with a tape measure completes it.
Termit.spb
For those who do not have extensive experience in marking cuts, at the first stage of mastering this science, I recommend marking by sliding the tool back and forth. In this case, it will not be possible to make a “mirror” angle when marking cuts. When marking cutout parts, you have to work with material that varies greatly in height. It is the cutting that allows you to compensate for this difference in heights. The fry always slides along the top of the rafters; we always set the height mark from the top edge of the rafters. This is the key to success and smooth slopes.
It is convenient to make an oblique cut of the rafters of the hip slope from fifty using parquet (a hand-held circular saw for wood) with a large overhang of 75 mm.
In order not to get carried away and cut a batch of one-sided rafters, Anatoly advises beginners to mark and cut the blanks in pairs: they made the right and left ones, marked them on the drawing, and put them aside.
Support cuts for layered rafters: two oblique cuts with parquet, removing the remainder with a sharp chisel. It is more convenient to make cuts in thick timber (100 mm) using a saw.
When working alone it is more difficult - ingenuity helps. For handling parts that are slightly shorter than the sawhorses, additional support is convenient.
For very short workpieces, you can use a backing board and a clamp.