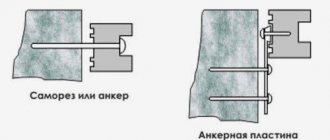
Draining water from the foundation is the main task of owners of private homes. Its solution will help to cope with the problem of the destructive effect of moisture on the foundation, as well as significantly extend the life of the house. To do this, a blind area and drainage are installed, which ensure the outflow of water and prevent its penetration underground.
Organization of effective water outflow
What drainage looks like: an overview of the device and what you need to know about it
The drainage device inside can be wall or trench. Each option has its own structural features:
- Wall-mounted. Convenient drainage system, in which a hydro- and heat-insulating layer is located closer to the foundation. Additionally, a layer of clay can be used. This takes up almost half of the blind area, and on the second half there is a layer of crushed stone or gravel and a drain (a pipe into which water flows). A layer of geotextile is laid on top, and everything is sprinkled with river sand on top.
- Tronsheyny. It is installed immediately after the end of the blind area. A trench is dug into which crushed stone is poured onto the bottom, then a drainage system pipe is placed, and geotextiles are laid on top. The entire remaining volume is filled with sand. Please note that the trench needs to be dug in a trapezoidal shape.
Drainage layers when installing a blind area near the foundation of a residential building Source w-proofing.ru
When preparing a drainage system under a house, you need to determine whether it is needed at all. Listed below are several factors that emphasize the need for drainage of the blind area:
- location of the house on a low part of the site;
- groundwater lies quite high;
- the foundation is installed lower than the soil freezing level
- the house was built on clay soil;
- Non-monolithic materials were used to arrange the path.
Please note that it is ideal to drain the blind area before the stage of its construction. This will make the work much easier.
Installation of drainage from plastic pipes with a water collector Source skvima.ru
On a note! If, when preparing a trench, an uneven bottom is noticed, and correcting it with further excavation is problematic, then it is best to fill the desired area with sand. This will help eliminate differences, as a result of which the slope of the drainage system will not be affected.
Making a blind area with a drain
The blind area and drainage can be installed simultaneously. This water drainage option allows you to combine two processes, which will significantly reduce the time for work.
Marking and excavation work
First of all, it is necessary to make markings that will take into account the placement of all elements. At the initial stage, it is necessary to decide on the width of the trench. It is important that it is wider than the roof overhang so that the flowing precipitation does not cause damage to the structure.
Excavation
To adhere to the selected parameters along the perimeter, you should drive in pegs and stretch a fishing line between them, to which the orientation will be carried out.
Pouring the blind area
After waterproofing the foundation with roofing felt or mastic, you can begin pouring the blind area of the house with concrete mortar. Before the procedure begins, formwork is constructed and reinforcement is carried out. It is important to consider the angle of the slope so that water flows away from the house.
Pouring the blind area
After pouring, while the blind area is still damp, gutters are formed for drainage or pipes are embedded in the mixture. Further work can begin only after the concrete solution has completely dried.
Gutter installation
The final stage will be the organization of drainage. The direction and slope will depend on the location of the reservoir where the water will be drained. To do this, a trench is dug along the edge of the entire blind area, the width of which will be similar to the pipe used.
Gutter installation
You can use both the sewer option and asbestos-cement or polymer pipes cut in half. The base for the pipe can be compacted with sand and gravel, and the trench is also filled with concrete, which gives additional strength.
Blind areas and drainage make it possible to create high-quality protection for the foundation from the influence of atmospheric moisture and groundwater, so their arrangement is mandatory.
Correct placement of elements and adherence to installation technology make it possible to obtain the maximum effect, even when constructing drainage on your own.
Types of drainage
In order for the drainage system under the house to be effective, you need to know which option is best suited.
- Open. It is a small ditch, the depth and width of which does not exceed 50 cm. It is dug along the perimeter of the house, around the blind area. Subsequently, the top of the ditch is secured with cement, and gratings are laid on top. It is then convenient to navigate through them, and the aesthetics of the room will not be compromised.
- Closed. It is considered the most effective for removing moisture from the walls of the house. It is designed in such a way that all water flows fall exclusively into the recess, so not a single drop has a chance to penetrate to the base of the structure. This is usually a drain with a grate that is installed directly under the gutter. This option is acceptable for an organization if it is planned to equip a garage, a bathhouse, or make a basement in the basement of the house.
- Backfill. It means a prepared trench, which is filled to the top with large crushed stone. This drainage system is considered the simplest and most cost-effective. But, there is a risk of soil silting too quickly. Accordingly, you will have to periodically clean and replace the crushed stone for better water drainage. Ideally, this is best done once every two to three years.
Note! A closed drainage system is the best alternative, although expensive. The finished device does not require regular maintenance and will work effectively for more than ten years.
Additionally, it is customary to divide drainage systems for blind areas of a house into surface and deep; they, in turn, are classified as follows.
Installation of backfill drainage for a blind area in the foundation area Source gidro-1.ru
Surface:
- Wall-mounted. This type of drainage is built together with the foundation. They are trenches that encircle the base of the house. Depth of occurrence is 0.3-0.5 meters. Moreover, it is necessary to arrange it so that the drain is laid below the foundation. The slope of such a trench should be 1.-1.5 cm per 1 meter.
- Plast. It is considered a complex and expensive method of drainage. However, it is highly effective. It can not only reduce, but also completely prevent the destruction of the base. A good option for cases where there is a water layer under the foundation. A mandatory component in the device is a sand cushion 0.3 m thick. In this case, the perimeter of the sand layer must be greater than the perimeter of the foundation.
- Annular. This type of drainage is built to lower the groundwater level to protect the house from moisture. A ring structure is laid around the foundation at some distance. Usually this is at least 5 meters; if you make the device closer, the soil may shrink, which will lead to the destruction of the foundation. The depth of the drainage system is 20-50 cm, depending on the climate (the more precipitation in the region, the deeper the trench will have to be dug). This type of structure can be constructed after the construction of the house and the completion of work on organizing the blind area.
Ring drainage around the house for draining wastewater Source s.onliner.by
How to do it yourself
Before proceeding with the basic procedures for organizing drainage around the house with your own hands, it is necessary to ensure high-quality waterproofing of the foundation itself. To do this, you can use a layer of roofing felt.
There are also a huge number of other, more modern, waterproofing materials, for example sprayed, geotextile or bitumen options. Next, pipes are laid into gutters, which also need to be waterproofed, after which they are backfilled with gravel.
Principles of drainage system
To protect the foundation of a house from moisture using drainage, you must follow several principles. You can find out the details below.
Choosing the Right Depth
The depth must be sufficient, since overflow over the sides of the ditch is sometimes possible. More often this occurs on watery soils, soils with a close occurrence of a water layer, as well as during heavy rainfall.
When arranging drainage for a blind area, it is necessary to take into account the depth of the trench Source vodolov.ru
Moreover, the drainage of the blind area must be arranged so that it is lower than the freezing depth of the soil. This will help ensure high-quality drainage during spring floods. At this time, the upper part of the soil is still frozen, and until it thaws, it will not be able to absorb water efficiently. This means that all the moisture will accumulate at the base of the house.
Note! The depth of soil freezing in each region is different. Therefore, to determine this, you will have to turn to specialists. A soil map can also come to the rescue.
Adjusting the correct slope
It is important not to overdo it in this matter. It is enough that the slope of the blind area drainage system corresponds to 1 cm/1 meter. If it is less or more. Water will still get to the foundation. If the angle of laying the pipes is done correctly, the water will flow out at a speed of approximately 1 m/s. Based on this parameter, we can judge that the drainage system is done correctly and is working efficiently.
Maintaining a slight slope when digging a trench for drainage makes water drainage effective Source sense-life.com
Place of drainage
You need to select the point where all the water will go after accumulation in advance. The amount of consumables that will be needed depends on this. Often, water is drained into a special well, in which it then settles and is used to water the garden. The practice of transporting wastewater into lakes, rivers or ravines is also popular. It is appropriate to extend the drainage system to reservoirs if they are located near the house.
Pump installation
If there is a heavy drainage of water from the roof, the drainage around the blind area may not be able to cope, and an additional pumping system will be required. To do this, it is advisable to install a pump. You will need to place it in a safe place. This may be a special well. If you plan to operate a submersible pump, then you need to choose a section of the ditch where sediment and small debris will not get to the motor.
Pump for pumping water from the drainage system near the blind area Source septik27.ru
What to pay attention to before installation?
Before draining the blind area, pay attention to:
- average annual precipitation;
- location of reservoirs relative to the site (what is the likelihood of spring floods);
- groundwater level (and whether it is possible to increase the level);
- the composition of the soil on which the site is built;
- communications carried out on the site, neighboring buildings;
- optimal type of blind area;
- slope of the land.
Components of a drainage structure
To organize storm drainage you will need several components:
- pipes. These can be asbestos-cement or composite materials. Thick-walled plastic products are also used. The latter are considered easy to install and budget-friendly. If clogged, they are easier to maintain;
- well. This is the place where all the water will accumulate. More often they try to use a natural water intake (any nearby body of water), but if this is not possible, then they have to build a special container. A large septic tank, iron barrel or reinforced concrete sewer well is suitable for this;
- pump equipment. It will be required for almost any drainage system (even with maximum efficiency). A pump is needed to pump out remaining moisture in the ditches; if this is not done, silting will occur.
Having dealt with the main components that should be present in the drainage system in the area of the blind area, it’s time to get down to the arrangement process itself. It is based on several stages.
Filtration and storage wells
In the absence of the possibility of discharging water into natural reservoirs: ditches, rivers, ponds, there is nothing left but to equip a well. There are two options: a well with a drainage bottom and a storage tank.
Option 1. With drainage wells
The essence of constructing a drainage well is that the water entering it is filtered and seeps into deeper soil layers. There may be several of them in a pipe drainage system. They are located at the beginning of the line, in places of turns, intersections, changes in slope or pipe diameter.
The well can be built from factory-made concrete rings with perforations, purchase a ready-made plastic product, or cut a piece of large-diameter pipe, make holes in its walls and install it in a cylindrical hole 1.8-2 m deep on a prepared crushed stone base.
Prices for popular models of drainage wells
Drainage well
Option 2. With storage
The water that is collected from the site can be used in some way on the farm: for washing cars, breeding fish or crayfish, watering greenhouse crops. In any case, if groundwater on a site already reaches a high level, it is irrational to add surface runoff to it.
- Water can be discharged into a street storm drain, a ditch, or simply into a forest or river. For this purpose, not a drainage well, but a storage well is introduced into the system. The difference between them is that the first has permeable walls and bottom, while the second must be airtight.
- A pump with a float sensor is installed in it. As soon as the container is filled above a predetermined level, it begins to work, discharging excess water into a drainage channel or a drainage well located further from the site. The rest is always in stock, and if necessary, you can use the accumulated water.
- It can be very helpful if you need to extinguish a fire. Or when you start some kind of construction in the yard that will require water - for example, to moisten a compacted sand cushion.
- During the summer drought, the water supply, for which you don’t have to pay a penny, will also be useful for watering beds that suffer from excess moisture in other seasons. After all, at dachas there is often no water except what its inhabitants bring for themselves to drink.
Electric submersible pumps
Organization of drainage
The drainage system is built in several stages. Let's look at the features of each in more detail in this section.
Preparation of water intakes when organizing a drainage system in the blind area Source w-proofing.ru
Preparation
Here you need to take care of drawing up a diagram or drawing, according to which further construction will be carried out. But before making a sketch, it is necessary to carry out a number of geodetic works. Only after this can the type of drainage be determined and, as a result, a plan can be drawn up.
The preparatory stage also includes the selection of building materials. For high-quality drainage under the foundation you will need:
- geotextiles;
- drains;
- gravel or crushed stone;
- sand;
- plastic inspection well;
- collector;
- drainage pump;
- fitting.
In addition to this fittings, it is necessary to purchase gaskets and grilles. In most cases, they are sold complete with ready-made drainage systems. They can also be purchased to order.
Estimated depth for the drainage system in regions with minimal precipitation Source teplica-exp.ru
As equipment for work you can use:
- two types of shovels (bayonet and scoop);
- garden wheelbarrow (for transporting soil);
- level;
- tamper
To transport soil when excavating a trench for drainage, you can use a garden wheelbarrow Source pixabay.com
Installation stages
The process of installing a drainage system can be divided into 10 stages:
- Preparation - bringing in tools, material, marking the area, removing layers of turf
- Digging trenches with proper bottom angle
- Filling trenches with a sand cushion
- Cutting geotextiles, lining trenches (the edges of the material are attached to the walls with small wooden pegs)
- Filling the first layer of crushed stone
- Laying drainage pipes
- Filling pipes with smaller fractions of crushed stone
- Closing the resulting sandwich with the edges of geotextile (overlapping). For strength, you can pre-place pieces of synthetic cord at equal intervals. The rolled textile is additionally tied.
- Backfilling with a layer of sand removed when digging a trench with soil
- Reinstallation of cut layers of turf in their original place
Cross section of a building with a wall drainage system
Determining direction
First you need to decide on the direction of drainage of stormwater. This could be a slope going down into a ravine or towards a river. In this case, there will be no problems with the volume of excavation work.
If this is a ravine located behind a hill, then it is necessary to determine the height of the bottom of the ravine or ditch relative to the surface of your site. The simplest geodetic instrument, a “level,” will help with this.
Various fittings for receiving storm drains
With its help, you can calculate the depth of all wells and the required slope yourself. But such calculations are needed only over large areas and distances. Usually, owners of private plots do not face such problems - and so everyone can see where the water flows and where the nearest ditch is.
Advantages and disadvantages
A blind area is a moisture-impermeable strip that runs along the perimeter of a building and has a slope away from the building. This is a multi-layer structure, which is made using the same technology, the only difference is the top layer. You can choose a hard surface, such as concrete, tiles or artificial stone.
The crushed stone structure is easy to manufacture and can be used in any climate zone, on different soils.
Positive aspects of this material:
- improves the thermal insulation of the house;
- affordable price;
- is not subject to deformation when the foundation settles;
- the repair is simple, there is no need to invite specialists;
- no risk of cracking;
- good resistance to sudden temperature changes;
- work with crushed stone is carried out without special construction skills and additional equipment;
- There is a large selection of decorative crushed stone on sale, which allows you to create unusual design solutions, for example, planting plants around the house directly in the blind area.
The disadvantage of this type is the need for repairs. After 7 years it is necessary to redo the blind area. Regular surface care will also be required. It is necessary to clean the surface of dry leaves, branches, and other debris from the area, and monitor the external condition.
Installation instructions
Since gutters can be installed as finished products, or you can make them yourself, there will also be two instructions.
Installation technology for finished gutters:
Cleaning the area - along the entire perimeter around the house, you need to clear the area of weeds and other vegetation along with roots (about 2 m from the wall).- Marking the future blind area - along the entire perimeter, with a step of 2 m, you need to drive pegs into the ground, which will serve as guides for the contour of the future blind area.
- Digging a trench - about 20 cm deep. At this stage, it is important to seal all the cracks and potholes in the foundation.
- Create a compacting layer: clay (7 cm), tamping the clay, a layer of waterproofing with an outlet on the base, crushed stone (5 cm) or pebbles - to give rigidity, sand (7 cm), watering with water and compacting with a tamper.
- Installation of a border on a cement-sand mixture - to limit the movement of the tiles and create the external boundaries of the blind area.
- Placement of ready-made gutters along the edges of the blind area or along the entire wall (next to it or near the curb).
- Laying tiles with trimming around gutters.
- Sealing the seams between individual tiles, as well as in places where the tiles adjoin the gutter - the mixture is distributed with a brush over the entire area of the blind area, and then watered with water (to quickly harden the solution).
The technology for creating recesses for water drainage with your own hands is quite simple. You can make recesses for the drain while the freshly poured blind area is still damp (remembering to maintain the slope of the drain).
To form a gutter, you can use a rule or use a sewer pipe , simply drowning it in the solution flush with the main surface. The pipe can be cut in half and covered with a grate on top, or left whole and brought under the drain pipe from the roof. Seams and cracks must be sealed with sealant.
You can also use a hammer drill to make potholes (with a slope) in already hardened concrete, and then lay tiles on the solution, sealing the seams with special glue. It will turn out aesthetically pleasing and neat.