Self-installation of a plastic window on anchor plates
That it's plastic
windows are even more reliable, durable and economical than their wooden counterparts, confirmed in practice.
But the main problem that people who want to replace old frames face is the cost of transporting and installing new structures. Even a novice master can carry out the installation without the help of others. You just need to know the aspects and tricks of the upcoming work. Which windows are better, plastic or aluminum? To answer this question, you need to find out what useful properties MP windows are characterized by. And what kind - aluminum, study and. And it makes more sense to install the new frame on anchor plates .
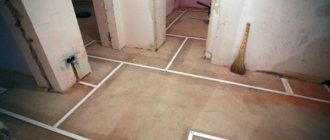
Figure 1. Scheme of formation of anchor fasteners.
Installation Basics
Now there are 2 methods of installing windows, which differ in the type of fastening unit and the method of fixing the frame to the window opening. This is installation with and without unpacking. For self-installation of windows
It makes more sense to choose the 2nd option, since it is simpler, does not require special skills, and the work does not take much time. In addition, it helps to avoid errors during installation and makes it quite easy to configure all the fittings.
Installation without unpacking does not imply removing the bead and dismantling the glass unit from the frame. The structure itself is attached to anchor plates. The principle of forming such fasteners is shown in Fig. 1.
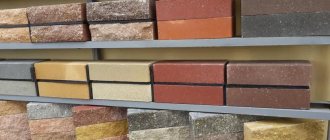
Before installing a new window, you must select the correct plates themselves. They come in two types: universal and designed for a specific model. That is, they take into account the requirements of a specific profile system. As a rule, such anchor plates come complete with complex, non-standard structures.
Figure 2. Layout of anchor plates during installation.
Specialized fasteners differ from universal ones in that they are equipped with ears. These elements are installed in the groove of the frame profile and fixed with self-tapping screws . Universal plates do not have special ears. They are simply secured with bolts.
For the installation of window structures, experts recommend choosing bolts of type 4.525. Their body must be equipped with a metal drill. Since the self-tapping screw is attached to a reinforced structure, another type of fastening may not fit or will not fix the plate very securely.
How to fix plastic windows in concrete?
If you mean good quality concrete, from which, for example, lintels are made over window openings, then drilling such concrete with a diameter of 10 mm under a frame dowel is a bit difficult, but it is possible.
In this case, it is better to use anchor plates. But it is more efficient to attach panel and block houses to a frame dowel. It's more reliable and faster.
At the beginning of the article, I said that the choice of fasteners for windows also depends on the type of structure. So I want to talk about this type of glazing of loggias and balconies.
Typically, the window fastener hits the very edge of the top concrete slab or the edge of the brick bottom and side walls. Therefore, attaching loggias to the edge of the wall using a frame dowel can be quite dangerous.
Anchor plates are a great way out of the situation.
And finally, I would like to say about the big advantage of anchors, which is at the same time a disadvantage for anchor plates.
When the window frame is attached to anchors, at the time of drilling you level only one vertical plane. And you adjust the second vertical plane after inserting the anchor.
When fastening with anchor plates, you will have to set two vertical planes at once and only after that make holes with a hammer drill. This requires certain skill and skill.
Source: lankins.ru/montazhnikam/chem-krepit-plastikovye-okna.html
Window installation rules
As a rule, it is recommended to install 5 anchor plates on a standard type window. Their location is shown in Fig. 2.
The central plate is fixed exactly in the middle of the frame, and the side plates are fixed approximately at a distance of 20-25 cm from the edge of the structure.
As mentioned above, the method of installing a plastic window without unpacking does not require removing the glazing bead and the glass unit itself. This becomes possible due to the fact that the frame is fixed using anchor plates to the outside of the window opening. Otherwise, you have to form through fasteners.
Figure 3. Installation diagram
low tide
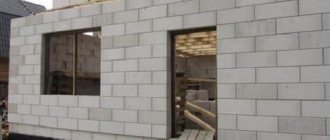
But you need to remember that large structures (with an area of more than 4 m2) should not be installed using plates. After all, such a mount may not withstand the weight of the window. In this case, it is wiser to use anchor dowels. For plastic double-glazed windows of small or medium size, plates will be the most rational method of fastening.
Not only large windows, but also doors are secured with dowels. Professionals believe that this installation method is the most reliable. But it has a number of significant disadvantages:
- Installation with unpacking is difficult even for specialists. Often, with this installation method, the glass unit breaks or cracks form on it.
- Installation on anchor bolts is almost impossible to do alone.
- Working with such fasteners requires experience and special skills.
- The work requires more effort and time.
If you prefer this installation option, then you need to purchase dowels measuring 10132 mm. In addition, installing anchors requires a powerful hammer drill. Some modern stores that sell equipment for construction and repair provide rental services. Therefore, it is not necessary to buy an expensive device. But it’s easier to install the window on plates.
Features of timber houses
Undoubtedly, a well-built wooden house will serve its owner for a long time.
This is a comfortable building, which is a convenient option for environmentally friendly housing. But it also has some individuality. Specifically, they should be taken into account for the installation of plastic windows in such houses. Here are the main nuances:
- General instability of tree houses.
- The "floating house" problem.
- Shrinkage.
In fact, this is all one problem, but it is called by specialists with different definitions. It lies in the fact that the walls in houses made of timber beams can sag without the help of others for another 5 years or more.
But for those who decide to install plastic windows in such housing, there is still a way out - to make a special immovable structure for window openings. With this method, it is possible to avoid shrinkage and subsidence of the opening itself, because it remains in its original position, thanks to the stationary casing structure - the casing.
Installing a window using plates
To carry out the work you will need the following tools:
Tools for window installation.
- electric hammer drill (or drill with impact function);
- screwdriver;
- hacksaw (it’s wiser to use a jigsaw);
- hex key for adjusting fittings;
- anchor plates (5 pcs.);
- bolts (self-tapping screws);
- polyurethane foam in cylinders;
- silicone in cylinders (and a gun for working with it).
Don't forget to have your measuring tools ready. You will need a measuring tape, a building level and a square. All necessary marks can be placed with a simple pencil. As a rule, traces of it can be removed from plastic with ordinary dishwashing detergent. When everything you need is prepared, you can begin installing the windows.
How to fix fastening hardware with broken threads
If the warranty does not cover the cost of repairing the broken threads of fastening the fittings, then you will have to resolve the issue yourself. There are several repair methods:
- Fill the hole for the screw with liquid plastic or its equivalent. Wait for the product to dry completely and screw the screw back into the same place.
- Cut a piece of tin the same width as the hole and fold it into a “Y” shape. Insert the resulting element into the hole, and then screw in the screw. The metal plate will act as a very strong spacer. This method is effective and virtually cost-free. Instead of a tin plate, you can use a piece of plastic together with PVC glue.
- Increase the diameter or length of the self-tapping screw, if the design of the window and fittings allows it. However, it should be remembered that if you increase the length of the screw, you can damage other elements of the window, for example, a double-glazed window.
- Move the fittings fastening a few millimeters to the side, if the design of the window and fittings allows this. Old screw holes can be sealed with any sealant, such as silicone or liquid plastic.
If you want to know how to care for the profile of a plastic window and what products to use, go here https://4okna.info/remont/pochemu-poyavlyaetsya-plesen-v-uglu-okna-i-kak-ot-neyo-izbavitsya.html.
And in this article you will learn how to repair cracks between the frame and the slopes, as well as the reasons for their appearance.
Installation of a balcony block according to GOST. Fastening plastic windows
Our contacts
When installing plates, the following rules must be observed:
- For fixation, use only mechanical fasteners (screws). Never use glue or foam.
- When forming holes for fastenings, use the impact mechanism only if the slope is made of concrete.
- The drill must be long enough. Make sure that the drill chuck does not damage the window frame. The edge can be protected by placing a piece of PVC next to the socket being drilled.
- If the wall is made of brick with vertical voids, then the hole must be formed in the seam between the blocks. The solution will “hold” the fastening quite securely.
- To install self-tapping screws, it is better to use a screwdriver with a torque limiter. This will allow you to control how the fastener fits into the frame and how deep it goes.
Following these simple principles will help you install the window without errors that will be difficult to correct.
How to attach the suction cup so that it holds?
How to firmly attach the suction cup to the tile?
Alcohol is best for degreasing. After such manipulations, just press the suction cup tightly against the tile, and it will remain in the place you want. If you need to move the product, wet the tile next to the suction cup. It will glide easily on such a surface, but you won’t have to peel it off.
What is the best way to lubricate the suction cup?
The easiest way to attach the suction cup to the glass is to use something sweet that contains sugar. We suggest you take regular Coca-Cola, just regular, not Zero or Light. The regular one has quite a lot of sugar. Wet your finger with it and lubricate the suction cup.
How to attach Velcro?
How to attach: instructions
- First, degrease and wash the surface. ...
- Degrease the Velcro surface as well.
- If the suction cups come with mugs with a sticky side, do not neglect them: they will make the attachment stronger.
- Place the suction cup on the cleaned wall and apply maximum pressure.
How can you soften the filter suction cups in an aquarium?
“Old rubber products can be restored to softness and elasticity by immersing them for 20-30 minutes in a weak solution of ammonia. You can immerse the rubber product for 1-2 hours in clean kerosene.
How do suction cups work?
A suction cup is a device or organ used for attachment to solid surfaces. ... In a simple case, the suction cup, under the influence of an external force, is flattened on a flat surface, and after the deforming effect disappears, it restores its shape due to its own elasticity.
Where is the best place to install a DVR?
Where should I attach it, dear one? Still, the best place to mount the DVR is the “patch” around the rearview mirror or directly behind it, without compromising the rain and light sensors. There and only there the device is able to do its job without interfering with the car's security systems.
Installing frame mounts
Window frame installation diagram.
First you need to secure the anchor plates
. At the same time, make sure that the distance from one plate to another does not exceed 1 m. If you are going to install a high window, then it is wiser to install an additional fastening unit.
In this case, the distance of the outer elements from the corner of the window structure should be 20-25 cm. There is no point in doing it anymore. Since in this case the frame may lose stability.
Remember that the self-tapping screw with which the plate is fixed to the window must be equipped with a drill.
These bolts are usually marked "for metal". This necessity is explained by the fact that the window is covered with plastic only on the outside. There is an aluminum profile inside the structure.
If you want to use regular bolts, you need to first form holes in the frame. To do this you will need a drill and a metal drill bit. Make sure that the socket is 1 mm smaller than the diameter of the screw.
If necessary, the anchor plates can be replaced with universal U-shaped brackets measuring 125 mm. Such fasteners are usually used when installing plasterboard boards. But it is wiser to use ready-made anchor plates.
Dismantling
Since the technology for installing plastic windows requires a free opening, the first thing we do is get rid of the old window. Why do we first remove all the removable sashes, and take out the glass from the blind ones. Now you need to remove the frame. This is where you have to work hard, especially when it comes to old windows. Because, although the doors themselves have long since dried out and acquired, to put it mildly, a not entirely presentable appearance, the frame, as a rule (and oddly enough), was made of excellent wood, which even after many years is too tough for even the sharpest saw . Therefore, for dismantling it is best to use a grinder, and put a metal circle on it
We make deep cuts in the frame in several places and on all sides, after which we carefully remove it piece by piece with some available tool (say, a crowbar). Then we get rid of the old window sill in the same way.
We clean up after ourselves, clearing the opening of all kinds of debris (of which there will be so much) and dust.
Window frame installation
Window anchor installation diagram.
The distance from the window frame to the opening in the wall should be 2-3.5 cm. If the gap is smaller, then it is necessary to form recesses in the slopes for installing fasteners. How to attach blinds to plastic windows without... This is done as follows:
- Install fasteners on the window.
- Install the frame into the opening provided for it.
- Mark the location of the plates on the wall. To do this, use a simple pencil or chalk.
- Remove the window and use a chisel to select the bed. Its depth should not exceed 2 cm, but the plate must fit tightly into it and not protrude beyond the edges.
This technique will help in the further finishing of the window opening. Since the anchor plates do not have to be “hidden” under an additional (sufficiently thick) layer of plaster.
Next, you need to insert the frame into the opening and align its position. To do this, you will need wooden wedges, which must be prepared in advance. The thickness of the wedges should be 0.7-3 cm. The wedges must be installed only under the horizontal crossbars of the structure, while simultaneously aligning the window vertically. Constantly check the position of the frame using a building level. In order to achieve the correct installation of the window, if necessary, several wedges of different thicknesses can be placed in one place at once.
Then you should attach the plates to the window opening. To fix the fastening on a concrete or brick slope, 640 dowels are usually used. For wooden slopes, it is wiser to take self-tapping screws designed for woodworking. In this case, mounts size 4.245 will suit you.
To ensure that the frame does not warp during installation, the plates are attached sequentially. As a rule, installation begins from the lower left corner, and then fixes the lower right. In this case, you must constantly check the correct installation using a building level. While working, you may accidentally push or move the frame. An incorrectly installed frame will make it difficult to adjust the position of the sashes and install fittings. The top plates are secured last.
Sealing
The sequence of sealing the gap from the outside and inside:
- PSUL;
- polyurethane foam;
- vapor barrier film.
PSUL tape is glued along the outside of the plastic window between the profile and the quarter or along the edge of the end and the window opening. Carefully pry and wrap 2 cm of protective film on the adhesive side. Insert and secure the tape to one of the bottom corners of the window. Lay the strip around the perimeter and, gradually removing the film, press the PSUL to the window. Then remove the protective film so that the strip begins to expand. The PSUL is attached from the bottom at the end.
Attach a vapor-permeable film to the inside of the window along the edge, removing the protection from the adhesive side only partially.
Fill the gap with mounting foam from bottom to top. Fill gradually 20–30 cm at a time and then take a break until the foam gains volume. Filled gaps are sealed with vapor-permeable film.
Filling cracks with foam
Diagram of a gun for polyurethane foam.
After you have installed all the plates and checked the positions of the frame one last time, the gaps between the window and the slopes must be filled with foam. Make sure that the gap is completely filled with foam. If the gap is large, then work in 2 stages. First put 1 layer, wait about 1.5-2 hours and blow another 1 layer.
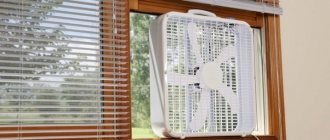
Pay attention to the foam characteristics. Because it expands differently at different temperatures. Therefore, select the material taking into account the season. Usually the manufacturer puts a “winter” marking on the cylinder. Read the instructions on the label carefully. The temperatures that are optimal for working with foam are indicated there.
Treat the gaps carefully and carefully. Remember that too thin a layer can lead to drafts in the room. And excess foam will deform and bend the aluminum frame profile. Then the entire window structure will warp. Make sure that splashes do not get on the plastic of the window, as it will be difficult to clean them off. Excess foam can be immediately cut off with a stationery knife. When finishing the window opening, the foam will need to be protected from exposure to sunlight, and this must also be taken into account during installation.
How to attach plastic windows to wood?
The ideal option for fastening windows for wood is anchor plates.
And no one can convince me of this. Frame houses or timber, plates only. From my bitter experience, I’ll tell you how I fastened windows with screws to the top of the frame in a house made of timber. And there was a casing, and a gap of about 4 cm. A year later, the timber began to shrink, and these screws, together with the timber, went straight into the double-glazed windows.
As a result, several double-glazed windows were replaced under warranty. Got the money. After this incident, if I use screws, then only in exceptional cases, and only in the side parts of the window frame.
By the way, even when building frame houses, professionals do not recommend using hardened screws. Wood is a living material and when moved, screws break, and a nail, for example, bends. The same principle applies to the anchor plate.
Anchor plates for wooden houses are good for the following reasons:
- Quick installation;
- Compensates for thermal expansion;
- They do not affect window structures during shrinkage.
Installation of window sills and ebbs
According to existing standards, window sills and ebbs are installed a day after foaming the cracks. This time is necessary for the material to completely dry and for the frame to finally “stand” in the opening. Otherwise, the decorative elements may lead and they will be positioned askew.
The ebb is installed under the window frame, connecting it to the window sill. This installation method ensures that moisture does not seep in at the junction of the frame and the ebb. The installation diagram is shown in Fig. 3.
As a rule, manufacturers produce window sills of standard overall dimensions. Therefore, if necessary, it must be trimmed so that its length matches the width of the opening. Then it is joined to the substitution profile and leveled.
The window sill is leveled in the same way as the frame itself. Use wooden wedges to determine the correct location. Be sure to check whether the structure sags under weight. How to install plastic windows in an apartment yourself. Fasten it with self-tapping screws. After the correct location of the window sill has been established, the niche under it is filled with polyurethane foam. Pre-prepare the oppression (enough heavy objects that can be placed along the entire length of the window sill). If you don't put a load on top, the expanding foam can bend the structure. The oppression is removed approximately 10-12 hours after work.
Types of self-tapping screws
There are two main types of screws used for DIY repairs - for wood and universal.
Their main difference is in the thread pitch - “screws” for wood are characterized by a huge pitch (more rare application of thread turns). There is a misconception that universal parts are just as good for wood, plywood and chipboard as special parts. Is it possible to use floor insulation on a balcony while others can be used cold? No, of course, it won’t be difficult to screw them into these materials, but how well they will stay there is a big question. The fact is that the “raw material” into which the screw is “immersed” must lie firmly in the grooves of the thread, and the structure of the wood will not allow it to fit perfectly into the narrow “grooves” of a universal screw.