Installing the hob: instructions
Manufacturers produce panels powered by electric or gas energy. Installation features depend on the type of device. But there are also general requirements for the process:
- safe installation of a finished kitchen hob should only occur with ventilation or an exhaust hood;
- It is allowed to use cooking surfaces with a heat resistance of at least 100 degrees and a thickness of 25 mm;
- when installing between sections of the headset, it is necessary to maintain a distance from the walls to the slab of at least 1 cm;
- the hob should not be closer than 5 cm to the load-bearing wall of the room;
- thermal insulation is placed between the wall and the equipment;
- The stove is placed only on a thick tabletop - from 38 mm.
Advice! If exhaust hood is not possible, place a very powerful fan on the windowsill.
Necessary materials
To install the hob you will need the following tools:
- jigsaw or hand router;
- screws and clamps;
- silicone-based sealant or nitro varnish;
- roulette;
- self-adhesive seal or thin aluminum tape;
- pencils, ruler and meter board.
Important! In some cases, you will also need a drill.
Taking measurements
How to install a new hob correctly so as not to damage the set? Refer to its dimensions from the instructions. If the brochure is lost, use the following technique:
- Turn the product over onto the table;
- Measure the width and length along the inner edges;
- Measure the parameters of the protrusion for fixation and draw it with a pencil on the surface;
- Mark these parameters on the table with a pencil;
- Find the center of the segments and make markings;
- Check clearances carefully. For a protrusion with a length of 15 mm, a retreat of 10 mm is sufficient. To install the cooker itself, a 5 mm indentation is required.
Installation opening dimensions
Important!
You can simply trace the tabletop with a pencil, but there are risks of inaccurate dimensions and damage to the furniture. Experts recommend making calculations step by step and sequentially:
- Marking the cabinet based on the dimensions from the instructions by drawing a rectangle;
- Determining the center using a tape measure. You need to draw a cross on the table so that one line corresponds to the front edge of the tabletop, and the second is perpendicular to it;
- Painting tape is glued to dark table surfaces and markings are made on it;
- Taking measurements of the panel itself with a margin of 1-2 mm;
- Drawing lines - there should be 4 of them.
At the last stage of marking, the evenness of the figure is checked with a ruler or level.
Advice! If you doubt the measurements are correct, make a cardboard mockup and use it.
Cutting holes
For ease of work, you need to drill the central point with a drill with a drill diameter of 8-10 mm, which is held perpendicular to the surface. Through this hole, further insertion and installation of the kitchen hob into your countertop will take place. The optimal tool is an electric jigsaw or a saw with fine teeth. Elements must fit freely into the material.
Important! The sharper the saw teeth, the smoother the edges of the cuts will be.
Further work is carried out according to the following algorithm:
- Several holes are made with a screwdriver or drill in the corners of the figure;
- Painting tape is glued to the tabletop so that no traces of the jigsaw remain;
- A jigsaw or file is inserted into one of the holes on the blade;
- An incision is made according to preliminary markings with the tool pressed;
- When working, the bottom of the tabletop is supported or fixed with tape;
- Sawdust is removed and the quality of the cut is checked in accordance with the dimensions. The plate can slide in freely, so it needs to be moved a little.
Check the quality of the cut according to the dimensions
Advice! Place a stool under the bottom of the set - this way you will not damage the furniture and maintain the evenness of the edges.
Sealing and sealing
To prevent moisture from entering and deformation of the countertop material, the holes are treated with sealant and sealed. The use of silicone sealant has several nuances:
- The surface needs to be prepared - wiped off dirt, dust and treated with a degreaser;
- Place mounting tape on the sides of the seams with an indent equal to the line of the material;
- Cut off the spout from the tube and put a syringe attachment on it;
- Load the tube into the gun and press the lever to release the pressure;
- Gradually squeeze out the sealant, spraying the seam with a solution of soap and water;
- Smooth out the seams with a spatula and remove the tape.
The edges need to be sealed
Laying a seal along the seam will prevent moisture from reaching the countertop and temperature changes. Use a special aluminum tape, which is glued to a degreased and dried surface, pressing slightly.
Before applying the sticker, it is important to check the consistency of the thickness of the seal and the internal depth of the panel sides. If the tape is thin, a gap will form through which moisture will flow. A single strip is laid around the perimeter of the cutout from the front of the cabinet. Ideally, the seal should protrude 1 cm below the side.
Advice! For sealing, polyethylene tape for plasterboard with a width of 30 mm is suitable.
Installation and fastening of equipment
How to properly install a new hob into a prepared countertop? Experts recommend working in stages:
- Try on the product and see if it matches the cut niche;
- Special metal corners are screwed onto the panel until it stops;
- The plate with fasteners is lowered into the cut rectangle;
- The product should fit easily, without being pressed down. Glass ceramics that fit tightly into the niche may crack when heated;
- The fastenings at the top, bottom, left and right are tightened and trimmed;
- On the front part, the metal tab is recessed into the furniture so that the cabinet does not warp;
- The fastening screws are tightened;
- The cut line is once again sealed with a sealant or silicone agent;
- The protruding parts of the materials are cut off with a stationery knife;
- The quality of fasteners is checked.
Advice! If the joints were uneven, they can be trimmed or additionally treated with sealant.
Possible problems with fasteners
The dimensions of the slab are almost completely equal to the width of the set, so it is difficult to fix the side parts. Correct installation of a finished hob into a kitchen countertop made of chipboard, MDF and wood with your own hands should provide for reliable fastening. The surface must be fixed so that there is no shift even by 1 mm during use.
The surface must be fixed so that during use there is no shift even by 1 mm
The problem can be solved very simply:
- Complete spring strips are attached to 4 sides, clamping the slab on the sides;
- The back and front parts are connected to the bottom of the tabletop using a metal plate, which is mounted on a 5 mm screw;
- The self-tapping screw must be installed in the hole, and the resulting structure must be screwed to the bottom of the cooking pot;
- The screw will rest against the bottom of the table, and thus fix the product.
Important! It is better to use complete springs. Others may increase the distance between the cut and the panel.
Installation nuances
Kitchen hobs are gas, electric and induction. Each of them has its own characteristics and requires a specific approach to installation. But there are general rules that apply to all types of kitchen installations.
Before proceeding with installation, you need to make sure that the following nuances are observed:
- the presence of a ventilation system and an exhaust hood equipped above the stove or the presence of a powerful fan in the window;
- tabletop material with a heat resistance level not lower than 100 °C, and the surface itself is not thinner than 25 mm;
- if you plan to install a panel between two cabinets, make the distance between the walls and the stove at least 15 cm;
- the gap between the wall and the slab must be at least 5 cm, and if it is smaller, then heat-insulating material is laid.
Any discrepancy in the installation of equipment is fraught with its incorrect operation and the occurrence of a fire hazard.
Electrical panel
Electric stoves are especially popular among users. They are easy to use, durable and beautiful. If they break down, you can carry out repairs on your own without calling a specialist. Of course, if you do not have at least minimal knowledge in the field of electrical engineering, then it is better to leave the installation and subsequent repairs to specialists.
On the back wall of any built-in electrical panel there is a diagram according to which the connection is made. If you do something wrong, it can result in a short circuit and incorrect operation of the burners. Some models are equipped with a wire for direct connection of the stove to the panel. This eliminates the need to make an additional electrical point for the socket. Installation in this case consists only of connecting the cable to the panel, installing it in the hole made and sealing it.
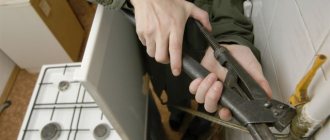
Gas hob
The gas stove, built into the countertop, is installed by the owner of the equipment himself. But a representative of the relevant service must make the connection and check the fault.
Typically, gas panels are attached to the countertop using special brackets that come included. After installation, you can connect the power cable and open the gas supply. At this stage you need to be extremely careful and take into account all safety regulations.
You need to make sure there is no leakage. For this, a special gas analyzer or the “old-fashioned” method is used. The joints between the panel and the pipe are lubricated with a soap solution and the gas is opened. If bubbling is visible, there is a problem that needs to be fixed.
Installation rules above the oven
Induction panels have many advantages over gas and electric stoves.
The following advantages can be highlighted:
- the surface quickly heats up to a certain temperature;
- easy to care for and keep clean;
- savings in energy consumption;
- the absence of open flame and too high temperatures makes the equipment safe for children.
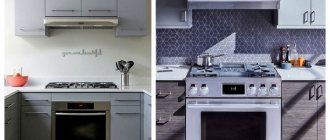
When installing a stove above the oven, you need to take into account some subtleties. The oven must be equipped with a cooling system and forced ventilation.
The countertop into which the panel will be mounted must be perfectly flat. If you neglect this rule, then perhaps the deformation will disrupt the normal operation of the equipment, and it will quickly fail.
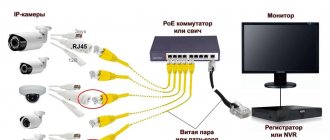
Connecting the hob to the mains
Experts note how to correctly and quickly install a new hob into a kitchen countertop and connect it to communications. The device can be connected to a separate power line if there are RCD circuit breakers for the stove on the panel. In houses with a power supply of 380 volts, you need to make a uniform load per phase.
The panel may require a separate outlet, so first you will have to dismantle the headset. The canal is prepared, strengthened, and covered with a layer of putty or cement. After this work, they move on to cutting holes and installing the slab.
The hob may require a separate outlet
Safety precautions
Compliance with safety precautions will help you avoid irreparable mistakes. We offer some tips:
- It is better to choose a gas hose with a length of no more than 3 m. It is prohibited to connect the hoses with each other.
- If you want to move the gas stove to another room, this must be agreed upon with the relevant authorities.
- To check the tightness of the hose that comes from the gas main, do not use open fire. This mistake can be fatal!
So, we looked at how to integrate a gas stove into a kitchen unit yourself. Before performing work, it is advisable to evaluate your abilities and skills. If you have doubts that you can do this, it is better to turn to professionals. However, it is worth noting that the installation process itself is not at all complicated and almost anyone can cope with such a task. The most important thing is to try to carefully read the instructions and purchase all the necessary tools and materials.
But remember that in order to install gas equipment, permission must be obtained from special regulatory authorities, who, after installing the stove, must check the quality of the work performed.
Connecting gas communications
The gas supply is completely shut off. To simplify the installation process, the gas hose is immediately connected to the panel. The paronite gasket is secured using a union nut. It is screwed tightly onto the pipe at the bottom of the panel. To ensure a reliable connection, the gasket is treated with grease. You can check for leaks by applying soap to them. If there are no leaks, foam does not appear.
On combined panels, a thermal shut-off valve is advisable, shutting off the gas supply when heated by more than 60 degrees. The supply valve must be located in a place convenient for control.
On gas hobs, the burners must be adjusted. The flame should burn without yellow reflections.
Measurements
Before purchasing a panel, you need to know the width of the tabletop. The dimensions of most panels are standard and do not go beyond 55-57 cm. The documentation for the panel must indicate not only the dimensions of the panel, but also the size of the hole in the countertop for installing the panel.
Panel installation diagram
Related article: Calculation of kitchen hood by room area
What do experts advise when connecting hobs?
- The film from the seal must be torn off gradually;
- The equipment is tried on in a niche until it lies flat and beautiful;
- The fewer gaps, the safer it is to use the panel;
- Before installation begins, the stove must be connected to the electrical network according to the complete circuit;
- Gaps on the front part can be masked with silicone;
- You can place drawers and metaboxes under the panel, so indentations should be made so that they do not touch the device;
- Two-burner models are installed along the countertop if they correspond to the dimensions of the box;
- The minimum installation depth is indicated in the equipment passport;
- The sole of the jigsaw should be placed at a right angle - this way the surface of the tabletop will not be scratched;
- The hob should be installed only after assembling the kitchen, so as not to deform the table;
- You need to apply sealant over absolutely all end cuts - this will save the material from delamination.
Watch the video about installing the hob
Features of accommodation
A kitchen stove to be built in can be inextricably linked with the oven (the latter occupies a place strictly under the panel) or can be arranged separately, independently of the oven (the controls belong to it personally and are not combined with the oven units). The location possibilities directly depend on what type you have to deal with - devices of combined models, with rare exceptions, have a single power source, plus, they are connected by a network of wires. First of all, the oven is installed as the main carrier of the control elements (the unit is leveled using a building level).
Freestanding hobs, which actively crowd out built-in sets, usually fit into or are embedded in the countertop set.
The minimum thickness of the countertop for installing a stove is 38 millimeters. The material must wick away moisture well and withstand temperature increases of at least 100 degrees.
If the device supports automatic ignition, there should be a socket next to it. Installation rules prohibit placing any stove near the sink so that drops of water do not end up on the hot surface. Close proximity to a refrigerator is also an unspoken taboo: the walls of the unit will be subject to thermal attacks every now and then.