Author: Alexander Starchenko
A system such as a video intercom consists of separate electronic devices that are connected to each other by cable lines. You should know that connecting wires play a role no less important than the electronic components themselves when organizing any video systems. A video intercom cable that is incorrectly selected or of poor quality can cause not only malfunctions in the operation of the device, but also its complete failure. In order to choose the right cable, you need to understand its main characteristics, as well as well-known brands.
Main types of doorbells
Mechanical
Bicycle bells. A metal bell inside or a looping spring mechanism activated by pressing a button or pulling a lever. No connection required. You just need to attach it to the door.
The advantage is ease of installation, but the disadvantage is low volume and sound absorption by the door material.
Such a call is easy to pick up, while an electronic one can give an electric shock.
With wire
The loudest and most powerful of calls. Powered by mains power, has adjustable volume, customizable melody, etc.
Wireless
They are battery operated, so when the battery is low the sound is quiet. If the battery is dead, you may not even hear the arrival of guests.
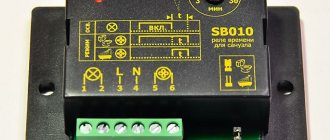
Connection diagrams
Below are visual diagrams that will help you connect a bell of any configuration. Connection difficulties arise due to the voltage transformer - the part that converts the network voltage into operating voltage. It does not require additional wires, but simply serves as a transition point between the apartment network and the call.
If a transformer is included, you cannot install the bell without it. At the first operation, it will burn out and break, and the result of long-term operation will be a quiet bell.
Speaker connection diagram
Complete connection diagram for a bell with a voltage transformer
Operating principle
Once you understand this, it’s easy to understand how to connect a call. It consists of a magnetic system with a contact group. When voltage is applied by pressing the button (the circuit is closed), the armature is attracted to the core. A hammer located at the end of the movable contact, periodically striking the metal cup, initiates the appearance of sound waves.
Consequently, the bell is always connected in such a way that current flows through the winding of its magnetic system when the button contacts are closed.
It turns out, nothing special. Any doorbell connection diagram (and it is not difficult to develop it yourself) is based on this principle. And no matter what kind of signaling device is purchased, or how the wires are laid, nothing changes. If we are talking about wireless modification, it’s even simpler. Here you don’t have to think about how to connect. The main thing is not to confuse their poles (“+” and “–”) when installing batteries.
Preparation
First you need to find “Zero”, “Phase” and grounding, make sure that they have quick access. Next, you need to unpack the call and find the corresponding markings on it.
If the markings are not applied, then it is better to consult with a specialist so as not to waste time. You also need to test the radio field for frequency blocking and interference.
If there is a large amount of electronics emitting waves near the bell unit, there will inevitably be noise and background that will prevent you from working and sleeping.
Installing a bell with a wire
What tools will you need?
- screwdriver;
- scissors/knife;
- insulating tape;
- soldering iron;
- screws;
- screwdriver;
- mounts/bracket.
Installation features
The installation process consists of connecting 2 wires and beautifully designing this connection. The bell works on the principle of a light bulb - as long as current is supplied, there is sound.
Basic rules:
- Having selected a place for installation, first turn off the electricity at the distribution box.
- Having previously found out where the other wires are in the wall, a hole is made for the bell cable away from them.
- Next, you need to make a groove from the hole to lay the wire, after which you can begin to assemble the doorbell.
- Zero is connected to the control unit, and the phase wire is connected to the button with the phase. After this, the phase from the bell is connected to the corresponding terminal of the distribution box.
- If there is grounding in the house, you must also connect the bell to it.
- Next, the operation of the mechanism is checked.
The above describes how to install a new door lock yourself. When replacing an existing one, you may find four wires coming from the wall. It is necessary to determine what each of them is responsible for, which can be made an indicator.
One of the wires will show a voltage of 220V, the others will not ring. This could mean:
- Phase from the network 220 Volts.
- Zero from the 220 Volt network.
- Wire going to the button.
- The wire coming from it.
To connect a new lock, having first turned off the electricity, you need to connect the first wire to the third, and connect the second and fourth to the main unit and check the circuit.
Before installing the bell, turn off the electricity, even if you are wearing gloves and a hard hat.
Speaker Installation
As a rule, the speaker is installed inside (if it is not in the bell itself). It is installed with glue or double-sided construction tape, which holds it firmly. Calculate the distance from the speaker to the button so that it does not catch feedback and does not work again.
Connecting the electrical wire to the button
Having previously stripped the two wires, you need to insert them into the button clamps, wrapping them around the base. Then you need to tighten the clamps with a screwdriver. Next, you can begin installing the button.
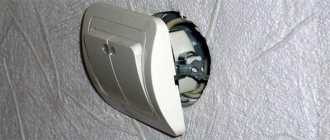
Installing a button
It is better to secure the button with screws, since it is pressed more often and it may fall off. It needs to be placed outside, mounted higher.
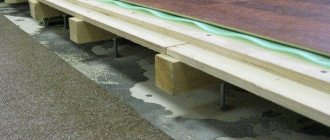
Masking and securing wiring
There is no urgent need to groove the wall to hide the wires, so they can be nailed to the wall using plastic fasteners or glued to tape, which is then painted over.
It is recommended to lay wires in places that are in difficult to reach areas to reduce the chance of damage from external factors.
Connecting the main bell unit
It is better to install it indoors, which will help you quickly repair the power supply and change batteries. If the call operates via radio, you need to measure the distance. You need to take the main block and press the button, gradually approaching and moving away from it.
This is done in order to obtain the distance at which the call “starts” (catches feedback). Some models are too sensitive, so the sound they make penetrates inside and causes repeated vibrations.
Since the speed of sound in air is very high, a person will only hear a humming noise for a few seconds after pressing. To prevent this from happening, the block should be placed far enough away, but not so far away that the signal disappears completely.
Power connection
After installing the doorbell, it needs to be connected to a power source (it doesn’t matter whether it’s the mains or batteries) and tested. If everything is done correctly, a bell will be heard. If it is incorrect, then when connected to the mains, after releasing the bell button, it will continue to work, and when pressed again it will turn off.
Also, if you mix up the connection points, the call will not work correctly or will not work at all. This can be resolved by reinstalling.
Final stage
Test the call several times. Simulate light and strong pressure, many clicks per second, impacts, etc. If the sound is the same and the contacts have not come loose, everything is done correctly.
If the call is connected without a transformer
Then the connection diagram is simplified in several stages. It is necessary to connect the zero and phase to each other, insulating the contacts with electrical tape.
You should not twist it, as if the insulation comes off, there will be a short circuit that will turn off the lights in the entire apartment.
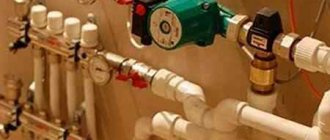
Main conditions for intercom cable
Depending on the location where the video intercom will be located, problems may arise in laying wires inside and outside buildings. Therefore, there are special rules regarding the thickness of the wires.
Classic intercom panel
Copper wire is mainly used, the size of which may vary depending on the type. Cheaper options have steel cores. But then the wire needs additional insulation. Such conductors are used:
- in a coaxial wire, which is used to connect elements of an analog video system;
- in twisted pair (twisted wire), which is used to connect digital equipment.
Note! Basically, intercoms and video cameras are connected indoors to increase security, so it is not advisable to use products with steel conductors. They are less safe and can allow the fire to spread if a fire occurs.
Connection diagram
If the intercom is located inside the apartment/house, then there are no special installation rules for it. At home, wiring is not affected by weather or humidity. For outdoor installation, it is advisable to use wires with insulation made of PVC materials. They do not allow moisture to get inside the wire.
Connecting a wireless device
It is necessary to measure 150-160 cm from the floor level and install a bell button there. Regular construction double-sided tape or adhesive tape will do. For greater strength, you can install the bell on a dowel.
The same actions need to be done with the speaker, installing it near the door. Don't place it too far away so that the person ringing the doorbell knows they were heard. The power supply must be plugged into the nearest outlet so that the signal goes to the button and the speaker. The call is ready for use and does not require further configuration.
Rules for choosing cables for intercom
The first step is to select the device model. You can't skimp on cable. The combined type KVK, produced by Russian factories, has all the parameters and can be used without restrictions.
Types of intercoms
When purchasing coaxial wire, it is recommended to give preference to CommScope. It is advisable to buy RG-6 or RG-59 wire, it has a fairly long service life.
Twisted pair cables are produced by many companies; when purchasing, you need to pay attention to the material from which the cores are made. It is not advisable to buy Chinese analogues from well-known companies. Such wires are cheap, but not safe, and also have thin insulation.
Important! You need to carefully select the wire so that the signal from the intercom is transmitted without interference.
Restrictions when installing wireless devices
We are talking about radio frequencies, the range of operation and signal transmission. If there is a powerful radiation source nearby, the bell will ring on its own, or vice versa - its signal will be completely muted. This situation happens extremely rarely. This is observed much more often: the bell sometimes makes quiet sounds and spontaneously goes off at half power. The rest of the time it produces noise and interferes with sleep.
There are two ways out of the situation:
- install a protective screen in the direction of radiation. This can be either a special material or regular foil.
- choose a suitable place and place the bell where the waves cannot reach it.
Most often, this situation is impossible, since in any multi-storey building there are large numbers of routers and radios, so shielding is the only adequate way.
You can wrap the inside of the bell with foil and hide it with a lid, the main thing is not to install the screen in the direction of the useful signal.