Illuminated mirrors are a functional and modern accessory in the bathroom. It is much more convenient to do high-quality makeup, tidy up your beard or mustache with bright lighting coming from under the mirror cloth. And thanks to the huge variety of shapes and sizes, LED mirrors will harmoniously fit into any interior design style.
It doesn't matter if you purchased a full-length mirror or a wall-mounted model to place above the sink, this article will help you install and connect either option. Follow the steps described below and you will certainly be able to complete the installation yourself. An owner who likes to do things around the house with his own hands is quite capable of this task. It is best to do this work together - this way you will not only get it faster, but it will also be much more convenient.
Types of lighting on mirrors
This article will discuss exactly how to connect mirrors with built-in LED lighting. They can be presented in two options:
Perimeter lighting
Depending on the model, the backlight of such products is an LED strip located around the perimeter or sides of the product. The lighting can be internal - located under the mirror surface, or external - when the light comes from the sides, as if from under a mirror.
Decorative lighting
Decorative lighting consists of shaped compositions on a mirror surface through which lighting penetrates. This option does not emit very powerful light, so it is most often chosen as decoration, as a design element of the interior.
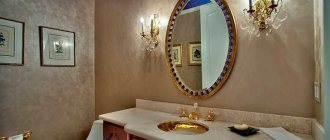
In the photo: illuminated mirrors Anabella and Vesna
How to properly install a mirror surface
Installation of a mirror or mirror cabinet begins with markings. First, determine the place where the interior item will hang. If the purpose is utilitarian, pay attention to the height. It must satisfy the requirements of all family members.
Installation steps:
- the product is applied to the wall, markings are applied around the perimeter;
- holes are drilled at the fastening points;
- insert dowels;
- screw in the screws;
- hang a cabinet (mirror).
Methods for turning the mirror lights on and off
Touch activation
• non-contact sensor may be located at the end of the mirror. The illumination of mirrors from this group can be turned on or off by raising your hand. When choosing this switching method, please note that access to the sensor must remain free. Therefore, position the mirror so as not to block the passage to the sensor with the entrance door or cabinet doors.
a contact touch sensor on the front surface of the mirror It looks like a glowing circle or square and is triggered when you touch it with your finger.
Plug into socket
Bathroom mirrors with a plug into an outlet are perhaps the simplest connection method. In this case, during installation you will not have to deal with electrical wiring, and turning on a backlit mirror will be no more difficult than a hair dryer or any other electrical appliance.
Switch on the wall
This method is considered one of the simplest; with this connection method, the electronic clock on the mirror will also work when the power is turned off.
Remote control
Controlling the backlight using a remote control is convenient in cases where the mirror is placed in a hard-to-reach place and there is no way to reach a button or sensor. Some models also provide the ability to change the brightness of the backlight thanks to a special control - a dimmer.
Choice depending on design
The interiors of the premises are decorated in different styles. Therefore, it is necessary to choose lamps with an appropriate design. The wide range of options on the market makes it easy to choose the right one. Classics are distinguished by natural forms and natural materials used in the manufacture of devices. Lamps should be combined with the color of the bathroom, be discreet and not attract the eye. They lack pretentiousness, flashy colors and unnecessary decorative details.
Minimalism promotes a certain asceticism. Each part of the lighting device fulfills its purpose. Lamps in this design have laconic shapes, glass lampshades and diffused lighting. Often in such options, frosted or, on the contrary, thin transparent glass is used to make lampshades.
High-tech is a modern style, a characteristic feature of which is a pronounced urban theme. It is distinguished by clear lines and angles, matte or shiny surfaces. Lamps in metal casings with shades of various sizes are perfect for this design.
Classic Minimalism
High tech
Please Read Before Installation
There are several rules that you need to consider in order to mount the mirror securely and safely. Here are the most important of them:
1. If you purchased a large illuminated mirror, make sure to purchase high-quality holders. Each dowel must support a weight of at least 20 kg.
2. Before starting work, you must turn off the power to the wiring, otherwise you are putting your life at mortal risk.
3. The power supply must be placed in such a way as to provide it with sufficient cooling and protect it as much as possible from moisture. The best option is to place the power supply outside the bathroom. The power supply housing must be grounded by connecting it to the appropriate network wire.
Common Mistakes
Beginners who independently install illuminated mirror structures often make the same mistakes.
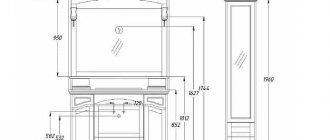
- The mirror is not placed correctly. The height from the floor surface should not be less than 0.3 m, and from the ceiling less than 17 cm.
- The wires are not insulated. All contacts must be protected from moisture, and the material used to make shelves and cabinets must have water-repellent properties.
- Halogen lamps are touched or shaken. Installation of this type of light sources must be carried out in compliance with all technical requirements.
If you have minimal experience in installing mirrors and knowledge of basic electrical installations, you should turn to the services of professionals.
Step-by-step instructions for installing and attaching an illuminated mirror
Unpacking the mirror
Place the mirror on a flat surface. Use a utility knife to cut slits around the perimeter of the shipping tape. Open the package and remove the protective foam from all sides of the mirror. If necessary, remove the protective film from the mirror surface. Check the package. Along with the mirror, the box must contain a product passport/warranty card and installation instructions.
Preparation for installation
At this stage, it is very important to correctly determine the height at which the mirror will be located. The recommended height for mounting the mirror is 30 cm from the floor. In this case, the top point of the mirror should be located 10-20 cm above the height of the tallest family member. However, this figure may vary depending on the height of family members, for your convenience.
Measure the width of the mirror with a tape measure and place notches on the wall between which the product will be located. Please note that there should be at least 2-3 cm between the level of the mirror and the level of the suspension. Take a building level and a pencil and transfer the drilling points to the wall.
Using a level, draw a horizontal line above the top edge of the mirror - with its help you will hang the mirror perfectly level.
Drilling holes
Drill holes according to the markings. Please note that this is a rather dusty job, so it is better to cover all objects in the room with a protective film in advance.
The diameter and depth of the hole will depend on the dowel used. For a plasterboard wall, we recommend using a butterfly dowel, for other cases - an 8*60 dowel for concrete. For ceramic tiles, we recommend starting with a ceramic drill bit and then also using a concrete drill bit.
Designer tip: mirror mounts are best done at the seams between ceramic tiles.
Insert the screw-crutches with the dowel into the resulting holes, screw in the brackets. Mount the mirror on the hooks.
Instructions for attaching the mirror to hanging brackets:
Instructions for installing a mirror on through dowels:
Connecting the backlight
If the mirror is plugged into an outlet: Carefully turn the mirror over so that it is facing down. In the center of the decorative plastic box you will see the power cord: carefully remove it. Check the functionality of the mirror by connecting the power cord to the network.
Do not forget! The socket must be located at a sufficient distance from the mirror, otherwise you will have to use a splitter.
All bathroom mirrors with LED lighting have a waterproof rating of IP44. Thanks to this, they are completely safe for use in rooms with high humidity levels. Make sure that the outlet also has a high degree of moisture protection. One way to do this is with a plastic protective housing.
Watch this video to clearly see the process of installing a backlit mirror that is plugged into an outlet:
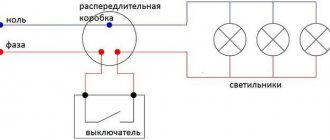
If the mirror is connected to the electrical network: you will find a connection diagram included with the mirror. All that remains to be done is simply follow the instructions. If you do everything carefully and strictly according to the manufacturer’s recommendations, the result will definitely please you.
On the back of the product you will see a control unit. Your task is to connect the lead cable from the wall to the mirror using terminals. The connection diagram shows the insulation markings. It will help you not to confuse anything when connecting wires. Thanks to Wago's special terminals, you won't need to use electrical tape or twist ties to insulate connections.
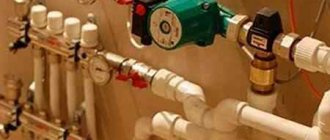
It is necessary to make the connection through a transformer so that the LED strip can withstand voltage surges and serve you longer.
From this video you will learn how to connect power to the LED backlight via the mains:
And watch this video instruction if in your case it was not foreseen in advance where the power supply wire would be connected:
Idea: in the bathroom you can combine the wiring of the mirror with the wiring of the ceiling lamp. Then the mirror will turn on and off simultaneously with the ceiling light.
Mirror installation
There is very little left: carefully lift the mirror - it is better to do this together with a partner - and hang it on the prepared hooks. Adjust the top line of the mirror to the horizontal markings you made with the level. Pull the connection wire through the hole in advance so that you can then connect it to the power cable without removing the mirror.
In this video we also invite you to see how, if necessary, you can replace the touch button and power supply on the mirror:
Additional functions
If your mirror has a clock and temperature sensor, now is the time to set it up. You will find detailed instructions on how to do this in the box with the received product.
Congratulations! The mirror is installed and ready to go!
Other electrical appliances
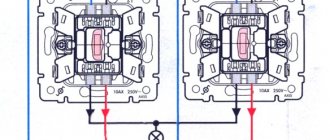
How to connect two light bulbs to one switch: diagram, video, instructions
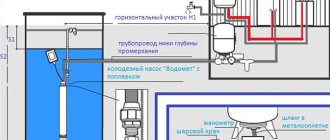
The washing machine is a frequent resident of the bathroom. To connect it, you need a separate outlet on a separate branch coming from the main distribution panel.
The same separate outlet on a separate branch with automatic protection is also needed for an electric water heater or boiler: this is a powerful electrical appliance that should not be connected to common lines with other devices.
An exhaust fan is a useful thing that gets rid of unpleasant odors and excess moisture; it also requires power. It is plugged into a separate socket, which is installed specifically for it under the ceiling, or connected to the electrical network of the bathroom through a common light switch or its own.
Another powerful consumer of electricity in the bathroom is a heated floor. It, like other devices that consume a lot of electricity, is connected to a separate branch that comes from the main panel. Its dimmer switch, with the ability to adjust the heat level, is located outside the bathroom.
As you can see, the electrical content of a modern bathroom can be very, very rich.
When designing it, it is important to follow three main rules:
- Be sure to ground all outlets, lamps, electrical appliances and metal equipment.
- Install devices with a high moisture protection class, not lower than IP 44.
- Use waterproof cables and wires for wiring.
If everything is done correctly, staying in the bathroom will not only be comfortable and enjoyable, but also absolutely safe.
Professional installation of illuminated mirrors
If the process described in this article seemed easy to you, try installing a backlit mirror yourself. If you have any questions, write to us or leave your message in the feedback form. We will definitely advise you! But if you are still not confident in your abilities, it is better to entrust the connection of the illuminated mirror to a professional. You can order the installation service by checking the appropriate box when ordering the product.
In the Rosestar catalog you will find both inexpensive basic mirrors with linear lighting and premium models of unusual shapes, sizes and designs. Our workshop produces all possible options for illuminated mirrors: rectangular, round, oval and irregular shapes; with frames and without frames; for the bathroom, nursery or dressing room and many, many others.
Write to us right now! The sooner you place your order, the faster your custom mirror will be delivered to you. You will fall in love with stylish mirrors from Rosestar from the first second, and time will only confirm their reliability and impeccable quality!
Types of lamps
The home designer should know that mirrors are classified according to the type of emitters installed inside. The most famous and favorite type among buyers is luminescent. The light is as close as possible to daylight, which means it is most comfortable for human eyes. In addition, gas-discharge (another name for them) lamps last from one to three years: the first replacement will occur after 20 thousand hours of illumination.
But not everything is so perfect - this modification has its drawbacks:
- long combustion period;
- the need for a second throttle;
- frequent flickering of the lamp;
- content of mercury vapor, hazardous to the health of residents.
It is because of mercury that the use of gas discharge lamps in an apartment or home requires caution.
If they accidentally break, the spilled substance will poison all residents. Therefore, when fixing the accessory on the bathroom wall, you need to make sure that each part is attached securely and the mirror will not fall. An alternative to fluorescent lighting is with halogen light sources. They have advantages:
- impressive service life;
- brighter light.
But despite their advantages, halogen lamps are rarely purchased for the bathroom. They are very fragile and break easily even from the slightest shaking.
Tools
To create the backlight you need to prepare:
- mirror;
- brackets for hanging;
- glue for fixing the box to the glass (or tape to the glass, if necessary);
- LED strip with power supply and connecting elements.
In addition, you will need:
- ruler, square and marker for marking;
- electric drill with special drills for making holes in tiles;
- a hammer drill with a drill, the diameter of which corresponds to the size of the holes in the tile;
- dowels and screws;
- soldering iron with solder for connecting contacts;
- screwdriver, pliers, etc.
The listed tools represent a minimum set; additional devices may be needed during work.
LED emitters
LED emitters have become a popular solution among interior designers.
They are located behind the mirror, under or above it, and often form a frame around the perimeter of the bathroom accessory. The only parameter in which they are inferior to halogen lamps is cost. The price per piece is no longer so affordable. Otherwise, it is more profitable to purchase diodes:
- serves for a long time without replacement;
- consumes little electricity;
- turns on quickly and does not flicker;
- shines powerfully;
- does not require other technical construction parts.
Main conclusions
Do-it-yourself illumination of a bathroom mirror using an LED strip allows you to decorate the room and complement its interior with a stylish and effective element. Installation and installation of lighting is not fundamentally difficult; all that is required is care and thoroughness in performing all operations.
The result will not only decorate the room, but will also make using the mirror more convenient, improve visibility, and improve the quality of all hygiene procedures. If you have your own options for making the backlight, you can outline them in your comments. Both experienced and novice craftsmen need new ideas.
Previous
LEDsTechnical characteristics and features of choosing two-pin LED lamps for cars
Next
LEDsHow to measure and improve LED efficiency
Network connection
Under normal conditions, you connect the tape yourself to the network via a power supply - the device is plugged into the network, and the tape is connected to the 12 V output. In this case, there may be different connection options. For example, if you need to automatically turn on the mirror lighting when you turn on the general lighting in the bathroom, the power supply is simply connected to the switch.
However, some users find it necessary to start the mirror illumination themselves and not use it constantly. To do this, you need to install a button (microswitch) on the frame (box), which will turn the lamp on and off at the request of the owner.