Renovating an apartment is not complete without renovating the ceilings. And here the question arises: do the usual decor with whitewashing or painting, or create something unique on the ceiling? A practical plasterboard box on the ceiling is a positive solution from all sides. It is impressive, can be done with your own hands, and besides, you can make any form of design, realizing all your fantasies. And additional lighting on the box will visually expand the room and give it warmth and comfort.
Connection recommendations
Before connecting the spots, hidden electrical wiring is laid to power the ceiling lights. The ends of the wires are usually brought to the central part of each room. The wire can be three or four wires, and will depend on the connection method - to a switch with one or two keys.
Before installing spotlights with separated lamps in different groups, you need to connect two wires to the switch, connect one to the neutral, and the last to ground.
It should be understood that the neutral (N) is the common wire for all lamps, to which all zero contacts of the sockets are connected.
Phase wires from all groups of sockets are connected to the internal wiring of the luminaire by two separate wires running from the terminal block to a specific switch key, and later to phase (L).
In this case, all phase ends of the wires from the sockets are connected into a common wire and connected to the dimmer.
Keep in mind that when choosing a dimmer, you need to take into account the total power of the lamp bulbs - the power of the device must be with a small margin.
Instructions
Installing a lamp and connecting it is not the most difficult task if done correctly. It is quite possible to connect a ceiling lamp with your own hands. A special place is occupied by the selection and installation of the switch.
Important! The connection order should not be confused. Otherwise there will always be voltage on the lamp
Single switch
A standard switch is one of the easiest to connect. To do this, you need to connect the house wiring and the lamp contacts in pairs. In this case, the neutral wire is connected to the neutral of the junction box. Phase - first to the switch, and then to the phase wire of the lighting device.
Double switch
This method is suitable for installing multi-lamp chandeliers and lamps. This is done to regulate the required level of illumination. An important condition is the number of lamp wires
You should pay attention to this when purchasing
To begin the connection, divide the device wires into two sections. The first will go to the neutral wire, and the second to the phase wires. The result will be a three-mode level of illumination.
Connecting ceiling lights yourself is very common. There are 3 popular installation options for this.
Serial connection
The easiest way to install a lamp. It has many shortcomings. For example, if one of the light bulbs burns out, the others also fail. They will work at partial capacity.
Diagram of serial connection of lamp lamps
The phase wires must be connected one by one to each lamp, and at the output - to the neutral wire. In the case of three-wire wiring, the third wire (“ground”) is connected to the terminal of each light bulb. This wire is protective and is located in a socket or switch.
Parallel connection
Despite the large number of conductors and the complexity of installation, this method is the most popular. When connected in parallel, all light bulbs operate at full power. You can implement it in the following way:
The junction box wire is fed to the light bulb, to the output of which another wire is connected, going to the next light bulb. In this way, all lamps are closed.
Beam connection
This method is the most reliable, but expensive, because Wago terminal blocks are not cheap. In this case, you will need a lot of cable. Each of its conductors is equipped with a connector for wires and is connected. This option is good because if one of the light bulbs fails, all the others will continue to work. It involves not just twisting the wires, but also subsequent welding.
How to connect a light fixture depends entirely on the light fixture itself, the switch, and the home wiring.
Connecting a recessed luminaire
A slightly different installation option is for a ceiling lamp, which is called recessed. This type of light source is installed only on a suspended ceiling, in which holes are specially made. These holes are opened during installation of the suspended ceiling. And at the same time, lines are drawn to the holes.
From the very beginning, the technician should have a screwdriver, terminals for connecting wires and a knife for stripping the insulation on hand.
The main feature when connecting recessed lamps, according to experts, is that there must be such an element as a switch. For ease of use, it is better to mount the switch on the wall. The general sequence of connecting a recessed lamp is as follows: first, the cable from the electrical network should be connected to the switch, and from the switch connect it to the lamp itself.
As in the case of installing spot or LED lighting options, in the case of a built-in version of the lighting fixture, all electrical wires should also be connected at the installation stage of this ceiling lamp.
A prerequisite for installing and connecting the device, as in any case when working with electrical appliances, is to turn off the current in the home network.
Difference between parallel and series connection of lamps
If any light bulbs are connected in parallel to each other and, accordingly, in series with the switch, then the voltage on each of them will be equal and in this way light sources of different powers can be connected. The main condition is that the operating voltage at which they operate normally must be equal to the voltage of the power source. If in this case a step-down device with a rectification system is used, then the opening contact must disconnect the circuit in front of the converter, as shown in the figure.
In this case, it does not matter whether two or three light sources will be turned on. Most often these are halogen and LED lamps, designed for a reduced voltage of 12 or 24 Volts.
With a serial connection the situation changes dramatically. The supply voltage will be divided by the number of light bulbs, that is, if the network is 220 Volts, then on two artificial light sources connected in a series circuit, the voltage will be approximately 110 Volts. This must be taken into account when choosing and purchasing them. Another nuance with this connection is related to the power of each of them. It should be the same or as close as possible to each other, because With such a connection, the current is the same in all parts of the circuit. If one lamp is 500 W and the other is 50 W, then the lamp with the lower power, connected by one wire to each other, will still flow more current, corresponding to the most powerful load. A light bulb with less power will burn out instantly. This rule applies to all types of lamp sources, from incandescent to LED.
If you need to connect an LED light source from the network or from sockets, it often consists of a so-called driver installed inside the light bulb housing. It performs several functions at once: rectifying and reducing. These lighting devices are not intended for serial connection, only for parallel connection.
For fluorescent daylight sources, both with an electronic starting device and a starter, a series connection is most often found in raster lamps, as it allows one choke and two starters to ensure stable operation. In this case, the starter itself is selected for 127 V with the calculation of the operating voltage of a standard 220 Volt network. The switch in this circuit uses a regular single-key switch and also breaks the phase wire with its contact.
As for the parallel connection of several fluorescent lamps or compact lamps, the operation of which is based on the glow of a phosphor applied to a glass tube, then in this situation it is possible to connect any number to one switch, either single-key or two-key. The main thing is to take into account the power of all light sources, on which the current in their circuit directly depends. For any switch it is limited and indicated in the technical data sheet, on the packaging or case. If, for example, a current of 5 A is specified, then you should not exceed its value, since this will very quickly render the breaking contact itself unusable.
To fully understand the serial and parallel connection of light bulbs, we recommend watching the video:
How to connect spotlights
In order to connect spotlights, many use a special plinth, which has recently been especially often installed with suspended ceilings. You can also do a simple installation. Installing lamps is not a difficult task; it can be easily done independently, without the help of a specialist. To begin with, before installing the suspended covering, it is necessary to prepare the base ceiling surface, that is, by marking the places for installing devices, strengthen the consoles.
When the material for the ceiling covering has already been finally installed, holes for the lamp are made in its surface. Most often, plasterboard sheets are used for suspended ceilings, which can be very easy to cut. The dimensions for lamps are usually very easy to determine: usually the diameter is indicated on the packaging of the spotlight. Most often, the average dimensions of such a lamp are from sixty to seventy millimeters.
After this, cables should be laid into each of the holes on the surface of the suspended ceilings, which are then connected to the terminals of each device. To install, the springs of the spotlight are brought together, inserted into the hole prepared in advance, and then released. As soon as they take their immediate position, the lamp itself is pressed tightly against the surface of the suspended ceiling.
How to connect
When a suspended ceiling is installed, holes for lamps are cut out on it. Before cutting them out, you need to take into account the location of the device at a specific depth, taking into account the seams.
Holes for lighting fixtures on the ceiling are drilled using special wood bits or a drill with a cutter. In addition, these tools are used to install the socket box into the wall. When the fixture is square in shape, it is possible to use an electric jigsaw. The diameter of the hole is made 0.3-0.4 cm smaller than the outer diameter of the front part of the lamp. On suspended ceilings, experts install thermal rings under the lamps so that the coating does not deteriorate due to overheating. To create a hole for spotlights, you need:
- use only tools intended for these purposes;
- Before starting work, mark the holes and diameter;
- do not fix the plasterboard slabs until each hole has been drilled;
- In order not to drill a hole near the frame element (the device sometimes does not fit into the depth of the ceiling), it is recommended to use a magnet to locate it.
It is necessary to bring the wire out through the drilled hole and connect it to the terminal block when there are no clamps on the base. For all lamps, 2 wires of 11 cm in length are used. To connect, they are exposed (1-1.5 cm). One end is connected to the terminal and the other to the cable.
After connection, lamps are inserted into the holes made in the ceiling, clamping the spring antennae present in all structures. They diverge in the hole, the light element is fixed. All that remains is to screw in the light bulb and put on the cover. Self-installation of lamps will be completed.
Installation of the lamp
Tips for installing spotlights
If the ceiling is made of plastic panels, then:
The use of lamps with a power of more than 50 W should be avoided. Such lamps can melt the ceiling. You should not make holes for spotlights at the junction of panels. The panels may come apart and create an unsightly crack. The holes should be located closer to the center of the panels. The assembly of the frame for plastic panels should be carried out taking into account the installation of lamps
It is important that there is no profile in place of the lamps.
If the ceiling was assembled, but the location of the lamps was not taken into account, then there is a possibility that when drilling a hole for the lamp, you will get into a metal profile. You can avoid this with a simple magnet.
Where the profile passes, the magnet will be attracted.
Planning
It is very important to decide in advance, even before covering the ceiling, how to place the lamps on the ceiling. This is especially true in cases where the suspended ceiling is formed with several levels. Each level should be separated into a separate lighting circuit, and light sources should be distributed accordingly, based on the independent use of these circuits. Do not forget that the distance between the lamps should be maintained within a meter from each other, the distance from the walls should be 60 cm. It is important to distribute the lamps so that their installation location does not fall on the installed frame elements. That is, the holes for them should be spaced at a distance of 25-30 mm from the edge of the hole for the lamp to the nearest frame element. Otherwise, the profile of the frame may prevent the lamp from being secured using its latch.
When distributing spotlights, it is also necessary to take into account the presence and location of chandeliers, sconces and other decorative elements on the ceiling and walls. When used simultaneously, spotlights can be moved to the sides. Or divide the lighting circuits with spotlights for areas near other light sources and the rest of the room into separate switches.
What to consider when preparing for installation
As a rule, point light sources are mounted in a suspended ceiling - this is the most convenient and does not cause difficulties even for beginners. In this case, the material of the suspended structure does not play a special role: the technology is almost the same for both plasterboard and plastic panels. The exception is suspended ceilings - a slightly different fastening system is used here.
Due to the fact that the installation scheme of ceiling lamps involves installing them flush with the ceiling covering, the illumination angle of such a light source is only 30 degrees. Therefore, they need to be placed quite tightly on the ceiling structure: the distance between them should not be more than 100 cm. At the same time, you should not retreat more than 60 cm from the wall to install the first lamp: in this case, the corner may not be sufficiently illuminated.
It is also worth paying attention to the wire that will be used to connect lighting points to the 220V network:
- Since most materials used for suspended ceilings are flammable, the wire must have a reliable braid (preferably double);
- The insulation must also be heat-resistant - this is based on the operating conditions of the electrical wiring above the suspended structure;
- Connecting the wires with your own hands must be done as reliably as possible: it must ensure good contact.
Device design and varieties
The need to connect spotlights appears both when arranging the main lighting and auxiliary lighting in a building. Due to their universal purpose, compactness and energy efficiency, such devices have gained popularity.
All point systems consist of the following parts:
- Housings with parts for fixing the cartridge.
- A reflective surface that regulates the luminous flux.
- Front panel fixed in the room.
- Light source.
Metal, plastic or wood are used to assemble the outer panel that is visible in the room. By default, decorative elements are round, but square, triangular and other configurations are available. The main purpose of this part is to decorate the equipment.
Spot devices are divided into 2 groups:
- Invoices.
- Built-in.
To secure the first models in a suspended ceiling, it is worth preparing special clips.
This simplifies the installation of the system with your own hands on a plane. Their decorative part is not located on the same level with the base, but slightly protrudes from it. Such lamps are quite large, so they are not installed in small rooms. Integrated devices are installed in specially made holes, where they are recessed without protrusions above the ceiling, walls or furniture set.
Regardless of design and structure, devices differ in the lighting sources used. They are:
- Halogen.
- Luminescent.
- LED.
The first type is considered environmentally friendly and durable, especially when compared with options that use a filament.
The lighting of the space becomes bright and resembles natural sunlight. However, halogen lamps consume a lot of electricity and malfunction during power surges. Luminescent equipment is characterized by low energy consumption, like LED analogues. The latter are more expensive, but they are more durable. Compared to incandescent lamps, fluorescent devices consume less electrical energy (savings reach 80%). However, they require careful use because there is mercury under the bulb.
LED lamps have special diffuser lenses made of plastic or glass. Behind them are LED elements that generate a white stream. Depending on the color temperature, the light beam can be either cold or warm yellow. The high price of LED lamps is due to their service life.
Connecting a halogen chandelier (with and without remote control)
Halogen lamps operate not from 220 V, but from 12 V or 24 V. Therefore, step-down transformers are installed in each of them and the entire circuit is assembled and ready for installation. Only two conductors remain free, which need to be connected to the wires sticking out on the ceiling. It is connected in any order, “phase” and “zero” do not matter.
If the chandelier is equipped with a remote control, a control unit is added to the transformers. The connection is similar: there are two conductors that need to be connected to the one on the ceiling. The third conductor coming from the other side (it is thin) is an antenna, with the help of which the remote control and the control unit “communicate”. This conductor remains inside the glass in the form in which it is.
How to connect a chandelier with a remote control, see the following video.
How to connect 12-volt halogen lamps?
A halogen lamp is almost similar in design to an incandescent lamp, which means that the power source is not particularly important for it. They can be connected to network transformers, but more often so-called electronic transformers are used.
An electronic transformer (ET) is a pulsed power supply, which is usually based on a self-oscillator circuit. Its main feature is that the output is an alternating high-frequency pulsating voltage, the approximate shape of which you can see in the following oscillogram.
Widespread use is due to a number of advantages over network 50 Hz transformers, such as:
— with the same power, the dimensions of the electric vehicle are several times smaller and lighter;
— there is no low-frequency hum, like its 50 Hz counterparts;
- low cost.
You can see a typical electronic transformer below. The inscription INPUT is highlighted in red and the arrow shows the black wires that come out of the case opposite it - they are connected to a 220V network, and the green OUTPUT and two white wires are the low voltage output, 12V light bulbs or lamps are connected to these wires
Pay attention to the words “AC OUTPUT 12V 60W MAX” - this means that the output is alternating current
When connecting halogen lamps, we see that they operate normally.
If you simply replace them with LED bulbs, they will also seem to glow, but it’s not that simple.
You can observe a barely noticeable flicker; on some light bulbs it is more pronounced, and on others it is weaker, which is primarily due to the pulsating output voltage and the circuit design of the lamp itself. The camera does not transmit these flickers, and there was no heart rate monitor at hand, but there is an easy way to roughly evaluate the pulsations of the light flux - a mobile phone camera. If there are pronounced horizontal stripes in the frame, then there is something wrong with the lighting, and the closer you bring the camera, the more noticeable these stripes are.
You may have noticed that different light bulbs were used, this is not just the case. Let's figure out how they work
Conventionally, 12V LED lamps can be divided into 2 groups:
- “cheap and simple”, in which a diode bridge, resistors and LEDs are installed. The diode bridge allows operation from alternating voltage, and when connected to a direct voltage source, the polarity does not matter. Resistors are needed to limit the current. You see such a lamp in the picture on the right. In the close-up, two resistors and a diode bridge are visible through the silicone shell; they are located on both sides of the printed circuit board. The shell is elastic, but quite hard, vaguely reminiscent of bouncing balls.
- “expensive and complex”, in which the current is not limited by resistors, but is stabilized using a pulse converter. This particular instance does not use a set of discrete SMD LEDs, but a separate crystal filled with a yellow phosphor.
Preparation for installation and connection of the lamp
The main part of the work on installing and connecting the lamp will need to be done before the wallpaper is hung and decorative plaster is laid. First of all, you will need to perform several preparatory steps:
- Select the correct location for installing the lamp. The installation point is chosen in proportion to the weight of the lighting device, its dimensions and planned functions;
- Plan and cut a channel in the wall for laying electrical wiring from the junction box to the installation site of the switch and lamp.
The easiest way is to drill a channel from the box to the connection point for the sconce in a brick or plaster-block wall using a hammer drill. In extreme cases, the mounting groove for laying and connecting electrical wiring can be knocked out in a couple of hours with a chisel and hammer.
The situation is a little more complicated with concrete slabs. In this case, the channel to the installation site of the lamp will need to be cut with a grinder, or the harness will need to be hidden under the baseboard, and the vertical sections of wires to the connection point will need to be covered with decorative covers.
Advice! When laying wiring to the connection point of the lamp, use traditional marking methods with laying and turning the harness at right angles and strictly along the horizon line.
If the walls and ceiling are supposed to be lined with plasterboard slabs, the wiring from the box to the connection point for the lighting fixtures will need to be laid in advance. Typically, the harnesses are wrapped in a corrugated hose and tied to the supporting profile in the space behind the slabs. At the location where the sconce body or lampshade is installed, a hole is cut in the plasterboard board through which the harness is routed out for connection to the internal wiring of the device.
This is interesting: Remote gate control system - we explain in detail
A little about spot lighting
By their design, spotlights, which are mounted flush with the suspended ceiling, have only a 30-degree lighting sector. But due to their compactness, they can be mounted quite tightly across the entire ceiling. To ensure proper illumination, the distance between the rows should not exceed 1 meter, the distance from the lamp of the outer row to the wall should not be more than 60 cm. The figures are given for rooms with a ceiling height of 2.5 meters. The requirement is taken into account that the intersection of the cones of illumination from each spot be located at a height exceeding the bulk of the objects in the room.
Spot lighting can be mounted on any type of suspended ceiling. Installing spotlights in plasterboard is the simplest and most reliable option, but the installation process is no different in the case of ceiling cladding with plastic, aluminum strips or MDF, with several caveats.
Only installation of lamps in suspended ceilings should be carried out by craftsmen and installers. This is due to the technological features of the material and the fact that it is necessary, using special equipment, to secure dense inserts made of heat-resistant plastic in the places where the lamps are installed. These inserts also prevent the material from stretching. In all other cases, installation can be done independently.
Installation stages
Installing spots includes five main stages - from choosing a location to connecting to the network and securing it in the socket.
Make a small project. A sketch indicating the locations of the spots is sufficient. It is difficult to create it for multi-level structures if uniform lighting or zoning of the room is required.
Each level will be a separate circuit. Lamps should be placed at a distance of 1 m from each other. The gap between the wall and the nearest spot should be 60 cm. When placing spots, make sure that they do not touch the frame. The distance between the hole for the spotlight and the frame should be 30 mm (or higher). Otherwise, the ceiling structure may complicate the installation of spots.
Wire routing
It is advisable to carry out wiring installation before installing tension structures. First, place the frame to which the sheets will be attached, then run the wiring, having previously decided where the spots will be located.
If the ceiling is mounted, the task will become more complicated. Use a tape measure to take measurements and find the spots where the spots will be located. Cut pieces of wires the length of which matches the distance between the spots. The length of the segments should be 40 cm longer than the received data.
It is necessary to make two identical segments - one is supplied with phase, and the other is “zero”. In this case, soft conductors are used: special tools are required for pulling. You can make a rigid rod from solid wire. There should be a hook at one of its ends that will allow you to grab the desired cable.
If that doesn't work, make an identical hook at the other end of the rod. Pull it from one hole to another along with the cable pieces. To do this, make a loop on the wire, hook it on the hook and pull it through. The procedure is repeated for all spots.
To organize uniform lighting, buy identical lamps: not only in design, but also in power.
Hole preparation
To make holes in the ceiling, you can use an electric drill or screwdriver. You will need a special wood crown (depending on what material the ceiling is made of). The crown must correspond to the seat for a specific spot.
Place it in an electrical appliance and cut a hole. If there is no crown, the task will become more difficult. You can take a drill and a utility knife. Use a pencil to draw a circle of the required diameter, the size should be slightly smaller than the outer part of the lamp. After drilling a small hole, remove any burrs using a utility knife.
Having completed the wiring according to the method described above, all that remains is to connect the spots to the network. The electrical network must be de-energized. If the lamps come with wires by default, the task will be simplified as much as possible. If there are no wires, loosen the terminals on the device, twist the ends with your fingers and pinch tightly with pliers. This will significantly increase the contact area.
Consolidation
Most of the spots available on the market are attached using two brackets located on the sides. They must be bent upward until it stops, and then placed in the hole in the ceiling. Make sure that the power wires do not come into contact with these hooks.
When you insert the lamp, the hooks will unfold and press the device to the ceiling or wall. The fixation is very reliable. At the end, all that remains is to connect the main wire to the switch and the junction box, then turn on the power and make sure the spots are working.
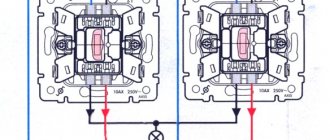
Two-gang switch
The principle of operation is the same as in the case of the single-key model. When can it be connected:
- on lighting fixtures with multiple arms to control lighting modes;
- installation next to separate entrances to the bathroom and toilet;
- when you need to save space on the wall.
The neutral and phase wires are supplied to the installation box. If they are not color coded accordingly, you can determine their purpose by using an indicator screwdriver. To complete this procedure, it is enough to touch each of the cores with the tool. Touching zero will not cause a reaction from the indicator on the screwdriver. The appearance of a glow indicates contact with the phase. Mark the phase by carefully placing a piece of insulating tape on top.
Separate lighting
The switch is installed in the place where the phase is broken. Each device has three contacts for two keys: 1 input, and two more are assigned to the output. The phase needs to be connected to the switch, from there it is output to the light bulbs, passing through the desired key.
Since each light is connected to a specific key, the lighting is called "split". The conductor with “zero” will be common. From the mounting box it goes to each light bulb individually.
Connecting a chandelier with multiple arms
To organize this type of connection, you will need a conductor with 3 cores. One of them needs to be made short enough so that it fits into the mounting box. The other two need to be connected to the switch. These 3 wire strands located in the socket box should be stripped using a knife. Use a knife to scrape off the insulation on each side of the core by 1 centimeter. Further:
- Connect one of the wires to the input pin on the switch. The other end must be connected to the phase coming from the power supply.
- Connect the remaining two wires to the output contacts on the switch. Their other ends should go to the phases on the lamps.
- After this, the working frame of the switch can be installed in the socket box. Tighten the screws and install the protective part: frame and buttons.
- Look inside the mounting box again. Connect the neutral coming from the light bulbs to the neutral on the power supply.
- In the sockets on lighting devices you can find 2 contacts. Zero goes to the side. The central one is needed to connect the sockets on the chandelier to the phase.
- Make sure the contacts are reliable and the assembled circuit is correct. To do this, release voltage through the apartment by activating the machine. The switches must be set to the “disabled” position before doing this.
- Turn the switches on. Check whether the light bulbs respond to the control key.
- Turn off the power to the circuit breaker.
- Take some insulation tape. Wrap the twisted wires in the wiring box in insulation. For greater reliability, special thin PVC tubes can be installed on top.
There are also variants of similar devices with three keys. They are usually connected in shopping centers. The connection diagram looks a little more complicated, but the process follows the same principles.
Connection diagram to a switch with socket
You can connect the switch to an already installed outlet. To do this, you will need 3 wires - zero and 2 phases.
If the light source is located next to the outlet, then “zero” can be output directly from it:
- Determine the purpose of the cables.
- Disconnect the network.
- Take the vein. Connect one end of it to the phase on the socket. Attach the other one to the input of the switch.
- Connect the other wire as follows. Bring one end to zero. The other is to the output on the lighting device.
- Lay out the wires, insulate them and apply voltage.
If the lighting device is located far enough, then it is more advisable to draw a “zero” from the distribution box. This will allow you to better manage the length of the wire and will ultimately look better. In this case, only the phase will be taken from the outlet:
- Turn off the voltage.
- Open the outlet and make sure there is no current in the system.
- Attach a wire to the outlet phase of the socket. Let it be connected to the input on the switch. In this case, lead the wire from the output directly to the light bulb.
- Find the "zero" in the wiring box. In its place you can find a whole tire.
- Connect one end of the wire to it, and the other to the side contacts of the lighting devices.
- If there is a ground on the lamps, connect it in the same way to the corresponding contacts in the junction box.
- At the end of the process, check the quality and success of your work.
Features of installation and connection of built-in lamps
The fashion for using built-in lamp models came simultaneously with the advent and spread of technology for finishing walls and ceilings with plasterboard, plastic and MF boards. A small space between the wall and the decorative slab allows you to hide the lamp body and wiring, leaving only the reflector and light source on the surface.
The connection diagram for built-in lighting devices differs from conventional wall sconces or lampshades only in the presence of an additional power supply, which simultaneously plays the role of a protective device. The main difference is in the method of attaching the housings to the decorative plate.
Suspended structure components
The main elements of suspended ceilings are:
- stingers - strips necessary for fastening cladding panels;
- suspensions - spring type with spokes (needed to attach the suspended structure and prevent deflection);
- intermediate and guide profiles - ceiling frame;
- cladding materials (decoration).
Wire selection
From all the variety of cable products, professionals recommend choosing copper wire marked RKGM. This wire, produced in accordance with TU16.K80-09-90, fully complies with the requirements for cables for suspended structures:
- The RKGM wire has class 4 flexibility, which makes it easy to insert it into any holes without the risk of damaging the cores or insulation;
- The insulation is made of silicone rubber, which does not lose elasticity and its protective properties when heated to 200 °C;
- The outer braid is made by weaving fiberglass threads and additionally coated with glyphthalic varnish.
It is worth noting that this wire is only available in a single-core version, which is perfect for laying it yourself over a ceiling structure and connecting lamps to 220V.
Common Mistakes
When arranging illumination from point devices, the following errors are encountered:
- Saving on diameter and compatible type of wires. This approach can cause overheating of the cables with subsequent ignition.
- Creation of twists instead of solders and terminal connections.
- Output to the switch "neutral" wire. With this connection, the lamps begin to “beat with current”, even if they are turned off.
- Choice of narrow corrugation or metal hose. According to safety requirements, the tourniquet can occupy up to 40% of the area.
- Crossing cable routes. If this phenomenon cannot be avoided, the joint should be insulated.
- Stretching the ceiling without first “ringing” the wires.
Replacing wiring under an installed tension structure is quite difficult.
If you doubt that you can solve the problem yourself, it is better to entrust it to specialists. If it is impossible to hire a professional, it is better to move the lighting outside the PVC film - for example, fix the spotlights in a plasterboard box. This will simplify access to the problem area in case of repair.
Rules for connecting wires
There are no small details when working with electricity. Therefore, we connect the wires in the chandelier according to all the rules. When combined into one group, it is not enough to simply twist them and screw on the protective cap.
You need to connect the wires from the chandelier and the switch in the terminal box
Such twist will sooner or later oxidize and begin to heat up. It is highly advisable to solder such connections. If you know how to handle a soldering iron and tin, definitely do this. This will guarantee normal contact and the connection will not heat up.
Now let's talk about how to connect the wires from the chandelier with the wires from the switch (which are on the ceiling). According to the latest rules, twists are not allowed. Terminal boxes must be used. Most modern chandeliers are equipped with them. If not, buy it at any hardware store or retailer of lighting fixtures.
When using such a terminal box, a problem arises: a twist of a large number of wires simply does not fit into the hole. Output: solder a conductor to the connection (copper, single-core or stranded, with a cross-section of at least 0.5 mm2). This connection is well insulated, and the free end of the soldered conductor is inserted into the terminal box (a long one is not needed - 10 cm is more than enough).
Having inserted all the wires from the chandelier into the terminal block and tightened the screws, the entire structure is raised to the ceiling. There it is pre-fixed, after which the wires are connected to the terminal block in the required order
In this case, it is important to set “zeros” one opposite the other. Phases are connected to phases in random order
The correct connection of wires in the junction box is described here.
How the wires on the chandelier are separated, how the conductor and the chandelier are connected to the terminal block - all this is in the video.
We install the box on a plasterboard ceiling with lighting
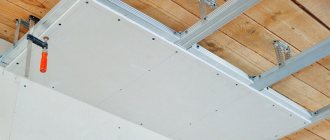
A box with lighting helps not only to diversify the design of the room, but to hide communications and electrical wiring. Installing such a structure is a simple process. In order to make the box yourself you will need pliers, a CD-60 profile and a grinder.
Installing a box on a plaster ceiling:
- Screw the UD profile to the wall.
- Fix the brackets to the ceiling.
- Attach the edge of the plasterboard sheet to the CD-60 profile, which will lie directly against the pipes.
- Cut the ends of the hangers and bend them.
- Attach the CD-60 profile to the hangers.
- Lay down sheets of drywall.
- Make a niche and decorate it with LED strip.
Installation technology
Now let's take a closer look at how to install and connect spotlights.
Marking
Before making holes for the lamps, you need to mark their location: it is important that their location is symmetrical and uniform. To do this, you can use a simple method: stick two small pieces of electrical tape (in a cross) to the ceiling at the intended installation location.
Thus, you can get a clear picture of how the lamps will be located after installation.
It is worth noting that it is not recommended to install lamps at the junction of panels. When cutting a hole with your own hands, there is a high probability of damaging both panels. In this case, it is more advisable to move the lampshade a little to the side.
Making holes
To make neat holes for the lamp in plasterboard, plywood or MDF, you can use a crown, which is used to drill holes in the wall for socket boxes. Holes in plastic panels can be carefully cut with a sharp knife or a special file.
When cutting or drilling a hole in the coating, it is important to consider one nuance. The hole should be slightly larger than the inside of the lamp
In this case, the front part – the “skirt” – should not fall through the ceiling covering.
Wire installation
As a rule, there are several holes for ceiling lights. The question arises: how to connect them all with your own hands? The scheme is quite simple, let's look at the step-by-step instructions:
- The central paired supply wire from the 220V distribution box is brought out into the first hole;
- Next, another pair of leads from the previous hole is inserted into each hole. To make it convenient to pull the wire with your own hands, you can use a broach from a piece of aluminum wire;
- The result should be the following diagram: two pairs of wires come out of each hole (except the last one). One pair should come out of the last hole to connect the lamp.
Connecting lamps
Now all that remains is to correctly connect the lamps to 220V with your own hands. For this, the following scheme is used:
- Two small (about 15 cm) pieces of wire are connected to each lamp. To do this, they are clamped into the screw terminals provided on the housing;
- After this, the resulting structure is connected to the extended wires. Since there are 4 wires in the hole, two wires are connected to each wire from the lamp body: one from each direction;
- Initially, the cores are connected by twisting, which is done with pliers. After this, a copper sleeve is put on the twist, which is crimped with special pliers or pliers;
- The sleeve is then carefully insulated.
All lamps are connected in this way, after which they are inserted into holes in the ceiling, where they are fixed with spring clips. This completes the installation and connection: all that remains is to screw the light bulb into the socket and press the switch.
Plasterboard ceilings
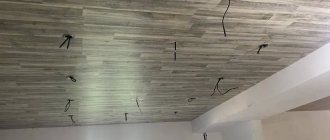
The connection diagram for lamps in a suspended ceiling looks similar, but installation begins only after applying a layer of putty. First, a plan for the location of the lamps is drawn on paper with the exact distance from the walls and from each other. Next, the electrical wires are laid out, fixing them to the main ceiling, and leaving the ends hanging freely. Moreover, it is best to leave the ends with a small margin, approximately 15-20 cm.
In general, the wire should hang below the plasterboard structure by about 10 cm. The fact is that it is very difficult to increase a short wire in an unforeseen situation, but the length can always be reduced. In accordance with the drawing, marks are made on the ceiling and holes are cut using a drill with an installed crown corresponding to the size of the hole for the spotlight. Install lamps into the resulting holes, connect the wires and check the operation of the lighting.
There is another diagram for connecting spotlights on a plasterboard structure. It is used when the number of light sources does not exceed 6 units.
The connection process is carried out according to the following scheme:
- Electrical wires are pulled from the junction box to the location of the lamps.
- Next, install the plasterboard structure and rough finishing work, in particular puttying and sanding.
- Holes are cut out in the ceiling into which spotlights are inserted during further installation work.
- Bring the ends of the laid cable out and connect the lighting devices.
This method allows you to quickly and easily find a solution to the question of how to connect a spotlight. However, it does not fully comply with fire codes and requirements, since in this case the wires end up simply lying on the plasterboard ceiling. The problem can be solved by using a non-flammable cable with a large wire cross-section, provided that it is installed correctly and there is a concrete base floor.
You can use this method when connecting spotlights on the ceiling with a wooden base ceiling. However, installation in metal pipes or non-flammable all-metal cable channels is required here.
It is important to carry out installation work on laying electrical wires before directly installing the plasterboard sheet. You should not deviate from the listed rules, since the combination of wood, electricity and the operation of lighting devices, accompanied by the release of heat, can be called quite dangerous
Classification of ceiling spots
Ceiling lights are widely available and can come in a variety of configurations. The main distinctive features of lamps in design, in addition to appearance, are their installation method and the type of lamps used.
According to the installation method, ceiling lamps are distinguished:
- Built-in: often used in combination with suspended or suspended ceilings, they look very aesthetically pleasing, compact and have a simple installation method.
- Hanging: in the broad sense, they are not spots, but belong to groups of chandeliers, sconces, and others. Often used for decorative lighting or when mounted to standard ceilings and chandelier mounts from the developer.
- Overhead: attached directly to the ceiling using dowels and self-tapping screws.
By type of lamps used:
- Halogen: they are efficient and environmentally friendly lamps with a long service life and high luminous efficiency, but they have significant disadvantages, such as high electrical energy consumption, heating and greater sensitivity to voltage changes in the network.
- LED: safe and energy-efficient lighting devices, have a long service life and a wide range of light temperatures, heat up little and have a high efficiency. The disadvantages of this type are: flickering of lamps when buying cheap Chinese lamps from unknown manufacturers (affects vision and eye fatigue) and a higher price compared to other options.
- Incandescent lamps: are losing their popularity due to the fact that they are uneconomical and short-lived devices, have low efficiency, heat up, but are still used by many consumers due to their very affordable price.
- Fluorescent: just like LED - very efficient and economical, and have a more affordable price. The disadvantage of these lamps is that they are unsafe if damaged (contains toxic vapors of mercury and argon) and are not environmentally friendly.
How to level a ceiling with plasterboard and make a decorative box with lighting
The old ceilings of my house, covered with ceiling tiles, have long lost their aesthetic appearance. Having started to renovate the bedroom, it was decided to make a flat ceiling from plasterboard with a box on both sides that goes onto the wall. The shape of the box was quickly thought up, taking into account the fact that decorative LED lighting would be installed in it.
Having drawn a sketch of the future ceiling with a box, we began to calculate the necessary materials. To begin with, we calculated the amount of materials + waste that will certainly occur during work. Ceiling plasterboard was 9mm, it is cheaper and lighter than wall plasterboard. It is better to take thicker profiles (meaning the thickness of the material from which the profile is made), and do not skimp on this. Thin and cheap profiles are very flimsy, do not hold their shape well, and complicate the work process. To install a plasterboard ceiling, you first need to purchase:
- profile UD-27, CD-60;
- pendants;
- cross-shaped crab connectors;
- drywall;
- metal screws 25 mm (for drywall) and 9 mm for attaching profiles to hangers and crabs.
Suspensions are needed to attach the CD-60 profile to the ceiling, and “crabs” are needed to connect these profiles crosswise.
To find out the required footage of UD-27, you need to measure the perimeter of the room where the ceiling will be mounted; the perimeter is equal to the length of UD-27. The CD-60 profile is mounted along the entire plane of the ceiling, every 60 or 40 cm (calculating the total length is not difficult). I advise you to maintain a distance between the profiles of 40 cm. The rigidity of the entire structure will be an order of magnitude higher, and the price will rise slightly.
The number of hangers is taken at the rate of 1 piece per 1-1.2 m length of the CD profile, “crabs” according to the number of cross connections. We take 9 mm self-tapping screws for metal at the rate of 2 pcs. for suspension, 8 pcs. to "crab". Consider drywall relative to the area of the ceiling and boxes + waste. Knowing the size of the room, all materials can be calculated before going to the store. It would be nice to agree on the return of the material (hangers, profiles, crabs) in case of a surplus, then you can not be afraid to take the excess.
Final moments of the work process
After laying the wire or pulling out the loop, it is necessary to free the wire from the insulating layer for further fastening. These bare wires are clamped into the lamp terminal according to the connection diagram that comes with the device. There are symbols on the spot according to which connections must be made: L - phase wire, N - neutral wire, PE - grounding. At this stage, everything must be done carefully, carefully and technically correctly, observing all safety precautions.
After connecting to the power supply, you need to insert the spotlight into the hole, slightly bending the clamps of the structure. This will allow it to fit tightly enough without forming gaps between the lamp cover and the hole in the ceiling. In this case, you must ensure that the fastening wires do not get between the brackets.
After this, the supply wire is connected to the switch, the bulbs are screwed in and a test run is performed. Once all the lamps are lit, the installation is considered complete.
How big holes are made
Typically, installing spotlights in drywall begins with measuring the basic dimensions of the housing. For each of them you need to cut a mounting hole. To do this, you can use one of two special drilling attachments for an electric drill. The first one is a set of circular saws. A slightly larger blade is selected from the set to suit the diameter of the body.
Another device is a milling cutter on the rocker arm. It allows you to cut holes whose diameter is larger than the saws in the set. If you need to install large recessed lights in drywall, a milling cutter is the most suitable tool. These two electric drill attachments make it possible to quickly make perfectly round holes.
But if you don’t have a drill, you can do without it by using a short saw with a narrow blade. Before cutting holes, you need to make markings according to the template. The template can be selected from used rolls of adhesive tape, as well as any lids or boxes of suitable sizes and round shape. A template is applied to those places where the lamps should be installed in the plasterboard ceiling and outlined with a pencil or marker. This creates a cutting line.
If there is already wallpaper on the ceiling, before using the saw, the surface inside the hole must be cleared of it so as not to accidentally tear it. This is done by cutting the mounting knife along the intended line. Inside the resulting circle there should be a hole large enough for the saw blade to fit into. Using it, you can easily get a round hole with fairly smooth edges. Once installed, the recessed lights will cover them. But still, working with a saw requires a certain skill and accuracy. You should not move it back and forth with a large amplitude.
Connecting luminaires to electrical wiring
Then the cable is removed from the resulting hole. It must be prepared for connection to the light source.
Next, you can begin installing the housing into the resulting hole. In this case, you need to thread wires through it.
After installing the housing, it’s time to install the wires. The best connection for the passage of electric current is made by soldering. Light source connectors are pre-prepared. Short wires are soldered to them, which will then be connected to the electrical wiring. Since this will also be soldering, the ends of the wires must be well coated with solder. Before connecting the wire to the electrical wiring, a piece of insulating tube made of heat-shrinkable material is put on it.
When installing the electrical cable cores, it is recommended not to cut them. First, the outer layer of insulation that covers both cable conductors is removed. The cuts are carefully made with a mounting knife on both sides of the middle of the loop. Then, from one incision towards the other, a longitudinal incision is made two to three centimeters in length. This allows you to grab the outer insulation and pull it off the wires, trimming as necessary. Then each of the two wires is folded in half. At the bend point, the insulation is carefully removed with a mounting knife to a length of 2–3 cm.
After this, the stripped core is folded in half so that it covers the end of the short wire that is soldered to the connector. After this, twisting is done. To make it more durable, it is recommended to use pliers.
The finished twist is prepared for soldering. To do this, it is moistened with an alcohol-based liquid flux to remove the grease film. After this, the twist is well soldered. A pre-prepared tube made of heat-shrinkable material is put on the finished twist. It is heated with a soldering iron until the required shrinkage occurs. A light source is then attached to the connector.
In our case, the installed device is a reflector with several built-in LEDs. The wires are laid in a niche between the drywall and the main ceiling. In this case, the installation of lamps in a plasterboard ceiling is completed by the final fastening of the reflector to the body with a special elastic bracket. This completes the installation.
Instructions for installing ceiling lights
If you have already learned how to wire spotlights, you can begin installing the fixtures to the ceiling. Several types of fastening have been developed for this purpose.
Regardless of the design of the LED ceiling lamp, they are attached to a special hook, the type of which is determined by the ceiling material. Floor slabs made of reinforced concrete, as a rule, already have a technological hole with built-in fastening. If it is missing, install an anchor bolt with a hook.
If you decide to fix the lamp to a suspended ceiling, then in this case you need a special hook, or one that could be screwed into the mounting devices.
On sale you can find lamps equipped with a special fastening strip, which is fixed to the ceiling using dowels and screws. After this, the chandelier itself is installed directly to the bar. To do this, you just need to mark the locations for the holes on the ceiling, take a hammer drill and punch holes for the dowels and install them.
Surface-mounted lamps are screwed to the ceiling through holes made in the base of the housing.
A diagram of how to connect lamps on a suspended ceiling is usually included with the lighting fixture. However, in any case, before starting work, it is necessary to turn off the power supply to the line from the electrical network, after which 10-15 cm of insulation must be removed from the supply cable. Be careful as the insulation on the wires themselves must remain intact.
If all fasteners are installed and the chandelier is suspended, you can now begin connecting the corresponding wires to each other using a terminal block.
The connection sequence will be as follows:
- The grounding yellow-green wire is connected to the ground terminal compartment. If there is no such designation, then the connection should be made to the third socket.
- The brown wire corresponding to the phase is attached to the L (phase) terminal, and the blue wire to the N (zero) terminal.
After all the wires are connected, they are collected together and, together with the terminal block, are hidden in a decorative element of the lamp, in which various fasteners are also hidden.
What is needed for installation
The following elements will be needed from the material:
- Spotlights;
- lamps;
- supply wire;
- terminal blocks or sleeves for connecting wires;
- insulating heat shrink, electrical tape;
- switch.
installation of a standard ceiling spot
It is advisable to select lamps of the same type for each type of lighting. According to the type of design, the lamps themselves are purchased in the required quantity. It is important to strictly check the presence of a reflective layer along the cone at the base of the base for incandescent lamps and the technical characteristics in accordance with the requirements for the lamp. For suspended ceilings, 40 W lamps are used; more powerful ones will significantly heat the suspended ceiling material and can lead to structural damage or even a fire. Halogen and LED versions of lighting elements are selected according to the power and spectrum of the light produced.
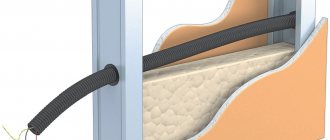
The wire is selected depending on the material from which the suspended ceiling is made. So for drywall, which is a fire-resistant material, a regular two-core or three-core wire VVG-2(3)x1.5 is suitable. For materials such as MDF or plastic, it is necessary to select a fireproof version of the RKGM wire. The wire must be soft, that is, each core is represented by many small veins united under one insulation.
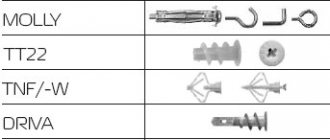
To connect wires and connect lamps to them, you can use special terminal blocks, which are sold at any hardware store. However, the bolted connection is serviceable. You will need to check the tightness of the clamping bolts at least twice a year. Otherwise, at the point of contact, the terminal blocks and wires may begin to heat up and char. A more reliable and durable option is fixation using copper or tinned copper sleeves.
It is necessary to protect the connection points using electrical tape or using a special heat-shrink tube to insulate the supply wires.
Installation features
To correctly connect spotlights, you need not only to choose the right circuit. It is necessary to follow a certain sequence of actions, which depends on the type of ceiling.
You just need to connect a few spotlights - and you have a beautiful interior
In suspended ceilings
Spotlights are usually installed with suspended or suspended ceilings. If the ceilings are suspended, all wires are laid in advance. They are attached to the ceiling without connecting to power, the lamps are placed and secured on pendants, then the wires are connected to them and the operation is checked.
Prepared for installation of suspended ceilings
Before installing suspended ceilings, turn off the power, remove the lamps and remove parts that may be damaged by temperature. After installing suspended ceilings, holes are cut in the material (the lamps are visible or can be felt), sealing rings are installed, and then the lamps are assembled.
In plasterboard ceilings
If the ceiling is made of plasterboard, you can proceed according to the same scheme, but the lamps must be installed after the ceiling has been plastered. That is, separate the wiring and leave the ends of the wiring hanging freely. To avoid problems with determining the location of lighting fixtures, it is necessary to draw a detailed plan indicating the exact distances from the walls and from each other. According to this plan, markings are made and holes are cut out using a drill with a crown of the appropriate size. Since there may be small movements - a few centimeters - when cutting the cable, leave a margin of 15-20 cm. This will be quite enough (but do not forget that the wires are attached to the main ceiling and they should extend 7-10 cm beyond the level of the drywall. If the ends turn out to be too long, you can always shorten them, but extending them is a big problem.
If you need to install a converter
There is a second way to connect spotlights to a plasterboard ceiling. It is used if there are few light sources - four to six pieces. The entire installation of spotlights along with wiring is done after the work on the ceiling has been completed. Before installation begins, the cable/cables from the junction box are led beyond the ceiling level. After finishing the puttying and sanding work, markings are made and holes are drilled. The cable is passed through them, bringing the ends out. Then the lamps themselves are installed.
Everything is simple, but this method cannot be called correct: the cables simply lie on the drywall, which definitely does not comply with fire safety standards. You can still turn a blind eye to this if the ceiling is concrete, the cable is non-flammable, the cross-section of the wire is not small, and the connection of the wires is done correctly.
Sequence of work in photo format
If the floors are wooden, the PUE requires installation in non-flammable all-metal trays (cable ducts) or metal pipes. You can install such wiring only before starting work on the ceiling. It is very undesirable to violate installation rules - wood, electricity, heat generation during operation... not the safest combination.
Preparatory work before installing lamps in a suspended ceiling
Installation diagram of a lamp in a suspended ceiling
In order for the lighting system to perform all the functions assigned to it, it is necessary to carry out some preparatory work before stretching the canvas:
Calculation of the number of lamps in a suspended ceiling. If you are planning the installation of spot products, then proceed from the calculation: one device per 1.5-2 m2. For example, in a room of 40 m2 it is optimal to use 27 lamps. However, when calculating, also take into account the power of the lamps and the purpose of the room. You may have additional lighting sources
Pay attention to the size of lamps for suspended ceilings, their number should be proportionate to the dimensions of the room
Preparing the wiring
. If you plan to install more than 20 lamps in a room, then it is better to group them and connect them to different power sources. All wiring must be in a corrugated sleeve and securely fixed to the ceiling. When using halogen lamps, you need to install an additional transformer.
Preliminary ceiling marking
. Even before fixing the canvas to the ceiling, you should decide how the light sources will be located. This is especially true for multi-level ceilings. It is necessary to allocate each tier into a separate lighting circuit. After this, the light sources need to be distributed accordingly. The places of the lamps should be distributed so as not to fall on the baguettes. A minimum distance of 25 mm is maintained from the nearest profile to the hole for the spotlight. When using a chandelier and spotlights at the same time, move them apart. Spotlights can be used to illuminate individual areas in the room.
Remember that oversaturation of a stretch ceiling with spotlights can not only negatively affect the appearance of the suspended structure, but also lead to deformation of the canvas.
Light sources for illumination
When choosing the location of lamps on the ceiling, you need to take into account all light sources. And the backlight too
At least she plays, mostly. decorative role, but also makes its contribution to the illumination.
For illumination, linear lamps are often used. They come in luminescent and neon colors. LED linear lamps or LED strips are also used. The best option in this case is LEDs in any design. They have several advantages. The first is that they are more economical (they consume 3-4 times less electricity than “housekeepers”), the second is more durable (although subject to temperature conditions), the third is that they heat up much less than the others. They also have disadvantages: they require a reduced voltage (24 V or 12 V) for power supply, and therefore require converters. They also cost money, they need to be placed somewhere, and so that they are accessible for routine maintenance and repair. And another minus is the high price. But if you consider that their working life amounts to thousands of hours, then it turns out inexpensive.
Neon lighting looks good
If for some reason LEDs do not suit you, you will have to choose between fluorescent and neon lamps. Usually they choose fluorescent ones, since installation and connection are simple and can be done with your own hands without the involvement of a specialist. Disadvantages: flickering light and “cold” glow.
Neon lamps look good when illuminated, but installing them is a hassle and not so easy to figure out. That’s why they either invite specialists or choose some other light sources.
What materials to use
The frame of the box is assembled from U-shaped guides and load-bearing profiles with walls at least 0.55 mm thick.
For cladding, gypsum boards with a thickness of 10.5 and 12.5 mm are suitable; the second option is preferable, since the structure will be more rigid and durable. If the box is installed in the kitchen, you need to purchase moisture-resistant sheets (GKLV), and choose vapor-proof paint, such as acrylic, as a coating. Special cement-based sheet materials are better suited for the bathroom.
Do-it-yourself installation of spotlights: location, connection diagram and installation
When installing in a line, you must order a set of covers, which includes: 2 end covers, fasteners for the end covers. The order code for a set of covers for lamps LINER/R DR, LINER/R LR is 2471000010.
CONSTRUCTION The lamp body is made of aluminum profile, painted with white powder paint. It is possible to paint in colors according to the RAL scale. An electronic ballast is installed in the housing
OPTICAL PART LINER/RD - opal diffuser made of PMMA. LINER/RL - mirror biparabolic grille made of MIRO brand aluminum
SHADOW-FREE LIGHT LINES It is possible to manufacture luminaires that are connected into a shadow-free line with a uniformly illuminated diffuser due to the special arrangement of light sources. It is possible to connect lamps at an angle of 90°, as well as to transfer the light line from the ceiling to the wall. Product in development: I half of 2012.
| A | B | |
| 28 | 1198 | 1175 |
| 14 | 598 | 575 |
| 35 | 1498 | 1475 |
| vendor code | Weight, kg | Electronic ballasts Luminaire code | Power, W | Article number (line connection) | cos φ | ||
| LINER/RD 114 | 1,8 | 1471000020 | 1x14 | LINER/R DR 114 | 1,7 | 1471000210 | ≥ 0,96 |
| LINER/RD 128 | 2,8 | 1471000020 | 1x14 | LINER/R DR 114 | 1,7 | 1471000210 | ≥ 0,96 |
| LINER/RD 135 | 3,1 | 1471000040 | 1x35 | LINER/R DR 135 | 3,0 | 1471000230 | ≥ 0,96 |
| LINER/RD 214 | 1,9 | 1471000050 | 2x14 | LINER/R DR 214 | 1,8 | 1471000240 | ≥ 0,96 |
| LINER/RD 228 | 2,9 | 1471000010 | 2x28 | LINER/R DR 228 | 2,8 | 1471000250 | ≥ 0,96 |
| LINER/RD 235 | 3,2 | 1471000060 | 2x35 | LINER/R DR 235 | 3,1 | 1471000260 | ≥ 0,96 |
| LINER/RL 114 | 1,8 | 1471000120 | 1x14 | LINER/R LR 114 | 1,7 | 1471000310 | ≥ 0,96 |
| LINER/RL 128 | 2,8 | 1471000130 | 1x28 | LINER/R LR 128 | 2,7 | 1471000320 | ≥ 0,96 |
| LINER/RL 135 | 3,1 | 1471000140 | 1x35 | LINER/R LR 135 | 3,0 | 1471000330 | ≥ 0,96 |
| LINER/RL 214 | 1,9 | 1471000150 | 2x14 | LINER/R LR 214 | 1,8 | 1471000340 | ≥ 0,96 |
| LINER/RL 228 | 2,9 | 1471000110 | 2x28 | LINER/R LR 228 | 2,8 | 1471000350 | ≥ 0,96 |
| LINER/RL 235 | 3,2 | 1471000160 | 2x35 | LINER/R LR 235 | 3,1 | 1471000360 | ≥ 0,96 |
Luminaire LINER/R.pdf
How to connect ceiling lights?
Installing spot lighting is not as difficult as it might seem at first glance. Connection of spotlights must be done strictly according to the diagram. All work can be carried out simultaneously with the installation of any ceiling systems. The main thing is to comply with some conditions, namely, there must be a distance of at least 10 cm between the base ceiling and the lamp body. This will allow you to completely hide the lamp body, transformer, and wires inside the ceiling structure.
To connect ceiling lamps, a transformer is required - this is a mandatory element of the device circuit, ensuring an uninterrupted supply of voltage.
For these purposes, you can use several types of transformers:
- Electronic. They are installed quite simply and easily. Due to their light weight, they do not weigh down the ceiling structure. However, they have their drawbacks - they break quite often and require replacement;
- Induction transformers are cheaper, but they are quite heavy - about 2 kg. Such devices last much longer than electric ones, they are reliable and practical. If you decide to use this particular type of transformer, you will need to either further strengthen the ceiling structure or make additional fasteners for the device from the base ceiling.
If you decide to mount a network of spotlights with your own hands, then you need to purchase several transformers at once. Each device will provide voltage to a certain group of lamps, and if one breaks, the others will maintain the operating voltage in the network.
How to choose the right transformer power
Before connecting ceiling lamps, one point should be understood: for normal operation of all connected lighting fixtures, it is necessary to use a transformer whose power is 20% higher than the total power of the lamps in the electrical circuit. For example, a power reduction device is required for 8 40-watt light bulbs. First, the total power is determined: 8*40=320 Watts. Therefore, for this voltage you should purchase a driver with a power of about 400 Watts.
When calculating voltage, it is important to take into account that a large number of light bulbs requires a higher power converter. However, the cost and size of the step-down device increases with increasing power value. To solve the problem, spotlights are divided into several groups and a transformer is connected to each of them. But in this case, the converters must have less power.
Preparation
Several preparatory activities:
- Before installing ceilings, turn off any power and remove elements that may melt.
- Cut holes in the ceiling and install O-rings.
- Assembly of lamps.
If the ceiling is plasterboard, then the action plan remains the same, but you need to work on the lamps after puttingtying the ceiling and final finishing of the room (painting, wallpapering). Be sure to route the wiring! You can even make a sketch so that there are no problems with determining the location of the lamps
It is advisable to decide on the location and connection diagram at the stage of installing the ceiling frame. This is important so as not to get caught in a metal profile when cutting! Then we make markings along which we cut out the holes. Do not forget that the wires are attached to the ceiling and they should protrude slightly from the plasterboard (about 10 cm)
Technical characteristics of spot lighting
- It is important to use the same type of luminaires for certain lighting circuits.
- Powerful lighting devices over 40 watts can damage the suspended ceiling.
- For plastic ceiling options, it is recommended to choose wiring that is more fire-resistant compared to plasterboard ceilings.
- Without fail, the wire for lighting must be stranded, soft and flexible.
- You should periodically check the fastening and tightening of the clamping bolts of the wiring fastenings.