– the DRIVA dowel is the fastest fastener in drywall, the plasterboard does not need to be drilled first and the back side of the drywall will be intact,
– the MOLLY dowel for plasterboard is the most powerful, more details here, but requires pre-drilling and special pliers or training to open it from the back of the plasterboard sheet,
– the TNF/-W butterfly dowel (more details here) also requires preliminary drilling in the drywall and the result is not fast or powerful, but average and maybe just what you need?
What drill to use to drill a hole in the wall
You can easily drill a wall or prepare a through hole by choosing the right drill for the equipment you are using, be it a drill or a hammer drill. For any purpose, the hole must have smooth edges and the right size. Accuracy is quite easy to achieve. Let's talk about the right choice of drills and features of drilling walls.
You need to select the type of shank (hexagon, cylinder or SDS mount) suitable for the selected tool, and the working part, based on the wall material.
In the store, the color of drill bits and drill bits will definitely catch your eye:
- Faded gray color - drills for metal or wood with additional hardening. Standard strength and durability.
- Black metallic color - the drill was treated with superheated steam at the last stage of production to form an oxide protective film. Increased durability, but strength depends on the choice of steel grade.
- The bright golden uniform color of the entire drill is the result of the internal stress release technique within the drill material.
- The yellowish tint (golden) mainly only of the working part of the drill is a protective coating based on titanium compounds, which increases the strength of the cutting edge and the entire working part.
Installation without reference to a profile
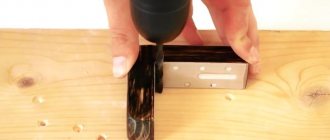
Sometimes it happens that the calculations are made incorrectly and after drilling in the hole for future sockets, a profile is visible, due to which it is impossible to push the block through and securely fix it in the recess. In this case, the crown is replaced with an ordinary metal knife or chisel and the holes are made manually, removing 5-10 cm of the visible profile.
Incorrect installation, in which the profile prevents the placement of the socket box in the prepared hole.
The frame of the structure will not suffer from this, but the sheet of drywall itself may be deformed, and due to the inconvenient viewing angle there is a risk of injury. When cutting the profile, it is recommended to wear special installation gloves - they will protect your hands from unwanted cuts.
Concrete, brick, stone
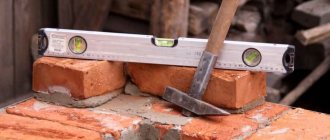
You will need a drill with a carbide insert. The plate is welded at the end of the working area of the drill, made of an alloy of cobalt, tungsten carbide and a number of other elements, which together give it strength and abrasion resistance. The name of the alloy is “win”, firmly entrenched in everyday life and the technical environment.
When choosing a Pobedit drill in a store, you should pay attention to how smoothly the nozzle is welded. Often there are drills from nameless manufacturers with poor-quality alignment, which is easy to determine even by eye.
The process of drilling holes in concrete or stone is based on the crushing process, so a hammer drill is used as the main tool. An impact drill is suitable for brick. Depending on the selected tool, the type of drill shank is determined.
- SDS, SDS-plus - mount with a diameter of 10 mm and a part inserted into the chuck 40 mm for quick change of drill used in rotary hammers. Drill diameter 4–26 mm, length from 110 to 1000 mm.
- SDS-max - mount for large drills used with powerful hammer drills. Shank diameter 18 mm, used for concrete drills with a diameter over 20 mm.
For an impact drill, the shank is cylindrical. Drill diameter - 4–11 mm, length - up to 110 mm.
For drilling holes with a diameter of 4–10 mm and a depth of up to 100 mm for a dowel or anchor, drills with SDS-plus mounts or drills with a cylindrical shank are suitable.
For holes with a diameter of up to 42 mm and a depth of up to a meter or through holes for laying communications, pipes or connecting an air conditioner, drills with an SDS-plus, SDS-max shank are used.
When drilling deep holes with a diameter of over 10 mm, it is advisable to perform the work in two or three passes, selecting drills from smaller to larger diameters, the same applies to the length of the drill. First, short 110 mm drills are used, and then half a meter or meter drills are used to reduce the risk of damaging a larger drill and ensure a smooth edge at the hole.
To drill holes in a wall with a diameter of over 42 mm, crowns are used, for example, to install a socket box. This is a cutting tool with a ring cutting edge, often mounted on a cylindrical base with an SDS-plus, SDS-max shank. The cutting edge is formed by a series of teeth made of Victory alloy or coated with diamond.
LED strip lighting
LED strip has many advantages, both functional and aesthetic.
Functional benefits include:
- ease of installation,
- long service life,
- various colors,
- economical - consumes very little electricity.
- unbreakable body - since this type of lighting device is presented in the form of a transparent strip with LEDs, it is very problematic to break or otherwise damage it;
- There are waterproof tapes that are used not only in the bathroom, but even under water to illuminate swimming pools.
The aesthetic advantages include the fact that such a lighting source is hidden from view - the tape itself is not visible, only diffused light is visible. This effect is used to add zest to the interior, as well as to create soaring ceilings.
If you install special controllers, you can adjust the lighting intensity, and in the case of using multi-colored tape, change the color.
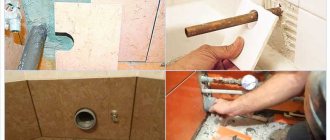
Tile, glass
To drill small holes of 4–25 mm, special cone-shaped drills with diamond coating are used. The main task is to go through the surface of the tile and its base. After this, you need to switch to a drill suitable for the wall material and continue drilling with it (a drill for metal or wood will win).
It is especially difficult to start drilling in a strictly defined position. You need to stick tape over the mark or mark a point along the mark, carefully knocking off part of the glaze or polished surface so that the drill does not “walk” along the surface.
Large diameter holes for the socket are drilled with a ballerina drill. It contains a sprayed support cone on the main axis. An adjustable arm with a fixed cutting tip is moved away from it. It is better to start at low speeds until the surface of the tile is passed. When the surface has been covered by 2–3 mm, you need to move on to a crown for the corresponding wall material.
Additional Installation Requirements
To ensure that the installation of socket boxes is carried out in accordance with fire safety regulations, is distinguished by quality and accuracy, adhere to the following rules and recommendations:
- installation of electrical wiring must be completed before the start of the stage of covering the frame with gypsum board sheets; for these purposes, it is preferable to use a non-flammable flat cable of the VVGng LS type, which is placed in a corrugated sleeve with a self-extinguishing probe and secured with staples to the side shelves of the profile, the wiring should go to the location of the socket box;
- To prevent the material from cracking, when working with a crown, it is not recommended to press hard on the surface of the drywall sheet;
- installation of the socket box should be carried out 30 cm from the floor, before finishing work with gypsum boards begins;
- the dimensions of the recess between the original wall and the drywall must be 45 mm or more, otherwise the socket box will not fit through the hole made and will have to be further deepened;
- if there are wooden floors between the frame and the gypsum board wall or to increase the level of electrical safety, it is recommended to treat the edges of the installed socket box with gypsum plaster.
Sealing a rosette with gypsum plaster
You can find out how to install a socket using a bimetallic crown, the diameter of which is 68 mm, in compliance with installation standards, using the example video below.
Metal
Metal drills have the most familiar appearance. This is a spiral-shaped working part and a cylindrical shank. The sharpening is cone-shaped without a sharp tip with an inclination angle of the cutting edges from 90 to 140 degrees. The spiral is formed by two protruding parts and twisted at an angle of 27 degrees. The outer edge has a cutting edge along its entire length, due to which holes in soft metals and wood can be expanded by lateral movements of the drill, like a milling cutter.
Depending on the specific metal, the sharpening angle at the tip of the working part is selected:
- for most grades of steel used in construction - 140 degrees;
- duralumin, bronze and brass - 110–120 degrees;
- copper, aluminum, wood and plastic - 90–100 degrees.
Universal drill sets contain metal drills, mostly with an average sharpening angle of 110–120 degrees, which is quite enough for most tasks.
When drilling walls, metal drills are needed if there is reinforcement or profile frame elements inside the base material. It is impossible to go through these obstacles with a drill with a pobedit tip; both the tool and the already passed section of the hole will be damaged. You need to switch to a regular drill with a metal drill, go through an obstacle, and then continue working with a drill or drill on the selected material.
Recommendations for placement and calculation
Before embedding LED lamps into a plasterboard ceiling, it is necessary to correctly mark the installation of profiles and the lighting sources themselves.
This should be done before installing the ceiling structure for two reasons:
- so that the elements of the suspended structure do not block the light source;
- in order to hide the wiring under the ceiling.
For wiring, a cable with a cross-section of 0.75 to 1.5 mm is used, the wiring is attached to the profile frame. At the future locations of the lamps, I leave a wire reserve of about 15 cm.
Lighting sources should not be placed far from each other (more than 1 meter), unless you intend to install a chandelier in the center. To connect the wires, use terminal blocks.
Wood, drywall
A distinctive feature of a drill for wood with a diameter from 2 to 16–24 mm from a similar one for metal is the presence of a sharp tip in the center of the main sharpening at the end of the working part. This is necessary for normal alignment of the drill in relation to the hole and for easy starting. The tip easily enters the wood fibers in a strictly marked place and no longer allows the drill to jump off.
Metal drills are suitable for drilling wood and drywall, but often the holes turn out uneven, especially if you do not select the correct drill speed depending on the type of wood. In soft rocks, the fibers along the edges of the hole will diverge, but in hard rocks, they may split if the drill moves.
For large diameter and/or deep holes use:
- Feather (feather) drill.
- Ballerina.
- Screw drill.
- Wood saw bits.
A point drill is a flat plate with two sharpened edges and a point for determining direction. Fixed point drill bits help drill holes with a diameter of 8–45 (60) mm. However, without rigid fixation of the tool and the base, the shape of the hole is unlikely to be even, and due to the absence of side cutting edges, the walls of the holes often end up with broken fibers.
Ballerinas for wood help to drill holes of large diameter, but only in a base with a thickness not exceeding a certain threshold, for example, up to 50–70 mm.
Screw drills are optimized for bringing wood chips out and are a direct analogue of large drills for concrete. Used for drilling holes with a diameter of up to 45 mm and a depth of up to a meter.
Saw bits drill out the material around the circumference. A fine file is formed along the edge of the crown. Afterwards, you need to use a chisel to select the material inside if you need to make a blind hole.
Selecting a suitable lamp
When choosing ceiling lights built into a plasterboard structure, it is best to opt for LED lamps.
They provide bright lighting, consume little electricity, and their body does not heat up during operation, which is especially valuable when using tension fabrics. LED devices differ from their analogues in that the brightness of their radiation depends on the type of crystals used in the design. If the quality of the emitters is poor, then such lamps will not last long. To purchase a high-quality light source, pay attention to the brand of the product. Well-known brands, as a rule, use high-quality crystals, so their products last for years and produce a bright luminous flux. In addition, well-known manufacturers always provide a guarantee for their products.
Typically, LED lamps for plasterboard ceilings are sold with a lamp.
What is a crown
How to cut an even round hole in drywall of the required diameter? To do this, use a cylinder-shaped cutter with a serrated cutting edge on one side and a “tail” for attaching the cutter to the drill on the other. A drill is located in the center of this cylinder. This whole structure is called a plasterboard crown, or a core drill. How it works: the drill is the first to enter the drywall and sets the center of the future hole, while the nozzle is fixed in the desired position, the edge of the cutter enters the surface and makes a cut of the circle.
How to hide LED strip
There are many ways to install diode strips; very often they are used in multi-tiered ceiling structures to emphasize each fragment. But even if you have an ordinary flat ceiling, you can also play with it in an interesting way. You can install such lighting even alone. In this case, you will need a special wide cornice for LED lighting.
Let's take a closer look at the algorithm of actions:
- Using a building level, mark the line for the location of the cornice, 10 cm from the ceiling.
- Glue the cornice using liquid nails, titanium or acrylic putty.
- Carefully glue the joints between the cornice strips, especially in the corners.
- Run the wiring into the cornice and connect the power supply that needs to be secured to the wall.
- Connect the LED strip to power. If you need to connect more than 5 meters of tape, then each section is connected to the power supply in parallel.
Types of crowns
Core drills can be divided into two types: solid and split.
- Solid crowns are basically a drill bit with a single metal toothed cylinder on it;
- The collapsible crown device contains a universal disk into which cylinders of different diameters can be inserted. The cylinders themselves have an open shape and come complete with a disk. Like solid crowns, the collapsible edge is serrated.
The diameter of the cylinders can vary from 33 to 150 mm.
Both wood and metal drill bits are suitable for making holes in drywall. There are universal - bimetallic crowns that can be used to drill metal, wood, gypsum plasterboard, of course they are more expensive, but if you use them only for drywall, then we can say that they are eternal. When purchasing a bimetallic crown, you should pay attention to the fact that they are usually sold without a holder and a centering drill. In the assembly this is called an adapter, which will have to be purchased separately.
Crown saw (aka hole saw or circular saw)
This is perhaps the easiest way to get a perfectly straight hole; fortunately, you can buy a hole saw at the most common building materials store, and they (the saws) are quite cheap. The price of a set of ten simple carbon steel bits starts from five hundred rubles, and for three hundred rubles you can buy at least one, but much more durable saw made of bimetallic steel. The drilling process itself consists of three simple operations: put the bit on the drill bit - attach it to the front side of the drywall sheet - press the “start” button. As a rule, this is enough, but if you need to make the hole just a little larger, you can “edit” it with an ordinary knife.
Of course, there is a drawback in this method of cutting holes in gypsum plasterboards, limitations, only round holes, but if you need holes of a different shape, read on.
Selection of cutter
When you come to the store, it’s easy to get confused by the abundance of crowns on offer. How not to make a mistake with the choice so that it does not break when making the first hole?
- Take the crown in your hands and take a good look at it. If the product is of low quality, you will be able to visually immediately see, for example, elements of careless processing or defective coating. It is worth paying attention to the tail of the crown; if it is too light, it is made of low-quality metal and can quickly break;
- The centering drill and shank must be firmly secured, gaps are unacceptable. Also, if this is a dismountable bit, you need to check each cylinder included in the kit, how easily and evenly each of them fits into the groove of the disc. Make sure that none of the cylinders is loose in the groove, because the quality of the cut will depend on this;
- The element of the crown that bears the maximum load when drilling is the cylinders (glasses) with a serrated edge. The service life of the entire device depends on the quality of the material of this element. The saws should not be too thin and bend easily, the material should be elastic, otherwise you may not get a hole. Saws with hardened teeth are higher quality and more durable. Do not forget - the cutting teeth must ensure a clear and even cut of the material;
- Core drills come in different sizes (cylinder diameter, drilling depth), if you buy a set, make sure it has the one you need.
Installation methods and types of tools for its implementation
There are three ways to install socket boxes:
- linked to a profile;
- without connection to the frame;
- installation of a socket block.
Before choosing the installation method, prepare the tools, in addition to the crowns and socket boxes, use a drill, a screwdriver and the outer part of the socket.
- building level;
- ruler or tape measure (to control the distance between block socket boxes);
- pencil for marking;
- a construction vacuum cleaner, which is used when making holes with a drill in drywall, so that less dust collects and does not clog the lungs.
For precise marking, a laser level is used, which will allow you to carry out work with minimal deviations in calculations.
Crown for installing mounting boxes
The most common need to drill round holes in drywall is to install electrical outlets. The invisible part of the socket, the plastic round mounting box that is mounted in the wall, is called the socket box. There are socket boxes for concrete, wood and plasterboard.
The socket box for drywall is a plastic cup with adjustable plates made of plastic or metal. Thanks to these “claws,” the socket box is fixed to the back of the plasterboard sheet. The depth of the installation box can be 40, 50, 60 or 73 mm. As for the diameter, for a standard socket box it is usually 68-70 mm.
If you only need to drill holes to mount sockets, you will only need one hole saw. In this case, you should not purchase a set of dismountable crowns. It is enough to buy one special core drill, with a diameter of 68 or 70 mm (depending on the size of your socket boxes).
Today, the diameter of a core drill for drywall 68 mm is the most popular standard size.
Electric jigsaw
A slightly more complex and energy-consuming method, which, however, gives the opportunity to cut a hole of any diameter. Unlike round crowns with their strictly defined dimensions, an electric jigsaw not only allows you to adjust everything almost down to the millimeter, but also cut holes of any shape in drywall, from even squares to beveled polygons. This is where the advantages end - you won’t be able to operate a jigsaw if the sheet of drywall has already been mounted, or if the length of the jigsaw blade is longer than the gap between the sheet and the wall (or the sheet and the ceiling). In addition, all your artwork will have to be modified with sandpaper in any case.
Spotlights
Spotlights, so-called spots, which represent a point source of light, have become widespread these days. In most cases, spots are installed in plasterboard ceilings or boxes. For installation, it is necessary to cut a hole with a diameter corresponding to the diameter of the ceiling lamp. Usually, the required diameter for cutting is written on the packaging of the lamp or in the instructions for it, but it happens that there are no instructions, then you should measure the diameter yourself. This can also be done simply to check the specified information, so as not to accidentally make a hole of the wrong diameter, because nothing can be corrected later.
The most common diameters of holes for spots are 60 and 75 mm. To get a hole of the required diameter, you should use a special drill - a plasterboard crown. The main thing when you choose the size of the crown for drilling a hole for a spotlight is that the drilled diameter is smaller than the diameter of the spot, that is, the lamp must completely cover the lamp during installation.
Installation of a block socket
Block sockets are called sockets that consist of several terminal blocks for simultaneous connection to a 220 V network, the Internet, TV, etc.
- the distance between the centers of block sockets should be 72 mm;
- calculations are transferred to the wall using a level;
- The cups of the socket boxes are connected to each other by C3A3 cable or “butterflies”, which are taken with a margin of 2 cm and assembled into a block;
- under level control, circles are cut out of the plasterboard wall, to which the block is applied and the correct calculation of the recesses is checked;
- the resulting holes are connected to each other with a chisel;
- the block is inserted and fixed to the wall with clamping bolts;
- Cables are routed between the socket boxes.
Connecting a block socket
How and with what to drill | Construction portal
The answer to this question is of interest not only to beginners in carrying out repair work, but also to professional builders. After all, without using a drill, even the most ordinary shelf or hook cannot be secured. A hammer and nail are not the answer when it comes to metal, concrete, tile, glass or stone. To drill a beautiful, neat hole, you need not only certain skills, the choice of a suitable drill and its sharpening play an important role.
Content
What types of drills are there?
Drilling is the most common way to make a hole in any material. The main element of this process is a drill, the type of which is selected depending on the type of surface being processed and the purpose of the work.
There are several classifications of this cutting tool.
According to the design of the working part, drills are divided into spiral, flat, annular, centering, single-sided cutting drills, and for deep drilling.
Depending on the design of the tail part, drills are divided into cylindrical, conical, three-, four- and hexagonal, SDS drills.
By purpose (type of material being processed): drills for metal, wood, concrete, glass, stone, ceramics, universal.
How to choose the right drill?
The main rule when choosing a drill is that the structure of the cutting tool must be harder than the structure of the material being processed. To drill drywall, wood, and plastic, you can use a regular drill made of high-strength steel. And to drill into stone, brick or concrete, you need to use a carbide drill - the tips of such drills have plates made of alloys that are harder than concrete and stone. Most often, the role of such an alloy is victorious - an alloy of tungsten with cobalt in a ratio of 9:1.
It is necessary to select a drill of the correct size and appropriate for the type of work being performed. The diameter and length of the drill are selected depending on the mass of the surface being processed - the larger it is, the thicker and longer the drill is required. The most commonly used drill diameters in everyday life are from 6 to 12 mm. Small shelves or curtain rods can be secured using a 6 or 8mm drill bit. You can fix the toilet in holes drilled with a drill with a diameter of 10 mm. More specific types of work require different drill sizes.
When choosing a drill, it is important to consider the functionality of the working tool, which is selected based on the type of material being processed. You can drill holes in wood or plastic with a regular mechanical drill. Using an electric drill or screwdriver will make the job easier. These tools are indispensable when drilling stone and metal surfaces. If you need to drill holes in concrete, it is best to use a hammer drill.
When choosing drills, it is important to pay attention to their appearance. A high-quality tool should not have chips, scratches or other defects.
It is best to choose drills from well-known manufacturers that have proven themselves in the market - this will protect you from purchasing low-quality tools and wasting money.
Selecting a drill for metal
A metal drill will help you easily make holes in cermets, alloyed and non-alloyed steel, non-ferrous metals and cast iron.
The most commonly used twist drill for metal is a cylindrical rod with two helical flutes that form the cutting edges.
Most often, such drills are made of high-speed or alloy steel. These materials make strong, durable drills that can help you get the job done as efficiently as possible.
Cylindrical and conical drills for metal are common. HSS conical drills are excellent for processing metal sheets. Hss Sprint metal drills are suitable for use with hand drills. Other brands of professional metal drills include DeWalt, Bosch and Ruco drills.
You can get a neat hole in sheet metal without deforming it using a step drill.
Choosing a drill for concrete
Processing concrete is not an easy task due to the strength and power of this material. Carbide and diamond drills are used to drill holes in concrete. The easiest way to drill concrete is with a drill with an asymmetric sharpening. It’s better to mark the hole and start drilling with a drill with a regular sharpening.
SDS drills for concrete are very popular. They are designed specifically for use with hard concrete structures and high impact loads.
For professional drilling in concrete, drill bits for bosch hammer drills are used. Bosch drills have a four-spiral shape, which allows you to quickly remove residual material from the hole.
Choosing a wood drill
You can drill several holes in a wooden surface with a metal drill, but for constant work with wood, where accuracy and precision are important, you cannot do without a special wood drill.
Twist, feather and cylindrical drills are most often used for processing wooden structures.
The advantage of twist drills is that they are easy to remove from the work area after finishing the job. To create blind holes in wood with a diameter of 10 mm or more, feather drills are used. Such drills are used specifically to create holes, since it is impossible to drill an existing hole with their help, due to the absence of cutting edges on the side surface. A cylindrical or core drill is used to create large diameter holes. Using such a drill allows you to get a neat hole without defects, with high processing efficiency.
What you need to know about drilling?
During the drilling process, the cutting tool heats up, which leads to a change in the structure of the steel and a reduction in the service life of the drill. Therefore, if you need to drill a large number of holes in a durable material, the drill must be cooled by lowering it into a vessel with water.
When working with various materials, it is worth knowing some drilling features. If you need to drill a hole in a tile, you need to make a notch in the place where the hole is planned. This is done because the glaze of the tile is much stronger than the tile itself, and at high speeds the drill can move, leaving marks on the tile. The notch is made using a pobedit drill, a steel dowel or a special punch. The same operation will help to drill high-quality holes in metal surfaces.
It is important to maintain the drilling depth of the holes. If the wall is thin, there is a risk of drilling through it. Conversely, when drilling thick brick or concrete walls, it is necessary to take into account the length of the fastener. You can make a hole of the desired depth using the special factory stops indicated on the drills. If there are no such marks, you can screw a little electrical tape onto the drill, thus marking the required drilling depth.
To avoid splitting the tiles when drilling, you should use a drill and turn off the impact mode.
Below is a demonstration video on drilling tiles.
Using a diamond drill will help you drill a hole in durable materials quickly and efficiently. This option is the best choice if you need to make a large number of holes in a short period of time.
To drill a center hole in a part and carry out its further processing, use a center drill.
This drill is also suitable when you need to drill out a “stubborn” screw or screw.
A Forstner drill is used to drill large-diameter blind holes, such as through holes or loop holes, to install hinges in furniture.
strport.ru
Types of drill bits
One of the features of plasterboard sheets is that they are easy to process. To drill it, you can use various types of crowns designed to work with harder materials.
Set of bits for plasterboard and wood To obtain holes of the required diameter in plasterboard surfaces, you can purchase the following types of attachments.
- wood drill bits;
- wood crowns;
- bimetallic crowns.
What are the differences between them and how much do such sets cost?
Wood drill bits
The second name is a wood saw. The nozzle is designed for cutting large diameter holes. Kits are available for sale, consisting of an adapter for cylindrical nozzles with various diameters and a centering drill.
Drilling holes in drywall
- The shank of a quality product is made of steel. You can distinguish it by its weight, it is heavy. Cheap tools made from powder are much lighter. There may also be markings indicating the presence of alloying elements (vanadium, tungsten, chromium, nickel and others);
- the kits are designed for working with wood, chipboard, fibreboard, OSB and are quite suitable for cutting holes in plasterboard finishing;
- wood drill bits are designed for household use; professional sets differ in their design.
Wood drill bits
When choosing a high-quality crown, you should pay attention to the following points:
- In addition to the weight of the product, you should focus on the assembly. Good sets do not have defects or size discrepancies. Also, when installing the nozzle on the adapter, there should be absolutely no play.
- The cutting element is made in the form of an open cylinder. Made with high quality, it is flexible and resilient. If the cylinder bends easily when pressed, it is not suitable for working with drywall.
- The high-quality cutting edge is made from hardened steel.
- The package may include from 3 to 7 pieces of cylindrical nozzles with different diameters.
It is worth knowing that sets of inlaid drills mainly come in two varieties: the first from 23 to 63 mm, and the second from 63 to 100 mm.
Drills for wood at work You need to select them in accordance with their intended purpose; if it is an opening for a socket box (68 mm), then it is worth buying the second option. The price for a good set ranges from 200 to 400 rubles. On average, a set costs 200 rubles. It is better to immediately ignore the offered attachments at a more favorable (read cheaper) price.
Wood crowns
These kits are designed for cutting openings in wooden surfaces, which means they are perfect for working with plasterboard sheathing. What differences will there be between this set of attachments and the one described above? The configuration can include up to 13 cylinders; their walls are made of steel and have a thickness of 2-3 millimeters.
- The attachments allow you to drill into material up to 22 millimeters thick. Considering the parameters of the plasterboard sheet (thickness 14.5mm), this set is perfect.
- The holder is also different; it has protrusions for securely fixing the cylinders and a centering drill.
- Fix the nozzles using a hexagon.
- Professional sets are sold in hard plastic cases and have several holders, spare drills and sets of crowns with sizes from 38 mm.
Wood crowns
When buying a kit for drilling drywall, pay attention to the presence of a crown with a diameter of 68 or 70 mm; this is the accepted standard for a socket box, the opening for which will probably have to be cut.
The price per set may vary depending on the number of attachments, manufacturer and additional items (for example, spare drills). On average, a small set with 6 crowns costs up to 600 rubles. Large sets with 13 replaceable cylinders will cost the buyer 1200-2500 rubles.
If you only need one crown, it can be purchased for 600 rubles (for a quality product!).
Bimetallic crowns
The purpose of such attachments is to drill holes in various materials: wood, metal, plastic and others.
Bimetallic ring crown Considering their strength, you can work with such a tool on drywall forever. The kit is perfect for professional repairmen. Most often, these types of crowns are sold individually with different gradations of diameters, from 14 to 200 mm. The attachments are sold without a holder, which will have to be purchased separately. The cost of the holder ranges from 300-1 thousand rubles. A standard crown for drilling holes for socket boxes (68 mm in diameter) will cost approximately 500-1500 rubles. It is better not to consider cheaper options. Watch the video: test of HSS bimetallic crowns.
Possible options
When deciding how to cut a hole for a lamp, you need to know that this work can be done in two ways:
- Using special professional tools, as well as special equipment.
- Use the available materials in the house.
Obviously, the first option is more acceptable. Moreover, now it is easy and simple to buy a set of crowns or one drill of the required diameter, and such a tool is inexpensive. Of course, you can try to do the work with improvised materials - use a knife, a metal file, etc. But it’s impossible to guarantee the quality of such work. Moreover, if any inaccuracy is made, an entire sheet of drywall will have to be replaced. And this is difficult and will require additional time and financial expenses.
How to make a hole for a socket in drywall?
How to make a hole for a socket in drywall without a crown?
- Drill with a hole saw (circular saw) into the drywall. The fastest and most convenient way. ...
- Cut with a jigsaw. ...
- Drill with a circular drill (nibblers) on the tiles – “ballerina”. ...
- A hacksaw blade for metal. ...
- Drill with a drill with a drill bit with a diameter of 6-8 mm. ...
- Drill out with a drill. ...
- Cut with a knife. ...
- Make a tattoo.
17 Dec 2021