11/17/2016 master
Repairing the ceiling is quite a responsible undertaking, which, among other things, involves a wide variety of calculations. Here it is necessary not only to calculate the repair budget, but also to correctly calculate how many lamps, especially if spotlights will be used, will need to be installed. To find out, the first thing you need to do is decide what distance between the lamps should be.
Ceiling lamps
Moreover, such calculations are important not only for creating a general lighting system in the house, but also in production (for example, for security, emergency, etc. types of lighting). Our article will tell you about everything related to this type of calculation.
Recommendations for placing lamps for different rooms
When planning, you need to take into account not only the size, but also the purpose of the room. Here are examples of the most successful installation options.
Hall
In the living room you need to provide several lighting scenarios. A chandelier is placed in the center. In spacious halls it is better to have lighting around the perimeter. Those that are more modest in size use a different placement option - in those places where it is especially important (work desk, reading chair, TV area, etc.). The arrangement may or may not be symmetrical.
Kitchen and dining room
Spotlights are installed above the cooking and dishwashing area. For this room, choose models that are protected from moisture.
The chandelier can be moved by placing it above the dining area. And in a small kitchen, you can get by with only built-in appliances, placing them in the second row.
Bedroom
Here you need a laconic ceiling lighting that does not attract unnecessary attention and is conducive to relaxation. A chandelier is optional. You will need lamps in the area of the bed, for example, built into the ceiling that is low in this area. You also need to provide lighting for the cabinet and dressing table. It is better to hang spots here to direct the flow of rays to the desired point.
Children's room
The room for a child is one of the most difficult. You will need lighting of different levels: strong in the work area, medium in the play area and very weak near the bed. Here you need to combine general overhead lighting (chandelier) and 1-2 groups of additional devices. And in the sleeping area you can install a night light or lay a diode strip.
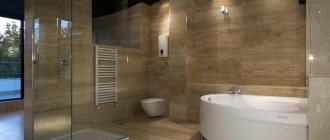
Bathroom and toilet
Just like in the kitchen, you need to choose appliances with waterproof casings. A few points of built-in lighting are enough
It is important that one of them is located near the mirror, and the other in the area of the bathroom or shower stall. You can develop a general layout scheme taking this into account or lay down additional spots
Hallway
Here you need to illuminate the entrance area, closet, clothes hanger and mirror. In a square room, a small chandelier and two or three point fixtures are enough (you can choose ones that resemble street lanterns). In the hallway of the Khrushchev building there are only enough spots. And in a narrow corridor it is better to install them in one line, in a wide one - in two, so the distribution will be more uniform.
The location and brightness of the lamps on the suspended ceiling determines how convenient it will be to use the room. This issue needs to be thought through before installation begins in order to prepare everything you need in advance.
Layout examples
The placement of lamps on a suspended ceiling largely depends on the purpose and shape of the room. The distances between point devices, decorative factors, and regulatory requirements are taken into account. It is important to ensure a harmonious combination of all norms and aesthetic needs, to create an attractive and stylish element of room decor. The space should not be overloaded with point light sources, but insufficient brightness is perceived negatively and depresses the people’s psyche. Let's look at some options:
Angle of light propagation from a spotlight
The light from a ceiling spotlight spreads downward in the form of a cone. One of the important characteristics of such lamps is the angle of light propagation.
To ensure normal, uniform illumination (that is, without any shadow sectors), the light cones from individual emitters should intersect approximately 75-80 cm from the surface (for example, for living rooms - from the floor, for kitchens - from the cutting table). Also, according to general (recommended by experts) standards, light circles on the illuminated surface should overlap each other by approximately ⅓ of the diameter. Below, as an example, we present a diagram of the location of spotlights used as the main lighting of a small bedroom (or living room) measuring 3 X 4.5 m (with a standard ceiling height of 2.6 m), made taking into account all the recommendations described above.
This specific example is valid for emitters with a light propagation angle of about 38°÷40°.
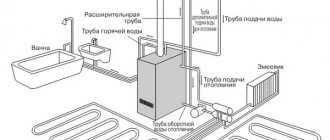
Distance between ceiling and tension fabric
To determine how much the height of the room will decrease, let’s take as an example the three most popular suspended ceiling designs:
- Simple one-level without lighting.
- With built-in lamps and chandelier.
- Two-level.
Minimum distance for a single-level ceiling
First, let's figure out how much a simple single-level ceiling will fall depending on the installation method and the type of profile used.
An aluminum wall molding with a harpoon fastening system eats up 3.2-3.7 cm, a plastic one - 2.5-2.9 cm. Taking into account the level difference, the height of the stretch ceiling usually decreases from 4.0 to 5.4 cm. Bead and clip profiles take up less space and allow you to reduce the space by 0.5-0.9 cm.
The ceiling harpoon profile made of aluminum has a height of 1.8-2.2 cm. The mounting part of the baguette is attached directly to the floor slab. Installation is technically more complicated and more expensive, but compared to the wall version, the loss of height is 4.2 cm less. When installing a plastic ceiling profile with a clip fastening system, the gap will be only 1 cm. A universal aluminum molding steals 2.5 cm of height from the room in the absence curvature of vertical surfaces.
To install the profiles, a hammer drill is used; the minimum distance from the drill to the top of the tool is 4 cm. Therefore, it will not be possible to make a hole closer to the ceiling. The offset can be reduced if you drill at an angle, but then the reliability of the fastening will decrease.
In addition, placing the molding close to the base ceiling is undesirable, since the space between the wall and the floor slabs is filled with low-quality concrete, which has weak load-bearing capacity. Over time, the profile may move away and the canvas will sag. Electrical cables often run here as well. This dictates the need to lower it some more distance and increases the minimum offset to 4-6 cm.
Height of stretch ceiling with built-in lamps
The most popular type of lighting for suspended ceilings are spotlights. The fastening is made to the rough surface in the inter-ceiling space; the parts of the lighting fixture are hidden behind the canvas.
The thickness of the stretch ceiling directly depends on the size of the lamps. The larger the lighting fixtures, the more the level decreases.
The design height of the most popular models of recessed luminaires is shown in the table.
| Lamp type | Minimum height loss, cm |
| Ecola GX53 | 3,8 |
| Ecola GX70 | 2,4 |
| Ecola MR16 | 2,4 |
| Feron DL308 | 2,5 |
| Feron DL11 | 2,7 |
| R50 | 9,8 |
| E27 | 11,4 |
Soffits (spots) can contain several light bulbs and are suitable for primary and additional lighting. The level decrease depends on the type chosen and is 5.5-10 cm.
If the chandelier is installed on a hook, the loss will be about 3 cm, installation of the platform will take from 4 to 5 cm, but the height of the structure itself will visually lower the ceiling more.
When installing hidden lighting behind the canvas, you need to step back from the LED strip by at least 4 cm. To install carved 3D ceilings, the distance must be at least 10 cm. Such designs are used in rooms with a height of 2.7 m.
How far does a two-level ceiling go down?
When installing a two-level stretch ceiling, special double-sided profiles are used. This allows you to position the canvas at different levels.
Baguettes for fastening the lower plane are mounted on the wall. The distance from the rough ceiling should be equal to the height of the double-sided profile and is additionally adjusted depending on the condition of the floor slab, the quality of the vertical surfaces, the presence of various communications and the location of the electrical wiring.
The total reduction in height using a special molding for two-level ceilings ranges from 9 to 15 cm. For large rooms, it is possible to use multi-level structures with a total level offset of up to 30 cm.
Influence on the height of the sheathing material and structural elements
The answer to the question of how many centimeters a suspended ceiling eats up also depends on the material of the supporting structures of the house and its features. In some cases, the ceiling finishing option requires securing the corners of the room and joints.
The lathing material affects the distance between the suspended ceiling and the base surface. At the same time, the wooden sheathing conceals up to 3 cm, the metal-plastic structure requires less space, it is quite durable, and is small in size. Used to create complex structures with several levels.
As far as we know, material stretched over a metal frame lasts a long time; aluminum sheathing is most often used.
Ceiling spots in the interior: photos in different rooms
If you have not seen the arrangement of the lamps on the ceiling, it is quite difficult to imagine the result from the diagram. Even the simplest diagrams - in the corners, in a semicircle near one of the walls, along opposite or adjacent walls - are quite problematic to imagine. Moreover, the appearance varies significantly depending on the shape, size of the lamp, and the type of lamp selected for it. After all, they are available with different scattering angles - from narrowly directed (about 30-40°) to shining in different directions (120-180°). That’s why in this section we have collected photos of schemes, and grouped them by type of room, because the appearance also changes depending on the design.
Living room
A chandelier is most often used in the living room, and most often it is quite large. If the room is square or close to square, it makes sense to choose symmetrical schemes. They emphasize the correct geometry.
Spotlights are located around the chandelier and in the corners
This is only true for those cases where there is no need to emphasize zoning. In this case, asymmetry is more suitable and you can use spots that differ in appearance.
In some areas the number of spots may be greater
In living rooms, a large number of light sources are most often used, which are divided into several groups. This makes it possible to vary the lighting intensity over a wide range.
Zoning is emphasized not only by light, but also by lighting
It doesn’t matter whether with or without a chandelier, but the diagrams contain more than a dozen spots, and more often - several dozen. So in this case, to save energy, it makes sense to install LED lamps
Yes, they are much more expensive, but in terms of efficiency they have no equal. At least for now.
Bedroom
The location of the lamps on the ceiling should be selected taking into account the fact that the atmosphere should be cozy and relaxing. Therefore, when choosing lamps, you need to choose them with a warm glow temperature, that is, those that give a slightly yellowish light. You should not place lamps with a blue or bright white tint in the bedroom - it will be difficult to relax.
The light should be warm
Bedroom lighting schemes are usually not very complex. A circuit of small lamps around the perimeter of the room, maybe a slightly larger number above the bed. That's all the delights. The simpler the better. The task is to create a cozy atmosphere and everything is subordinate to it.
If you want something original
If there are other areas in the bedroom - a dressing table or even a workplace, you can “add up” the illumination with the help of wall lamps. The second solution is to install more lighting fixtures in this area, put them on a separate switch and turn them on as needed.
Sconces are usually hung at the head of the bed, or table claws are placed on bedside tables.
So when choosing a layout for built-in lamps in the bedroom, one of the main rules is brevity.
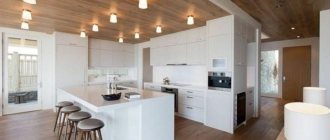
Kitchen
Most often, a kitchen, even a small one, is divided into two parts. In one they prepare food, in the other they eat it. When developing a lighting scheme, these zones are often emphasized. In this case, spots are usually placed along the kitchen unit, and a rectangle, oval, or arbitrary figure is built above the table.
Arrangement of lamps in the kitchen: two zones, two schemes
If the kitchen is very small, you won’t be able to set up complex circuits. In such cases, spots are distributed around the perimeter or along two walls - opposite or adjacent. This needs to be looked at depending on the situation, but both options are good.
Simple designs are more often used in kitchens
An oval or square also looks good. Just don’t install large lamps with complex shades in a small room. They, of course, look beautiful, but they are more suitable for the living room; in small quantities they are good in the bedroom. Even in the corridor and hallway they are appropriate. But not in the kitchen. Firstly, they are very difficult to wash, and secondly, they do not look good in a small room. Laconic forms are more suitable here. But a circle or a square - the choice is yours.
How to properly place spotlights in the kitchen
You can use different types of lamps. For example, as in the photo - on long legs. By the way, this is one of the trends. Lampshades can be of any shape, but the most common are cylindrical or round.
The actual calculations
Schematic representation of the room
Determining the distance needed to install lighting fixtures on a ceiling (regular, suspended or plasterboard) comes down to figuring out how many lamps will need to be installed in the room (bedroom, bathroom, etc.). From this alone the distance between adjacent lamps will be calculated so that they can all fit in the room. Thus, for the calculation we need to know:
- type of lamps installed in the room;
- the power that the lamp has;
- the total area of the room in which the selected light bulbs and fixtures will be placed.
Knowing these three values, you can already make a competent calculation of the distance that should be between the selected lighting fixtures. But do not forget that before the calculation it is necessary to calculate such a parameter as the number of lamps themselves. The algorithm of actions in this case is as follows:
- find out the power of the lamp;
- Next, measure the area of the existing room (multiplying the length by the width);
Note! If the room has a non-standard shape, then special formulas must be used to calculate its area.
- Next we multiply the area by the power. Let's remember this number;
- then we find out its light emission in the device passport;
- after this, you need to divide the light emission power by the figure we got by multiplying the area of the room and the power of the lamp.
The resulting number (can be rounded up) will reflect the number of lighting fixtures that need to be installed in this room. Calculating the distance between the lighting installations themselves is quite easy. To do this, you need to know that the lamps on the ceiling should be placed evenly. When zoning a room, some of the light bulbs can be placed a little more closely. By maintaining the sequence of calculations, you will be able to independently carry out all the necessary calculations correctly and without any problems and ultimately obtain an accurate figure. In this case, the error in your calculations will be minimized.
Transformers for halogen lamps and transformers for LEDs: are they interchangeable?
The transformer for halogen lamps has its “relative” - the transformer for LED lighting. But even with the same rated power and output voltage, these transformers are not interchangeable devices.
The fact is that in a halogen lamp the light source is an incandescent filament. The glow of an LED involves completely different physics. Electric current passes through the P/N junction of the diode and releases part of the energy in the form of a photon of light. This difference in the physical phenomenon of the glow of a halogen lamp and an LED puts different requirements on transformers. Without going into a deep analysis of transformer oscillograms within the framework of this article, let’s make some inputs:
- 12V at the output of the electronic transformer is the average voltage. In reality, there are short-term surges up to 40V. A halogen lamp “swallows” this jump without damage, but for an LED it can be disastrous.
- In addition to short-term voltage surges, electronic transformers for halogen lamps are characterized by instability of the output voltage. It can be in the range of 11-16V and depends on the input network voltage, connected power, and ambient temperature.
- The halogen lamp transformer produces non-rectified voltage. It contains both positive and negative impulses. For long-term operation of the LED, a rectified voltage is required, the pulse amplitude graph of which is close to a straight line.
Halogen lamp protection block Granite
Halogen lamps have an unpleasant feature - they burn out when turned on. Conventional lamps, of course, also have this disadvantage, but not to such an extent.
Halogen and incandescent lamps, as a rule, burn out when turned on, when the filament is still relatively cold and its resistance is low. In this case, a large current jump occurs, and a short-term high power is released on the spiral. This effect is described in detail on SamElectric in the article.
To extend the life of halogen lamps, such a device was invented - a halogen lamp protection unit
. The principle of operation of the protection unit is extremely simple - since the lamp burns out at the moment of a sharp jump in current through it, this device is connected in series with the lamp and limits the current at the initial moment.
The current, and therefore the brightness, gradually increases over 1 - 2 seconds. Connecting the protection unit is not difficult. It has two terminals, polarity, input-output and phase-ground do not matter. It is better to connect it in series with the switch in a phase break.
Such a unit is sometimes called a soft starter, a protection device, or a protection device. The device is used not only for halogen, but also for conventional incandescent lamps.
Installation by room type
All options for the location of point devices are unique for each room. There is absolutely no need to carry out installation in rooms according to the same pattern - devices can be placed in an original way, creating a winning effect in the interior due to spot lighting.
Let's look at examples of how to place spotlights on the ceiling in different rooms of a house or apartment:
Bedroom. The room does not need intense bright lighting. You may want to think about installing light sources without a central chandelier. It is enough to place the devices under the cornices and moldings in the working areas of the room. Spots can be installed in a zigzag, oval, semicircle and even in a checkerboard pattern. Kitchen. A room with a working dining area and food preparation area needs upper central and spotlight lighting. Without a chandelier, eating at the dining table will not be very comfortable. The arrangement of spotlights in the kitchen can be done as follows: three - above the work area and a chandelier in the center, seven pieces in a semi-oval above the tables and a central source with a square. Living room. A spacious room requires good lighting from a central light source and the design of individual zones. In this room you can install a lot of lamps and in any order, both symmetrical and asymmetrical
The main thing is to pay attention to decorative areas - paintings, a fireplace area, comfortable chairs at a table where you can read, and a TV. Children's room. The room is divided into two zones so that the child can relax and study, for example, learn homework
The light in the desk area should be brighter. You can arrange the spots in an L-shape. There is no need to install too bright a light by the bed, but overhead lighting in combination with a night light should be present. Corridor. This room is usually deprived of natural daylight. Placed above the mirror area, the light visually enlarges the room. In the center of the ceiling, you can place two or three more powerful lamps instead of a chandelier. And along the wall on which the mirror is located, several devices of lower power can be installed on the ceiling. Bathroom and toilet. High indoor humidity requires the use of devices that are well protected from moisture - the higher the index on the label, the better. Be sure to illuminate the area with the washbasin and mirror. In a spacious room, you can place spots symmetrically around the perimeter of the ceiling, and in a small room, you can concentrate light sources in the work area.
Calculation of the required number of lamps
The number of lamps is determined based on the overall level of illumination required for a given room. The main criterion is sanitary standards, which provide different values:
| An object | Illumination level, lux |
| Living room | 150 |
| Kitchen | 150 |
| Children's | 200 |
| Office, library | 300 |
| Corridor | 50 |
| Bathroom, bathroom | 50 |
Based on regulatory requirements, it is easy to calculate the optimal lighting level for each room. At the same time, you need to take into account your own preferences and decide on the most comfortable lighting style for yourself. Standards are not able to take into account the personal qualities of people, so they should be adjusted based on one’s own perception.
What parameters affect calculations
The main calculation criterion is the standard power of lamps per 1 m2 of area. It is generally accepted to be equal to 20 W, but this value applies only to incandescent lamps. LED devices have their own parameters, which are indicated on the packaging. To calculate the quantity, it is necessary to recalculate the total power of the devices in relation to the selected type of design
The performance of LED devices is approximately 7-9 times lower than that of incandescent lamps, so it is important to take into account the difference. Excessive lighting is poorly perceived by a person; harsh light negatively affects well-being and can cause headaches.
The distance between ceiling lights depends on several factors:
- number of devices;
- power;
- room configuration;
- interior features.
In addition to the distance, it is necessary to take into account the design of the point element itself. The deeper it is recessed into the canvas, the more the so-called. “dead zone”, a dark spot at the top of the walls. This phenomenon is especially noticeable in rooms where ceiling soffits are used, forming directed beams of light and not scattering it to the sides. This can be compensated for by installing several wall lights around the perimeter of the room.
Calculation order
The number of lamps is calculated in stages:
- the standard power of the lamps is determined. To do this, the area of the room is multiplied by 20 W;
- the total power is divided by 7-9 to adjust the values relative to the type of lamp;
- the resulting value is divided by the power of one spotlight. The result is a number of devices that meets the standards.
If you plan to install several lighting lines that allow you to obtain different modes (for example, brighter or evening, soft), you should calculate them in a similar way, only the total power should be taken at a lower value.
Optimal solutions
Stretch fabric has great decorative potential, which is realized with the help of lamps. There are many ideas for placing ceiling lighting fixtures. They are based on the uniformity of lighting, but take into account the features of the interior or the shape of the room. If there are decorative plasterboard structures, then the placement of lamps follows their shape, decorating and emphasizing the design elements.
Spot devices are installed around the perimeter of the room, or grouped in the center. In the latter case, the distance between them may be significantly less than the recommended values, but the overall brightness is compensated by a decrease in the power of individual point elements. A method of decorating a canvas that imitates a starry sky is often used, when the entire surface is filled in a chaotic manner with small lamps.
Important! It is most convenient to design a square ceiling, which allows you to create strict geometric groups. It is more difficult to choose a style in long and narrow rooms, when the distance between the long walls is small and greatly limits design possibilities. In such situations, additional elements installed on walls or other surfaces are used, and the ceiling slab is left free.
Before starting work, you should carefully consider and draw up a diagram of the location of point devices with the obligatory indication of the distances between them. This will help you find them after installing the tension fabric.
Kinds
There are several classifications of spotlights. Depending on the target direction of use, light bulbs are:
- for general and area lighting;
- for work surfaces and accents;
- universal.
Spot lighting plays a big role in creating the atmosphere.
Spot devices are also distinguished by their level of security:
- ordinary (IP20). Installed in rooms where the level of humidity and dust do not cause inconvenience;
- for increased requirements (IP22-44). They are used in bathrooms, in outdoor buildings under awnings, on terraces, etc.;
- with the highest degree of protection (IP55 and higher). They are used near swimming pools, in warehouses, in storerooms.
In general, the described devices, depending on the models, are divided into three types.
Invoices
A single-lamp device, presented in the form of a cube, cylinder or ball. A light source is placed at the lower end of the figure.
In most cases, the devices have mirror lamps. Thanks to this, the light is collected inside the shell into one beam, then scattered throughout the room. The lighting is mostly dim, which creates a romantic atmosphere in the room.
A number of features should be noted here:
- variety of forms;
- the ability to work with any light bulbs (from halogen to filament);
- ease of installation and dismantling.
However, with the installation of overhead modifications, the ceiling visually and actually loses height. The larger the selected lamp, the more contrast this effect is visible.
Built-in
Recessed spotlights are installed flush with the ceiling surface. The lamps are mounted directly into the ceiling.
Interesting to know! Designers often suggest decorative edging. So, the lamp itself moves 1-3 cm from the ceiling.
Benefits noted:
- excellent combination with modern and minimalist design;
- a wide range of
Recessed lamps and their installation in the ceiling
The laboriousness of the installation process is considered a compelling argument to “be careful.” Unlike the first option, for recessed spotlights it is necessary to calculate the diameter of the mounting socket, its shape, and the length of the wires. Therefore, when choosing models, you need to consult with a specialist in advance. Subsequent dismantling will not be complete without removing the suspended ceilings and cutting them.
Hanging
Original spots, installed not in the ceiling itself by cutting, but running on “legs”. The support of spotlights can change direction and degree of inclination, which is very practical for focusing attention on certain areas of the room. For example,
- racks, display cases;
- museum paintings, posters, photographs;
- sculptures;
- architectural details (arches or columns).
Hanging
Convenient for constantly adjusting the backlight. This method of lighting has found particular demand in museums, galleries, cinemas, and living rooms.
Characteristics
As a standard, the described luminaries consist of several elements:
- Decorative detail. We are talking about lampshades, shades, covers, etc. This is the final editing touch.
- Frame. Provides frame and protective functions.
- Light source. Here is an ordinary lamp, which is purchased separately or a built-in LED module.
- Technique. This includes drivers, microcircuits, electrical connections, etc.
- Fasteners for installation.
Important! Lighting sources can be ordinary halogen, LED and incandescent lamps.
Lamps with a built-in module - a guarantee of safety and long service life
Recently, installers and manufacturers have been trying to switch completely to LED lamps with a built-in module, since other models have significant flaws in their operation: heating and dim light.
You might be interested in Features of a fluorescent lamp
Which LED lamps to choose
Depending on the design and material of the product, an LED lamp can produce light in different directions. Before purchasing for a certain type of room, you need to study what types of light distribution lamps there are:
- Direct - when a directed flow illuminates a specific area.
- Mostly direct - illumination of a certain surface + a small part of the light is scattered upward.
- Mostly diffused lighting - created by directing the flow of light into the ceiling and reflecting from it.
- Diffused - when directing light onto the walls and ceiling, from which it is reflected.
Lamps for home
For the living room you can create multi-level lighting. A central chandelier may be provided, and spotlights may be used in individual areas. LED strips are also used.
For the kitchen, it is better to use general diffused light lamps and separately illuminate the work area. The light source must be moisture resistant and easy to maintain. Spots are suitable for small kitchens.
The hallway requires bright light, so it is better to use a spotlight, soffit or ceiling light.
For the bedroom, it is recommended to use a light source with dim soft light and several lamps in the bedside area.
The bathroom requires LED lamps with moisture resistance and high irradiance.
For office
Recessed lamps, including spotlights, are well suited for office premises. You can also buy overhead lamps that will be fixed to the surface of ceilings or walls. Often suspended light sources are used, which are attached at a short distance from the ceilings on chains or cables.
The choice of one type of lighting or another depends on the conditions of the office in which they will work. It is necessary to take into account protection from dust, moisture, the type of surface on which it will be attached, and lighting standards.
Household
Household LED lamps can be used for lighting in basements, garages, entrances and other rooms for various purposes. You need to choose a device with high protection from dust and moisture, in a durable housing with protection from mechanical influences and with a wide range of operating temperatures.
LED ceiling lights are a good alternative to traditional light sources. Despite their high cost, they help save energy, provide good lighting, are environmentally friendly, easy to use and will last a long time.
Device
Before installation, it is recommended to analyze two points:
- Lamp size. It is calculated depending on the object, the ceiling structure, the number of electrical appliances in the room, and the required power.
- Number of levels in the ceiling.
Pay attention to fire safety:
- non-flammable, heat-resistant cables;
- reliable connection method (via terminal blocks);
- correct determination of the required power.
Accenting with spotlights is a design move.
Next are the following stages of repair:
- Determining the type of ceiling. Rack and pinion - consists of a complex of narrow panels called slats and a hanging mechanism designed for fastening. Plasterboard - a lattice frame is folded, attached to the ceiling with connecting means. Tension - a canvas attached to a specific profile (made of aluminum or plastic) under the main ceiling.
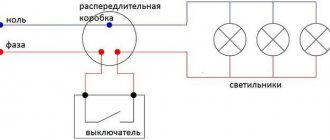
- Designation and wiring in places previously marked on the plan.
- Ceiling installation.
- Cutting holes for spotlights of the required diameter using specialized tools.
- Connecting cables using terminal blocks. Finish the job with electrical tape or heat-insulating shrinkage.
- Fixing the device in a complete structure.
Depending on the design, two types of lamps are also distinguished.
Rotary
For rotating spotlights, the body together with the bulb can change the direction of light due to the presence of a hinge. This makes it possible to adjust the flow of “rays” to a certain place. These include:
- spots;
- chandeliers with rotating branches.
The standard rotary luminous apparatus includes:
- hinged part responsible for mobility;
- stationary element;
Attention! There is free space between the hinge and the stationary part, providing better ventilation.
- metal case with built-in base;
- bracket.
Rotating lamps - independent control of the flow of light.
Undeniable advantages (besides the obvious):
- various execution options;
- compactness of lamps;
- ease of installation;
- interaction with any light source.
There are no downsides as such. However, the cost makes itself felt.
Static
Fixed spotlights are designed for main (upper) lighting. They are used if the project does not provide for a central luminous element (chandelier or ceiling light). Then the points are located in groups on the main intersection areas.
Stationary lamps in the living room design
The device is firmly fixed in the ceiling space. Subsequently, the light flow is directed exclusively in one direction (mainly vertically).
They cost an order of magnitude cheaper than rotary ones. Which explains the lack of a turning mechanism.
Height of suspended ceilings and installation of lighting fixtures
Depending on what kind of lamps are planned to be installed in the room, the distance to which suspended ceilings are lowered from the ceiling also varies. By combining several lighting options, you can not only visually divide the room into functional zones, but also make it more spacious and taller.
Lamps that are most often installed when installing suspended ceilings:
- Spotlights (spots);
- LED backlights;
- Chandeliers;
- Halogen lighting;
- Using LED strip for a stretch ceiling.
Spotlights (spots)
Standard placement of spots on the ceiling of a small room
Very convenient and functional lighting fixtures for suspended ceiling structures that can be installed in any room:
- Apartments;
- Offices and offices;
- Bars and restaurants.
The system of spotlights is combined into a single whole, and each individual lamp can be rotated in any direction. This allows you to illuminate the necessary areas of the room using a minimum number of lighting fixtures.
When installing spotlights on stretch ceilings, no more than one centimeter of gap is required between the ceiling and the stretch ceiling sheet.
A variety of decor options for spots allows you to choose exactly the option that best suits the design of the room.
Spotlights consume a small amount of electricity and significantly save lighting costs.
LED lighting for stretch ceiling
Effective LED lighting in combination with spotlights
An effective design solution for the design of suspended ceilings, which completely solves the problem of how not to lose the height of the room. With the help of interior lighting, you can make the room taller and more spacious by placing it around the perimeter as a central solution in the design of the ceiling covering.
You can also arrange the internal LED lighting in the form of a dome, which will not only give the room a solemnity, but will make it taller.
There are a great variety of design options for the placement of lighting on the ceiling and you can always effectively and originally illuminate a particular area of the room.
When installing LED lighting, a gap of at least two centimeters between the ceiling and the coating is required.
Installation of a chandelier on a suspended ceiling
Installation of a chandelier on a suspended ceiling using an installation strip
First, you should decide on the type of chandelier that you plan to install on the suspended ceiling.
There are two types of chandeliers:
- Ceiling chandeliers that are mounted on a mounting plate;
- Hook chandeliers – hung using a hook and loop.
Depending on how far the suspended ceilings are lowered, the option for mounting the chandelier is selected. Mounting on a hook provides at least three centimeters of distance between the ceiling and the stretch ceiling.
Halogen lighting for suspended ceilings
Combination of halogen and raster lighting
Halogen lamps not only significantly save energy, but also have greater brightness. Thanks to the varied shapes of halogen lamps, you can design an original and stylish design for a stretch ceiling.
https://youtube.com/watch?v=j0BZHEkxkuc
LED Strip Light
The use of LED strip for stretch ceiling decoration
LED strips are not only an effective decoration for ceiling structures, but can also correct unevenness made during the installation of the stretch ceiling frame.
In conclusion, we can say that the distance to which it is possible to lower a suspended ceiling can vary from two to twenty centimeters, depending on the chosen design and design features of the room.
Main conclusions
The choice of distance between ceiling lighting elements is determined not only by regulatory requirements, but also by your own preferences or design decisions. The main criterion for determining the optimal distance is also comfort, ease of perception, and the absence of irritating factors from an excess of lamps. When calculating the number of devices and determining the layout, you should take into account the purpose of the room, the age and habits of the people living in it. This will allow you to choose the optimal placement of lamps, install them at the most favorable distance from each other, and create an attractive and cozy design style for the stretched fabric.
Previous
Lighting in a suspended ceilingHow can you calculate how many lamps are needed in a room with a suspended ceiling
Next
Lighting in a suspended ceilingLighting options in a bedroom with a suspended ceiling