The creation of an autonomous heating system begins (or ends) with the installation of a gas boiler.
This procedure is one of the most important and critical stages of work, although it is not fundamentally difficult.
Depending on the design features, additional actions of various types may be required.
This applies to installing your own chimney of one type or another, connecting the boiler to a common chimney, choosing a location and other actions.
In the process of work, many issues arise, both technical and organizational and administrative, which should be discussed separately.
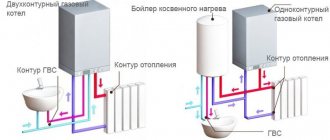
Where should a double-circuit boiler be installed?
Installation of a double-circuit boiler must take into account several requirements:
- The design features of the unit itself are outlined in the user manual.
- Current norms and rules for the installation of gas installations.
- The location of the common chimney, the specific placement of the heating system and other features of the system.
Most double-circuit boilers require connection to a special coaxial type chimney. This is a short unit, arranged like a “pipe in pipe” .
It is passed through the outer wall at the installation point of the unit, connected from the inside to the flue gas outlet, and from the outside it is designed according to its own operational requirements (special cap, mesh fencing or other protection elements).
To install such a chimney you need an external and strong wall . Typically, such units are installed in the kitchen.
If the boiler is of an atmospheric type (with an open combustion chamber), it requires a separate room with an area of at least 8 m2, which has its own window opening.
Floor-standing boilers, as a rule, have large dimensions and weight, so they choose separate rooms in the lower floors of the house.
IMPORTANT!
First of all, you should carefully read the instructions, which clearly describe the conditions of installation work and give instructions for their production.
What to do if the diameter of the gas pipeline does not match the boiler pipe
Sometimes the inlet on the boiler may not match the diameter of the gas pipeline. For example, the gas pipe of a Navien floor-standing boiler is 1/2″, and the gas pipeline is 3/4″. Is it possible to connect the device using a DU-15 1/2″ bellows connection instead of 3/4″? Such a transition is permissible, since it is local and does not provide significant resistance.
It is impossible to imagine a modern private house, and especially an apartment in an apartment building, without gas equipment. This could be a stove, a heating boiler, a heating boiler, or other household appliances.
Gas is supplied to a house or apartment through a pipeline system, and from it to each individual consumer via flexible connections. Flexible gas supply can be made in several versions at once.
What requirements must be observed during installation?
When performing installation work, you will have to combine two types of requirements:
- Installation conditions set out by the manufacturers.
- Norms and rules for working with gas equipment.
The installation procedure is always described in detail in the instructions. Even if there are no specific requirements, any manufacturer must outline the procedure.
To install wall-mounted units, you must:
- The presence of a strong, ideally load-bearing wall, capable of supporting the weight of the boiler.
- Installation on thin or plasterboard partitions is prohibited.
- Gas boilers with an open burner require a separate room. If installation is in the kitchen, there must be a door and window opening.
Floor-standing boilers have their own requirements:
- The installation is carried out on a layer of asbestos covered with a sheet of metal. This seems unnecessary, but most manufacturers, as well as gas service workers, are unanimous on this.
- The room is separate, ventilated, with access to any point of the boiler.
- The distance from the walls to the surfaces of the unit is at least 0.3 m (for some installations it is greater, please check the instructions).
- The room used as a boiler room should be free of trash, flammable materials, and foreign objects. There should always be quick access to the window, and access to the boiler from all sides should be free.
When mounted in the kitchen, it is allowed to use a quick-detachable decorative box with opening doors.
The gas service requirements are a separate list of conditions. The main one prohibits unauthorized actions with gas equipment . According to it, no one, except gas specialists who have all the required permits and approvals, has the right to install, move or perform other actions with gas appliances.
There is a fine for violation. According to the rules, upon commissioning, the owner undergoes instructions, signs in the log and begins to bear full responsibility. In practice, the situation is somewhat confusing, since these rules were developed for residents of apartment buildings.
Therefore, in most cases, some deviations from the norms are ignored, provided that they do not pose a danger.
In particular, they usually make a compromise - the owner can connect the boiler to the gas supply pipeline, but the connection of this pipeline to the main line is carried out by specialists.
NOTE!
According to Art. 7.19 of the Code of Administrative Offenses of the Russian Federation, unauthorized connection to gas networks is punishable (for individuals) with a fine of 3-4 thousand rubles. Any inspector from the gas service can qualify the connection as unauthorized, so all actions should be agreed upon in advance.
Types of gas taps
In old buildings, two types of cranes were usually installed on vacation:
- petal;
- suberic.
The differences between the designs of these products can be seen in the figure.
When the slab is replaced or the valve fails, it is best to install a new ball valve.
This device is much better, but more expensive. Installation of an Italian faucet will cost $10. You can also install a cheaper domestic faucet, costing $5. They are no worse than their foreign counterparts, but sometimes have defects. Therefore, do not forget to take a receipt with you when purchasing so that you can exchange the defective product for a good one.
Wall-mounted unit installation and connection diagram
First of all, you should carefully study the instructions and prepare all the necessary materials and tools. You can start working only when there are no unclear points left.
If all issues are resolved, proceed with the actual installation.
Let's look at the procedure:
- The boiler delivery set usually includes a template, according to which holes are made on the wall for anchors and a coaxial chimney. The bearing surface is marked on it.
- Using a hammer drill, holes are made for the anchors.
- A mounting plate is attached to the anchor, onto which the boiler is hung. This point cannot be neglected; the plate provides a technological and fire safety gap between the boiler and the wall. Its size must be at least 45 mm.
- The boiler is attached to the plate using standard elements included in the delivery set. All parts must be used and their quantity must not be reduced. There are often situations when the unit is installed in a corner, thereby violating the condition of having a 30-centimeter gap on all sides of the housing. In this case, there is no possibility to secure elements located in the corner. This setting is unacceptable.
- Communications are connected according to the location and purpose of the pipes. As a rule, the extreme left and right are the forward and return lines of the heating system. In the center there is a gas pipe connection pipe. the second ones on the left and right are the hot water pipeline and the cold water supply line. This arrangement is most common, but there may be other options. It is necessary to carefully study the instructions and clarify the location of the pipes of the existing model.
The last step is to connect the boiler to the power supply system. This also has its own characteristics . Most volatile boilers are extremely sensitive to changes in supply voltage.
For proper operation it is necessary to use a power stabilizer.
If this is a standard device produced by the boiler manufacturer as an additional peripheral element, then to connect it you will need to insert a plug into the output of the stabilizer, and connect the device itself to the network.
Other types are connected in a similar way. The main requirement will be the presence of a connected grounding electrode, without which the boiler electronics will constantly generate errors (diagnose a stray flame).
After this, the installation can be considered complete and proceed to the next starting operations.
IMPORTANT!
When connecting pipelines, you can be guided by the diameter of the pipes. On some boiler models it is different, which eliminates the possibility of erroneous connection of communications.
Types of gas flexible hoses
The current market offers a fairly extensive list of gas hoses. In addition to the material, you will also need to choose a manufacturer. And in this case it is better not to save. The item is bought once and for a long time. Having saved 500 rubles, you can then spend a lot on health and repairs if the pipe starts leaking gas. Therefore, let’s first look at the varieties.
Rubber-fabric
It has many advantages that allow it to be used in a gas system:
- easy installation;
- good flexibility;
- low cost;
- various sizes;
- excellent electrical insulation.
The disadvantage of such rubber parts is poor rigidity. Today, the industry produces hoses from a special material of high elasticity. Therefore, their service life can reach 10 years.
The cost of such hoses usually does not exceed $7.
Bellows metal
Professional gas fitters consider it the most suitable for gas systems. The service life of such hoses can be more than 25 years. It connects to a gas stove without any difficulty. Bellows systems can be connected to boilers and water heaters, and they are completely safe.
If you have a gas stove equipped with electric ignition in your kitchen, in order to connect the bellows device, a special insulating connection is created between it and the tap.
This type of hose bends freely and can withstand high pressure, reaching 6 atmospheres. It can withstand significant temperature changes ranging from -50 degrees to heating up to 200 degrees. The main disadvantage of a bellows hose is its cost. It is many times higher than similar gas connections.
The advantages of such bellows metal systems include:
- made of stainless steel;
- complies with GOST;
- meets all technical requirements;
- protected from any mechanical influences by a special polymer coating;
- able to withstand any mechanical impact;
- the warranty period exceeds 30 years;
- withstands voltage of 1500 Volts.
Oxygen
It can also be connected to gas stoves, but you need to take into account several very important points:
- The internal diameter must exceed 16 millimeters;
- The surface in contact with oxygen must be well cleaned of oil. Otherwise, the hose will overheat and material damage will occur.
The advantages of oxygen hoses include the following characteristics:
- withstands high pressure. It can reach 20 atmospheres;
- very simple installation;
- low cost;
- rich assortment;
- does not conduct electric current.
Installation of the floor model
Since installation is carried out on the floor, it is necessary to provide it with sufficient strength and rigidity. A cement screed or reinforced concrete slab is required; floor units should not be installed on wooden floors.
There is no direct prohibition on this installation method, but we must remember that wood is prone to warping, drying out, and cracking. Over time, the stability of the boiler may become impaired, which will entail very undesirable consequences.
If possible, a floor-standing boiler should have its own foundation . This is done for powerful and massive models, but you need to take care of flexible adapters, since the position of your own base relative to the general foundation may change, and a significant load will be created on the pipes.
This may result in leaks or destruction of connecting elements.
Procedure:
- Unpack the boiler and check for the presence of the necessary documentation. Make sure the device is complete.
- Place the boiler on a prepared non-combustible base. Carefully align it horizontally. To do this, you need to use all the possibilities - when building the podium, ensure that the horizontal support plane is as level as possible, and use height-adjustable boiler supports. As a last resort, you can place tiles made of non-combustible material under the legs.
- Connect the chimney.
- Connect the direct and return pipelines of the heating system. On the return side (the flow coming from the system to the boiler), it is necessary to install a filter to remove metal particles, scale and other small elements. This will help preserve the boiler heat exchangers and increase its service life.
- Connecting hot and cold water pipelines is no different from connecting a heating system. A filter must also be installed on the cold water supply pipe. Some experts recommend installing shut-off valves; this will help quickly shut off water under pressure.
- Connect the gas pipe through a special shut-off valve. This is mandatory; there must always be a shut-off unit that allows you to quickly stop the fuel supply. You can only connect the gas pipe to the boiler yourself. Only a gas service specialist who has a permit and all the necessary documents has the right to connect to the main line. He will also check the quality of the connections using a soap solution.
- The power connection should be made using a special socket with a grounding electrode. It is strongly recommended to use a voltage stabilizer so as not to spend money on expensive repairs to the boiler electronics.
The last step will be another thorough check of the correct connection, strength and reliability of the pipeline connection.
After this, you can begin setting up and launching for the first time.
Preparatory work
To install the unit correctly, it is necessary to perform a number of basic works so that no emergency situations arise during operation of the equipment. You need to start by collecting permits. At the same stage, a place for installation of the heating system is selected and prepared. All current regulatory requirements are taken into account.
How to connect a boiler
There are different options for installing a boiler, depending on its design.
Can be used:
- Indirect heating boiler with heat exchanger.
- Layer heating boiler.
- Electric storage boiler.
The most accessible and inexpensive option is an external stratified heating boiler. It is not equipped with its own heat exchanger, so it is inexpensive and easy to operate.
Any type of connection is made according to the user instructions. The process is not difficult at all, you just need to connect the boiler inlet and outlet to the corresponding boiler pipes, and also connect the hot water collection line to its outlet.
Depending on the design, a connection to a break in the heating circuit supply line, or a direct DHW outlet from the boiler can be used to accumulate hot water in a container.
Preparation of devices
To install and subsequently start up such heating devices, the following tools and materials are required:
- American type detachable connections, ball valves. These elements are used to connect pipes with cold and hot water.
- Self-tapping screws, brackets, dowels.
- Pipes for the heating circuit and chimney.
- Filter with a deep cleaning system on a magnetic basis. This extends the service life of the boiler, since particles of debris and dirt will not enter the internal compartment of the system.
- Three-core cable, sockets, 2A automatic switch.
- Hacksaw, screwdrivers, set of keys, drill, file.
The classic connection diagram for a gas boiler allows even a beginner to install all the necessary equipment.
If plastic, copper or metal-plastic pipes are installed, the list of parts and tools may change.
Installing a coaxial pipe step by step
The coaxial chimney is installed in close proximity to the boiler, along the axis of the chimney outlet. A hole must be made in the outer wall, 5-10 mm larger in diameter than the external size of the chimney.
This is done using a special diamond crown, or with a conventional hammer drill (which takes a long time and will require additional plastering and finishing work).
After that:
- The base of the coaxial pipe is connected to the boiler chimney outlet.
- The first chimney segment is installed. Immediately securely fixed with all appropriate fasteners.
- After it, the second section of the chimney is connected, the whole procedure is repeated. All pipe sections required by installation conditions are connected in a similar way.
- The joints of the pipe and the gap between the chimney and the wall are carefully sealed.
- The performance of the chimney is tested.
A through hole in the wall is made with a slight inward slope so that condensate can drain into a special container. If this is not done, the chimney outlet will freeze in the winter.
Boiler room preparation
First, work is carried out to improve the furnace room, radiators are attached, water supply and heated floors are installed. Before fixing the main unit, electricity and sewer pipes are installed. Heating is installed after laying a solid floor based on cement screed. The walls, floor and ceiling are finished with fireproof materials.
Installation of high-quality heating devices involves the installation of auxiliary equipment. It is necessary to use the boiler diagram to provide for all the nuances of the arrangement. The locations of the mounting holes are marked on the wall and floor, and all missing elements are installed. The heating boiler is installed last.
How to start the boiler after installation
The first launch is carried out in stages:
- The system is slowly filled with water. This is necessary so that all the air has time to escape. Fill until the pressure is 1-1.5 Bar.
- Check the condition of all connections, look for possible leaks.
- After this, gas is supplied and the boiler is tested. These actions are performed by technicians from the service center. They determine what adjustments need to be made to the factory settings, determine the upper and lower limits of temperature conditions, and perform other necessary actions. Starting the boiler on your own is not recommended even for experienced people, and this procedure is strictly prohibited overnight.
Installation of a home boiler room
Installation of multifunctional gas equipment in a two-story wooden building is carried out only in a specially equipped room - a furnace room. You cannot break the rules, since gas-powered units belong to the category of potentially dangerous devices, which is why they must be operated with the utmost caution. The boiler room must meet the following requirements:
- The minimum permissible ceiling height is 2.5 m.
- Availability of natural light.
- The minimum width of the doorway is 85 cm.
- Installation of a gas analyzer that communicates with an automatic valve so that in the event of a fuel leak, the gas supply is immediately stopped.
- The degree of resistance to open fire must be at least 0.75 hours.
- Ventilation equipment.
- Unobstructed access to heating and auxiliary equipment.
When installing a boiler with a closed chamber, the area of the combustion room does not matter, and the ventilation requirements are less stringent, since the boiler takes air from the street to operate.
Gas release
The second part of the start-up is the release of air from the pump, for which the heating regulators are brought to the operating position. The circulation pump turns on, which is accompanied by a faint hum and gurgle of water. To eliminate noise, you need to bleed air from the heating system: the cap in the center of the pump is slightly unscrewed, and when water begins to come out instead of gases, the cap is screwed back.
https://youtube.com/watch?v=taQJKUjiso8
After this, the noise will stop, the electric burner will start working, and the boiler will start working. You should also check the pressure and add more water if necessary. To set up a working system, you need to screw the batteries closest to the boiler, and start the distant ones using control valves, which are located in the water supply section to the radiators.
You also need to take care of the sewage system: during installation, you need to calculate the volume of condensate at the rate of 1 liter per 1 kW of equipment power per day.
Ventilation is located 25 cm from the ceiling with a diameter of 10 cm. Date: September 25, 2021
Selecting a heating system wiring diagram
There are several options for lining the boiler with polypropylene.
This scheme is selected individually for each house. What is optimal in one building may be ineffective in another. In addition, heating systems based on the principle of water movement are divided into: forced with a hydraulic pump and gravity (gravity, natural), there is also a classification based on the construction of pipelines. According to their structure, they are single- and double-pipe, collector beam or analogues with closed rings.
Which is better: gravity or pump?
In the gravity circuit, heated water flows from the boiler to the radiators by gravity. A hot coolant that has a high temperature always tends to replace a colder liquid. This heating boiler piping system is the easiest to assemble. In addition to the heater, it contains polypropylene pipes, radiators and an expansion tank.
In the version with top distribution, water, after heating, rises to the highest point - into the expander, and from there it goes down to the batteries. After the heat is released, it returns to the boiler, where it is heated again, then starting a new cycle.
This is how heating is installed in many houses in our country’s villages. Only there is a solid fuel stove. This is the simplest and cheapest way to organize heating for a small cottage. However, it has limitations both in the number of connected radiators and in the distance of the outermost one from the water heater.
The piping scheme with natural water movement is the simplest of all possible options, it has a minimum of nodes and connection points for polypropylene pipes
The compulsory system is more complex and expensive. However, it greatly simplifies the creation of comfortable temperatures in individual rooms. The coolant moves in it due to the stimulation of its movement by the pump.
The choice of polypropylene pipe layout and the boiler itself are closely related. The natural circulation system is energy independent. If the water heater does not require power from the electrical network, then even during power outages the house will be heated.
In a forced circuit, the pump requires a constant power supply to operate. Therefore, it is best to select a boiler for it that is dependent on electricity, which has additional capabilities. But in order to insure against voltage problems, you will have to purchase a backup generator or uninterruptible power supply.
Which heating scheme is better to choose?
There are many ways to route polypropylene pipelines from the boiler to the heating radiators.
But all these schemes are divided into:
- single-pipe;
- two-pipe.
In single-pipe systems, heated water supplied as a coolant is supplied and discharged through one pipe. In two-pipe systems for supplying coolant and return, i.e. to drain cooled water back into the boiler for heating, separate lines are constructed.
According to the method of connecting the working components, heating circuits are divided into:
- tee;
- collector
Tee types can be used for both gravity and forced circulation. The collector circuit can only work if there is a circulation pump.
A single-pipe circuit is obviously cheaper than a two-pipe circuit, but the radiator farthest in the chain from the boiler receives a minimum of thermal energy (+)
The single-pipe method involves laying one looped line and connecting batteries in series to it. In a two-pipe scheme, two independent pipelines with hot water and return flow from the boiler. And radiators are already connected to them.
With collector piping, one or two collectors are built into the system, from which separate pipes are routed to each battery. Also, such a distributor allows you to connect a “warm floor” made of the same PPR to the boiler.
Collector wiring makes it possible to create efficient heating systems for houses of large area and different number of storeys (+)
The use of collectors and separate risers for each battery leads to a significant increase in the cost of both design and installation. At the project preparation stage, more complex calculations have to be made. And during assembly, a much larger volume of polypropylene is consumed. But what we get is a system, each part of which can be adjusted to specific conditions and requirements.