Here you will learn:
- Installation of convectors for window sills
- Purpose of convectors
- Advantages and disadvantages
In an effort to make heating more efficient, specialists in the field of heating engineering have created convectors built into the window sill. Such unusual heating devices are designed to provide reliable protection against the penetration of cold into heated rooms. And it should be noted that they do this quite well. Let's see what these built-in convectors are, how they are designed and how they work.
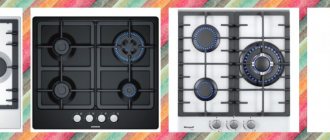
Types of convectors depending on heating elements
Convectors for installing a heating system in rooms, depending on the energy source used, are divided into several types:
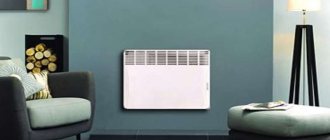
electric. Devices of this type are very convenient and effective. They work from the mains. To install them, you do not need to install a complex pipe system. Electrical appliances are equipped with closed-type heating elements - heating elements. Additional plates are installed on them to increase the heat transfer area. Heating elements are made of aluminum, steel and copper. The durability of the entire system and its efficiency depend on the quality of the heating elements;
aquatic. The working element of the system is hollow tubes, which are equipped with welded or pressed plates. A certain coolant circulates inside - water, antifreeze, and others. The type of liquid depends on the model of the device. Connection to the existing heating system is made through threaded pipes. Coolant circulation is most often forced. The system layout is one- or two-pipe. Pipes are made of copper, aluminum, regular and galvanized steel. The first option is characterized by the highest cost. To reduce the price, a combination of copper and aluminum is often used. The cheapest models are made of galvanized steel;
gas. Devices of this type are characterized by efficiency due to the low price of energy. A significant disadvantage of using such units in residential buildings is the high risk of gas explosion
But if all precautions are taken, these devices show their best side.
Advantages and disadvantages
Built-in convectors have a number of positive qualities, thanks to which the popularity of these heating devices is only growing. The benefits include several factors.
- Compact size and neat design compared to classic radiators. Convectors do not take up much space and are not conspicuous. The only visible part of the structure is the metal grilles for air intake.
- Safe. Since their body is hidden, and the device itself does not heat up to high temperatures, it is impossible to get burned on it. This makes it an ideal choice for installation in apartments with small children.
- Efficiency. Built-in radiator models are no different in results from classic models and perfectly heat rooms of any size.
- They do not spoil the interior and are invisible. More and more designers are proposing to install floor convectors in their projects. They do not overload the interior with unnecessary details and are combined with any style - both classic and modern.
- Fast heating of the room. This is possible thanks to the tangential fans installed in such radiators. They provide additional, forced convection.
However, such radiators also have disadvantages.
- High price. Built-in models have always been and will be more expensive than classic convectors. This does not allow them to be used for mass purposes.
- The installation process can be difficult. Difficulties are especially often encountered when integrating convectors into ready-made window sills. For this reason, many install radiators before replacing windows or during the construction of a house.
Hidden convectors are divided into several types depending on the installation location.
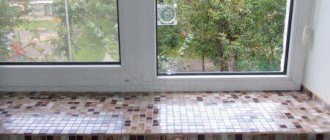
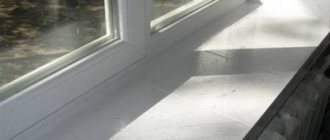
Built into the window sill
Such models are installed under the window. Its main functions are:
- blocking the penetration of cold air into the room from windows;
- protection of glass from fogging and freezing;
- protection of slopes from the formation of condensation and, as a result, mold.
According to statistics, up to half of the heat in a room can escape through the windows. In addition, condensation on the windows will invariably lead to an increase in the overall humidity in the home and increase the risk of mold formation. Convectors built into the windowsill cope well with these tasks, becoming the first line of protection against cold and dampness in the apartment.
Supplemented with tangential fans, the models will provide forced convection, which will significantly increase the energy efficiency of the device.
In-floor
You can often find a so-called water fan coil on sale. It is sometimes called electric because it is complemented by tangential fans that operate from the mains. The power range of such devices is from 750 to 3000 kilowatts. They differ from standard models only in the shape of the body and the location of the grilles for air intake.
Heated double-glazed windows
Recently, there has been an increase in demand for windows in which heated double-glazed windows are installed, capable of creating a thermal curtain directly in the air chamber itself. Their operating principle is based on heating a special coating, evenly distributed over the entire area of the glass, with the passage of electric current. A detailed review of these models has been published on OknaTrade. This modification will cost more than the two previous devices, but it is much more advanced and compact than heaters and more functional than flexible heating tapes. In Russia, heated double-glazed windows are recommended for installation in regions with harsh climates, as well as glazing of verandas, terraces, winter gardens and swimming pools.
Built-in heating systems
Heating built into the floor must have a special recess in the floor. To do this, a niche is made before laying the floors. An electric convector or in-floor water heating convectors are installed in it. Such systems are widely used in houses with panoramic glass panels. They do not spoil the appearance of the interior of the rooms. Built-in heating device, covered with a decorative mesh flush with the floor. This allows you to heat not only the room, but also doors and windows.
In-floor water convectors are more economical than an electric unit built into the floor.
Materials for the manufacture of water heating systems are varied. Thermal conductivity properties of the metal from which the pipes and fins of the models are made:
- Iron – 47 W/Mk
- Brass – 111 W/Mk
- Aluminum – 236 W/Mk
- Copper – 390 W/Mk
Devices
Copper has greater thermal power. Combined options such as copper-aluminum (aluminum fins) or copper-brass (brass fins) have a lower cost. Although they are not inferior to copper in thermal conductivity. Iron water systems built into the floor are the cheapest. Their thermal power is significantly inferior to the listed specimens.
Electric convectors built into the floor are made of heating elements to which current is supplied. The heating elements are usually protected by ceramic jackets. Heat-conducting metal plates are mounted on their body. They increase the heat transfer area.
Built-in water heating convectors can have forced or natural air convection. With natural circulation, heated air rises on its own. It is pushed out by the cold lower layers of air. For forced convection, it is necessary to build in one or more small fans. They promote more intense air exchange through the heater. This helps to heat the desired room faster. Fans are connected to an AC or DC power source. Electric convectors that are built into the floor are also equipped with such devices.
Built-in heating can be equipped with temperature sensors that connect to the smart home system. This helps improve operating efficiency.
Water
The underfloor water convector can be used in the summer as an air conditioner. For such purposes, systems with four pipes are used. They are connected simultaneously to the heating and to the chiller (liquid cooler). Such models are called fan coil units.
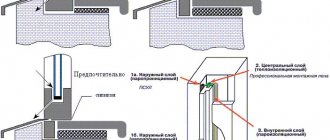
What does it consist of?
The main part is in the window sill block. The block is made of expanded polystyrene (high-rigidity, XPS or its cheaper variety, EPS), which can withstand loads well and create a decent level of tightness. The material is inexpensive, does not absorb moisture, and does not dissolve in it. Such blocks are compatible with windows made of any material: aluminum, wood, PVC, but the profile system must be taken into account.
Important
Expanded polystyrene is inert in a chemical sense, does not decompose, and is safe for human health. According to scientists, it retains these properties for at least 50 years.
Benefits of the latest technology
Infrared film is used not only for heating window sills; it is used in systems of heated floors and baseboards. Installation of this device is simple, and no special tools or skills are required.
The heating film has the following qualities:
It heats up in a very short time: one or two minutes, and it is in the operating temperature range. It warms up efficiently, evenly, affecting the entire area. Electricity consumption is striking in its economy - 20 W. Three window sill plates - three 20 W each - the energy consumption is equal to one incandescent light bulb. Excellent aesthetic appearance. It does not damage the base at all, since it does not require either a cement screed or an adhesive solution for installation: it is applied to the surface using a dry method
This is very important: if it fails, there is no need to do “dirty” work. Replacement will require about an hour of free time. Sold in kits that include all the necessary accessories and elements for its installation: special tape, mounting wires, an insulating block, several clamps. To control such a heating system, a convenient electronic control has been created
There are both simple hand-held devices and programmable ones with an LCD display. Invisible to prying eyes. It is more convenient to measure thickness not in millimeters, but in microns.
Do-it-yourself remote glazing - step-by-step instructions
- Clear the subfloor by removing the old floor and removing loose concrete with a hammer drill. Pour reinforcing screed over the cleaned balcony slab using ready-made dry mixtures.
- Remove the old glazing and cut off the balcony railings. Treat the floor, façade and top slab, which acts as a roof, with penetrating waterproofing.
- Attach the vertical posts of the future metal structure to the façade using anchor bolts. Lay the metal logs of the future floor on the slab, securing them with anchors.
- Place a horizontal beam on the edge of the joist, butt-weld or overlap it. Before starting work, put on a safety belt and secure the beam with a cable.
- Assemble the side elements of the metal structure (left and right sides) “on the ground”. Lift them onto the balcony and weld the “sides” to the horizontal beam and vertical post.
- Prepare the vertical posts, weld them to the horizontal (support) beam and the side elements of the metal structure. Assemble the front part of the metal structure. Weld the counter-lattice to the front and sides to which the cladding is attached.
- Complete the installation of the metal structure by installing the top brackets on which the roofing sandwich (canopy) will rest. Paint the metal structure with an anti-corrosion primer.
- Fix the rolled waterproofing on the counter-lattice and secure the outer finish - a profiled sheet.
- Insert plastic windows into the openings, or rather, their frames (without double-glazed windows).
- Insert insulation panels (mineral wool or polystyrene foam) into the gap from the window sill to the floor. Fill the joints with foam. Cover the insulation with a vapor-permeable film.
- Install a counter-lattice made of wooden beams on top of the insulation, and screw drywall to it - the basis for interior decoration.
- Insert double-glazed windows into plastic frames, fill the cracks with polyurethane foam, install window sills, slopes, ebbs, upper and lower canopies.
- Assemble the roofing pie: fasten sheets of metal tiles to the upper brackets, laying rolled waterproofing underneath them. Glue the foam sheets that fly out onto the canopy to the ceiling. Sew up the ceiling with plastic or plasterboard.
- Place a heat insulator on the floor - extruded polystyrene foam. Fill the thermal insulation with reinforcing screed (at this stage you can organize the installation of a heated floor system).
- Take care of the interior decoration. Cover with plasterboard or use lining (as an option - balsa wood panels).
- Finish the flooring using floor tiles, linoleum, and decking boards.
Using this scheme, you can assemble the takeout with your own hands. However, at the installation stage you will have to deal with high-altitude work on a dangerous area - a balcony slab without railings, so we recommend ordering work from professionals. Experienced installers will assemble metal structures of any complexity at any height, completing the work in a matter of days.
Installation
The first stage of installation of in-floor convectors is always the preparation of a special niche for installing the device. In the case of convectors built into the floor, this can be either a regular concrete screed or installation in a raised floor. Both installation options for such convectors are possible only if the renovation of the room has not yet been completed and the floors have not yet been installed.
When choosing a niche for heating units, you should pay attention to the following indicators
- Hole depth. The depth of the niche should be approximately 10-15 mm greater than the height of the device itself. This figure is most often indicated by manufacturers in the user manual for individual models. Safety millimeters will allow you to correctly align the device box, as well as the grille, with the floor level.
- Niche width and length. Here experts advise adding 5 to 10 mm to the dimensions of the device - this way you can properly strengthen the body of the device and will not experience difficulties when laying communications.
- Distance from windows and walls. Experts recommend leaving 5 to 15 cm between the installed unit and the window (or panoramic windows). If we are talking about the distance from the device to the walls, then here you should maintain from 15 to 30 cm to avoid the formation of mold in the corners and heat accumulation only on the walls.
- Curtains. Curtains or tulle are an indispensable element in most style decisions. Keep in mind that they should not impede air circulation, therefore, they should not block the heaters from the room. The ideal option for built-in convectors would be small and light country or Provence style curtains, blinds or rollable fabric models.
- Insulation and heat loss. Incorrect placement of the heating device leads to a decrease in the heating efficiency and the efficiency of the device itself. When installing, be sure to use insulating material, otherwise all the heat generated by the unit will heat not the room, but the next 1-2 square meters of the floor
- Sustainability. The device is mounted to a state of complete stability and stability. To adjust a comfortable height, special supports or brackets can be used. To further stabilize the device in the niche, various fixing working solutions can be used. Such stabilization of the position of the unit is necessary for the future installation of pipe communications, which, with the slightest displacement of the wiring, can lead to flooding of the room and damage to the floor covering.
When installing a water-powered convector built into the floor, there are only 2 ways to connect communications.
Flexible. This connection involves the use of flexible communications or hoses that supply coolant to the heat exchanger. The clear advantage of this connection is that the communications can be easily removed while cleaning the unit, and then freely secured back. The disadvantage of such a connection is the relative fragility and vulnerability of flexible communications.
If you connect an electric convector built into the floor, you just need to lay the wires correctly and connect the device to a 220-volt network. In this case, grounding is not required, since communications in modern floor convectors are manufactured a priori with grounding. Make sure that all wiring is hidden under the floor - this way you will protect yourself from injury, and the device itself from premature failure.
Additional tips for installing floor-mounted convectors.
- Metal-plastic pipes or communications are considered the best material for piping built-in convectors. They simultaneously have sufficient strength for long-term use and flexibility for convenient placement in any installation conditions.
- Communications, regardless of their type, should be embedded in a concrete covering or covered with a raised floor. There should be no unnecessary connections or switches in this area of communications laying, which is why purely metal options are impractical here. In the case of laying a raised floor, it is possible to install communications of any type, however, the recommended materials here remain metal-plastic or polypropylene.
- When installing the unit and subsequent laying of the grille or decorative frame, gaps and free space may form between the flooring. Experts advise filling it with silicone.
- Installation of the circuit pipes to the device should be carried out using special union nuts (they are also called “American”).
Installation of convectors for window sills
All convection heaters operate by natural convection. The heating elements installed in them provide heating of the air, as a result of which it rises upward, displacing some of the air masses downward. A kind of circulation is formed, thanks to which all the air masses in the room are heated and mixed. After some time, after turning on the heating, the rooms become noticeably warmer.
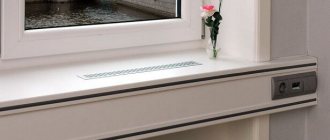
Convectors built into a window sill are fairly simple heating devices, similar in design to in-floor models. They are often called parapet. Their main distinguishing feature is their small size - they are built under window sills, so they should not take up too much space.
These built-in heating devices consist of the following parts:
The device of a parapet convection heater.
- Metal cases - they are completely hidden under the window sills, so they are not visible from the side;
- Heating elements - made of steel and non-ferrous metals, provide air heating;
- Tangential fans – provide intensive air circulation;
- Thermoregulation systems – ensure maintenance of the set temperature.
Thus, built-in convectors in a window sill are not much different from conventional convector devices.
Thermostats and transformers for powering tangential fans are most often supplied separately, but can also be included in the basic package of built-in convective devices.
Please note that there are two categories of convectors built into window sills on the market - with and without complete window sills. The first are structurally complete devices that only need to be installed under the window and connected to the heating system. In their upper part you can see a narrow grille through which warm air is emitted
In their upper part you can see a narrow grille through which warm air is emitted.
Convectors without window sills are designed to be inserted into existing windows - in this case you will have to seriously struggle with their installation. In some cases, it is easier to buy a device with ready-made window sills, made to order
. In order for them to match the appearance of the premises, consumers can choose from models of various colors. Air intake and removal are carried out through decorative grilles.
About the manufacturers
The fairly widespread use of panoramic glazing in the construction of cottages, in retail, commercial and public places creates a demand for floor convectors. It is quite difficult to select just one manufacturer from the general list. Yes, this is probably not necessary, because... Thanks to the available variety, you can choose a device suitable for a specific situation.
So, if a narrow and low model is required, or if you want to use a convector instead of a window sill, and you also need to be able to use a heating control system, then Czech minib floor convectors will probably be the most suitable in such a situation.
But this is not the only manufacturer; similar products are made in Slovenia, Belgium, Germany, and Russia. Convectors built into the floor - they are produced in Germany or any other country, are usually of high quality, and each of the models offered by manufacturers has some peculiarity
For example, some convector variants have non-standard dimensions; analogue or digital controllers can be used for control; the design of the convector itself can make it easy to clean and tidy, etc. As another example of the variety of models, you can pay attention to convectors built into the floor, Breeze. This series of convectors is equally suitable for use in living rooms of apartments, sales areas, offices, etc. The models have a low noise level of built-in fans with sufficient power
The models have a low noise level of built-in fans with sufficient power.
Floor-mounted convector Breeze
So, buying a convector built into the floor will not pose any difficulties. However, it is worth keeping in mind that some nuances may arise when purchasing. If you consider floor-mounted convectors as a heating source, the price of such products is higher than that of conventional batteries. In addition, it depends on the scope of delivery, in particular, this concerns the choice of grille.
Installation
Water convector
Warm window sill slabs are an expensive pleasure, unless they are made by hand.
A simple solution is to equip the load-bearing base with a heater, and form 1-2 convection grilles in the window sill. A more complex and labor-intensive, but no less effective (and maybe more) design is a concrete block with heating elements (heating elements or water pipes).
Preparation of materials and tools
To install the heating device, you may need the following tools and materials:
- grinder (angle grinder) with a set;
- hammer drill and various attachments (chipper, mixer);
- welded metal mesh;
- foil isolon;
- adhesive solution (tile adhesive or the like);
- cement with sand (for a monolithic concrete window sill);
- copper tube (for water coolant);
- heating elements (for electrical devices);
- materials for creating molding formwork, etc.
Step by step process
Let's consider two main methods of installing heating. Let's start by arranging the base on which the window sill with convection grilles will be attached.
Water coolant
Approximate installation
- Before installing the heating, the base should be prepared. To do this, use a hammer drill to deepen it by 5-6 cm.
- Formwork is formed from the side of the room with a height of 2-3 cm: two slopes, the bottom of the window block and a wooden board make up a container, which will later be filled with screed.
- Foil-coated isolon is placed in it with the foil facing up.
- A screed about 1 cm thick is poured.
- Foil is placed on it, on which heating elements (electric or water) are placed. They must be fixed in any convenient way (glue, screws, etc.), the main thing is not to damage them.
- Everything is filled with cement mortar.
After the solution has hardened, the window sill is attached to the resulting base. Products with high thermal insulation properties, for example, polyurethane foam, cannot be used as a binder.
The resulting device is connected to a heat source. If water is used as a coolant, the heater must be equipped with shut-off valves and a Mayevsky valve. When installing an electrical system, you need a step-down transformer, a control unit and a protection system.
Video about another installation option:
Approximate order of work
The simplest design solution is to form a concrete slab with heating elements or water pipes placed inside.
Heater from scratch
- A form is being prepared for pouring a concrete slab. A plywood sheet of suitable shape is selected in accordance with the required dimensions. It is better to choose high-quality plywood with a smooth surface. This will avoid the finishing putty step. Sidewalls sufficient to pour a layer of concrete of the required thickness are attached to it.
- In the resulting form, a small-diameter copper water pipe or electric heating wire is laid at a distance of at least 1 cm from the plywood. You can attach these elements in any convenient way. For pipes, fastening for polypropylene tubes is used.
- A metal welded reinforcing mesh is placed on top of the heating elements. You can attach it to a binding wire or plastic ties.
- The pipes must be equipped with a Mayevsky tap and other fittings.
- A concrete solution is prepared for pouring: the ratio of materials is maintained in accordance with the brand of Portland cement.
- Concrete hardens within one day, and gains strength after 2 days.
- The rough window sill is ready, we move on to finishing it. The corners are rounded with a sanding machine. If necessary, when there are defects on the front side, the surface should be puttied.
- It is coated with paint and installed in place.
- Connect to power supply or heating
Characteristics of parapet convectors
An enclosed heating device EVA COIL – KBP, mounted in a window sill is the optimal solution. The heating device is always ready for use and does not take up additional space.
These products can serve as parallel heating to the main heating, or they can replace it, working independently. The room is constantly warm, since the parapet convector is able to provide optimal air exchange.
During assembly, it uses stainless steel parts, so this EVA brand equipment is reliable and designed for a long service life without breakdowns. The device is mounted on a window sill board with a width of at least 260 mm.
They are produced in different styles and using all kinds of colors. Another advantage of such a convector is its lower cost than its foreign analogues.
To understand the operation of a convector, you need to understand the characteristic features of its design and the essence of its work. The device has a built-in aluminum heat exchanger and fan.
Warm air moves from the device naturally, and if the grommet is turned on, it is forced. Thus, air exchange will occur until the heat is evenly distributed throughout the room.
The convector blocks the exit of cold air flows from the glazed window unit. At the same time, hybrid use with complex systems of underfloor heating, water heating and even ventilation is allowed.
The device is built into a single-circuit or double-circuit heating line. In large rooms, two heat exchangers equipped with electric fans can be used.
This is especially important for removing condensation from window openings, and the efficiency of the convector directly depends on the direction of the fan relative to the window.
Some devices are manufactured with a customized drainage system and automatic thermoregulation. Convectors are also produced complete with window sills, which only need to be installed and connected. If you buy one device, you need to embed it into the installed window sill board, which complicates the installation of such a heater.
Rice. 2. Heat output of EVA enclosed convector
Installation of convectors for window sills
All convection heaters operate by natural convection. The heating elements installed in them provide heating of the air, as a result of which it rises upward, displacing some of the air masses downward. A kind of circulation is formed, thanks to which all the air masses in the room are heated and mixed. After some time, after turning on the heating, the rooms become noticeably warmer.
Convectors built into a window sill are fairly simple heating devices, similar in design to in-floor models. They are often called parapet. Their main distinguishing feature is their small size - they are built under window sills, so they should not take up too much space.
These built-in heating devices consist of the following parts:
- Metal cases - they are completely hidden under the window sills, so they are not visible from the side;
- Heating elements - made of steel and non-ferrous metals, provide air heating;
- Tangential fans – provide intensive air circulation;
- Thermoregulation systems – ensure maintenance of the set temperature.
Thus, built-in convectors in a window sill are not much different from conventional convector devices.
Thermostats and transformers for powering tangential fans are most often supplied separately, but can also be included in the basic package of built-in convective devices.
Please note that there are two categories of convectors built into window sills on the market - with and without complete window sills. The first are structurally complete devices that only need to be installed under the window and connected to the heating system
In their upper part you can see a narrow grille through which warm air is emitted.
Convectors without window sills are designed to be inserted into existing windows - in this case you will have to seriously struggle with their installation. In some cases, it is easier to buy a device with ready-made window sills, made to order. In order for them to match the appearance of the premises, consumers can choose from models of various colors. Air intake and removal are carried out through decorative grilles.
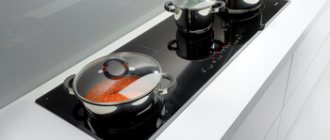
Principle of operation
So, the body itself is located directly under the window. There are some tubes in the casing, inside of which coolant flows. Warm air comes out through a special grille and is then placed in the window sill itself. The heat then acts on the glass, removing the condensation. This way, the window will always be dry, regardless of the weather outside.
The unit provides a comfortable temperature and optimal humidity. The air blown out from all openings of the heater is warm, but never hot. Therefore, you can safely leave flowers on the surface of the windowsill, with the exception of plants that prefer cold.
Installation recommendations
Installing the convector inside the floor is simple and can easily be done with your own hands. Before starting installation, you should study the manufacturer's instructions for installing the heating device and carefully follow all recommendations. A properly installed floor convector will not only last much longer, but will also ensure safety and uninterrupted operation.
It is very important to choose the right installation location. Built-in convectors can be installed not only on the floor and window sill, but also in walls, in niches, in flights of stairs, on steps
Attention: it is prohibited to install any built-in convectors behind curtains, blinds, doors or screens, as well as under openings for room ventilation. This will make the device difficult to operate and may be unsafe.
When the choice of a safe and convenient place has been made, you need to decide on the size of the niche. Each heating device has its own dimensions. The depth of the opening for installation is the main parameter. It ensures not only the correct installation of the radiator grille, but also sufficient and correct operation of convection. The radiator itself should be one centimeter (no more!) above or below the floor. You should also leave technological gaps for landing. Typically they range from 10 to 25 mm.
The width of the installation niche consists of the width of the battery itself and a technological gap of 30-50 mm. This is necessary in order to be able to fix the radiator with cement material, as well as to adjust the height of the device using special bolts and subsequent docking with the floor covering.
Important: when installing convectors in rooms with high humidity levels, a drainage pipeline is connected to the bottom of the device. In this case, the radiator is mounted with a slope of 20 degrees to the pipe
This will ensure timely removal of condensate from the built-in convector and its long, uninterrupted operation.
All built-in radiators are supplied complete with the necessary fasteners for installation (legs and special bolts). It is with their help that the battery is located and secured in the floor. Installation of the product is simple:
- the radiator legs are fixed to the floor;
- height is adjustable with special bolts;
- The box is filled with cement-based materials.
Professionals advise moving away from the windows by a distance of 10 to 25 mm, depending on the need. 10-20 mm also recede from the surface of the walls.
Convector connection. Main connection types:
The first type of communications connection makes it easy to clean the convector, and also makes it possible to connect communications from the side. Typically used for those radiators in which the heat exchanger can be lifted to remove dust and debris underneath.
The second type of connection is the most reliable. However, cleaning will be difficult.
When connecting models with tangential fans to the network, you must additionally purchase a transformer, since standard fans in radiators have a power of 12 volts, and in the network - 220 volts.
Installation of built-in radiators under the window sill can be done independently only if the latter comes complete with a convector. In other cases, it is better to entrust the installation to professionals.
Built-in heating radiators are an excellent alternative to classic batteries. They are invisible, but at the same time perform their functions of heating the room. And therefore they will remain popular for a long time as non-standard solutions for apartments and private houses.
For information on what built-in convectors are, see the following video.