Most contractors who finish window sills with tiles highlight the following advantages:
- Visual. The apartment owner can choose tiles that suit the interior design of the room. The uniqueness of the work depends only on the imagination of the customer.
- Physical characteristics. By decorating the area near the window with ceramics, the apartment owner can avoid frequent cleaning. The tile is not so susceptible to dirt and dust and is easy to clean. In addition, it is able to withstand greater physical stress than conventional plastic.
- Duration of operation. Ceramic tiles benefit significantly when it comes to durability. In addition to the service life, the strength of the entire structure increases several times.
In short, in almost every component, ceramic or tile will be better for the home. If renovations in the house are being done “for yourself,” then it is recommended to opt for higher quality materials.
Peculiarities
A properly installed window sill will decorate any room. Finishing with universal tiles is a rational solution. This material is not afraid of moisture, resistant to dirt and stress. High-quality cladding increases the strength of the structure. Tile surpasses even plastic in all respects, as it does not fade, is not afraid of contamination, and is easy to clean.
An original option for the kitchen
Window sill finishing options
In addition to the standard option for finishing the area near the window, there are several popular options.
Mosaic cladding
Ceramic material can neatly fill a small space near the window. Moreover, outwardly it will look stylish.
If a white mosaic matches the interior, then only white glue should be chosen. Otherwise, the color at the end of the procedure will not be in harmony.
DIY repair
You can finish the window sill yourself. Some tips:
- It is necessary to check the integrity of the base: there should be no cracks, large scratches, chips, voids or other defects on the surface.
- The best base for tiles is concrete. This finishing material fits well even on wood and plastic.
- The working surface must be well secured in the opening.
- Finishing should begin after installing the window frame and external sill.
Cutting tiles
In what cases are they necessary?
Whatever the reason, the new surface will add freshness and attractiveness to such an interior element as the window sill.
There can be many reasons for installation:
- Concrete or granite window slabs sometimes crack or chip at the corners.
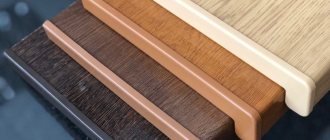
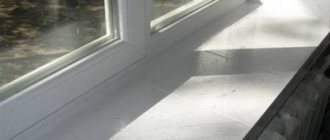
- Plastic window sills, especially white ones, fade and turn yellow over time.
- Often, damage occurs from hot objects that accidentally fall on the surface, including unextinguished cigarettes.
- Traces from flower pots and water dried on the surface.
- Stains from aggressive cleaning products.
- Accidental mechanical damage.
- Scratches and marks of claws and teeth of pets.
- The desire to simply update the surface by changing the shape or color shade.
The fastest way to decorate a window sill with mosaics
If you can’t look at your PVC window sill without sighing, there is an excellent solution - decorating the window sill with mosaics.
The fastest and easiest way to make a spectacular and practical window sill yourself is to glue a glass mosaic on a mesh onto its surface. In this case, the composition can be monochromatic or cast in all the colors of a kaleidoscope. It is good to form a pattern from pieces in colors that harmonize with the color of the walls.
Mosaic on the windowsill: multi-colored decor
Required materials and tools:
- glass mosaic in chips on a grid of different colors
- tile adhesive
- substrate degreasing agent
- self-adhesive tape (wide)
- notched trowel
- grout
- mosaic press
- rubber spatula for grouting
- sponge
- scissors
- STEP 1. Cut the glass mosaic into strips from factory blanks placed on a PVC mesh. Depending on the composition of the pattern, the stripes can be of different lengths.
- STEP 2. Lay the mosaic segments on the windowsill, creating a pattern.
- Step 3. Glue wide self-adhesive tape onto the laid mosaic pieces. Thus, we combine all the elements of the mosaic pattern and remove it entirely from the window sill.
- STEP 4. Next, you need to prepare the substrate: apply tile adhesive to the dust-free and degreased window sill using a notched trowel.
- STEP 5. Very carefully transfer the mosaic composition to the windowsill, lay it flat, pressing it evenly with a special press. Carefully remove the adhesive tape.
- STEP 6. Make an edging using a single mosaic strip. When the adhesive solution has hardened (approximately 24 hours), apply grout in a neutral color or matching the color of the mosaic.
- STEP 7. After the grout has dried, the excess is removed from the surface of the window sill with a sponge moistened with water.
Mosaic on the windowsill: plain decor
The mosaic on the windowsill can also be plain. Then the process of applying it looks a little different.
For this you will need:
- plain glass mosaic in chips on mesh
- glue gun
- liquid nail glue
- rubber spatula
- grout
- White Spirit
- sponge
- wire cutters
- STEP 1. First place sheets of glass mosaic on the windowsill to determine the required dimensions. We cut out the corresponding fragment with pliers, taking into account the edging of the bend.
- STEP 2. Degrease the surface of the PVC window sill using white spirit or another similar substance.
- Step 3. Using a gun, apply a small amount of glue to each segment. Then carefully lay out the mosaic canvas on the windowsill, pressing each square well against the backing.
- STEP 4. After the adhesive layer has completely set (about a day), we begin grouting. The composition is applied using a rubber spatula. Excess is removed with a regular dishwashing sponge.
Practical and aesthetic result - mosaic on the windowsill
Glass mosaic tiles are very smooth, so dirt will not accumulate on the surface of the window sill. Thus, in addition to the fact that it looks beautiful, this decorative window sill is also easy to clean. Accordingly, it can become a harmonious addition to the kitchen or bathroom.
If you are concerned that the mosaic window sill will be “cold” in winter, you can insulate it. To do this, after preparing the base, lay a sheet of extruded polystyrene. Then reinforce with plastic or metal mesh and apply a layer of screed of 50 millimeters. Then begin the standard process of gluing the glass mosaic according to the first or second option.
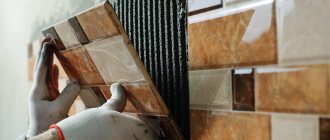
Fastening tiles on a mesh base
Laying mosaic tiles on a grid is carried out in the following order:
- Glue is prepared - it is diluted in small portions, sufficient to attach 4 tiles. When mixing large volumes, the residue will dry out. The proportions of the combination of the dry component and water are indicated on the packaging;
- Using a spatula with a serrated edge, apply the glue to the wall surface. Movements with a spatula are made in one direction, vertical or horizontal. An area of no more than 1 m2 is processed at a time;
- Each tile is applied to the wall with your own hands, pressed and rolled with a spatula with a rubber base. You don't need to press hard, otherwise the tile adhesive will come out on the surface. The element is aligned vertically and horizontally and set to level. To obtain identical seams, crosses are used. After acquiring the skills of laying mosaics, crosses do not need to be used;
- excess undried glue is removed from the surface of the mosaic after 30 minutes. If the glue is allowed to dry too much, it is difficult to remove it from the ceramic surface;
- The adhesive composition will completely harden in 24-48 hours. Then you can grout the seams. The mixture is applied to the surface of the mosaic and distributed with diagonal movements of the spatula along the seams;
- Remove excess grout mixture with a damp cloth without waiting for it to dry. To remove excess, you can also use special ready-made alcohol solutions.
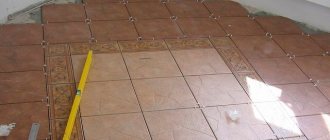
Stages of laying mosaic tiles
To lay mosaics in dry rooms, you can use grout for regular ceramic tiles.
Window sill made of tiles in interior design
Window sills in the bedroom interior
A fashionable and modern solution for finishing work is tiling the window sill with ceramic tiles.
At the same time, its color can effectively harmonize or, conversely, be in contrast with the shade of the countertop.
This will give your kitchen, for example, a unique look that distinguishes it from others.
Peculiarities
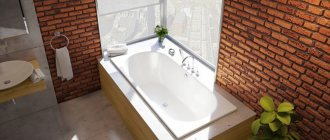
A window sill can perform several functions simultaneously. In a small kitchen, this is additional useful space, which is used for arranging indoor plants, cooking, placing dishes and other household appliances.
Finishing using tiles is a practical, stylish and durable solution. Due to its special performance properties, this finishing material is ideal for tiling kitchens and bathrooms.
The material is not afraid of water, resistant to stress and dirt.
Tips from the experts
Recommendations revealing the features of mosaic installation:
constantly use a grater and a building level, since products can move;
to fix translucent mosaics, use white glue; for bright ones, choose materials in accordance with the shade of the cladding;
do not put excessive pressure on the products;
When laying mosaic tiles, place the paper or film side on top, and the plastic mesh side on the bottom.
When you plan to use mosaic as the main finishing material, you need to understand how to lay it in order to reduce the time it takes to complete the work.
Advice from experienced masons
The cladding process will not be difficult if you pay attention to the following factors:
- Surface condition. The base must be complete. If during preparation you find cracks, large scratches, chips, empty spaces, etc., then the problem should be corrected. If you ignore these nuances, the finish will not be of high quality. The tile can simply crack.
- Choosing a base. A concrete base will ensure the durability of the structure and high quality of finishing in general. It will lie on any surface (wooden or plastic) without any problems.
- Surface condition. After checking the area of work, you need to make sure that it is firmly fixed in the opening and will not “ride” during installation.
- Choosing the tile itself. The most important aspect. The type of masonry and the complexity of the work depend on the size of the tile. The diagonal of the tile is selected based on the size of the base. If it is not large, then it is recommended to go with 10x10 or 15x15 tiles. This will eliminate the need for cutting and will give the surface a more attractive appearance. If the dimensions of the base allow you to choose a larger tile, then you can think between 30x30 or 40x20 centimeters. Any store has a wide range of products, so choosing a model is not difficult.
Installation begins only after a new double-glazed window has been installed and the external type of drip has been correctly installed.
Advantages and disadvantages
Advantages of plastic finishing:
- environmental friendliness;
- durability;
- giving a neat appearance;
- variety of choice;
- reliable adhesion to the window frame;
- perfectly flat surface;
- heat and sound insulating properties;
- reasonable price;
- high installation speed;
- possibility of self-installation;
- no additional steps are required to level the surface of the opening after dismantling the old windows;
- moisture resistance;
- ease of use;
- Possibility of use on arched structures;
- preventing fogging and freezing of windows;
- a small amount of dust, dirt after installation.
Among the shortcomings are noted:
- tendency to mechanical damage;
- poor quality of additional elements;
- inability to replace part of the panel if damaged.
What is necessary
To lay ceramics efficiently, you need to prepare the necessary tools and consumables. The standard list includes:
- Universal primer.
- Adhesive solution.
- Tile.
- Grout for seams.
- Pliers.
- Glass cutter.
- Hacksaw.
- Building level.
- Small rubber mallet.
- Standard spatula.
For the window sill in the kitchen, porcelain stoneware is the best choice. This material has high strength.
Basic set of tools
Necessary tools and preparation
To lay tiles, you will need a certain set of tools and compounds. The list includes:
- adhesive solution;
- grout;
- primer;
- finishing material;
- glass cutter;
- building level;
- putty knife;
- rubber hammer;
- hacksaw;
- pliers.
To decorate a window sill in the kitchen, it is recommended to choose porcelain stoneware.
This material is particularly durable, dense and durable. The finish is completely unpretentious to clean and boasts a long service life. You can place hot dishes on porcelain stoneware without fear of damaging the surface of the material and its integrity.
Installation
At the stage of laying tiles, it is necessary to prepare an adhesive composition. The solution is applied to the base and back side of the tile evenly and carefully using a spatula. When laying tiles, ensure the integrity of the pattern. Don't forget about the gaps between the tiles. To place the tiles at the same distance from each other, you can use special crosses that differ in size.
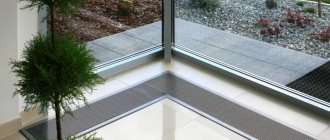
For convenience, it is recommended to arrange a slight slope of the window sill from the window to the outer part of the structure. This will help prevent moisture buildup by allowing water to flow from the base of the frame to the edge. As soon as the laying of the horizontal dies is completed, it is necessary to begin installing the end parts. The placement technique is similar to that described above.
As you work, carefully ensure that the vertical and horizontal elements match each other at the joints.
After the entire window sill is tiled, putty is used. For greater practicality, experts recommend using the composition in dark colors. The most common options:
- beige;
- brown;
- burgundy;
- dark grey.
The choice of shade is selected depending on the color of the tile. Once the solution has completely dried, the window sill is thoroughly cleaned. Now the updated window sill is ready for use.
Choosing a window design
Depending on whether you are installing a wooden window or a PVC profile, the installed slopes will also vary. There are a lot of materials that can be used to decorate windows inside and outside. For exterior decoration, it is best to choose materials that will not only match the facade of the house, but will also bring real benefits, protecting the window from destruction. The materials from which the slopes are made must be very durable, moisture-resistant, and practical.
Of course, the window on the inside also needs finishing, because without installed slopes and a window sill, the structure will not be completed. The inside of the window is not affected by external irritants, the finishing is reliably protected from negative influences, so you can choose absolutely any material. Let us dwell separately on the most common and affordable options, which stand out not only for their attractive price, but also for their durability and practicality. Most often, slopes in a wooden house are made of plastic or wood. What are the advantages and disadvantages of these materials, how to install them correctly?
Wooden slopes in a wooden house
Plastic slopes in a wooden house
Subtleties of preparing the base
Each time cladding work should begin with this procedure. Carefully remove old enamel, putty, and other coating. You also need to remove all dust and dirt. After this, a deep penetration primer is applied to the surface. Increased attention is paid to the selection of high-quality ceramics.
If the window sill is compact, then the finishing material should be small. Elements measuring 10x10 or 15x15 cm are quite sufficient.
For large window sills it is better to choose larger tiles. In some cases, the choice can be made on elements measuring 40x20 or 30x30 cm.
It is not difficult to choose high-quality finishing ceramics. This material is available in a wide range.
Mosaic cladding
Ceramic mosaic looks neat and stylish. Its installation process is much simpler than tiles and takes minimal time. The finishing material will add expressiveness to classic and modern interiors. The only disadvantage of such cladding is the many seams, which can cause mold formation and a place for contaminants to accumulate. To avoid this problem. Use quality grout.
The best option is a mosaic not in a grid.
If necessary, its dimensions can be easily adjusted. Before laying, the surface is treated in the same way as when working with tiles. After installation, the window sill must be cleaned and then used at your discretion. When choosing a transparent mosaic, you need to choose white glue. If it is necessary to insulate the window sill, this is done before installation.
Masonry technology
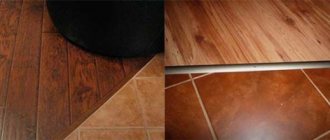
There are two options: along the entire window and perpendicularly. The choice should be based on minimizing the resulting trimming of parts. To adjust the die, you can use a classic glass cutter.
The location of the cut should be marked in advance using a marker. The trim is placed on a flat and stable base in order to trim along the marked points. During the procedure you need to press hard on the material.
It is difficult to achieve a high-quality result without a rubber hammer. Using this tool, carefully tap the ceramic product on the back side at the site of the intended cut. If such a hammer is not at hand, then you can use the handle of a spatula, which is first wrapped in a towel or thick cloth.
The required fragment is broken off with a sharp, confident movement. If the master has the necessary skill, then cutting the ceramics can be done with a grinder. This electric tool saves a lot of effort and time.
Rational approach
Ceramic tile cladding
Ceramics are used in rooms with high humidity: in the kitchen, bathroom, shower. To correctly calculate how much material is needed for covering a window sill, you need to measure its surface, compare it with the dimensions of the tiles and add 20% for possible defects.
You can do it yourself by tiling the window sill, if you follow some nuances. The material must be laid at a slight slope so that the water that falls on the windowsill does not flow into the corner, but goes to the floor.
For window sills protruding beyond the wall, you first need to make a concrete base and reinforce it with steel mesh or rods with a diameter of at least 4 mm. Before laying the tiles, check the tightness of the joint where the window sill meets the window. Existing cracks must be treated with silicone putty intended for wet rooms. Ordinary mastic will not work here, as due to high humidity it will quickly begin to crumble.
For cladding, you can use not only white tiles. It is necessary to take into account the design of the room; in some cases, color will look more advantageous. Some homeowners turn a tile window sill into a real work of art, but it’s difficult to do it yourself; it’s better to turn to professionals. It is worth considering that such work will cost more than standard cladding.
In general, the price of a tile window sill directly depends on the quality of the material, the manufacturer and the cost of repair work.
Scope of application
Most often, a tile window sill is made in houses made of brick, ceramic concrete, foam concrete or cinder blocks. In these houses, the window sill, as a rule, has already been filled or a kind of blank has been made that will serve as its base. It must be thoroughly cleaned of dust and primed to increase the adhesion of the material to the base. If this is not done, the tiles may fly off within a few months.
If there is already a window sill, but you need to make a new cladding, you must first remove the old one. Next, the surface of the window sill is carefully leveled, all dents and chips are filled with putty. In order for the tiles to last for many years, you need to purchase putty, primer and glue from one manufacturer in stores.
Mosaic on the windowsill: plain decor
The mosaic on the windowsill can also be plain. Then the process of applying it looks a little different.
For this you will need:
- plain glass mosaic in chips on mesh
- glue gun
- liquid nail glue
- rubber spatula
- grout
- White Spirit
- sponge
- wire cutters
STEP 1. First place sheets of glass mosaic on the windowsill to determine the required dimensions. We cut out the corresponding fragment with pliers, taking into account the edging of the bend.
STEP 2. Degrease the surface of the PVC window sill using white spirit or another similar substance.
Step 3. Using a gun, apply a small amount of glue to each segment. Then carefully lay out the mosaic canvas on the windowsill, pressing each square well against the backing.
STEP 4. After the adhesive layer has completely set (about a day), we begin grouting. The composition is applied using a rubber spatula. Excess is removed with a regular dishwashing sponge.
Restoration of an old window sill with insulation
Restoration of a window sill without replacing it with insulation and glass mosaic covering.
To be honest, we wanted to replace the old window sill after replacing the windows with new ones. However, when the window installers finished their work, it became clear that simply replacing the window sill would not be enough: the window frame turned out to be significantly higher than the level of the window sill. What to do in such a situation? You can replace a thin window sill with a thick kitchen countertop. But we decided to make do with a simpler and more effective solution: we will increase the thickness of the window sill using extruded polystyrene foam (EPS) and cover its surface with glass mosaic. Such a window sill will look stylish, its surface will be resistant to water, sun, high temperatures, and a layer of polystyrene foam will create additional insulation against the cold.
Before gluing the EPS sticker, we washed the window sill and primed its surface with an acrylic primer.
To improve the adhesion of tile adhesive to the smooth surface of the window sill, we attach fiberglass mesh to self-tapping screws.
After this, we glue 3 cm EPS boards, cut to the size of the window sill, onto the old window sill using tile adhesive.
Afterwards, for reliability, we fix the EPS with self-tapping screws to the old window sill.
And prime the EPS with a layer of tile adhesive over the fiberglass mesh.
The base of the new window sill is prepared. We leave it for one day to gain strength.
Then we proceed to gluing the glass mosaic sheets onto white tile adhesive. To distribute the glue, use a 4 mm comb.
We level the glued mosaic on the surface using a foam float.
Now you need to glue small parts of the mosaic to adjoin the shaped surfaces. We bite off the mosaic pieces with ordinary nippers.
And glue them onto the windowsill with tile adhesive.
A day after gluing the mosaic, we begin grouting the seams. Apply the grout with an elastic plastic spatula.
After 15-20 minutes, we begin to wipe the surface of the mosaic with a barely moistened sponge. You have to wipe the surface several times with 15-minute breaks until the surface is completely clean.
This is the new window sill covered with mosaics that we got. Previously, we made a similar window sill in the kitchen at the dacha.
In the same mosaic style we made the wall apron by the balcony door.
Source: dom.dacha-dom.ru
How to tile a wooden window sill
In order to lay tiles on the windowsill you will need: cementless acrylic adhesive, liquid nails adhesive or polyurethane sealant, as well as cement-based tile adhesive.
- Remove household dirt from the windowsill.
- Apply a thin layer of cement-based adhesive into which the paint mesh is pressed to create a strong base suitable for laying tiles.
- The surface is leveled and dried.
- Working with tiles and laying them out. Based on its size, it is worth determining how it will be located on the windowsill - perpendicular or along the window. Trimming tiles is done using a glass cutter or grinder. First you need to select the cutting location and use a marker to make the necessary marks. Then it is placed on a flat surface and, with firm pressure on the tool, its incision is made. You need to break it off with a gentle blow on a flat corner. If you use an angle grinder, the work will take much less time.
- As soon as it is laid out, it is necessary to remove dirt from its surface and wait until it is completely dry.
- Then, between the laid tiles, it is worth placing the grout of the desired shade. After working with it, its undried residues are removed from the surface. As soon as the grout has dried, the renewed window sill should be thoroughly washed.
It is recommended to seal the seams between the tiles with sanitary silicone. If the gap between the wooden window sill and the open window sash is large, then it is better to attach drywall to the base with self-tapping screws.
Then the plasterboard sheet is primed, dried and tiles are laid on it.
Skillful hands - two ways to make it yourself ↑
It’s quite possible to save on buying a plastic panel! To do this, you can go the following ways:
- Install a concrete window sill. To do this, make permanent formwork and pour the first layer of concrete. Next, install the top removable formwork. Lay a 1.5–2.0 mm wire mesh with a mesh size of 50x50 mm. This will help strengthen the structure. Then pour the concrete and sand it after drying. You can lay tiles or mosaics on top.
- The second way to make a window sill yourself is to glue it together from a floorboard. To strengthen the structure you will need dowels. The board must first be sanded and primed, and then varnished in several layers. It is better to install such a window sill using liquid nails.
Advice! To grow flowers on a wooden structure, it is better to use special overlays. They can be glued to wood.
Decorating a window with your own hands is both simple and difficult. On the one hand, this does not require serious skills or special tools. On the other hand, it will be quite difficult to correct the mistakes made. Therefore, it is still better to entrust the installation of window sill boards to professionals!
Do-it-yourself window slopes and window sill
How to make slopes and a window sill from plasterboard with your own hands, photographs of the step-by-step production and finishing of the slopes and window sill with ceramic tiles.
Many homeowners, when replacing a window, come to the idea of how to finish the window slopes, and not everyone is happy with the prospect of installing a white plastic window sill.
An alternative to plastic is a window sill frame made of a metal profile, followed by plasterboard covering of the frame and window slopes, after which ceramic tiles are laid on a plasterboard base.
The strength of such a window sill is not inferior to a plastic one, and the possibility of finishing the slopes and window sill with tiles of any shade and texture will allow you to create a beautiful and unique window in your home.
Someone will say that such slopes are cold, and a slope made from a sandwich panel is much warmer, but this is not so.
A gypsum slope is attached with a gap from the stone opening, and the free space is filled with polyurethane foam; the foam creates a barrier to cold, so the inside of the slopes is protected from freezing.
The main advantages of tiles: they are not afraid of moisture, do not get dirty and are easy to clean.
Examples
You can appreciate the aesthetics of a tiled window sill by looking at the examples in the photo gallery.
- A neat window sill, decorated with small mosaics in classic colors: brown and beige.
- Window sill trim with square brown tiles.
- Glossy tiles for a wide window sill in pastel colors. A practical and stylish option.
- A contrasting combination of light and green mosaic tiles will decorate the window sill and refresh the interior of the room.
- A practical window sill decorated with glossy tiles. The structure can be used as an additional workspace.
To learn how to make a window sill from tiles with your own hands, see the following video.
Everyone who started a renovation had to listen to advice from mom, dad, relatives, and friends on how and what to do best. Not all advice is good. Houzz.ru surveyed its readers—designers and non-designers alike—and they shared stories of “bad advice.”
- Lay carpets. Everywhere. And they were very surprised when they didn’t do that.
— Make arches instead of “boring” openings)
— Ceiling installers are actively offering black glossy ceilings.
- Yes, everyone always advises to stretch the ceiling! It's so beautiful! Maybe I don’t understand something, we never use them in projects, and I would never make them for myself...
How to make a window sill from tiles or mosaics
As a rule, during renovation, the replacement of old windows with modern metal-plastic ones is accompanied by the installation of plastic window sills and a similar external sill.
If plastic as a material for windows has firmly and permanently come into use, then when installing a window sill, you can, if desired, abandon it and replace it with another material.
In this article we will talk about the advantages of decorating a window sill with ceramic tiles and mosaics and describe the main stages of laying tiles on a window sill.
What to make a window sill from?
The window sill in our apartments and houses can become an active, functional space if we approach the issue of covering it correctly.
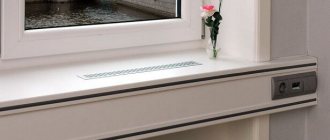
This is especially true for window sills in the kitchen - in addition to banal flower pots, you can place pots, pans, and other utensils on them.
The latest fashion trend has been the creation of a tabletop on the windowsill, which is a fairly rational and convenient solution in small spaces.
Of course, a plastic window sill does not shine with the wealth of possibilities that are inherent in this small but very important element of any house or apartment. Over time, the plastic turns yellow from moisture and flower pots, spoiling the aesthetic appearance of the room. It can be damaged due to high loads or excess heat or cold.
In this case, it is better to consider the available alternatives. The simplest options are to paint or sand it, but from an aesthetic and functional point of view, the best option would be a tile or mosaic window sill.
How to make a window sill from tiles with your own hands
Before you begin tiling the window sill, you need to take into account several important factors: - The base of the window sill must be concrete (you can also lay tiles on wooden and plastic window sills. This is discussed further); — The base should not have significant damage (cracks and chips) and be firmly fixed in the window opening;
— All work on installing the window and external sill must be completed.
Preparation for covering the window sill. Tool.
In general, the set of tools and materials is no different from the standard set for laying tiles on the floor:
- ceramic tiles; - primer; - glue; - tile grout; - spatula; - glass cutter; - rubber hammer (optional); - level;
- pliers and hacksaw.
If you are decorating a window sill in the kitchen, then you should consider porcelain stoneware as a facing material. It is stronger than standard tiles and just as easy to maintain. A porcelain stoneware window sill will serve you for a long time, perfectly withstanding hot pans and pots.
At the initial stage, it is necessary to properly prepare the basic foundation for facing work. Remove old paint and putty from the windowsill and clean the surface from dust and dirt. Next, coat the base with a deep penetration primer.
You need to be very careful when choosing tiles. Much depends on the size of the base. If it is small, then it is better that the tiles for the window sill are small in size - 10x10, 15x15.
This will avoid unnecessary hassle with trimming and will significantly improve the aesthetic appearance of the product. If the base is quite voluminous, then you can choose larger ceramics - 30x30, 40x20, etc. Especially if the room is small and every meter of space is precious.
For example, a wide window sill in the kitchen can be turned into a comfortable countertop.
Technology of window sill cladding with ceramic tiles.
Depending on the size of the tile, you should determine in advance how it will be placed on the window sill - along the window or perpendicularly. You need to find the best option in which the need for pruning will be minimal.
The cutting itself is done using a glass cutter. First, you need to decide where to cut the tiles and use a marker on the front side of the material to make the appropriate marks.
Next, the tile is placed on a flat surface and a glass cutter is made along the intended marks by pressing firmly and firmly on the tool, so that the cut is thorough.
Then, on the back side of the tile (in the place where it is supposed to be cut off), you need to tap it with a rubber hammer or the handle of a spatula (for greater confidence, you can wrap the handle with a thin towel). We will break off the tiles with sharp, gentle blows on an even corner. In this way, horizontal and vertical samples are made for laying on the windowsill.
Instead of a glass cutter, cutting tiles can be done using a grinder. For experienced craftsmen, this helps save more time, but requires skill in working with the tool and accuracy.
The next step is laying the tiles on the windowsill. To do this, you need to prepare an adhesive solution and apply it in even layers on the back side of the tile using a spatula. When laying tiles on the surface, observe the gaps between the tiles.
Tip: it is better if you use a building level to fix a slight slope from the window to the outer part of the window sill so that water or condensation does not accumulate at the base of the frame.
After finishing laying the horizontal tile elements on the window sill, you can begin installing the end parts. Here everything is done using a similar method. Make sure that the horizontal and vertical (end) elements match each other at the edges.
When the entire area of the window sill is tiled, you need to clean the surface from any remaining mortar and wait for it to dry completely. Next, grout of the desired color is laid in the gaps between the tiles.
Why do tiles fall off?
Tiles can fall off for two reasons.
The first is that you are using tile adhesive that is too liquid; it absorbs and dries quickly, causing adhesion to deteriorate and adhesion to decrease. In modern adhesive tile mortars this is unlikely, since they contain various additives and fibers that prevent this.
The second reason for tiles falling off most often is that the master does not apply a contact layer to the base of the window sill or does not apply tile adhesive to the tile itself - in both cases, the quality of adhesion suffers irreversibly and this cannot be done because adhesion is reduced significantly and the tile sooner or later it will fall behind.
If your window sill is made at an angle, the corner tiles must be cut with a tile cutter into a wedge-shaped shape. Since after this its area will decrease, such a tile will be a weak link, so pay especially close attention to laying such a tile and grouting its seams.
The outer tiles of the window sill must be deepened into the wall and window slope as much as possible, so that water does not accumulate at the joints and does not run along the facade, leaving behind streaks.
Traditional installation method
Before you begin installing ceramics, you need to prepare high-quality glue. The solution is applied with gentle movements to the back side of the finish and the work surface. You can use a spatula to distribute the composition. During installation, you need to ensure that the elements of the pattern match.
There must be a gap between the dies. To ensure that all the parts lie at the same distance from each other, special plastic crosses are used, which also differ in size.
Experts recommend forming a slight slope of the structure from the window to the outside. Thanks to this, it will be possible to avoid the accumulation of condensation, since all the water will flow from the base of the frame to the very edge. The end parts are mounted only after the laying of the horizontal dies is completed. Once all the tiles have been laid, you can proceed to using putty. It is more practical to use a dark shade. Popular options:
- Blue.
- Beige.
- Brown.
- Burgundy.
The choice of putty shade depends on the color of the tile. Once the solution has completely hardened, the window sill is thoroughly cleaned. After this, the updated surface is completely ready for use.
Attention! During work, you need to ensure that all vertical and horizontal elements are as consistent as possible with each other at the joints.
Interesting shades of grout
Selecting masonry type
In most cases, the master has to choose from two options:
- Along the area around the window.
- Perpendicular to it.
The dimensions of the base should be taken as the basis for choosing the type. It is necessary to minimize unnecessary trimming of materials. To adjust the die to the dimensions, use a regular type of glass cutter.
After determining the location of the incision, the area is marked with markers. Cladding should only be carried out on a smooth surface that is firmly fixed. Otherwise, you will not be able to trim the marked marks.
You should not be afraid to press hard on the laid material. If you press weakly, then there is a chance that the tile will not press through.
To do the job carefully, a rubber hammer will help, which should be used to slowly tap ceramic products in places where there is a potential cut. As an alternative to a hammer, you can use the handle of a spatula. But you should wrap it in something soft (for example, a towel) in advance, otherwise there is a risk of damaging the product.
The selected part must be broken off with a sharp and forceful movement. If you are not sure that the process will be like this, it is recommended to use an angle grinder. It will save time and physical effort.
The main advantages of clinker window sills
High strength is a distinctive feature of clinker. The thing is that this is not ordinary ceramics: the clay mass is sintered at a very high temperature (from 12,000 C and above). The result is a material that can withstand heavy loads, resistant to impacts, scratches, and other mechanical damage.- Excellent aesthetic characteristics. Dozens of color shades, textures and shapes of clinker elements allow you to create a window sill that will organically “fit” into the appearance of the house.
- Resistance to various weather tests. Rain, snowfall, hail the size of an ostrich egg - the clinker window sill itself will remain intact, and will even protect the facade. The material can withstand up to 300 cycles of freezing and thawing - an indispensable quality for our climate, where the thermometer can cross zero up to 10 times a day.
- The color of the window sill remains pristine, even under the burning sun. The secret of such “constancy” is that the clinker is colored “in bulk”, that is, throughout the entire structure during the manufacturing process.
- Eco-friendly material. Each tile is based on natural slate clay, thoroughly cleaned of impurities. Therefore, the finished products are absolutely safe for health and do not cause allergies.
- Record service life. Such ebb tides last for at least half a century (official manufacturer’s warranty). But for clinker, 100 years is not the limit, and over time the coating takes on an even more noble vintage look.
- Easy to clean: just wipe the tides with a damp sponge when they get dirty. You can use chemical cleaning agents - the surface and structure of the clinker will not deteriorate.
Important nuances
The finish will look beautiful if you think it through well in advance. Create the pattern you want to see and decide what size tile will work best for you. Almost always, the best solution is to decorate the window sill with small details or mosaic tiles. They will require minimal styling skills from you and will make the whole process much easier.
Remember that the water resistance of the coating will not be complete if you choose the wrong grout. It must also have the necessary properties. Even in rooms where the humidity is within normal limits. Window openings are more susceptible to moisture, since this is where the border between the cold air from the street and the warm air inside the house is located. Condensation can easily appear. Otherwise, everything will not be so difficult to do. The design of this surface will not differ much from the laying of standard tiles.
Shutdown
There is very little left until the work is completed. The surface must be treated with a special solution. Water-repellent antifungal liquid will do the job perfectly. Apply a little product to a rag and wipe the entire surface with it. This is necessary so that the window sill remains so attractive and beautiful for many years. After this treatment, it is not afraid of either dust or moisture.
This window sill looks very beautiful and original. And indoor plants will complement the composition. All this will create an atmosphere of comfort and warmth. This modification took only three hours of working time, and the window sill will delight you for many years.
Found a violation? Report content
Sheathing base made of wood and plastic
The process of finishing window sills from natural materials is no different from finishing concrete surfaces. But in this case, the craftsman will have to cover the entire structure with plasterboard slabs in order to then lay the colored tiles. You can do without cladding gypsum board, but in such a situation you should use an acrylic primer, which is used to cover wooden window sills. For installation you will need epoxy glue and grout.
It is much easier to decorate plastic bases. Instead of an adhesive solution, you can use liquid nails. The reliability of adhesion directly depends on the texture of the plastic. Specialists use special compounds for laying ceramic products on plastic or wooden bases.
Sources
- https://mezhdveri.ru/28711-obustrojstvo-originalnogo-i-dolgovechnogo-podokonnika-iz-keramicheskoj-plitki.html
- https://beton-monolit.ru/podokonniki/podokonnik-iz-kafelnoj-plitki.html
- https://SerebKlych-uk.ru/otdelka-i-remont/podokonnik-iz-plitki-keramicheskoj-2.html
- https://okna-dom.net/otdelka-podokonnika-plitkoy/
- https://stroy-podskazka.ru/furnitura/podokonniki/iz-plitki/
- https://florantino.ru/podokonniki-iz-plitki-foto.html
- https://esto-okna.ru/balkony-i-lodzhii/otdelka-podokonnika-plitkoj.html
- https://krovli-zabori.ru/podokonniki/podokonnik-iz-plitki-svoimi-rukami.html
- https://zh-art.ru/krasivye-podokonniki-iz-plitki/
- https://proosteklenie.com/podokonnik-iz-kafelnoy-plitki/
- https://promalpworks.ru/podokonniki/podokonnik-iz-plitki-svoimi-rukami.html
- https://mailtrain.ru/podokonniki/podokonnik-iz-kafelnoj-plitki.html
- https://vesnakuhni.ru/podokonniki/podokonnik-iz-kafelnoj-plitki.html
- https://dom-kirov.ru/balkony/podokonnik-iz-plitki.html
Decoration with mosaic tiles
Recently, tiling the window sill with mosaic tiles has become popular. The process of laying mosaics is much simpler and does not take much time. This design looks modern and stylish.
The only disadvantage of this cladding is that it has a lot of seams, because the mosaic is much smaller than ordinary ceramic tiles. Moisture can accumulate in the seams and mold can appear, making it difficult to care for the surface. The problem can be avoided if you purchase high-quality grout for joints; you should not skimp on this. When choosing a mosaic for cladding, you need to understand in advance that you need to take more care of such a window sill.
As a decoration, you can purchase a ready-made mosaic in the store or make it yourself from broken tiles. The second option will require certain skills in working with glass. If you do not have such experience, then it is better not to experiment so as not to get injured.
Before laying the mosaic, the surface of the window sill is prepared in the same way as for ceramic tiles. Then special glue is applied to it and mosaic elements are laid. Excess pieces of material are cut off with a glass cutter. Excess grout is removed with a rubber spatula. After the surface is completely dry, clean it with a damp sponge.
Source of the article: https://fb.ru/article/472646/podokonnik-iz-plitki-osobennosti-materiala-i-ukladka-svoimi-rukami