How to insulate a window sill
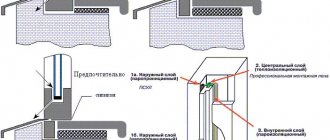
Having identified the cause of the window blowing, you can begin to eliminate it. To do this, you need to stock up on materials that need to be used for work. Polyurethane foam can serve perfectly as insulation for a window sill. Sealant (preferably acrylic) is necessary to fill the seams if there is blowing. When shrinking slopes, you will need a regular dry mixture of plaster.
Materials for sealing windows - polyurethane foam, acrylic sealant, dry plaster
Signs of seal wear
On average, seals last up to five years. If the following symptoms appear, you should make an urgent replacement:
- the house has become noisier, extraneous sounds from the street are heard more clearly than before;
- Condensation, ice appears on the windows, traces of mold are visible;
- dust on the windowsills began to accumulate in large quantities, it has to be wiped off more often than once every three to five days;
- the room is uncomfortable, there are drafts and you can hear the wind blowing;
- upon visual inspection, cracks and deformation of the material are noticeable;
- the seal has become hard;
- the heterogeneity of the shade of the sealant is noticeable.
Seal wear
How to insulate
It's no secret how to insulate the windowsill of a plastic window. It is possible to insulate the cracks and the blow-out area under the canvas without dismantling, if this is not necessary. It is necessary to replace foam that has sagged over time and flaking sealant. Remove the old foam and fill the niche under the window sill with a new layer of polyurethane foam. Fill the resulting small cracks with sealant. This method of insulation is suitable if the ventilation is detected only under the window sill. If it blows between the window sill and the frame or from its other parts, then you should resort to dismantling.
In what cases is this relevant?
Insulating walls from the inside certainly improves the thermal performance of a house. But this is an unconventional technology, because usually they try to do external insulation. However, there are situations when there is no other choice.
Internal thermal insulation is recommended only when external insulation is not possible
This option is also relevant for apartment buildings. It helps not only to increase the comfort of your home, but also to prevent the occurrence of troubles such as mold or mildew.
Removing the window sill
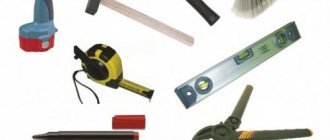
Before work, we determine the material from which the window sill is made. The principle of work and the set of tools depends on the material. To dismantle the plastic structure you will need the following tools:
- Hammer
- Chisel
- Hammer
- Fine-toothed hacksaw
- Knife
To dismantle a wooden window sill, you will additionally need a chisel and a wood saw.
Removing a plastic window sill
First way
We dismantle the plastic window sill for insulation and insulation of cracks
Before carrying out work, it is recommended to cover the floor with film, since the work involves a large amount of dust and construction debris. Dismantling steps:
- Remove wallpaper from the wall under the window, after moistening it with water.
- Using a chisel with a hammer, knock down the plaster under the window, leaving a small space. It is recommended to expose the base of the wall.
- To separate the canvas from the slope, beat off the plaster at the point where the sides of the window sill come into contact with the slope. This creates a recess that allows you to remove the lower part of the window structure without interference.
- Cut off the polyurethane foam layer.
- Slowly pull the window sill towards you, lowering it down a little, and remove it from the niche.
Second way
- There is no need to remove the plaster. Using a knife with a long blade, carefully cut off the mounting foam under the window sill and the layer of sealant on the sides of the slopes.
- Having released the fastening elements, you can carefully remove the canvas by pulling it towards you.
Removing a wooden window sill
- First determine how to attach the window sill. If it is attached to the wall, then hit it with a hammer from below to loosen the fastenings.
- Pull towards yourself with a little effort.
- You can make cuts around the perimeter if you can’t pull out the window sill right away.
- After removing the window sill, you can find glass wool. It needs to be removed.
For further work, you need to clean out dust and debris from the opening. A stiff brush will help.
Material selection
The technology allows the use of different types of insulation. Each of them has its own characteristics, advantages and disadvantages. The most commonly used options for insulating walls from the inside are:
- Styrofoam;
- extruded polystyrene foam (Penoplex type);
- mineral wool;
- wood fiber boards.
Styrofoam
Polystyrene foam is inexpensive and has good performance. In most cases, 5 cm will be enough to ensure a comfortable microclimate. It allows you to complete work quickly, without complex processing and additional tools.
Foam plastic is an inexpensive and effective heat insulator
But this material has significant disadvantages:
- low strength;
- flammability;
- poor vapor permeability - polystyrene foam can turn a house into a real greenhouse.
To avoid the latter prediction, a forced ventilation device will be required. Such activities will require additional financial and labor costs. Read a detailed article about foam insulation from the inside.
Extruded polystyrene foam
The closest relative of polystyrene foam is extruded polystyrene foam (Penoplex type). It is very similar in appearance, but is orange in color instead of white. It is also worth noting that it has greater strength and durability. But such disadvantages as flammability and poor vapor permeability have not gone away. Such insulation of the wall will not allow it to breathe and will require additional ventilation.
Read the information on insulating walls with Penoplex from the inside.
Penoplex is stronger than polystyrene foam and lasts longer.
Is it possible to perform internal insulation using polystyrene foam? Yes, you can. But you need to prepare for negative consequences and eliminate them in time. This option is more suitable for brick or lightweight concrete. Wood for walls is usually chosen precisely for its ability to breathe. Polystyrene foam or polystyrene foam will easily block air flow and negate all the benefits of wood.
Mineral wool
This type of insulation has become widespread. It costs a little more, but has high vapor permeability. It is recommended to choose basalt mineral wool, which is produced in rigid slabs. It is easy to install, does not burn, and has fairly high strength.
But you should be careful when placing the insulating layer inside the room. This material has low moisture resistance. Vata absorbs water perfectly, after which it practically ceases to perform its direct functions. For reliable protection from moisture, a vapor barrier should be provided on the warm air side and waterproofing on the cold air side.
Vapor barrier and waterproofing materials are traditionally produced in two forms: films and membranes. The former have low vapor permeability. The cheapest example is ordinary polyethylene film. In order not to block the air movement inside the walls, it is recommended to choose modern membranes. Read step-by-step instructions for insulating walls with mineral wool from the inside.
Fiberboard
The walls of the house can be insulated from the inside with soft fiberboard boards. The option does not guarantee that the difficulties listed earlier will not appear in the future, but it has the following advantages:
- good thermal insulation and noise absorption;
- unattractive to insects and rodents;
- good resistance to moisture and temperature changes;
- ease of processing, you can use any tools;
- easy installation;
- Convenient for wiring.
Fibreboard is resistant to temperature changes and high humidity
Problem Definition
It is not always possible to confidently determine the location of the blow-off. If it is clear that the air passes precisely from the bottom of the window, then it is not always possible to visually find micro-slits.
Matches will come to the rescue. If you carry the flame across the entire niche, you can understand where the cracks are.
Seal up the air vents
Foaming the space under the windowsill
For work you will need materials: foam, primer, sealant; tools - assembly knife, spatula. To seal large gaps and cracks, it is recommended to use foam. It helps to insulate the area under the windowsill. “Foam” the joints of the base and frame of the window and niche. Seal small cracks with sealant (mostly acrylic). Treat the base with a primer. Sometimes, to level the base, it is recommended to apply one layer of putty, having previously aligned two beacons in level.
Replacing the rubber seal is one of the most popular topics in the field of window repair. In terms of popularity, it is comparable, perhaps, only with the notorious “window adjustment for winter mode.” If you have read my articles before, you will not be surprised at the skeptical attitude towards these manipulations in general - because, without understanding the reasons, neither one nor the other is a panacea for blowing, freezing and drafts.
However, sometimes replacing the seals on windows is really necessary. First of all, this applies to conventionally “old” structures - those that have served for 10, 15 or more years from the moment of installation. The elasticity of the window rubber, and therefore its ability to “hold” heat, gradually decreases over time. And if repair or plastering work was carried out in the room, then the service life of the seals can be reduced significantly.
Contents: Do the seals on windows need to be replaced? How to check if the rubber is “tired” What types of window seals are there? Is it worth using “universal rubber bands” on a window How to determine which seal is suitable for your windows KBE rubber Types, appearance and features REHAU rubber Appearance and features VEKA rubber Attention! VEKA seals and the specifics of their replacement How to choose a rubber seal for a window? Selecting the type, color and length of the seal Replacing the seal on windows Removing the old and installing a new seal Nuances of the process and “life hacks” Features of replacing co-extruded seals What is it and can you do it yourself The finishing touch Finishing the window to “standard”
How can you determine whether the rubber on your windows requires replacement or not?
Indirectly, this can be done by the “organoleptic” method - that is, visually and by touch. The seal is in good condition, has more or less the same height around the entire perimeter, is soft and elastic, and holds normally in the corners and grooves. At the same time, it can be pulled out without any problems and inserted back into its place (with the exception of co-extruded ones). Very old rubber is hard, flattened, and sometimes even breaks when trying to dismantle it.
Meanwhile, a not-so-good-looking “elastic band” can actually last for more than one year. So, the most reliable criterion for making a decision to replace the window seal is the undoubted and obvious blowing in the vestibule, with the clamping pins correctly installed and fully pressed. The sash and frame, of course, should not have any deflections or distortions (and this is not difficult to determine with a regular pencil). Of course, you can replace the seal on the windows as a preventive measure - without waiting for the old rubber to “fail” in severe frosts.
We decided - let's change! And for what?
If you plan to replace the window seal yourself, first you should determine the manufacturer (that is, the name) of the plastic profile. And the craftsmen need an eye and an eye - many of them use only one type of rubber for all windows. As a rule, this is a KBE 228 seal, or the so-called “universal” one, but it also happens that it is a Eurostrip “noodle”, which is actually intended only for inserting into old wooden frames.
However, plastic windows that look so similar to each other have a different shape, depth and location of the groove for the seal. The manufacturer calculated the profile exclusively for “its” rubber, taking into account all its design features. And if, for example, for REHAU the KBE seal is at least suitable (only the appearance of the window will suffer), then for the VEKA profile only the original “elastic” is suitable - another one will not stick to it properly. The “universal” seal for plastic windows, which has recently appeared on sale, is only very conditionally “suitable” for such different profiles, and the result is usually quite mediocre (for the reasons stated above).
No need to chase the thickness of the seal! This is one of the common mistakes - after all, a window with abnormal, excessively thick rubber will not close properly. A seal intended for installation under glass (double-glazed windows) should also not be used as a replacement for the elastic band of the rebate - this will not lead to anything good.
So let's determine the name of the profile. On some windows it is printed by the manufacturer, on others it is not. You need to look at the white (plastic) part, and not at the metal fittings (its brand is not important when selecting rubber). You can also look for remnants of protective films with inscriptions (often left on the street side), or agreements with installers.
Very conditionally, we can divide the whole variety of window “rubber bands” installed in the vestibule into 4 main groups.
1) Type KBE. 2) REHAU type. (I write “type” because these seals fit both the original profiles and their numerous analogues, or clones). 3) VEKA. 4) Everyone else.
Why did I divide them this way, “offending” many well-known and worthy brands? It’s simple, these “rubber bands” are usually always available for free sale, they are sold by the meter, and if necessary, they will fit most windows from other manufacturers - you just need to choose them correctly. In addition, a significant number of modern profile systems are partial or complete copies of the same KBE and REHAU.
Even if you set out to find the original seal for your exclusive window, and eventually find it, buying at least 300 meters of rubber for this from a wholesale warehouse is, to put it mildly, impractical. Keeping a large assortment is also unprofitable for repair companies, so in the vast majority of cases, by default, they will “roll” the same KBE seal into your windows.
Sealing rubber for KBE windows and their analogues
KBE seals come in two types - 227 and 228. Their main difference is the air chamber of 228 rubber, which gives it greater elasticity. It is most often used as a “repair” and universal one. The main feature of KBE rubber is the “step” that corresponds to the shape of the groove in the plastic profile, which ensures its correct fit. The “leg” is thin and quite long.
Sealing rubber for REHAU windows and their analogues
REHAU rubber does not have an air chamber, but it has two “petals” of sealing that cannot be confused with anything else. Based on this feature alone, you can most likely conclude that this is a REHAU profile or its equivalent. The rubber on both the frame and the sash is the same.
Many people replace the REHAU seal with KBE rubber, citing its larger width and the presence of an air chamber. However, the appearance of such windows deteriorates - the rubber protrudes beyond the edge of the sash, forming a “mourning border”, which is absent in the original.
In most cases, there is no need for such a replacement at all - you just need to align the doors, and the original REHAU rubber will last for many more years. Such “castling” is advisable only in case of serious “jambs” in the installation or production of windows, and then a wider KBE seal will help to bridge the gaps between the sash and the frame.
Sealing rubber for windows VEKA
The VEKA seal is the widest of the trio. Large air chamber with a petal, the “leg” is short and thick. It is very difficult to push this seal into other profiles, but someone else’s will, on the contrary, dangle in it. Therefore, if we see a blue diamond with the inscription VEKA on the window, we are looking for original tires!
Be careful! The main feature of replacing the seal in the VEKA profile is the different type (thickness and shape) of window rubber on the frame and sash! Very often, unscrupulous or inexperienced “craftsmen” install the same (sash) seal in them, which leads to excessive load on the fittings and, paradoxically, to blowing! The fact is that with such a replacement, the thicker sash rubber, being in the frame, “squeezes” the ledge away from it, and the window soon begins to blow again, and the handles stop closing normally. So, for your own money, you can easily get a bunch of problems out of the blue.
Selecting a replacement seal
If the window profile is unknown, the easiest way to do this is to insert a piece of new seal next to the “original” rubber. Before purchasing, you can ask the seller for a small piece of rubber to try on; usually no one refuses. The main thing is that it holds well, the width, height and position of the “petal” match - then you can safely replace the old tires with new ones. First, try replacing the seal on one window, and if the result suits you, change it on the others.
The color of the seal is definitely black. The point is the composition of the rubber - colored (white, gray) seals are often based on plastic, not rubber. Accordingly, their elasticity decreases sharply in cold weather, and the service life of black EPDM seals is much longer. I have repeatedly encountered cases of VEKA windows with gray rubber blowing, and REHAU windows with white rubber whistling.
Determining the amount of tires to replace
Everything is simple here, we use a tape measure to measure the perimeter of the sash, and, in the case of the same seal with the frame, multiply by two (for double-circuit windows). It’s worth taking a meter or two more - after all, it’s unacceptable to stretch the rubber, it’s better to leave a little extra.
How to replace the rubber seal on a window?
First, of course, you need to remove the old tires. We hook it with something and pull it - it should come out of the groove without any problems (with the exception of very old windows, when you have to literally take it out piece by piece). In the upper part, the seal is usually glued together (and glue is often used generously), so here you can help the process with a knife, which removes all residues, including inside the groove. From under the top loop, we simply pull out the rubber. And we throw it away.
Next, during the replacement process, you need to insert a new rubber band into the installation groove, using the same side. It’s better to start from the top loop, from under which we so famously pulled it out. How to lay a seal under it - after all, on, and only then hang the hinges?
Do I need to remove the sash and hinges? No, everything is much simpler than it seems.
If you have a tilt-and-turn window in front of you, you should find the so-called lock, and with the window open, turn the handle up to the “tilt” position. Thus, by opening the window in two positions at the same time, you get the opportunity to freely lay the seal under the top hinge. After replacing the rubber, in exactly the same way, the handle comes back.
For a pivoting sash, you first need to get to the screw for adjusting the pressure of the top hinge to the frame and loosen it as much as possible.
Without this, it is very difficult to stretch the seal under it, and some unfortunate craftsmen simply cut off the elastic near the loop, which is absolutely unacceptable.
To make it easier to push the rubber, you can cut it at an acute angle. Don't forget to adjust the hinge pressure again, otherwise there will be blowing from the corner of the window.
Now we move on to the process of “filling” the seal into the groove. In production, where the wages of assemblers depend on the speed of work, the rubber is “pulled” by pressing it into the groove - this is significantly faster than “pushing” it, pressing it without stretching. But this method is fraught with subsequent contraction of the stretched seal, which is observed everywhere - the rubber, after some time, peels off from the corners. That is why the seal is always glued together at the factory - so that it does not separate at the joint.
The best course of action when replacing window rubber is a combination of “pushing” and “stretching”. This means that if you push the rubber with your fingers, you definitely need to smooth it out, and if you pull it, remove excess tension (the main thing is that wrinkles do not form).
At the corners, it is necessary to lay the seal evenly, if necessary, removing plastic burrs with a knife (in production they often don’t do this - there’s no time!).
Correctly executed corners look, I would say, beautiful.
The joint should always be on top , and there is no need to glue the seal - just leave an extra centimeter of elastic, and it will press itself.
What if you have a window with a co-extruded seal?
Extruding the seal together with the profile is a technology designed to simplify and reduce the cost of the production process of plastic windows. The seal and plastic form a single unit, which significantly reduces the number of workers. But, as usual, cheap is never good, and if this is quite acceptable for a glazing bead, then for a sash (where the seal is constantly working on compression) it is not very good. After all, such a “rubber” of a window is usually not rubber at all, but the same modified plastic. In countries with a temperate climate, this is not a problem, but in the Russian frost, such a seal quickly “stubs”, causing a flurry of calls from angry customers in winter. Quite often, completely new windows are blowing!
Of course, most large manufacturers have also provided the possibility of replacing the co-extruded seal with a regular one. It’s just that the procedure itself is much more complicated, since you need to not only tear out (with considerable effort!) the old rubber, but also clean the corners by milling grooves into them. For this operation , I would still recommend finding an experienced window repairman (especially since, to replace such a seal, you usually have to completely remove the sash from its hinges).
The seal has been replaced. But that is not all!
You have successfully coped with replacing the rubber band of the window, but the problem is that the handle has become difficult to close? The new seal, of course, is more elastic than the old one, but that’s not the only reason. Most likely, you forgot to adjust the window back to “summer mode”. I recommend “once and for all” setting the factory (average) position of the trunnions , or even the minimum. This way the seal on the window will last much longer. After this, you must lubricate the fittings and the handle itself. As they say, feel the difference!
Now you can relax and congratulate yourself on your success!
Thermal film gluing
In a brick house or any other, a window can give off cold from the glass itself. To eliminate this problem, it is not enough to hang thick curtains on the cornice. Try sticking thermal film on the glass. It contains rare earth metals and alloys of silver and nickel. They do not allow cold air to pass through. In addition, the thermal protective film tints the glass a little. So it will be more difficult to look inside the room from the outside. This is especially true if you live on the ground floor.
Insulating the walls of a house from the inside - justification for the work
The main reason for insulating the walls of a house from the inside is to create comfortable temperature conditions for permanent residence in the house. In old foundations and brick buildings, especially at night, when the mercury column on the thermometer sharply drops, the air inside the building cools more rapidly. This is very noticeable in the morning. To avoid waking up from freezing, you need to create conditions to reduce heat loss. One of the effective solutions to the problem is thermal insulation.
The second reason is changes in humidity. Large differences in temperature, especially near cold bridges and in areas with poor ventilation, cause condensation to form. The same result is a consequence of freezing of the walls. Any moisture with prolonged exposure to the material has a destructive effect. Condensation also creates a favorable environment for the appearance and proliferation of mold fungi.
High-quality insulation of the walls of the house from the inside will significantly reduce heat loss
While it is relatively easy to rid stone houses of biological damage, wooden buildings suffer from a long-term “disease” to the point of complete destruction. This is just a replacement of parts of the structure. In any case, a person suffers from a fungus.
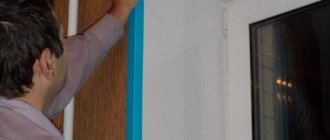
Slope insulation
Slopes need to be insulated when there are cracks that allow air and moisture to pass through. The material used for these purposes is one that is easy to install, durable and safe. Ordinary polystyrene foam has these properties. It is one of the simplest and most convenient hydro- and heat-insulating materials.
The process of insulating a slope with foam plastic looks like this:
- Treating the entire surface of the slope with an antiseptic primer, removing excess foam.
- Apply plaster mortar to the slope using a special spatula, leveling the surface with a trowel.
- Re-treat the surface with a primer after the plaster layer has completely dried.
- Cutting out pieces of foam plastic and sanding them.
- Spreading foam with glue and attaching it to the surface.
- Processing foam plastic with plaster.
- Applying primer to a dry surface.
Insulating slopes yourself is not difficult if you purchase good quality materials and find out in advance in what order the work should be performed. As a result of high-quality sealing, cold air will not flow through the window opening, which means the room will become more comfortable to live in.
Causes of drafts
You should also have basic information about the causes of drafts. Having basic knowledge, you can avoid such unpleasant situations in the future.
- Making mistakes during window installation. One of the most common problems associated with the low qualifications of the installer. If a draft occurs immediately after installation, then you need to contact this installation company again and demand that the defects be corrected. If you install plastic windows yourself, you need to check the correct installation and correct any errors.
- Shrinkage of the soil under the house and, as a result, skewing of windows. A rare problem that occurs among residents of new houses.
- Poor quality materials and manufacturing defects. An attempt to save on the price of double-glazed windows can cause poor window sealing, but even owners of expensive windows are not insured against defective parts. If the terms of purchase allow, take advantage of the opportunity to return the entire set or only the defective parts.
- Physical wear and tear on the locking parts of the window and seal. A very common problem for window owners who have been using them for a long time without replacing them.
- Violation of the rules of use and care. Over time, the sealant may lose its properties. To prevent this from happening prematurely, it is necessary to wash it and treat it with emollients. For example, glycerin.
If you evaluate in detail all the causes of drafts and heat leaks, you can divide them into two categories based on the possibility of eliminating them - with the help of window installation specialists and solving problems yourself.
It is best to use the services of professionals to solve the following problems:
- If problems with the window are identified during the warranty period. At this time, the installer company bears full responsibility for its operation. Independent intervention in the design features may result in denial of further warranty service.
- External work at height is required. In such conditions, the likelihood of injury greatly increases, and it is better to entrust such work to professional workers.
- Detection of manufacturing defects during the warranty period.
- Replacement of some structural parts, requiring certain tools and skills to work with them.
If the work is done from the inside, then most of it can be done independently.
Seal care
All products must be maintained to prolong their service life. The care procedure is simple and not particularly labor-intensive.
It is advisable to clean not only window frames, but also seals twice a year (before the winter season and, accordingly, before the summer season), without using aggressive chemicals. After cleaning, the seals should be wiped dry and then applied with a protective agent that contains silicone. You can also use glycerin or petroleum jelly (except EPDM). This is necessary to maintain the elasticity of the material.
Silicone grease for rubber seals
Seal lubrication
Advice! If dirty renovation work is being carried out in a room, it is better not to open the windows wide so that dust and particles of construction mixtures do not settle on the seals.
Prices for various types of silicone lubricants for rubber seals
Silicone grease for rubber seals
Difficulties and errors
When insulating panel walls, novice repairmen often make the following mistakes :
- They begin work in the cold season.
- They do not pay enough attention to the quality preparation of the wall.
- The glue is applied incorrectly (it is applied to the slabs along the perimeter in the form of strips about 4 cm wide, and dotted along the rest of the surface).
- The seams between the insulation are left empty.
- Install the insulation on an undried wall.
Consequences of errors
Mistakes made during the process of wall insulation lead to serious consequences:
- If the walls are cold or poorly prepared, the glue between the insulation and the wall will dry out quickly, which will impair its adhesion. As a result, the entire structure will be unreliable, and there will be a risk of mold and mildew growing.
- If the glue is applied to the insulation incorrectly, the material will deform, bending in one direction or another.
- If the seams between the slabs are not filled with sealant, cold bridges will form in the wall, through which warm air will escape.
- If the wall is wet, then soon a fungus will appear under the insulation.