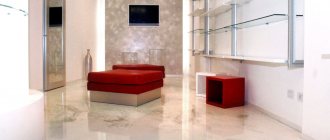
Renovating a house or apartment, changing the design, carrying out a radical redevelopment is an inevitable reality that each of us faces. At this moment, issues related to the choice of finishing materials, furniture, and decorative items become relevant. One of the most important items on the renovation list is the flooring. It should not only be functional, but also be aesthetically pleasing. All requirements are fully met by a 3D floor, which allows you to implement different design solutions, with it the interior of any room becomes original and unusual.
Features of self-leveling 3D floors
In terms of manufacturing technology, 3D floors are practically no different from their self-leveling counterparts, which were previously used exclusively in industrial and public spaces. The main highlight is the effect of presence. Three-dimensional drawings have long been included in many areas of our lives. You will no longer surprise anyone with such things as photo wallpapers, stretch ceilings with a realistic image of the starry sky.
Self-leveling 3D floors appeared not so long ago. The idea for their creation originated from street art. Three-dimensional graphic pictures were drawn by street artists; their creations aroused interest and admiration among the audience. Creative designers picked up this idea and brought street technology into living spaces. Many people also liked this, as evidenced by the interest in flooring.
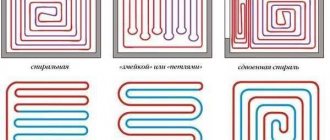
The drawings can be absolutely anything: your own photos from a digital camera; ready-made pictures downloaded from the network; paintings made to order. The main thing is high quality, large size images that can be transferred to the base using a large-format plotter in any advertising agency. However, finding a device of the appropriate size is quite difficult, so in most cases the picture is divided into several fragments.
The image is printed either on banner fabric or on a satin base. You can also use ready-made vinyl films or photo wallpaper. You can also create a 3D effect using various objects placed on a base polymer layer. For example, multi-colored sand, shells, pebbles, wood slices, coins, etc. When choosing this method, it is worth taking into account the high consumption of materials and the increased cost of coating.
When choosing a design, you must not only rely on personal preferences and the functionality of the room, but also take into account the psychological message. Too aggressive paintings with a terrible plot can have a negative impact on the psyche and health.
Order flooring from professionals
provides services for pouring self-leveling floors in living rooms, using materials of its own production. Confidence in the professionalism of the craftsmen and the quality of the products allows us to include a guarantee clause when concluding a contract.
We are confident that the customer will never have any complaints about our work. An additional bonus will be favorable prices for materials and work. The absence of intermediaries allows us to maintain them at the minimum level in the region.
The main reason to order or buy a polymer floor from us is that we can create a beautiful floor covering with a long service life because we have been working in the coating market for more than 15 years and know all the features of the material that needs to be used. After pouring the coating, the room will pleasantly please not only you but also your guests; it will be pleasant to walk on this floor.
Advantages and disadvantages
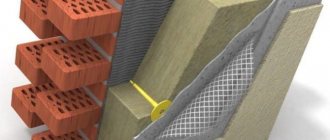
Self-leveling 3D floors are valued both for their aesthetic qualities and for their functionality, reliability and safety. They represent a unique surface that consists of three layers: a base base, a three-dimensional image, and a protective coating. The structure and materials used are responsible for good performance characteristics. Among the main advantages of this type of finishing are:
- Durability . The coating has a long service life of more than 20 years, while it does not lose its presentable appearance.
- Durability . If the casting technology is followed, the canvas will be resistant to mechanical loads and impacts.
- Wear resistance . The finish has good resistance to abrasion and abrasion.
- No seams . After pouring, the floor is solid and smooth, without any seams.
- Decorative properties . You can choose any design, decorate the room in an original way, and bring bold design ideas to life.
- Ecological cleanliness . After hardening, the raw material becomes harmless and does not harm the health of residents.
- UV resistance . The picture does not fade under the influence of sunlight.
- Moisture resistance . The polymer material completely and reliably covers the base and serves as a waterproofing agent. It is neutral to water, so it can be used in the bathroom, toilet, and kitchen.
- Fire safety . The components used belong to category G1, they do not burn.
- Chemical inertness . The polymers used are not affected by chemicals and can be cleaned with detergents.
- Possibility of heating . It is possible to combine it with a “warm floor” system.
- Easy care . The canvas does not accumulate dust or absorb dirt. To maintain cleanliness, it is enough to periodically perform wet cleaning.
Like any other material, canvas has a number of disadvantages:
- High price . Arranging even a small room will require significant costs, which not everyone can afford.
- Complex pouring technology . Only professionals can do quality work.
- Dismantling . Removing floor covering is very difficult. It becomes monolithic; you will have to use a jackhammer to work.
- Long hardening time . Drying the poured layer can take up to six days, and at low temperatures and high humidity this process takes longer.
The three-dimensional image will dominate the interior and act as an accent.
Characteristics of polyurethane floor varnish
Polyurethane varnish is often used to protect concrete floors, polyurethane or epoxy self-leveling surfaces. It can also be used to protect wood, stone flooring and furniture. The material may be water-soluble or contain organic components.
The varnish is applied to a completely dry surface using brushes or felt rollers.
This varnish is characterized by good plasticity and provides a high degree of surface protection from moisture, physical, mechanical and chemical stress. The surface becomes more wear-resistant, which ensures the preservation of its original decorative qualities over a long period.
Polyurethane varnish is characterized by increased ductility and strength. The material resists well the negative effects of ultraviolet rays, temperature changes, and shock loads. The surface after application can be glossy, semi-gloss, semi-matte or matte.
Polyurethane varnish is available in a one-component or two-component composition. The first option is suitable for use without preliminary preparation. A two-component material requires mixing of components, is more difficult to use, and has a high cost, but the performance indicators of such a composition are much higher.
The varnish is applied to a completely dry self-leveling surface or after treating the base with impregnation for concrete or concrete floors using brushes, felt rollers or a pneumatic spray gun in three layers.
Polyurethane varnish has increased ductility and strength
Important! Before purchasing varnish, you should make sure that the components of the material are compatible with the ingredients of the self-leveling coating.
Review of the best varnishes for polyurethane polymer floors
The leading position in the production of polyurethane-based paints and varnishes is occupied by the Perti company. The material has excellent properties, thanks to which the surface acquires high technical and operational characteristics. The varnish is completely safe for human health. It is characterized by a high drying speed, is odorless, and gives the coating an aesthetic appearance, which retains its original decorative qualities for a long period.
A good option is Russian varnish. The material is environmentally friendly, made on a water basis, fits well on the surface, sets and dries quickly. The varnish gives the coating higher strength, resistance to mechanical and impact loads and durability. This finishing coating can be used in premises for any purpose, which are characterized by significant mechanical and chemical influences.
VGT Premium varnish based on polyurethane is characterized by excellent decorative qualities. It is odorless and dries quickly. The material can be tinted with special VGT color pastes to give the surface a more aesthetic appearance.
Varnish gives the coating higher strength, durability, resistance to mechanical and impact loads
Self-leveling polymer flooring is a modern material that creates a strong, wear-resistant, durable, decorative surface. This coating can be easily laid on a concrete base. To obtain a positive result, which will guarantee long-term operation, it is important to follow all stages of installation of the material.
Types of self-leveling floors
There are many different characteristics of self-leveling floors. Based on the thickness of the coating, they are divided into: thin-layer (less than 1 mm), medium (up to 5 mm), highly filled (the mixture layer reaches 8 mm or more). By solvent: aqueous, solvent. By surface type: smooth, rough. According to electrical conductivity: conductive, non-conductive. But the main division into types is carried out depending on the binding materials used:
- Methyl methacrylate . For production, solutions based on methyl methacrylic resins are used. The main advantage is rapid curing within 1-2 hours, but you need to work with the composition very quickly. Without professional skills, it will not be possible to perform correct installation. Most often used in industrial facilities.
- Cement-acrylic . The composition includes the following components: cement, acrylic, fine sand, plasticizers and other additional additives, usually mineral. Previously, such coating was used exclusively in food production. The material is not afraid of water, chemicals, mechanical influences, and it creates a non-slip surface.
- Epoxy . The main component is epoxy resin. Floors are hard and rigid, but have reduced impact resistance. They can be used on wood, metal and concrete substrates. They are characterized by good wear resistance and are not subject to abrasion, so they can be installed even in high-traffic areas, for example, in shopping centers, cafes, public and educational institutions.
- Polyurethane . The base of the mixture is polyurethane. They are characterized by high elasticity and flexibility, have high tensile and compressive strength, which eliminates the possibility of cracks. This is the most popular type, which is durable, hygienic, and is used even in medical institutions.
Common mistakes
It is very important to try to avoid the following mistakes when performing pouring work.
- If you did not dry the base properly before pouring, allow grease stains to appear or leave dust, the floor will begin to peel off in layers when a certain amount of force is applied. If you notice this phenomenon throughout the coating, you will need to remove it. If only a few areas are affected, you can re-flood them. If you allow debris to get in, get rid of it after the composition has hardened using simple sandpaper.
- You should be very careful about the amount of water in the mixture. When there is not enough of it, lumps will begin to form; if there is too much, the quality and strength of the polymer will decrease.
It is important to carefully monitor how much water has been added to the mixture - both excess and deficiency can affect the quality of the floor
- It is very important to be aware of this mistake, which can be very costly for people pouring polyurethane floors. In hot weather, after finishing mixing the mixture, you are literally distracted for a few minutes, and as soon as you return to work, you will find a tightly frozen mass. Of course, the instructions say that hardening occurs in 20 minutes, but in the heat everything can happen faster. Many novice masters make precisely this omission. So in the heat it is better not to work with compounds. At normal temperatures, it is better to immediately place the mass in the application area.
It is worth saying that during the process of pouring the floor, a nasty smell will most likely arise, which will disappear after a couple of hours.
Design and stylistic ideas
Choosing a poured floor design is a difficult task. The main thing in this matter is harmony. The floor should be combined with the decor of the living room, hallway, kitchen, nursery, and other functional rooms. You can use almost any image to create a 3D effect. A lot depends on it; a picture can not only lift your spirits, inspire, calm, excite, but also cause aggression, poor health, and depression.
It is also worth considering the fact that the coating belongs to the category of expensive and durable materials; the pattern cannot be changed over time. When arranging the flooring, you don’t need to pay attention to fashion trends, which quickly become outdated, because you will have to admire the floor for more than one year, and perhaps not even a decade. Experienced designers recommend using classic motifs, for example, natural and seascapes.
When choosing the most suitable image, first of all you should pay attention to the purpose of the room, its style, which also affects the color palette. In order for all family members to feel comfortable, it is necessary to take into account everyone’s opinion and come to a common decision. Only in this case will it be possible to create a presentable and cozy interior. For clarity, let's consider several possible ideas using the example of different rooms.
For the hallway and corridor
The hallway is the calling card of any home. Its furnishings form the first impression of the owners, their tastes, preferences, and well-being. Among the features of the room one can highlight high traffic. Here the floor is constantly dirty and subject to abrasive influences, so it must be washed and cleaned frequently. Due to their characteristics, bulk structures are most suitable for existing conditions.
You should not use complex designs or three-dimensional landscapes in the corridor. One image in the center of the room is enough. It can be an abstraction, an animal, a plant on a plain background. You can also use imitation of masonry, tree cuts, and laid stones. It is necessary to abandon pictures with a cliff, an abyss into which you find yourself when you enter the front door. They will not bring vivid impressions for long.
For kitchen
Self-leveling flooring can easily be called the best solution for the kitchen. It does not absorb dirt, it is not afraid of stains from fat, spilled juice or wine, or other products that have fallen on the surface. He is not afraid of water and fire. Objects falling on the canvas will not cause any damage to it. In addition, kitchen spaces in most houses are small in size, so organizing the covering will require less money compared to a living room or bedroom.
You can choose almost any topic, but you must take into account the fact that the image should not discourage your appetite, but also not cause an excessive desire to eat. Floral motifs, fresh grass with drops of dew, and sea surf will look great here. You can also use an urban direction, for example, landscapes of megacities. A room where the floor and apron are designed in the same style looks especially impressive.
For the living room
The living room is intended for active recreation, all family members gather in it, and guests are invited here. It is appropriate to use accents in this room. Here you can fully implement interesting design solutions that are inappropriate for other rooms. For example, create an abstract composition, set an image of an evening or night city, various picturesque landscapes, even paintings with seething volcanoes.
Using drawings, you can also create zoning in the room, for example, using a marine motif, divide the room into two functional parts, one of which will be on the shore, the other in the middle of the sea. An excellent solution would be bright colors that tone and invigorate the body. These shades include red and orange.
For the bedroom
The bedroom is a place to relax. Here you should use calm textures and relaxing motifs to create a romantic atmosphere. Various flowers, small waterfalls, insects, dew, and grass would look appropriate. The plots moving from the floor to the walls look interesting. For a married couple, you can choose an image of swans swimming together on the lake.
Self-leveling floors should complement the interior of this room, and not act as the main accent. When decorating, preference should be given to pastel colors, or natural ones: blue, green, yellow, brown. They do not evoke strong emotions and symbolize purification and peace. Bright, saturated colors, especially red, attract attention and do not allow you to relax.
For children's
In a children's room, you want to bring to life the most original ideas, to create a real fairy tale for your baby. Floors with 3D effect allow you to achieve your goals. When choosing a picture, parents often choose images of characters from cartoon series. But the child grows quickly, as he grows up his idols change, and existing pictures cease to satisfy him.
You should choose a suitable design taking into account the child’s gender. For boys, images of castle ruins, space, cars will be relevant, for girls - flowers, plants, favorite heroines from fairy tales. Pictures with animals will suit all kids, regardless of their gender. The main thing is not to overuse with an abundance of complex patterns, so as not to overload the room.
For bathroom and toilet
The self-leveling floor creates good waterproofing. It does not absorb or allow moisture to pass through, making it an excellent solution for the bathroom. The most common motif for this room is a marine theme. Fishes swimming in the water, friendly dolphins, the coast, and lagoons are often depicted here. These paintings allow you to relax as much as possible and make your time enjoyable.
Instead of ordinary images, you can use real pebbles or shells covered with a protective layer in the toilet. It is not necessary to use the water world with its inhabitants, as well as landscapes associated with the ocean, everywhere. The space theme is also popular here: a view of the Earth from orbit, planets and their satellites. Less common, but also in demand, are drawings of exotic animals, flowers, and trees.
Varieties
Polymer bases are currently manufactured by a variety of companies. These types of solutions are used to perform a wide range of tasks. Based on the composition, polyurethane floors can be divided into such varieties.
| View | Description |
| One-component | From a technical point of view, this type of product is very similar to oil paint. They are used in a thin layer, wanting to provide additional protection to the base. The thickness of the floor should not exceed 0.4 millimeters. |
| Two-component | Products of this kind are composed of a polish base and a hardener. To obtain a floor, the components are mixed and then covered with the finished base. Solutions do not spread so well, so the layer thickness sometimes reaches a couple of millimeters. |
Which is better - one-component or two-component polyurethane flooring?
Polymer bulk solutions can be divided based on the amount of filler in the composition.
- Thin-layer. Here the thickness cannot be more than a millimeter.
- Self-leveling self-leveling. If we talk about the percentage of filler, it already reaches 50%. It is applied in a layer whose thickness reaches 5 millimeters.
- Highly filled. In this situation, the filler already makes up 85% of the total volume. Using the named product, it is quite possible to obtain a coating whose thickness reaches 8 millimeters. These substances almost do not exfoliate and do not suffer from cracks in comparison with the types mentioned above.
The greater the thickness of the layer of this substance, the greater the quality it shows in terms of load resistance and service life. In this situation, quartz sand is added to the mixture mostly during the laying process by workers.
The more filler in the solution, the better the final coating will be.
There are several other classifications of polyurethane flooring. Today in stores you can find elastic, elastic-hard and hard surfaces. The top layer of the material can be matte or glossy, with different types of transition colors.
Self-leveling floor device
At first glance, a self-leveling 3D floor has a three-layer structure: a base, a three-dimensional image, and a polymer coating. However, this does not take into account the protection of the canvas with a primer varnish and the final protective layer. To understand the structure of the floor, let’s look at its structure in more detail:
- Base . The base is a concrete slab, cement screed, wood or metal covering.
- Base layer . It is not always possible to make the base smooth using putty or pre-grinding. For this, a polymer solution is used to create a leveling layer.
- Canvas with a three-dimensional image . A drawing selected and printed in a printing house.
- Protective coating of the canvas . To organize it, a colorless varnish is used, which is applied in two passes.
- Main layer . A transparent polymer whose thickness determines the three-dimensional effect.
- Final defense . After the floor has completely dried, it is coated with protective varnish in two stages.
Video description
About calculating the amount of mixture for a self-leveling floor in the video:
Final calculations
As a rule, provided that the base is well prepared, calculations are made based on the data specified by the manufacturer of the self-leveling floor. As an example, we will give the procedure for calculating the required amount of mixture to fill a layer of 2.5 millimeters. At the same time, the manufacturer indicated that for 1 millimeter, when pouring 1 square meter, 1.5 kilograms of the composition are needed. The calculation requires three steps:
- The area of the filled plane is calculated. With the correct geometry, it is enough to multiply the width of the room by its length. Complex contours are divided into rectangular sectors and their area is summed up.
- The required thickness is determined using a level. In the case of a relatively flat surface, you can use a standard or laser building level. In case of significant deviations in height, it is necessary to use a water level.
- All received data is recorded and double-checked.
Let's assume that the width of the room is 4.7 meters and the length is 5.9 meters. Therefore, the area of the room will be:
As mentioned above, it is planned to pour a layer of 2.5 millimeters at a mixture consumption of 1.5 kilograms per millimeter. So per square meter you will need:
For the entire room:
When calculating, it is necessary to take into account the density of the composition. We provided approximate indicators for this parameter above, but for more accurate calculations you should check the data provided by the manufacturer.
Self-leveling floor with colonial-style ornaments Source polsdelat.ru
How to make a 3D floor with your own hands
Self-leveling floors are suitable for any room in an apartment or house. When deciding to make such a coating yourself, you must remember that it will be almost impossible to dismantle it in the future. Difficulties will also arise with correcting errors made during work. The special specificity of pouring requires accuracy, attention, and strict adherence to technology. Since decorative images are covered with a quickly hardening mixture, installation should be carried out according to the instructions step by step.
Selection rules
Sometimes choosing the right product for your concrete floor can be a little challenging. Simple rules come to the rescue.
- Surface color and texture. When polymer is needed for high-tech residential premises, you can take glossy surfaces. If we talk about the Provence style, then it is better to take matte options.
- Application environment. When a polyurethane floor will suffer from heavy loads, it is best to take a two-component product. Due to this, the coatings are dense and do not suffer from abrasion. The most important thing is not to forget that this specificity is related to the thickness of the polymer itself. Each type of floor is suitable for different load forces.
- Price. The cost of products is directly related to their technical properties. It varies over a wide range, so you can choose the best variations to solve various problems.
When choosing materials, be sure to pay attention to the color and texture of the surface, manufacturer, as well as cost
- Firm. Here you need to look exclusively at the reviews of people who have already tried such products. Only they allow us to really judge how good a specific type of polymer is.
Required materials and tools
To create a polymer pattern, you can use several systems on different bases - polyurethane, epoxy, methyl methacrylate. The most common choice is epoxy fill. It is easier to install it yourself, it has no smell. The materials for installation will require a wooden or concrete base, a primer layer to increase adhesion, a 3D graphic image, and a transparent layer to add volume. Be sure to use varnish protection against wear. You will also need the following tools for the job:
- Construction mixer;
- Raklya;
- Synthetic padding roller for priming and needle roller for rolling;
- Several spatulas of different widths;
- Container for mixing the mixture;
- Paint shoes for free movement on the surface;
- Hard brush.
Calculation of the required amount of material
At the initial stage, consumables are calculated. The amount of mixtures will depend on the thickness of the future layer, the area of the room and the condition of the subfloor. Each manufacturer indicates the recommended mixing proportions on the packaging of their composition. On average, it takes 4 kg of material to create a layer of 3 mm at the rate of 1 kg per 2 square meters. meters.
Selecting a photo drawing
For a floor with photo printing, you can select and process the picture yourself or use any image from the Internet. The main thing is that the drawing matches the interior as closely as possible and has a high resolution. It could be an interesting abstraction, geometric lines, patterns, stones, flowers, leaves.
If you decide to take the photo yourself, then you should photograph the floor, trying to capture the entire area to be filled into the lens. It is better to take the photo from the side of the doorway. It must be clear, without eclipses or light spots. Then the photo of the room must be transferred to any graphics program and compared with the selected picture. Now we need to remove unnecessary objects, leaving one surface, and align the borders. The resulting pattern now needs to be transferred to the fabric of the required size. This can be done by any outdoor printing company.
Preparing the base
You can only pour the floor mixture onto a perfectly flat surface. Only in this case can you get a beautiful and even picture. There should be no differences exceeding 1 mm on one linear meter. Despite the ability of the mixture to level, it should not be laid on an uneven floor. This procedure will require more filling and additional financial expenses. It will be much cheaper to level the existing base.
First of all, you need to get rid of the old coating and remove the baseboards. Then you should thoroughly clean the entire surface from dirt and dust. If there are deep cracks and potholes in the concrete slab, they are opened with a chisel and hammer, painted with a primer and filled with a cement-sand mixture. In rooms with high humidity, it is imperative to install a layer of waterproofing.
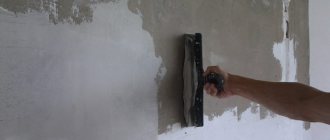
Priming the subfloor
Surface treatment with primer is a mandatory procedure. When carrying out work, it is necessary to take into account some nuances. Floors should be painted no later than two hours after cleaning from dust. Due to the limited period of action of liquid compositions, they must be distributed over the surface as quickly as possible. You need to do it in 40 minutes.
The mixture is mixed in a large container with a construction mixer, alternating reverse and rotary rotation. When the composition becomes homogeneous, it must be left alone for a few minutes for the air bubbles to completely escape. Then the thick mixture is poured onto the floor and leveled with a foam roller. The soil must be placed into the cracks and depressions using a brush.
Filling the Base Layer
Lay the base 5 hours after priming. The background for a three-dimensional image or picture must be made of high-quality materials and have a suitable shade. To make it, polymer mixtures are used, which are mixed with a construction mixer right before pouring, since after 30 minutes the liquid will begin to harden.
The composition is poured onto the primer and the base layer is formed using the rule. After the entire surface has been filled, the floor is left alone for 24 hours until complete polymerization. Then the evenness of the filling is checked. You can start laying out small decor on the 3rd day. The main drawing is placed after a week.
Laying the pattern on the floor
The image of the self-leveling floor can look like a banner or be painted with special paints. The first option is preferable because it is publicly available and easily adheres to the base layer. First, a transparent mixture of polymer and solvent is applied to the surface and left for 24 hours. After the soil has completely dried, a canvas, tile or pattern is applied in another way.
A simplified option for laying out a pattern is to use ready-made self-adhesive film. It is enough to remove the protective film from the back, lay it on the surface and straighten it with a roller.
When laying the banner, it is necessary to carefully remove air bubbles. To do this, carefully roll it over it with a dry roller from the center to the edges.
Filling the finishing layer
At the final stage, a finishing layer is applied, which will help maintain the integrity of the coating and enhance the effect of a three-dimensional image. Like the previous options, it is also applied using a special technology, following the master class. First, a transparent polymer composition is mixed, then the parts are poured onto the picture and distributed with a roller. The thickness of this coating should not exceed 0.3 mm.
Applying varnish
For the finishing layer to dry completely, 30 minutes will be enough. Then it should be coated with colorless varnish several times until a gloss is formed. You can actively use the floor covering within a week. The time interval between application of layers should not exceed 12 hours. Otherwise, the manufacturer cannot guarantee reliable adhesion between them.
Tools used for pouring
To perform the filling you will need the following set of tools:
- Low-speed drill or hammer drill for mixing the solution. It is necessary to ensure that the power of the tool is sufficient and that it does not fail due to overload or overheating. Filling should be carried out continuously in the room, so there will be very little time for the drill to cool down.
- Mixer attachment. It is important to decide in advance whether a drill or hammer drill will be used to mix the solution, since they have a different cartridge. As a result, the stirring attachment from the drill will not fit the hammer drill and vice versa.
- Buckets. The volume of buckets must be at least 20 liters. Do not use dirty buckets, as the filling will be interspersed, which will result in poor performance.
- Putty knife. Although the mixture is called self-leveling, it is better to pre-level it under the radiator and in hard-to-reach places to obtain a better-quality floor covering.
- Needle aeration rollers. The presence of air bubbles significantly reduces the mechanical strength of the self-leveling floor and, as a result, its durability. Therefore, air should be removed by carefully rolling the surface with a roller. For greater convenience, you should choose a roller with a telescopic handle.
- Wet feet. Special shoes with spikes that allow you to walk on a self-leveling floor that has not yet hardened to distribute it evenly over the entire surface and perform other operations.
- Laser level. Most important for large premises or if 3D self-leveling floors are planned.
Recommendations and care tips
Any floor covering needs some care. For self-leveling polymer floors, any of the gentle methods is suitable. This can be wet cleaning, collecting dust with a vacuum cleaner or moistening with a steam mop. This coating does not absorb dirt, so there will be no problems with maintenance.
Self-leveling floors are seamless, have no joints, sand and dirt do not clog into the pores. This makes it most convenient for a hallway or kitchen. A coating with increased moisture resistance does not require additional care, for example, frequent rubbing with mastic.
Safety precautions
Since the mixture contains chemical ingredients, some rules must be followed during the work. It does not matter whether it is paint, primer or the main composition of the coating.
Leveling the floor
All work must be carried out in a well-ventilated room.
The worker must wear protective clothing on his body, shoes on his feet, gloves on his hands, and goggles on his eyes. The respiratory organs should be protected with a respirator or medical mask.
If the mixture drops onto an open area of skin, rinse the area with plenty of clean water. And if paint or primer gets into your eyes, wash it off immediately and consult a doctor.
Keep open flames away from the material. Smoking while working is strictly prohibited.
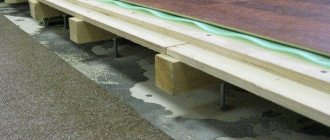
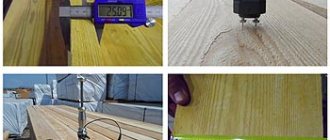
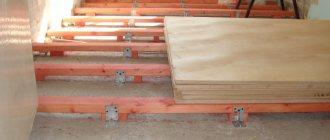
Self-leveling floor in combination with wood
A wooden base is also suitable for a self-leveling floor, just like a concrete one. It needs no less careful preparation. The surface for decorative coating should only be perfectly flat, durable, free of paint residues, drops of bitumen, oil stains and other defects.
First of all, the boards are checked for differences, creaks and gaps. It is better to remove painted areas with a special remover and remove all metal fasteners. Then the waterproofing is laid and filled with mortar.
Good examples and variations
A polyurethane floor in an apartment can significantly change its appearance in order to highlight the design of the room and make it unusual.
For example, in the bathroom the floor can be made in the form of an ocean with its inhabitants. The effect is simply incredible.
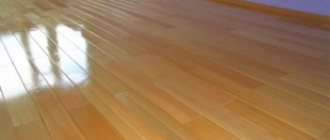
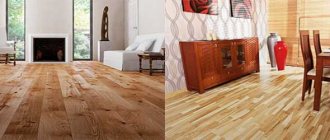
In the kitchen, you can make a floor that will look like a rich parquet made of wood.
In the bathroom, a self-leveling polyurethane floor is often installed, placing three-dimensional images of the ocean and its inhabitants between its layers
It would be nice to organize a spring meadow with bright flowers in the living room. This will make the room beautiful and pleasing to the eye, and will create a feeling of relaxing in nature.
Combination of self-leveling 3D floor with heating system
It is necessary to decide on the heating system before installing the self-leveling floor. The reliability, quality and service life of the floor itself will depend on the correct choice of option. Filling is possible on the following systems:
- Electric. Thin heating electrodes reduce the consumption of polyurethane mixture, as well as repair costs in case of breakdown.
- Infrared. Film elements have much greater performance and are characterized by high heat transfer.
- Water. The classic heating method involves laying water pipes. Negative points include high mixture consumption and maximum floor thickness.
What to look for when choosing a mixture for self-leveling the floor?!
- For street coverings, there are special compositions that are not susceptible to changes in temperature and excessive moisture.
- One of the key values is the ability to quickly harden (set after application).
- Waterproofing properties are desirable.
- The composition should not be too glossy, as the floors will be slippery.
- The packaging indicates the approximate service life; it is better to choose the maximum permissible.
- To avoid damage during operation and careful processing, including with chemical compounds, the composition must provide high strength of the coating.
- Good technical characteristics must be accompanied by an attractive appearance.
Preference should be given to mixtures that do not require special conditions for drying, especially when it comes to outdoor use.
How to care?
In terms of operation of self-leveling floors, there are no special requirements. However, in order to maintain their attractiveness for many years, it is recommended to regularly treat the surface with a special mastic. It is applied in a thin layer at least every six months. When performing repairs, it is advisable to cover the coating with thick fabric or other material.
In the “Cozy Wall” studio you can order photo wallpapers for arranging rear floors in any style with delivery throughout the Russian Federation. Our catalog has a large selection of popular designs in various categories and the ability to create images based on client sketches.
Which material is better to choose?
Self-leveling floors are distinguished not only by appearance, but also by composition.
- Epoxy. The resin is not afraid of chemicals and will last a long time. Due to the hygiene of the coating, it is suitable even for hospitals, and at home it is ideal for the bath, kitchen or nursery. Due to the large range of designs, epoxy self-leveling floors are loved by residential property owners. The disadvantage is its relatively low impact resistance, but at home it is almost impossible to damage the coating.
- Methyl methacrylate. Even with a fill thickness of no more than 5 mm, such a surface is particularly durable. The composition withstands changes in temperature and humidity and is not afraid of ultraviolet rays. Rapid hardening can be considered both a minus (you will have to work quickly) and a plus (in 2-3 hours it is ready for loading). However, washing with aggressive substances and rubbing with abrasives is not recommended.
- Polyurethane. If reliability is important to you, choose polymer materials. They easily withstand differences in humidity and temperature, shock and mechanical stress, and cleaning with aggressive agents and abrasives. But be careful during installation - too high humidity can negatively affect the result.
The photo shows a plain blue self-leveling coating
- Acrylic-cement. This type is more suitable for industrial workshops. The acrylic surface is non-slip, matte, and has moisture protection properties. Withstands temperatures from -60C to +110C.
Features of care
The service life of a self-leveling floor depends not only on high-quality installation, but also on further maintenance:
- Study the features of your material: polyurethane and epoxy can be cleaned with anything, but methyl methacrylate is afraid of rough brushes and aggressive chemicals.
- Place pieces of fabric or paper under furniture legs before rearranging. Use soft buffers on chairs and tables to prevent accidental scratching.
- Do not walk on the surface in high-heeled or hard-soled shoes; it is better to wear bare feet, socks or soft slippers.
- Polish the coating with special wax or mastic 1-2 times a year to keep it smooth.