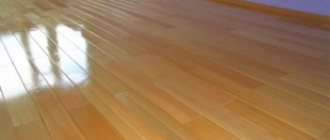
The range of floor coverings is regularly updated with new products. Often these are modern materials created using the achievements of the chemical industry, but there are also solutions that can be described as “well forgotten old”. A striking example is parquet boards. In terms of its aesthetic appeal, durability and reliability, it is comparable to parquet, but laying parquet boards is simple and does not require highly qualified workers.
Parquet board, what is it
Parquet boards as a type of flooring appeared in the early 40s of the last century. It was created as a cheap and practical replacement for expensive parquet that requires skilled craftsmen. These days it is experiencing a rebirth. The main reason for this is absolute environmental safety, because the coating is made exclusively from natural wood.
Externally, the parquet board is similar to the usual laminate, but differs from it in its internal structure. If you look at it in section, you can see three layers of planks of different thicknesses, the direction of the fibers of each of which is perpendicular to the previous one. This design ensures the strength and reliability of the material.
Upper layer
The top (front) layer primarily creates the floor pattern. The lamellas from which it is assembled are selected according to pattern, shade and texture, and boards are selected without defects or damage. Some types of boards are covered with valuable wood veneer. In a sense, this is a piece product that allows you to create a luxurious and unique floor without any special investment.
In addition to its purely decorative function, the surface is resistant to abrasion and insensitive to constant pressure. That is why the top ball is made of hardwood, the layer thickness reaches 4 mm or more.
An additional advantage of the material is that it is completely ready for installation and operation. The front side is sanded from the factory, impregnated with protective compounds and varnished. All that is required from the consumer is to prepare the subfloor and lay the covering correctly.
Middle layer
The job of the middle layer is to distribute the load evenly. The best material for this is coniferous wood. Longitudinal fibers give the material bending resistance, which ensures the durability and reliability of the coating as a whole.
The middle layer is assembled from planks about 7 mm thick. The width of each of them is up to 30 mm, the package is assembled with glue. Among other things, connection elements are formed in the middle layer, thanks to which the parquet board will be installed.
bottom layer
The entire layer cake rests on the base. These are one or two solid boards up to 4 mm thick, laid along the long side, which provide stability and prevent the floor from sagging under pressure.
Advantages and disadvantages
There is no ideal material, parquet boards are no exception. When planning to lay this covering, it is worth familiarizing yourself with its main advantages and disadvantages.
You need to start with the obvious advantages:
- absolute environmental cleanliness;
- a skillfully laid board is comparable to parquet in appearance and characteristics;
- the board is much cheaper than parquet;
- easy to install, no experience or knowledge required;
- allows for the possibility of replacing a section of the floor without completely dismantling it;
- does not require subsequent surface treatment, scraping, or varnishing;
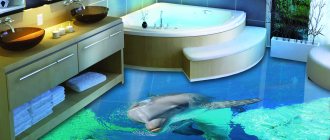
- A wide range of textures and colors are on sale.
With good care, the service life of the coating is 20–30 years. This can be considered a disadvantage, because the same parquet will last much longer. True, the obvious advantages outweigh this conditional disadvantage. And besides everything, you can lay a parquet board with your own hands, but for parquet you will definitely have to invite specialists.
Preparing the subfloor
Parquet boards are not too picky about the base material. It can be laid with equal success on a leveled screed, on a base made of wood or plywood, moreover, it can be used to renew an old ceramic tile floor. The only condition is that the base must be reliable and necessarily level.
In any case, before laying the tiles, you need to do a number of preparatory work. First, you should visually assess the quality of the floor using a simple building level. Identify problem areas and take measures to level the surface. The hills are smoothed out, the cracks are widened and sealed with concrete mortar, and the depressions are also filled with it.
Note! Such “pothole” repairs are only possible if the surface is close to ideal and the height difference does not exceed 2–2.5 mm per square meter. Otherwise, you will have to think about creating a new subfloor.
The easiest way is to prepare the base for parquet boards using self-leveling compounds. They are easy to work with; just dissolve the mixture in water, following the instructions, and pour the solution in an even layer, of course, not forgetting about waterproofing.
You can also consider using wood-based sheet material. Multilayer plywood, chipboard or OSB sheets are excellent for this. Using this material, you can create a new floor on joists or patch up an old one that is quite durable, but with a large difference in height.
The concrete floor must be primed and allowed to dry. It is necessary to lay a backing between the base and the board. Cork seems to be the best material for these purposes. It will smooth out possible unevenness in the foundation, help conserve heat in the house and protect from noisy neighbors.
Parquet base
During preparation for installation of parquet, special attention should be paid to the rough base. It must be perfectly smooth and clean, there should be no roughness or bumps on it, otherwise the parquet will not lie as required and will last very little time. First, remove the old floor covering, if any. It is important to inspect joists and subfloors for damage and rot. If they are unsuitable for laying parquet, they will have to be removed and replaced with new ones. In this case, the logs can be covered either with wooden boards or immediately with plywood. In general, such a floor has several layers - the concrete floor itself, joists, moisture-resistant plywood, adhesive composition and the parquet itself.
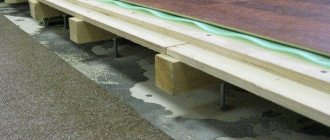
Installation of parquet on logs
The logs should have a thickness of 5-10 cm; before installation, they are coated with protective compounds that prevent rotting and destruction of the wood. Boards or sheets of plywood are already attached to them. The easiest way to fill the space between the joists is with some kind of insulation - it will make the floors warmer, which is especially important for those rooms that are located above the basement. To install a subfloor, you should not use plywood thinner than 12 mm. During installation, it is worth considering that there should be small gaps, about 1 mm wide, between its individual sheets. Slightly larger in width - about 1.5 mm - compensation gaps are also left along the walls.
Insulation of floor joists
Don't forget about waterproofing. It will provide protection for both the joist and the rough base, as well as the parquet itself, from excess moisture, which negatively affects the materials from which they are made. The easiest way is to use plastic film.
Parquet can be laid not only on plywood, but also on a concrete screed. But it must be perfectly smooth and reliable. If necessary, self-leveling mixtures will help level it. Also, such a base must be primed to ensure maximum adhesion. Then the adhesive composition will stick to it best.
Scheme for laying parquet on a screed
On a note! You can level the concrete base with sheets of plywood. Fastening is done using dowels.
If a new concrete screed has been poured, then further work can be carried out only after it has completely dried. The drying time for the screed is about 28 days. At the same time, you cannot speed up the process by using heating devices - in this case, the screed may begin to collapse. Installation of parquet should not be carried out on a damp base. Checking this indicator in relation to the screed is quite simple - a piece of polyethylene measuring 1x1 m is placed on it and left there for a day. Then the film is lifted and its condition is assessed from the inside. If it is dry, then you can lay parquet; if condensation has accumulated on it, then the subfloor needs to be dried.
The screed must be dry before laying the parquet.
It is recommended to cover the concrete floor with a backing before laying the parquet, if we are talking about laying the floor using the floating method, and also with the adhesive method. It will ensure the most comfortable use of floors, as it smooths out minor unevenness in the base, increases thermal insulation performance, helps distribute the load on the parquet correctly and additionally protects it from moisture.
Parquet flooring needs an underlay
Preparing to lay the coating
The technology for laying parquet boards is not particularly complicated; even a novice master can handle this task, but in any case it is easier to work with an assistant. And yet, before getting down to business, it’s worth preparing the tool. You will need:
- hand or electric saw;
- hammer with rubber striker;
- level and plastic rule;
- spatulas (smooth and serrated);
- tape measure, square, pencil;
- screwdriver;
- bracket for tightening rows.
In addition to the tools, you need to prepare the room itself. It would be a good idea to go over the floor with a vacuum cleaner again, paying special attention to the corners; a stray pebble can ruin the whole job.
Video description
The video features an interview with a technologist about adhesives for parquet flooring:
It is worth paying attention to the specialist’s recommendation about primers. Concrete must be treated 3 times with intermediate drying. Each layer is applied with a roller perpendicular to the previous one. Corners and perimeter are processed with a brush. The glue can subsequently be applied either with a notched trowel (wavy edge or in increments of up to 3*3 mm).
Gluing parquet material Source gorobzor.ru
Methods for installing parquet boards
Once the tool is assembled and the work front is prepared, you can proceed directly to installation. It’s worth mentioning here that there are three main installation methods:
- floating;
- glue fastening;
- using additional fasteners.
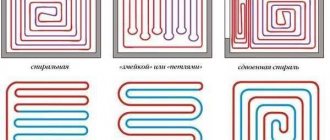
According to the installation method, a distinction is made between the longitudinal and diagonal method. When laying longitudinally, the boards are placed parallel to the wall, moving in the direction of the door, in the second case, diagonally from one of the corners. The longitudinal method is simpler; there is not much waste left during the work, but the diagonal method looks more impressive.
Floating installation
The peculiarity of floating installation is that the boards are not attached to the floor. The rigidity and immobility of the coating is achieved only through reliable locking connections. It is from this that all the pros and cons of such a configuration emerge:
- easy to install;
- it is easy to correct mistakes made during work;
- it’s easy to replace several damaged boards;
- it is possible to dismantle the floor and literally move it to another room;
- the coating is immune to changes in humidity and temperature;
- saving on adhesive composition.
As disadvantages, it is worth noting the need to carefully level the subfloor, the limitation on surface area; you should not use this method if the room is more than 50 square meters. Also, you cannot lay the board in this way in a room where a high load on the floor is expected.
Step-by-step instructions for carrying out the work are as follows.
- First, lay the board along the longest wall of the room, from left to right. The part of the castle that will face the wall is cut off from the board. A complete row is assembled, the end board is cut to fit.
- The coating should retreat from the walls by 10–15 mm; to achieve this, spacer wedges are used. Many people recommend completely assembling three rows before installing them, then placing wedges and using a bracket to pull the finished canvas, setting it in the desired position. The boards of each subsequent row are laid with a shift, selecting a pattern if necessary.
- The following rows are assembled sequentially; if necessary, the canvas is tapped with light blows of a rubber hammer. The hardest part to lay is the outermost row. Each board must be precisely adjusted in width, and it is important not to forget to leave a gap along the edge to compensate for thermal expansion.
Once the covering is completely laid, the wedges are removed, baseboards and door thresholds are installed. It is advisable to turn on the floor heating or any heating device to raise the temperature in the room and the board to sit in place.
Glue mounting
The essence of this method is reflected in its name - the parquet board is glued to the base using special adhesives. This method is more labor-intensive, but it also has a number of significant advantages:
- there are no restrictions on the area and purpose of the room;
- the coating is resistant to stress;
- Can be used in conjunction with water heated floors.
But this is a labor-intensive installation, and in the future it will be problematic to correct the mistakes made and replace the damaged area. The floor will cost more due to the need to purchase glue. You will have to wait until the glue hardens before you start using it.
It is worth noting that you need to buy the right glue, the composition of which is suitable for the specific board chosen. In addition, you need to work extremely carefully to prevent glue from getting on the front side of the coating.
As in the first case, installation is carried out along the longest wall. Before applying glue, the board is laid out and the outermost one is cut off to create a full row.
A layer of glue 80–100 mm wider than the width of the board is applied to the prepared surface. The glue is evenly distributed over the area using a notched trowel.
Spacer wedges are placed between the first row and the wall. When laying the boards, they must be joined immediately using locking joints. Each laid plank is pressed for better grip. After laying the entire row, it must be additionally secured with self-tapping screws. They are screwed at an angle into the grooves of the lock.
The operation is repeated. Apply glue and lay the next row with a shift of half or a third of the length. First, the ends of adjacent boards are connected, then they are attached to the previous row. If a gap has formed, you need to get rid of it immediately, move the row forward using a wooden block and a hammer.
The finished coating is left for several days until the glue dries completely. After this, the baseboard and thresholds are installed. It would be a good idea to treat the floor with a special compound that will fill the joints and create a perfectly flat surface.
How to lay parquet correctly? Important aspects
Laying parquet has certain nuances - although the process is simple, it still requires a responsible and correct approach. If special requirements are not followed, the base will quickly collapse or lose its appearance.
- The air temperature in the room where the work is carried out should be within +18-23 degrees.
- Air humidity should be no more than 45-60%.
- Before starting work, the parquet must be kept in the room where it will be installed for 7-10 days. This will allow the material to “get used” to future operating conditions.
- There should be nothing unnecessary in the room during work.
- The base for laying parquet must be carefully prepared - leveled and cleared of debris.
- You should not install parquet on old, swollen and damaged flooring.
If all installation conditions are met, as well as proper care of the parquet, the coating can last 60-80 years without any complaints.
Parquet floor