It would seem that laminate creaks and crunches are synonyms, and listing through “I” is casuistry and there is no difference here. But it is not so. There are several differences: a screed that is poorly removed from grains of sand, a dented substrate, and a completely broken lock joint due to an uneven base can crunch. And creaking occurs when the lock is untreated, both on a level base and when the coating sag on uneven surfaces. An experienced technician, in most cases, will understand the situation and be able to tell you what to do and how to fix it. If possible.
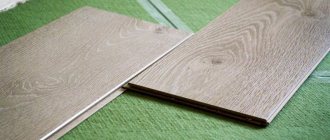
Some types of modern laminate have new generation locking connections with plastic inserts. These fasteners may click until they click into place. And the well-known brand Berry Alloc has an aluminum clutch in its design. After installation, this type of expensive laminated coating may click.
The Norse god Thor had a chariot pulled by two goats. One was called “Gnashing of Teeth”, the other “Grinding of Teeth”. It seems like the same thing, but the goats are different. This is the moral.
Why did the laminate begin to creak - reasons and solutions
If creaks are detected, there is no desire to disassemble the floor. After all, when you step on the slats and they crackle, the thought of dismantling immediately appears. So, let’s immediately look at cases where you can eliminate squeaks on the laminate without removing it:
- There is no or minimal compensation gap (indentation) from the wall.
- Laminate changes size (shrinks and expands) when temperature and humidity conditions change. This is why a gap of 8-12 mm is left near the walls. If it is not there, the boards will eventually hit the wall. And then, if further expansion is impossible, they will bump into each other at the joints.
- A characteristic feature is that the lamellas have risen at the junction.
When you walk, a cracking sound will appear in these places. Since the planks will rub against each other from tension. How to remove laminate squeaking in this case?
Solution: The situation can be corrected without disassembly. It is enough to remove the baseboard and check the gap. If its size is insufficient, simply file the edge of the laid laminate. This can be done with a grinder or jigsaw, but it is most convenient to cut the laminate with a renovator.
The laminate is pressed against heavy furniture, which prevents it from moving.
Example: The humidity changes, and the board begins to increase in size, pushing the next one. But the next lamella is pressed against the sofa and its movement is limited. As a result, the dies will rest against their ends and will crack if stepped on. This, as in the previous case, occurs due to friction of the narrow parts of the slats.
The sign is a slight swelling at the junction. How to eliminate squeaking laminate flooring without removing it?
Solution: You need to move back a little the board that rested on the adjacent one. This will remove friction between them and get rid of the crunching.
For this:
- We take a small wooden plank and glue 2-sided tape on it;
- Then you need to press this board tightly to the desired lamella. The side on which the tape is;
- Now, pressing the plank to the floor with your hand, tap it with a hammer until the pieces of laminate come apart.
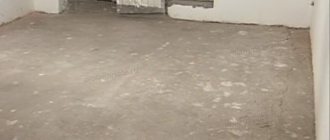
- There are differences on the floor of more than 5 mm.
Perhaps there are holes, bumps or significant differences left on the base of the floor. This is either a low-quality screed or an old wooden flooring. This is why laminate flooring creaks most often. Indeed, with high traffic, the planks will begin to sag in these places.
The load on the locks will increase, and constant friction will cause them to creak.
The main symptom is sagging slats.
Solution:
- The best way to get rid of the cracking is to disassemble the floor to this point and remove the hole. It can be filled with self-leveling mixture. Then lay the boards again;
- But, there is another option. In order not to remove the slats, you can drill a small hole in this place. Next, pour in the same mixture with a syringe and wait for it to harden. Then we cover the hole with wood plaster to match the color of the floor and paint over it with a furniture marker;
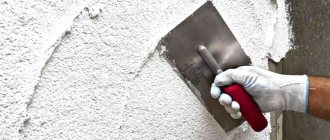
- Regular application of silicone to noisy areas (every week).
Very thick and soft backing.
As a rule, the thickness of the substrate should not exceed 2-3 mm. However, some take a lining thicker than 5-7 mm. Someone wants to make the floor warmer on the 1st floor. Others try to smooth out the unevenness of the base with a thick substrate.
But over the years, the lining material wrinkles under the laminate. And as you walk, the boards begin to sag more and more. This usually happens in the hallway and near doorways. Locks begin to creak due to constant friction and stress.
Solution:
- Remove the laminate planks to the problem area and replace the backing;
- Another option is to coat the crunchy joints with silicone. However, you will have to constantly lubricate squeaky places.
Debris and sawdust under the laminate or in the joints.
This happens if, during laying, you cut new boards next to the laid rows. You need to cut in another room. After all, the scraps fly into the locks and onto the substrate. They definitely need to be removed. Otherwise, the laminate floor will begin to creak in the first days.
This occurs due to the rubbing of debris in the joints or under the coating.
We break and build
Disassemble the floor, number the slats
If it creaks in one place, it makes the task easier. Most likely, this is where the base is uneven. Carefully disassemble the coating, numbering the lamellas for ease of subsequent assembly. Fill the uneven area with cardboard or mortar. Assemble the floor and enjoy the absence of squeaks.
The thick underlay is replaced after the floor is completely dismantled. The same must be done if the laminate turns out to be of poor quality. It will have to be completely replaced. Be sure to dust off the surface before reinstalling. Trim the boards in another room.
Base defects and debris are eliminated in the same way. We disassemble the floor, numbering the boards, level the base, prime it, and vacuum it. We repeat the process in reverse order. Of course, you can put up with squeaking due to litter. Over time, the sand will grind into dust and unpleasant sounds will no longer bother you. But during this time, the lower surface of the lamellas may suffer.
Most often, problems arise due to our inattention and neglect of recommendations when carrying out work.
Features – the new laminate crackled after a couple of days.
Solution:
Wait until the sawdust grinds and the cracking disappears. This is not the best solution, as debris can damage the integrity of the locks;
Until they brought in the furniture to dismantle the floor and get rid of the garbage.
Grinding in lock joints.
Sometimes light creaks are observed already in the first 1-3 months after laying the laminate. If you have a level base, correct gaps and backing, and no debris, then the reason is the “grinding in” of the locks. The boards adapt to room humidity by expanding/shrinking. At the same time, they move and create tension at the joints.
Laminate needs to get used to:
- to the type of base - screed, wooden floor;
- thickness and type of substrate;
- room geometry;
- apartment traffic level.
Solution: Simply wait for the floating laminate to settle and adjust. If the squeaks do not stop for a long time, look for another reason.
Defective or low-quality laminate
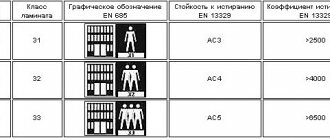
The technical characteristics of the laminate greatly influence its service life. This is the density of the slab, load and abrasion classes. But Chinese manufacturers churn out products without looking at quality. As a result, fragile locks wear out quickly.
This laminate begins to creak within the first year. Did you buy the cheapest coating from an unknown manufacturer? Then neither an even screed, nor a good substrate, nor maintaining gaps will save you from crunching.
Solution: Only complete replacement of the boards. Read how to choose the right laminate for your apartment.
Don’t forget about the service life of laminate flooring. If the planks have been lying there for more than a dozen years, creaking is a normal phenomenon. The locking joints have long worn out and the boards are rubbing against each other. It's time to think about replacing the floor.
Some tips for dealing with squeaking
- Some incompetent craftsmen sometimes advise dealing with the squeaking of laminate flooring using talc. However, real experts do not recommend doing this, since positive results are unlikely to be achieved, but it is easy to aggravate the problem. Once on the locks, talc will only intensify the squeaks over time.
- Laminate, which is held together with glue, creaks much less often, since the locks are protected from foreign particles getting into them, as well as from the possible occurrence of friction between the two panels. However, if the cause of the creaking is not the locks, but an uneven hard base, you will not be able to get rid of the unpleasant sounds until the surface of the base is leveled to perfection.
- If the installation was carried out in accordance with all the rules, a high-quality laminate was laid, but it creaks due to small grains of sand that got into the locks or under the panels, then it makes sense to endure unpleasant sounds for a while, since over time small particles of debris can grind and the boards will stop creaking and crackle. If this does not happen, you need to take measures such as those described above.
- To avoid becoming an unwitting culprit of squeaking, the owner should store the purchased laminate in a horizontal position on a flat surface before installation.
- It is not recommended to install newly purchased laminate - it should lie in the room where it will later be installed for two to four days, always with the original packaging opened - this is necessary for its acclimatization. It is especially important to take this requirement into account when purchasing material in the cold season, in order to avoid deformation of the panels.
When installing a laminated flooring, you must strictly follow all the manufacturer’s technological recommendations.
Strict implementation of all the manufacturer’s technological recommendations for the selected model of laminated flooring is the main condition for the floor to please you with its beauty, comfort and noiselessness for as long as possible. Well, in order to get rid of problems that arise during operation, you need to take one of the repair methods suggested above.
What to do, how to fix it if laminate flooring was recently laid and it started to creak or crunch?
A short guide to the causes of squeaking and crunching in laminate flooring. Recommendations and tips on what can be done and how to fix it:
- Remember whether you have thoroughly cleaned the base from construction sand. It is clear that this question is appropriate if the base is a cement-sand screed.
- If the laminate was laid with a modern type of lock joint (4G, 5G), listen carefully again, stepping on the end joints. It's probably the plastic inserts rubbing and clicking. Buy Rico wax sealant and pour it into the ends. Typically, laminate floors with this type of bond have a bevel.
- The joint of the beveled edges will serve as a reservoir for the sealing compound. It should be absorbed and work like a lubricant. A likely outcome is that, after some time, the joints stop clicking.
Creaking can occur if, for example, laminate flooring is laid in winter with the heating on. And with the end of the heating season, the end of spring - the beginning of summer, the coating began to expand imperceptibly to the eye. Leaning against the walls creates a load on the lock.
This situation can be seen by removing the wall plinth. If further expansion is prevented by cutting through the buried edge, a possible break in the locks can be saved and the creaking can be eliminated.
Damage to the lock also happens when the installation is done incorrectly or when laminate flooring is installed by amateurs. Incorrectly mounted boards threaten to instantly break the locking part. This happens if there is no assembly experience and ignoring the factory instructions.
Check whether the interior thresholds and door bumpers are installed correctly. It is necessary to unscrew the screws and inspect the place of fastening. When a screw passes through a laminated panel, the hole must be enlarged so that there is some play for movement.
Wet cleaning of the room can help in the short term. This is especially true for parquet boards, but can also affect laminate floors.
To improve the microclimate inside the apartment, if it is dry, install air humidifiers. I’ve heard about this for a long time, that it can eliminate squeaks by saturating the material with moisture.
If none of the above is broken, and the floor installation took place recently, try contacting the seller of the product. But most likely, they will tell you that the installation technology has been violated. And if the craftsmen were sent from the store, it was too dry in the apartment.
How to drill the coating
So, you need to drill a hole in the problem board and fill it with glue if the laminate creaks. We have found out what to do without dismantling the coating and how to fix the problem of an uneven base in this way. Now let's take a closer look at how to carry out this procedure according to all the rules. And let's start by finding out what technology exists for drilling holes in laminate flooring.
Unfortunately, it often happens that when carrying out this seemingly very simple operation, a large and ugly chip appears on the board, which is difficult to disguise in the future. Or the board simply cracks. In order to avoid such troubles, before you start drilling, you should take care of choosing the right tool. That is, the drill needs to be properly equipped. For laminate, as for wood, hardened steel twist drill bits are best. Moreover, you should choose not the standard version with a sharpening angle of 118°, but a sharper one. Otherwise, during operation, the drill will definitely begin to deviate to the side, and in this case, the risk of a chip or crack increases significantly.
How to remove creaking laminate flooring
The most common mistake that owners make while planning the flooring is related to the inconsistency of the temperature in the room. For example, laminate can be laid in the corridor or directly at the exit to the loggia or balcony.
Flows of cold and hot air, fluctuations in air humidity lead to the appearance of micro-condensation on the concrete base.
If a vapor barrier membrane was not used when laying the new laminate, the concrete was not primed, and the joints were not sealed with a protective lubricant, then you don’t have to wonder why, for what reasons, the new laminate has been creaking for two years now.
- Of all the possible causes, the most likely is improper foundation preparation. First of all, non-compliance with the permissible surface difference for a laminate and a specific type of substrate. There are two ways to remove squeaks from laminate flooring:
- Remove the layer of lamellas and lay cardboard leveling patches on the joint areas at the ends of the slabs. The method is not particularly reliable, but it helps if the laminate is quite old and there is no way to replace it or level the base;
- If the laminate is new, then the best way to get rid of the squeak is to remove the covering and additionally level the subfloor with a screed. This is more effective until the lamellas have rubbed against each other at the joints.
Before removing the coverings, it is necessary to mark the places where furniture and the heaviest interior items were installed. Often, the weight of cabinets placed around the perimeter of the room causes the covering in the center of the room to rise, resulting in popping noises and squeaks.
In such a situation, in the center of the room they make a slight increase in the level of the subfloor, and along the perimeter they plan to lower the level by 1-2 mm. If you do everything correctly and assemble the previously laid laminate in the same sequence as it was the first time, then there should be no squeaking.
If you know exactly where the “hole” is, where the laminate creaks the most, then you can pour a sealant plug under the panel without disassembling the coating
Useful tips
You can avoid noise if you immediately follow all the necessary recommendations when laying the flooring.
Then later you won’t need to eliminate the causes of the creaking: After purchasing the laminate, you should not immediately start laying it. First you need to let it rest in the room in which you want to lay the coating. This is required for the laminate to take its final shape. When purchasing, you should choose only high-quality materials
Purchasing a low-quality coating can lead to further deformation of the floor, swelling or squeaking. It is also very important to carefully prepare the base. To do this, it must be well aligned.
The foundation must not be allowed to crumble in the future. Otherwise, the laminate will need to be disassembled. The substrate should be chosen correctly. There are two options: cork and foam. The cork backing has high wear resistance. It does not deform for a long time, but it should not be laid in damp rooms. In this regard, foam is more advantageous, but it also has a drawback - it can become deformed over time. Before laying the underlay and flooring, the floor in the room should be thoroughly cleaned. It is necessary to remove dust in a timely manner and, if possible, cut the panels in another room. It should be remembered that in any room, when laying laminate flooring, it is necessary to leave temperature gaps.
How to eliminate laminate flooring squeaking due to the underlay
The easiest way to determine the cause of periodic squeaking sounds associated with the lining material. In this case, you can even see with your own eyes how the joint line bends under load with the simultaneous appearance of a squeak. The reason for this phenomenon is that the substrate is too thick.
For a high-quality laminate, a material with a thickness of at least 2 mm is recommended; if you lay the sheet at 5-7 mm, which is often done to insulate the floor, then not only will a squeak appear, there is a real risk of breaking the locks on the joints.
Therefore, the coating in places of greatest deflection can be disassembled, a patch can be applied and the laminate panel can be returned to its place. If a pattern of sagging and creaking is observed throughout the room, then it is better to replace the substrate completely. For example, throw away the polyethylene foam and buy a good mat made from pressed pine needles.
How to cut the coating
Next, let's take a closer look at what to do if the laminate creaks due to an insufficiently wide temperature gap. What to do indiscriminately (the problem is solved by sawing off the “extra” part of the boards) is clear in this case. But how can you reduce the coverage area by a few centimeters without damaging the boards?
Laminate is a material consisting of several layers. Therefore, you should put a disc with the smallest cutting structure on the grinder. In this case, the cut line will be very smooth.
Instead of a grinder, you can also use a jigsaw. For this tool, of course, you also need to choose a suitable file. Otherwise the cut will be sloppy. In this case, you can use either a narrow metal file with fine teeth or a special one designed specifically for working with laminate.
How to fix laminate flooring squeaking due to debris
Formally, the remains of shavings and dust on the subfloor have no effect on the appearance of a squeak or its absence. The laminate will creak only if the finest dust formed after cutting the slats with a grinder gets into the locks on the end connection line.
Expensive branded brands of laminate flooring that use a plastic insert at the ends are especially susceptible to squeaking. In this case, the creaking appears due to the accumulation of dust on the surface of the plastic. There is only one way to remove it - disassemble and clean the joint.
For inexpensive brands of laminate, you can try to eliminate the cause of the squeak by simply blowing air into the cracks. It is always recommended to do such a procedure immediately after laying the laminate, regardless of whether the flooring makes unpleasant sounds or not.
If the area of the laminate flooring is small, then you can even blow out the joints with a car pump. For more complex situations, it is recommended to use a compact electric compressor.
Laminate flooring squeaks when you walk
During installation, a professional craftsman can already guess what will happen next with the floor covering. Sometimes, when laying a floating floor, light creaking noises are immediately heard - this is the surface of the covering being pressed when walking, creating a creaking sound.
There was such a case. We came to order the laying of Megafloor laminate. In principle, this is a good brand at a price of about 600 rubles/m2 and I often recommended it. But two or three years ago, this brand experienced some difficulties with quality and various jambs periodically surfaced.
When installing the second row, the laminate creaked when walking. The base was level and the substrate was hard. Opening the second package we heard the same unpleasant sound. We outlined the situation to the customers and offered two options. Either return the entire batch to the store, or continue laying. People chose the latter option.
What could be done in this case? To correct the situation, it was possible to treat the locks with paraffin sealant. Now, of course, I don’t remember whether Megaflor’s grooves were lubricated with a wax compound at that time. I guess not.
How to get rid of laminate flooring squeaking due to a temperature gap
The first and main culprit for the appearance of unpleasant creaking sounds is incorrect installation of gaps at the joints. It is clear that creaking primarily occurs due to friction of the edges at the ends of adjacent lamellas.
The size of the temperature gap must be controlled at the stage of laying the laminate, otherwise you can get a beautiful floor with a squeak for quite ordinary reasons:
- Haste during installation. Before installing the lamellas, the material must lie in the room for at least two to three days and “accept” the temperature and humidity of the air. Otherwise, after installation, even if the gaps are maintained, the slabs will swell with household damp condensation, and all temperature gaps will disappear;
- Ignoring the requirements for constructing an expansion joint. Most often, the operation of final trimming of the lamellas along the perimeter of the room is not done; whatever gap there is between the wall and the end, it is left as such; anyway, the joint will be covered with a plinth.
Important! For every meter of room width, the gap between adjacent slats should be at least 1 mm. That is, in a room 3 m wide, the gap at the joints should be at least 3 mm.
To get rid of the squeak, first of all you need to dismantle the plinth and use a miter saw to trim the edge so that you get a gap at least 12-15 mm wide.
The second step is to level the gaps in the creaking areas. To do this, glue double-sided tape to the surface of the lamella, lay a beam at least 50 cm long on top and carefully use a wooden hammer to knock the slab in the required direction so as to increase the gap.
It is clear that a similar procedure will have to be performed over the entire surface of the laminate flooring.
Ways to solve the problem depending on the cause
If the methods listed above did not help, and the laminate still creaks, what can be done without dismantling the entire structure? Options for solving problems depending on the reason that caused the creaking.
Uneven base
If you lay laminate flooring on an unprepared (carefully leveled) base, the installed coating will creak.
In this case, you will need to fill the depressions in the base with foam. This is done in a similar way to the method using glue: problem areas are identified, holes are drilled, filled with foam, masked and varnished.
However, if there are a lot of unevenness or there are places where the base protrudes above the general plane of the floor, then you won’t be able to get rid of the squeak in this way; you will have to dismantle the structure and prepare the base according to all the rules.
No technical space between the wall and the covering
How to remove the squeaking sound of laminate flooring from the wall of a room? The grinding noise caused by the board touching the wall is quite easy to eliminate.
For this:
- Remove the baseboards that hide the junction of the laminate with the wall.
- Using a circular saw, carefully cut off the edges of the boards, leaving at least 10 mm between the wall and the covering.
- After vacuuming the perimeter of the room, carefully removing shavings and dust formed as a result of the work, install the baseboard in place.
Creating a technical space between the wall and the covering - eliminating the creaking of the laminate
It is quite possible that the baseboard also provokes squeaking - it is advisable to immediately check how tightly it adheres to the coating. If the gap between it is too small, it is recommended to fix the baseboard a little higher so that it does not put pressure on the covering.
High indoor humidity
Increased humidity in the room affects the size of the panels, they swell, increase in volume, the load increases at the joints, friction is created when the load is placed on the floor, and an unpleasant sound is heard.
Laminate swollen from moisture
How to get rid of the squeak in this case? Reduce humidity levels. To do this, turn on the heating devices and warm up the room. Operating radiators will remove excess moisture from the air in the room, and after some time the panels will return to their normal shape, after which the creaking will stop.
Grinding noise from panel joints
How to get rid of squeaking if the laminate was laid according to all the rules, but an annoying sound appeared immediately? Most likely, in this case, the cause is a grinding noise made by the locking joints or joints of the laminate panels. It usually goes away within 2–3 months after installation of the coating.
If even after this period the creaking does not go away, a special sealant is poured into the locks or panel joints.
Before starting work, it is important to inspect their condition. There should be no dust, sand or other debris between the boards
How to prevent laminate flooring from squeaking due to lapping locks
Oddly enough, the main reason why beautifully laid, absolutely high-quality lamellas begin to creak is the low qualifications of the coating installer.
On a branded laminate, the connection line will only make creaks if the lock was not completely closed during the assembly process. The reason for this can be a variety of circumstances. It could be dust, small shavings, a lock that is too tight, which for some reason no one wants to conscientiously snap and tighten using a portable clamp.
As a result, distortions and stress points are formed on the connection line, which produce creaking sounds.
If the laminate is laid on a coniferous substrate, then you can even carefully walk along the laid lamellas and make sure that the connections at the ends do not make sounds, do not bulge or sag in the surface.
Causes of squeaking
If the choice of laminate was made under conditions of a limited budget (a beautiful, but cheap and not certified product was chosen), then it is likely that the creaking in the apartment is associated with the incorrect geometry of the lamellas themselves - a characteristic feature of low-quality products. If there is a spare “board” left, you need to study it. Poor quality is indicated by:
- dirty green or dark brown color of the HDF board (the thickest inner layer);
- a simple lock with a single rounded groove;
- lack of information about the article, line, date and country of production printed on the reverse side.
If a combination of such signs is detected, you can immediately prepare for a complete replacement of the floor covering with a better one. It is impossible to eliminate the creaking of crooked laminate.
In the same case, when we are talking about products of trusted brands, extraneous sounds may indicate:
- insufficient size of compensation gaps;
- unevenness or destruction of the subfloor;
- presence of debris under the laminate;
- too thick substrate.
Each of the reasons is accompanied by a number of accompanying symptoms why laminate flooring creaks, on which methods for solving the problem depend.
Expansion gap
Fluctuations in temperature and humidity in the room are accompanied by expansion and contraction of the laminate. When laying the covering, this is taken into account - a gap is left between the edges of the lamellas and the wall, the size of which depends on the parameters of the room: from 1 cm for a small area to 3 cm for a large one, over 20 m2.
An expansion gap is left between the laminate and all “touching” surfaces. This means that it should also be between the covering and the elements protruding from the wall (the base of the arch, column, riser, etc.) since even point contact leads to a squeak.
If the requirement is not met, the swollen lamellas begin to press on each other, and the pressure on the locks increases. This is usually manifested by crackling when there is no load and a distinct sound when walking on the surface. In addition to creaking, it is possible to observe a “blowout” of the laminate - the appearance of a bulge along a long joint. If the necessary measures are not taken, the locks may break in this place, which will lead to the formation of an unsightly gap right in the middle of the room. What can be done:
all furniture is removed from the premises; baseboards are dismantled; a visual assessment of wall gaps is carried out; if there is contact between the laminate and a vertical surface, it is necessary to cut off the ends of the coating at a distance of 1.5 - 2 cm from it; if there is a bulge, a “pressure” is placed on top of it - you can even use a simple board weighted with bricks (it is important to evenly distribute the weight of the load); After a control inspection of the gaps, the plinths are installed back.
After 48 hours, the laminate will return to a condition suitable for further use. This will be indicated by the absence of “waves” and creaking.
Base defect
If extraneous sounds have not disappeared a week after installation of the covering, this may indicate poor preparation of the subfloor. The fact is that after the finishing screed of the base it should be perfectly flat. Maximum tolerance: per 2 m2 no more than 2 mm deviation from the general horizontal level. If this rule is not followed, the “playing” lamella will transfer the load to adjacent locks, which leads to creaking.
In a situation where only individual elements of the coating “moan”, you can solve the problem without removing the laminate. In order to get rid of extraneous sounds, it is enough to drill a through hole in the problem area and through it using a syringe, insert PVA glue under the lamella (as much as will fit). After 2 days, during which you cannot step on the defective area, the composition will dry out and the squeak will disappear. All that remains is to mask the hole with a special grout for laminate flooring or wood putty of the appropriate shade.
If there are several “noisy” zones, then it will not be possible to fully solve the problem without dismantling the laminate. The only temporary way out of the situation is to treat the compounds with molten paraffin or wax. To do this, you will need a flexible spatula or an old plastic card, with which the applied substance is rubbed into the joint. But this method is applicable only when the creaking is not accompanied by crunching or noticeable bending of the lamella.
How to eliminate creaking laminate flooring by lubricating the seams
A good way to prevent the possible occurrence of squeaking is to use a special mounting sealant. One of the options for lubricating laminate against squeaking is shown in the photo below.
The advantage of this technology is that a silicone film covers the inner surface, and even with mutual sliding there will be no sounds. An important function of lubricant is protection against moisture. The more water gets into the lock, the more the laminate will creak.
Voting: which laminate manufacturer is the best?
Which laminate manufacturers would you choose or recommend purchasing?
Pergo laminate
0.00 % ( 0 )
Kaindl laminate
0.00 % ( 0 )
Laminate Haro
50.00 % ( 1 )
Laminate Berry Alloc
0.00 % ( 0 )
Laminate Kronotex
0.00 % ( 0 )
Quick-Step laminate
0.00 % ( 0 )
Laminate Tarkett/Sinteros
50.00 % ( 1 )
Laminate Kronostar
0.00 % ( 0 )
Egger laminate
0.00 % ( 0 )
How to fix creaking laminate flooring without disassembling it
It happens that even after all preventive measures have been taken, including filing down the expansion joint, leveling the size of the gaps at the joint, especially at the ends of the lamellas, and eliminating places with hanging edges does not give the required result.
This happens with laminate flooring that has lasted at least 3-5 years.
This is a problem not only with laminate; strong squeaking can be produced by wooden block parquet and mosaic sets of sections. The reason for this phenomenon remains the drying out and deformation of the locks; in other words, the joints wear out and play appears. The protective coating gradually wears off, moisture absorption increases, and, as a result, the lock begins to squeak.
There are three ways to eliminate creaking sounds:
- Use silicone oil to treat rubber seals on car windows and metal-plastic windows;
- Using defrosting mixture VD-40. It is not intended for use on wood, but can be used as a temporary measure to eliminate squeaking;
- Use homemade powder lubricant for wooden products.
It is clear that each of the above materials has a certain degree of effectiveness. If you need to remove the squeak immediately, then perhaps silicone in an aerosol will be the best solution. In other cases, it is advisable to experiment with materials.
WD-40 aerosol is a mixture of alcohol and camphor oil, so you need to be extremely careful when applying the material to the joint. It will be incredibly difficult to wash off drops and marks after treatment, so you can first stick some tape on.
Treatment with silicone anti-squeak grease for laminate looks much more interesting. This is a fairly viscous material, so it is better to apply it in small portions using a knife blade or spatula. There is no point in spraying with an aerosol, as this can ruin the laminate flooring.
You can also get rid of squeaking using the smallest powder, rubbed from a frozen wax candle; you can buy them in a church shop or in a store, the main thing is that the material is soft and plastic at room temperature.
The rubbed dust is carefully poured into the seams, the surface is wiped with a brush to remove residues, and heated with an industrial hair dryer at a temperature of no more than 80C.
The powder melts and spreads inside the lock, as a result of which the creaking disappears for a long time. A kind of solid lubricating film is formed inside the joint, which does not dry out or be absorbed by the lamella material.
Is it possible to repair laminate flooring without dismantling it?
Try rubbing the cracks between the planks with molten paraffin. Real methods for eliminating such defects exist and do not at all involve dismantling the floor covering.
First of all, it is necessary to understand why the surface actually creaks and whether it is the floor covering itself. So how can you get rid of such annoying sounds without compromising the integrity of the coating? Adviсe:
- localized creaking can be removed using paraffin or candles made on its basis; they warm up, after which the creaking areas are filled with wax; rubbing of cracks can also be done with wax, which is spread over the cracks using a plastic spatula; the spatula can be replaced with an old bank card;
- you can get rid of the squeak without disassembly by removing individual panels; joints are filled with PVA or polyurethane foam;
- if the creaking is localized and located in the center of the room, you can make several small holes; glue is injected into the formed niches using a medical syringe; It is recommended not to step on the repaired area for several days;
- the adhesive solution is also used when “walking” individual floor elements;
- creaking can be removed with oil, which is poured into holes near the creaking areas;
- various deformations can be straightened using foam; the gaps near the baseboard are not touched, but the joints can be subjected to these simple manipulations.
Preventing laminate squeaks
To ensure that the new coating does not creak even after general cleaning of the room, the laminate must be regularly treated with protective mastics.
If there is nothing suitable, then the seams can be rubbed with furniture polishing material, or, at worst, use a homemade polishing paste based on wax and petroleum jelly. They all dry quite well and seal the lock from moisture.
It is necessary to treat at least once every six months; it is advisable to first thoroughly blow out the dust and dry the joints with air. Such prevention does not in any way affect the appearance of the laminate flooring, but at the same time significantly reduces the risk of squeaks.
How to close the hole
At the next stage, PVA glue is squeezed out into the hole made with a sharp drill from a syringe if the laminate creaks. What to do and how to fix this problem without disassembling the coverage is therefore clear. However, after carrying out such a not too complicated procedure, the owners of the apartment have another completely logical question: “How to disguise a hole drilled in the floor?” You can do this using:
- putty or sealant;
- special wax pencil;
- epoxy resin;
- self-adhesive film;
- mastic.
At the final stage, you need to carefully remove excess masking material from the laminate with a clean rag and very carefully treat the repaired area with fine sandpaper. Then the part of the board with the closed hole should be polished with a cloth and covered with one layer of colorless matte varnish.
Why do creaks appear not immediately, but after some time?
Laminate, underlay, concrete floor
Usually people do not pay much attention to the underlay and the floor surface on which the laminate is laid, since their primary goal is a beautiful appearance. Therefore, they take the most affordable option for the substrate - foamed polyethylene foam. Under constant pressure, the laminate bends in places, causing unevenness to form. Then the boards begin to sag and then creak as a result of friction against each other.
Important! It is necessary that the substrate be of small thickness - 2, maximum 3.5 mm. This reduces the amplitude of vibrations and, as a result, the wear of the locks.
Substrate mismatch
The base for the laminate must have certain shock-absorbing properties, but be quite strong in compression. Polyurethane foam sheets are excellent for these purposes. They have sufficient strength, elasticity, and are easy to install. However, for various reasons, sometimes there is a desire or need to replace the material with something cheaper, for example, foamed polyethylene. It is too soft, so the laminate locks will easily “sag” under the weight of a passing person. The defect can be corrected only by replacing the incorrect substrate with a more suitable one. You can learn about the right choice from experienced installers or sellers - they have probably already encountered the question and have everything they need on sale. The most popular solution is 3 mm polyurethane sheets.