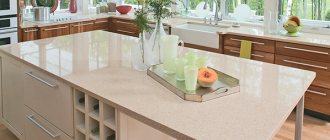
A kitchen countertop made of natural stone is not a cheap pleasure. But why not create it yourself? If you follow all the steps of the instructions, you can get a surface that is no less durable, but much more affordable. In this case it will be white, as this color contrasts with our dark kitchen cabinets. The white concrete countertops that line the perimeter of the kitchen complement the walnut island.
Start of the project
The tabletop was made, as they say, “from scratch.” Plywood was used as a base, which was fixed at a level of 80 cm from the floor.
A metal square was fixed on all sides along the contour, which served as sides that delayed the flow of cement mortar. Self-tapping screws were used to install these sides.
It was important to prepare the area for washing. To do this, an opening was cut inside the plywood using a jigsaw to fit the size of the stainless sink. And they installed it immediately. Silicone was used to install the sink. We thickly coated the edges of the plywood with it and secured the sink, waiting for the silicone to dry.
But in the middle of the sink they placed a board, which in this case was supposed to act as a spacer. After all, during the process of pouring concrete mortar, it can tighten the surface, which leads to deformation of the sink.
While waiting for the concrete work to begin, care had to be taken to keep the sink clean. Therefore, it was additionally covered with film, on top of which a board was installed to cover this section of the tabletop.
The most important trait for a leader is discretion: research findings
This is how customers trust more: reasons to market in simple language
Setting a daily limit: how to control expenses on a contactless card
Having completed these preparatory work, it was possible to begin the main part of the project.
Hole for sink and reinforcing frame
The sink can be built-in or overhead, the latter has a horizontal edge around the perimeter. If the invoice type is installed, the product is turned over, placed on a plywood sheet, and an outline is made along the side. Next, you need to determine the width of the side, let’s say it is 3 cm, then a similar shape is placed inside at a distance of 2.5 cm.
If you plan to have a built-in sink, you need to draw an outline along the edge of the sink. Then 50x50 mm boards are placed along the lines; they need to be attached to the plywood using self-tapping screws.
The built-in sink has a seating chamfer, which is quite difficult to make. Thus, the manufacture of a concrete countertop involves the use of an overlay structure. You just need to fix the pipe at the location where the mixer is installed.
Surface preparation
To mask all existing cracks on the surface of the plywood and crevices into which the solution could leak, we decided to fill these areas with the same silicone. This work had to be done carefully to ensure an accurate result.
Despite all the efforts, cement leaks still appeared in some places, so it took a lot of time to eliminate such defects.
The last part of the preparation was to deploy the fiberglass mesh (the equivalent of rebar in large concrete projects). This excellent building material prevents concrete from cracking and strengthens studs. Therefore, the importance of its use cannot be overestimated. When creating a tabletop, a mesh for concrete mortar must be used!
Conflict with family and yourself: why you shouldn’t work seven days a week
Missing your interview questions: six mistakes people make when looking for a job
Agility and adaptability: what business lessons can be learned from hockey
After we rolled it out and cut it with tin snips, we attached what are called Z-clips. They screw into the plywood and hold the mesh in place. If we decided to do without these clamps, while spreading the concrete mixture over the surface, it could move the mesh.
Methods of decorative finishing of tabletops
There are different ways to decorate a concrete surface:
- Decoration with white concrete. White color is given by ingredients of the corresponding color or special pigments.
- Natural stones, broken glass or shell rock are popular as fillers. This technique gives room for imagination.
- Decor in the form of inlay with an array of valuable rocks is no less in demand. Concrete and wood are the perfect combination.
Laying ceramic tiles is considered one of the simplest decorating techniques. The advantage of this design is that there is no need to sand the surfaces. In addition, the tiles are not afraid of increased loads, wet cleaning and aggressive detergents.
Ceramic, composite and mosaic tiles are suitable for the task. Mosaic gives the decoration originality and a special style thanks to a wide range of colors.
Pouring concrete
In order not to create even more chaos in the kitchen, we decided to mix the solution outside. We were finally ready to start pouring the countertops! For this purpose, we used a special mixture for countertops, recommendations for use of which are indicated directly on the packaging, but it is possible to slightly adjust the recipe depending on how thick the solution will be needed in each specific case.
Should we want to be better than others: why money won’t make us happy
Use time profitably: why it’s worth working part-time when you have a salary
Natural curiosity and more: how to become the best employee in the company
To create a concrete countertop in our case, 14 bags of concrete mixture were needed. To prepare it you needed a large plastic bucket and a construction mixer. The solution immediately turned out to be white in color, so the work looked neat and clean.
When pouring the mixture, it was important to carefully distribute it over the surface of the construction mesh, spreading it with a spatula. To ensure a perfectly flat surface, a building level was constantly used.
In addition to taking care to achieve a smooth surface, it was important to carefully pour the mixture into the corners so that the edges would look nice after removing the edging.
After finishing work with the solution, it was necessary to give it time to harden. On the packaging it was limited to 2 hours. But to be on the safe side, we decided to continue the work on the third day.
While the concrete was still very wet, we took a sander (no sandpaper) and ran it along the sides of the form. This helped get rid of the bubbles that formed in the concrete.
Basic moments
The technology for manufacturing concrete products is very popular in private construction. A horizontal work surface made of concrete can be described as a stone of artificial origin, obtained by molding and hardening a mixture consisting of the following components:
- high quality cement (acts as a binder);
- aggregates of various sizes, selected according to color;
- low salt liquid;
- special additives that improve the quality of concrete.
For those who are planning to make a concrete countertop with their own hands, it is important to consider several important points. Operation of the product involves a large shock load on it, for example, during chopping of a meat carcass with cartilage, that is, reliable reinforcement is necessary.
When choosing a sink and hob, you should give preference to the overhead type . This design does not require special precision in the dimensions of the opening, while the installation side has sufficient width. Possible flaws will be hidden, and the product will receive a reliable fastening. As for mortise structures, their installation requires special equipment. Such work is carried out exclusively in a workshop.
A concrete countertop weighs a lot, so its base must be quite strong. To reduce weight, you should try to shorten the width without sacrificing strength. An important step is grinding, which is accompanied by a large amount of dust.
The tabletop is a decorative element, so it is important to think about its color design. If you use gray cement, the product will turn out to be of a similar color. Fortunately, today there is a wide variety of colors available to add to the mix, so you can choose the shade that suits you best.
Final project
Although every care was taken to create a neat, beautiful fill, it was quite nerve-wracking when it came time to unscrew the metal square. But the mixture went on so well that it looked perfect. For an even better result, we ran sandpaper along the edges of the tabletop and were happy with the result.
After opening the car wash, we made sure that everything was fine in this area too.
Stages of work
Regardless of the product being manufactured, you first need to find out its size and shape. If you are replacing an old countertop, you can use its measurements. If a completely new product is being manufactured, then it is worth taking measurements of the base, and also taking into account the existing requirements for the selected room.
In order to have a template before your eyes, you can try to make a drawing of the tabletop on paper; you are even allowed not to make marks for different types of holes. Next you will need a full-fledged life-size template. To do this, you need to take a sheet of thick cardboard, of such a size that you end up with a full-fledged template. If the cardboard is small, then for the actual volume of the product you will have to glue the parts together. If you have large cardboard, then simply cut out the required layout. When the template is ready, you need to check that it fully matches the dimensions. To check, you should place it on the desired area and make sure that everything is accurate and there are no distortions. After such checks, the concrete countertop will be completed quickly and easily. Now you need to divide the template into separate parts. Once you have ready-made detailed templates on hand, you can begin production of the product itself.
Return to contents
Concreting
Now you need to fill with concrete. First you need to prepare the solution in accordance with the recipe and exact dosages. All components must be whipped until smooth. The consistency should be like thick sour cream. You can beat with an industrial mixer or a drill with a special attachment.
The finished solution can be poured into the frame and, using the rule, carefully smooth everything out. The form must be filled as thoroughly as possible, with concrete filling all voids. When the mixture begins to dry out, it must be covered with film and left for two days in a warm room. When 48 hours have passed, you can disassemble the frame and remove the tabletop.
Return to contents
Positive qualities of quartz agglomerate
This material has significant advantages over its natural counterpart - increased strength, resistance to aggressive chemical influences and pollution.
Highly active detergents do not have a destructive effect on this material.
Advantages and disadvantages of the materials considered
All materials are resistant to fading, easy to install, and lightweight, with the exception of quartz agglomerate.
Liquid stone and quartz agglomerate are heat-resistant and not susceptible to the destructive effects of cleaning agents, scratches, or moisture.
Acrylic stone has the lowest price, allows restoration and the possibility of seamless coating.
At the same time, this material is not sufficiently resistant to moisture, has low thermal stability, and has low scratch resistance.