Modern designers are increasingly using glass blocks in apartment interiors. This material has good operational characteristics and aesthetic qualities. You can use them to decorate walls or build partitions, decorate doorways, even windows. Your interior will become refined and original.
Glass blocks were used as a building material back in the last century, but having passed through the decades, they have undergone significant changes and returned in a new way to perform decorative functions.
Features of using glass blocks in the interior of an apartment
A block of glass can be different: matte or completely transparent, mirrored, multi-colored. The texture is embossed or smooth, with different effects: dimming the light and scattering it. The color range is wide: from neutral to bright, saturated shades. Externally, it looks like a rectangle hollow from the inside, with walls up to 1 cm thick. The brick is characterized by good sound insulation, but has a cold surface - thermal conductivity is low.
A glass block is two glass half-blocks welded together with a void inside.
Products are available in a variety of designs, you can even find them with stained glass
What is a decorative glass block: features of the material
A glass block is a hollow volumetric block created from fused glass plates about 10 mm thick. The product can have a square, triangular, round or rectangular shape. The first option is the most popular. Glass blocks are characterized by dimensions of 190x190 and 240x240 mm, thickness 80-100 mm. The weight of the product depends on the dimensions and averages 3-4 kg.
Glass blocks are moisture resistant, have high sound insulation and heat-saving properties
Glass blocks - the photos clearly show the different options - can be transparent or matte, with a smooth or textured surface, glossy, matte or with a mirror shine, which affects the light-scattering effect. Manufacturers produce products in a variety of colors, ranging from calm neutral shades to bright flashy colors.
Thanks to their special design, glass blocks are characterized by a number of distinctive advantages. Due to the air inner layer, the sound permeability of the material is reduced by 60-70%. The product is at the same time characterized by good light transmittance, and thanks to the dense glass, the outlines of the silhouettes located behind the glass block wall are blurred, this makes it impossible to spy on what is hidden from prying eyes.
Glass blocks are great for zoning a large room
The material is characterized by high strength, resistance to cracking, smooth surface and environmental friendliness, as a result of which it can be used for the construction of partitions in children's institutions. The products have increased moisture resistance, good thermal insulation, resistance to condensation and temperature fluctuations, which makes it advisable to use glass blocks for partitions in bathrooms, saunas and swimming pools.
Glass blocks do not require special care. The surface can withstand an unlimited number of cleanings using any detergent.
The glass block bar counter looks very original and stylish
However, this material is not without drawbacks. Among the main negative aspects is the significant weight of the product, for which reason it is not recommended to build walls made of glass blocks with an area of more than 15 m². In addition, installation of elements is very labor-intensive and requires certain skills and knowledge. Another disadvantage is the high cost of the products. You can buy a glass block from a domestic manufacturer for an average of 150-200 rubles. A product of European quality will cost 300-450 rubles. The cost of a decorative element varies between 1200-1500 rubles. a piece.
Advantages and disadvantages of using glass blocks
Good light transmission qualities can be highlighted - this is one of the favorite materials of modern designers. They do not burden the overall interior; a wide range of colors is provided for interior decoration.
You can decorate an entire wall with glass blocks or diversify the partition with separate colored inserts
Let's look at the main advantages:
- the material is considered universal, suitable for any style: minimalism, high-tech, urban, loft and others;
- practicality in care, just wipe the wall with detergents and wipe dry;
- the product does not burn.
The surface texture of glass blocks can be transparent, scattering or light-directing
We especially note the ease of installation. There are also disadvantages: if you cover the entire wall with it, you need to think through a plan for installing utility lines in advance - it is impossible to install anything through the glass.
Laying in the frame
Installation with glue
Laying on mortar
What is glass block and how does it work?
Glass blocks are two square glass boxes welded together with sides. Inside there is emptiness, or rather highly rarefied dry air. Dust and condensation cannot fall into the interior of the block, so the glass walls of the block always remain transparent from the inside.
As we know, sound waves, as well as a significant proportion of heat, are transmitted by vibrations of air molecules. Accordingly, the discharged space inside the block does not transmit sound well. The absence of air also prevents the transfer of heat, giving the glass block thermal insulation properties no worse than even double-glazed windows.
True, it would not be entirely correct to say that glass blocks are transparent; their walls transmit about 70% of the light flux. But, now, it will no longer be possible to see anything behind their thick corrugated surface, except for blurred silhouettes.
Glass blocks are suitable where you need to provide good natural light, while at the same time hiding what is happening behind the wall.
Another advantage of glass blocks is their high fire resistance. Thick glass can burst only from a sharp and strong temperature change, but is practically invulnerable to relatively uniform heating even from a strong fire.
Openings filled with glass blocks sometimes resemble exquisite stained glass windows
The aesthetic qualities of modern blocks are noticeably superior to their Soviet predecessors. Today they are produced in a variety of colors and shades, decorated with various designs. Various decorations and unusual objects are placed in the internal voids of the blocks. There are a great variety of design options for both the glass blocks themselves and the design using them.
Rules for decorating a room with glass blocks
Previously, this material was used for office premises. It is now popular to use partitions made of glass blocks in an apartment; photos can be viewed on design websites.
Glass block inserts can be used as stylish and expressive accents
There are many design variations even for a small apartment:
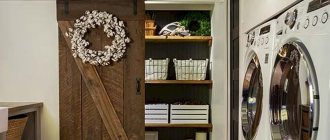
- Separating a small hallway from the main corridor or a shower from the bathroom. In such cases, a pallet and a partition made of blocks are simply mounted. High-quality sealing of joints is necessary.
- For the kitchen - studio. The partition is beautifully laid out with multi-colored blocks.
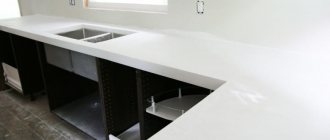
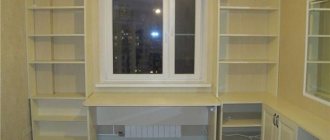
- Installation under the kitchen surface of glass blocks with lighting.
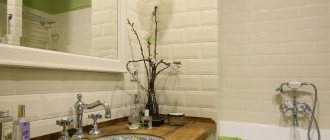
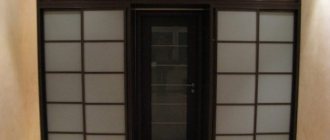
- Decorating a window or doorway using matte or colored blocks.
- Highlighting a wall or partition with corrugated products, with shells or flowers inside, a transparent surface and a glossy sheen.
A stand made of multi-colored glass for an aquarium looks very creative; as an option, a table top with inserts of different textures. This is a durable and practical material, so use your imagination and your home will sparkle with new colors!
Furniture made from glass blocks looks interesting in the interior of the apartment.
You can use glass blocks to make a coffee table or decorate the façade of a kitchen island.
What types of glass blocks are there?
To build walls from glass blocks or decor, square or rectangular bricks are usually used. The dimensions of the squares have been preserved since the times of the USSR - 19 * 19 * 8 cm or 24 * 24 * 8 cm. Rectangles make up exactly half of the main shape: 19 * 9.5 * 8 cm.
For ease of operation and a more decorative appearance, special end blocks are produced - angular, with rounded edges, cut into a quarter circle. Due to these elements, the erected walls look complete.
In the photo there are amber glass blocks in the living room
30-50 years ago, colored glass blocks were greenish, because... were made from ordinary unrefined glass - it was the most inexpensive. Transparent and crystal clear ones were less common. Modern manufacturers have expanded the line, adding pleasant blue, rich green, neutral brown, as well as yellow, red, purple, pink and other colors.
The color palette increases thanks to the addition of frosted glass to the gloss: so everyone can definitely find something to suit their style and taste
The photo shows glass in a loft style interior
To the usual colored or transparent ones, original inserts are added: glass capsules, inside of which there are compositions of stones, plastic fish or insects, flowers, fruits.
Based on texture, they can be classified as smooth or textured. The second category includes wavy, lattice (Inca), bubble, imitating a waterfall, shagreen.
Using glass blocks when decorating walls
High-quality materials are used for wall cladding with glass blocks.
You should not buy analogues made of plastic - they are fragile and will not last long.
The wall can be supplemented with lighting, the surface can be tinted, or left completely transparent. This is the best option for dividing the kitchen from the room in the studios or beautifully decorating the bathroom. If there is little light in the apartment, installing a glass partition would be the right choice. The sun's rays are refracted in the faces of the cube and conduct light into the room.
A glass block partition is an excellent solution for separating a room and at the same time filling the space with additional light.
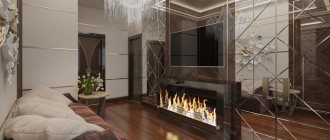
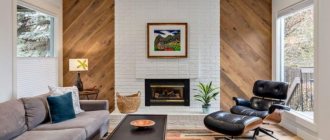
Glass blocks for delimiting space in the interior of any apartment can be selected in any shape; look at photos for inspiration on design websites. You can beautifully decorate niches and ledges on the surface of the walls, or build a fake fireplace in the hall.
If you want to create a wall to zone a living space, dilute the materials: also use chipboard and drywall.
Each element is selected taking into account the concept of the overall style. To decorate the wall surface, you can place the products pointwise. In the living room it would be appropriate to create a picture or panel from multi-colored bricks.
Transparent, matte or colored - you can choose the most suitable product option to realize your design idea
Advantages of interior design
Glass blocks have a lot of advantages, among the advantages of the material they note:
- Fire safety and frost resistance.
- High light transmittance.
- Super strength.
- High sound insulation characteristics.
- Easy to maintain and no need for additional finishing.
Unfortunately, glass blocks also have a number of not so significant disadvantages. You cannot drive a nail or drill a hole into such a “wall.” It will not be possible to cut the fragments during installation, and in cases where the window is made only of glass blocks, it is impossible to ventilate the room without using a door. The material cannot withstand high pressure.
Glass block walls can participate in zoning rooms deprived of light. This material is also popular for finishing home greenhouses and winter gardens, as it provides a favorable environment for growing plants.
Partitions made of glass blocks in the interior of an apartment
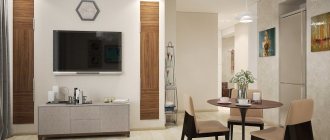
Partitions made of transparent glass blocks of different colors are widely used in apartments. The main goal is to zone the room and highlight the area.
Glass blocks are used to create lightweight partitions for zoning a room
Thanks to the transparency of the material, the space is perceived more integral
There are many ideas for partitions:
- oval;
- circle;
- trapezoid;
- arch;
- pyramid.
With the help of glass bricks you can implement many original interior design ideas
The optimal width and height are selected, depending on the ceilings. It is ideal to create a clear, limited space: dressing room, hallway, shower stall. This is a good choice for creating a dining area.
If the room is small, glass blocks will fit perfectly into the overall concept - they visually expand the room.
To enclose the bed and sitting area, frosted or multi-colored glass is used.
An example of separating a sleeping area from the rest of the apartment using a partition made of frosted glass blocks
How to do it yourself?
Installation of shower stalls and glass block corners is best carried out during general renovation of the premises. To avoid unnecessary costs and technical re-equipment of the bathroom, a new shower stall is installed in the place of the old bathtub, so as not to re-arrange the drainage system. When laying glass blocks, the wall must be reinforced.
At the stage of designing a bathroom, even before tiling the walls, it is important to provide places for the outlet of communications under the shower mixer. And then, after completing the masonry work, install the shower stand.
Construction of a shower tray from tiles
A shower tray for a stall is constructed in several ways:
- They purchase a ready-made acrylic structure, install a tray, and trim the side with ceramic tiles.
- Build the pallet yourself from silicate or red brick.
- A monolithic base is erected using a cement-sand mixture.
- A frame podium is mounted from timber, covering it with moisture-resistant material.
Any option for creating a pallet requires preparatory work. The bathroom floor is cleared of debris and existing cracks are filled with cement.
Before constructing the podium, sewerage and water supply pipes are installed, and heat and sound insulation is laid, on top of which a screed is laid. Then a waterproofing layer of coating or film material is applied. Install a shower drain.
At the next stage, the structure is installed relative to the selected option. The side of the shower tray is pre-built from brick, aerated concrete blocks or a metal profile. A cement-sand mortar is placed on top of it. After installing the pallet, lay out ceramic tiles or mosaics, followed by grouting the joints.
Laying the partition
Tools and materials
List of tools:
- drill or hammer drill;
- Master OK;
- level;
- rubber spatula;
- construction marker;
also need the following materials:
- glass blocks;
- ready-mix or cement-sand mortar;
- mounting plastic crosses;
- fiberglass reinforcement bars with a diameter of 6-8 mm;
- grout for blocks.
Oddly enough, fiberglass reinforcement can withstand greater loads than stainless steel reinforcement. It has a lower price and significantly less weight. 100 meters of such rods weigh only 4.5 kg. Therefore, it is better to use fiberglass for reinforcement .
For cement-sand masonry mortar you will need:
- cement - 1 bucket;
- fine washed river sand – 3 buckets;
- purified water – 1 bucket.
To give plasticity, add PVA glue at the rate of 200 g. for 5 buckets of cement mixture. Leave the masonry mortar for 5-10 minutes, then mix thoroughly again.
If you are going to use blocks of light shades, including transparent ones, it is better to use white tile adhesive , then the seams will look more organic.
Instructions
STEP 1. Guide frames or masking adhesive tape, which is needed to mark the installation line of the structure, is placed and secured on the cleaned surface of the pallet side or directly on the floor. The same is done on the vertical surface of the wall to which the partition will be attached.
The junction of the wall and glass blocks can be treated with sand-based primer to increase the reliability of fastening.
STEP 2. Next, you need to lay out the first rad and mark for vertical reinforcement at the junction of the glass blocks. For horizontal rods, make marks on the wall on top of the block.
The holes in the floor for the vertical guides are marked only once. For horizontal ones, mark when laying out each new row.
STEP 3. Now you should drill holes according to the marks. It is necessary to take into account that communications may pass through the wall, so you need to drill to the depth of the tiles and. It would be enough.
STEP 4. Laying begins from the wall to which the shower partition adjoins. A cement-sand mixture or glue is applied to the wall and floor, then the first plastic cross is placed in the corner. Additionally, apply the adhesive mixture to the glass block itself, place it along the markings and press it to the surface. Check the evenness of the installation; if there is a deviation, plastic wedges are inserted under the bottom.
For smooth and high-quality masonry, use special crosses for glass blocks.
The thickness of the seam depends on the size of the blocks themselves. If they are large: 19x19 or 24x24 cm, you can choose 10 mm crosses; if they are small: 11.5x11.5 cm, it is better to choose 5 or 3 mm crosses.
STEP 5. The solution is applied to the side of the next block and placed next to the first, while in the space between them a reinforcing rod is inserted into a pre-drilled hole. Then the upper surface of the blocks is smeared with glue, horizontal reinforcement is placed and placed inside the wall.
STEP 6. The next blocks are installed according to the same principle until the row ends. If the partition being erected has a restriction on only one side, then the opposite end of the reinforcement ends flush with the partition. When laying the blocks, remove excess mixture with a trowel. During this process, the evenness of the structure is periodically checked using a level.
STEP 7. After the first row is ready, perform the second and third. After laying the third row, it is recommended to take a break so that the mixture or glue has time to harden, ensuring the strength of the structure. When using tile adhesive, the break lasts 5 hours, if cement-sand mortar is used - 1 day. After the solution has dried, the remaining rows are laid out in a similar way until the partition reaches the desired height.
STEP 8. There are several ways to improve the ends of a shower partition. Firstly, there are special end rounded blocks that are placed at the end of the row.
Everything is simple here. Secondly, there are glass plates, which are attached to pre-aligned ends using mirror glue.
STEP 9. At the last stage, remove the plastic crosses and seal the gaps with a special grout mixture using a rubber spatula. Then the seams are leveled, the protective film is removed and the blocks are cleaned of dust and dirt. Acetic acid is used to remove excess glue or solution. Using water repellents, the seams are protected from water.
If the partition has a curved design, then the reinforcement bars are bent according to the shape of the wall, and the radius should not be more than 5 m. During installation, plastic crosses are placed only inside the curve. For curved partitions, it is recommended to use smaller blocks to create a smooth turn, and for strength, use more reinforcing bars.
STEP 10. When the partition is ready, you can leave the entrance to the resulting booth open, but to avoid splashes on the floor, it is better to install a glass door. To do this, measure the distance between the partition and the opposite wall, and then select a door in the store, or order individual production according to the specified dimensions.
The installation is simple. Mark the fastenings for the hinges on the wall and drill holes for the dowels. Then the door sits on its hinges.
Options for using glass blocks with lighting in the interior of an apartment
This is a great option for living rooms, kitchen surfaces and even the bathroom. It's creative, beautiful, and creates comfort. You can add LEDs to the hallway partition - you can turn it on when entering the apartment, which will demonstrate to your guests your sophisticated taste.
Stylish partition with lighting in a small hallway
Glass blocks with lighting in the kitchen interior
Strained glass
Partitions and glass railings cannot be called the easiest option for someone who wants to separate their shower stall from the rest of the bathroom. The hardest part is hanging the doors. The fence is made only from tempered glass. Please note that processing and cutting of the sheet are performed before annealing. Otherwise, strong surface tensions are highly likely to cause the sample to split. Before installation begins, some issues need to be resolved.
Many argue that the dimensions of the bathroom are strictly defined by standards and rules. Actually this is not true. There are no strictly defined fence sizes. That is why many are eager to do all the construction work with their own hands. It becomes possible to flexibly adjust the dimensions to the available space. It's no secret that the minimum size of a shower tray is usually 80 cm. Although you can find smaller products on sale, which we have a corresponding review about.
Thick glass shower enclosure
But then it turns out that for some reason a small pallet costs two to three times more than a standard one. In fact, everything is explained quite simply: the costs of producing popular models are quickly recouped. The small serial production of smaller cabins leads to a higher price for them in stores. Meanwhile, it is known that a space of 80x80 seems too large to many. The size is chosen so that anyone can get into the shower stall. Little people don't need this.
The shoulder width of most of the population does not exceed 60 cm. This means that you can save 20 cm of free space. Usually this is exactly what is not enough to successfully install a washing machine, toilet, sink... Glass partitions allow you to solve the problem in a simple manner. The thickness of the sheet is a few millimeters. Moreover, you can choose either painted or matte.
Tempering glass in Moscow costs about 500 rubles per square meter, that is, approximately 1.5 thousand rubles for one wall. With a total number of two pieces (one of which is allocated for the doors), the cost of annealing does not exceed 3 thousand rubles. The cost of the canvas itself is within the same limits. Total, 6,000 rubles for the entire fence.
Stylistic compatibility of glass blocks with different styles in the interior of an apartment
Transparent cubes will perfectly highlight and complement any style. Goes well with neoclassical and urban styles, art deco, loft, oriental and modern. You should not perform such finishing for Rococo or Baroque, country, Provence, classical design.
Glass blocks in a loft style kitchen
Glass blocks in the interior of a modern kitchen-living room
There are many interesting options for using glass products: focus on your taste and budget, room size and layout. It is important not to forget about the “coldness” of the material - you need to complement it with “warm” textile decor or living plants.
Shape and size
The most popular shapes of glass blocks are square and rectangle. They can have the following sizes:
- squares: 19x19x5 cm, 19x19x7 cm, 19x19x8 cm, 20x20x2.2 cm, 24x24x8 cm, 30x30x10 cm;
- rectangles: 190x90x80 cm, 240x11.5x8 cm;
- small (mini) glass blocks: 11.5x11.5x8 cm, 14.6x14.6x5.5 cm, 14.6x14.6x8 cm, 14.6x6x8 cm.
To create a pattern or clear corners on the shower wall, you can use triangular blocks that have dimensions of 17.2 x 23.6 x 8 cm (legs, hypotenuse and thickness).
To form edges and wall transitions, curved, half-shape and rounded models are available. The dimensions of the corner glass block are 19x19x8 cm (for the top joint of the two sides) and 19x15x8 (for the side joint). The standard halves have dimensions of 19x9.4x8 cm, and the end halves have dimensions of 19x9x9 cm.
To decorate the edge of the partition, end blocks are used, having 1 connecting and 1 transparent side wall. They are available in standard sizes - 19x19x8 cm and 24x24x8 cm. The convex end blocks have parameters of 19x14.4x11 cm and 19x13x8 cm.
The thickness of the seam between the elements should be from 2 to 5 mm. The recommended opening size is indicated by the manufacturer.
Photo: Glass blocks in the interior of the apartment
Glass fencing design
It is strongly recommended to divide the wall canvas into several parts. This makes installation much easier. Pieces of the same plane are joined together end-to-end using any profile available on the market. There is no need to buy an expensive branded one designed specifically for glass fences. Under the partitions, it is quite possible to purchase a decorative profile for installing polycarbonate. In our case, this does not matter, but the price is reduced almost tenfold.
Glass shower cabin
For example, a branded profile with magnets is sold at a price of 1000 rubles per meter. It is clear that polycarbonate is much more profitable to take. And it cannot be said that the decorative properties suffered greatly. In addition, it is almost impossible to get an H-profile under the glass, which allows for end-to-end glass installation.
Typically, such structures are assembled using aluminum window technology. The disadvantage is that aircraft metal is quickly eaten away by electrochemical corrosion. Such partitions cannot be durable. Branded door hinges are no less expensive. The standard price starts around 1,500 rubles. These are excellent products that provide reliable pressure of the door leaf to the stopper at the extreme point.
But it’s much easier to make sliding structures with your own hands. Here we allow ourselves a little trick. The doors will occupy exactly half of each of the two walls of the partition. On runners made of U-profile (aluminum or plastic), if necessary, they move to the side. As seals we use a decorative profile for polycarbonate, attached to silicone sealant. To avoid the hassle of finding handles, cut small holes in each sash and trim the perimeter with a plastic corner.
Pallet
If you choose standard cabin dimensions, you can buy a ready-made pallet - made of acrylic, steel or cast iron.
It is somewhat more difficult to arrange the floor in a cabin with a complex configuration or if, during the design, the dimensions did not fall into the standard line.
A homemade pallet is arranged in the following order:
- Preparatory work is carried out, which consists of dismantling the old floor covering and other layers of the floor structure - right down to its base. All cracks and other defects found on the surface of the reinforced concrete slab are filled with cement and kept until it sets completely.
- The prepared site is covered with a bitumen coating.
- Insulation is laid over the waterproofing (expanded polystyrene rigid boards up to 50 mm thick are suitable). A hole is cut in it for the drain pipe.
- A drain is installed and connected to the sewer pipe.
- A rough cement-sand screed is poured (cement to sand ratio 1:3).
- Additional waterproofing is carried out using isoplast.
- During the process of pouring the finishing screed, a slope of the floor is formed (1 cm by 1 m) towards the drain.
- After curing, glue is applied to the finishing screed and the tiles are laid out.
Shower in the corner
To prevent water from spreading outside the shower stall, you can build a low side by tiling it.
Polycarbonate as the main material for the shower cabin
A shower cabin made of polycarbonate is a favorite option among summer residents. Not surprising! This is a material that corresponds to the price-quality category. It is easy to work with, it maintains its performance characteristics for a long time and looks much nicer than traditional oilcloth, which is used to cover vertical supports.
Like any construction, installation of the cabin begins with the preparatory stage. The first thing you need to do is decide on the choice of installation location and preparation of the drain. You need to take this seriously, and in order to make the work easier, you can first prepare a drawing plan of the future structure. So let's get started.
Simple DIY polycarbonate shower stall
It is necessary to build the frame of the future structure. To do this, you can use various metal supports. It is to this frame that the polycarbonate sheets will be attached. The material from which the profile (frame) is made varies. For example, wood, aluminum, PVC, MDF, etc. Pouring the foundation is an important step in the construction of a summer shower
It is important not to forget to provide a drain for water. After this, vertical supports are dug into the ground; it is advisable to fix them with concrete. When the vertical supports are installed, you need to install the horizontal ones
They are fastened together with bolts, angles or by welding structures. In order for the shower stall to be stable, in addition to vertical and horizontal racks, you need to use oblique supports. The next step will be installation of the roof. And only after that the tank is installed.
- Be sure to attach the tank to the structure. It is best to purchase a flat model. It is more stable. But if you don’t want to spend money on buying a tank, then a barrel can easily replace it.
- Attach the polycarbonate to the frame. Seal air passages with sealant.
It’s easy to make a polycarbonate shower cabin with your own hands.
The cost of a polycarbonate structure depends on a number of factors: size, materials, fittings, etc. A polycarbonate shower cabin in your summer cottage will serve you for a long time if you strictly follow the rules of its operation, or rather, the material. Polycarbonate is easy to clean and does not require physical force to clean it.
You should also be careful when using household detergents (especially powder ones), because
they are not equally good for polycarbonate and can compromise its integrity.
There are a large number of training videos that will help beginners install a polycarbonate shower cabin in their summer cottage.
Shower project
The design of any shower cabin begins with determining its location and overall dimensions. Then a decision is made:
- by type of pallet;
- material for making the door;
- wall design.
Shower material
At the project stage, it is necessary to calculate the area of the walls that will be mounted from glass blocks. If they exceed 15 m2, it is necessary to apply reinforcement techniques. For this purpose, you can use a steel rod with a diameter of 4-5 mm or ready-made systems (Lux Prof, for example) designed for laying glass blocks.
Design and decor
Glass partitions are not only a functional element, but also a full-fledged decorative accessory. Glass is easily subject to additional processing, so the decor of the partitions can be chosen to suit your taste.
Clear glass
The simplest and most common option is ordinary transparent glass. Thin, weightless and graceful canvases create symbolic boundaries of different functional areas. This is a popular trend in all futuristic and technological styles.
Frosted glass
Depending on the processing method, the light transmittance of frosted glass varies between 15-75%. They provide something that transparent partitions cannot: the effect of privacy. Therefore, they can be used even in a bedroom or a combined bathroom.
Tinted glass
Glass tinting has two main functions: it filters out too much light and can be a stand-alone color accent. Tinting does not have to be black - orange, red, blue and green look bold and extravagant. And you will certainly appreciate the classic ones if you live in a sunny, hot area or in a house with windows facing south.
Opaque designs
The classic matte and tinted coating does not provide complete privacy, but special processing makes it possible to make the partitions completely opaque. This can be filming, sandblasting or chemical etching.
Fluted glass
These are textured partitions with embossed elements, stripes, ribs or waves. Such glass is usually thicker than simple transparent glass, but it creates an interesting play of light due to its refraction along the relief surface. It is precisely these inserts that are still often mounted in interior doors.
Pasting with film
The choice of films for glass is huge and varied, from invisible shockproof coating to matting films. There are also films with different designs, ornaments, and logos. The main advantage of this decor is its simplicity, because you can paste over the partition at home yourself.
Stained glass and mosaics
Complex artistic stained glass and mosaic partitions are a luxurious decorative element. Even factory-made, they are more expensive, not to mention handmade. But such an interior will definitely be luxurious and individual, especially in elaborate classical styles.
Sandblasting
The smooth transparent surface of the glass is processed with a special sandblasting machine. Abrasive particles under pressure create ornaments and entire pictures against the background, and the design can be anything.
Glass and other materials
In complex decorative designs, glass segments are harmoniously combined with other materials. For example, with valuable wood or metal inserts, with artificial stone, epoxy resin and any other decorative compositions.
Wall mount
Many people have a question: how will our partitions be attached, their outer corners hanging in the air? Two guides made of plastic and aluminum - along the floor and one of the walls - will completely provide a rigid frame. The upper part consists of guides (aluminum or plastic), rigidly welded or fastened at the corners. The glass sheets are simply inserted into this frame. The fixed part is glued with silicone sealant, and the doors simply slide over the surface.
All that remains is to coat the runners with silicone grease to avoid grinding. The most difficult part of the design is the outer corners formed by two doors. Here we can recommend using some kind of intricate decorative profile, for example, F.