Think over the layout
Depending on the shape of the tile, there are many laying patterns to achieve different patterns. As a rule, all manufacturers supply their products with similar information, so you should not have a problem choosing a circuit.
Do not forget that the more complex the shape of the paving slabs and the pattern that needs to be obtained, the higher the labor intensity and the more trimming. If you want to simplify your work as much as possible, choose rectangular or square tiles, and make paths and platforms with straight lines. Ideally, generally adjust the paving area to the size of a whole number of tiles in order to avoid trimming.
Preparatory stage
As a rule, paving is carried out at the stage of site improvement, upon completion of construction of a house and other capital projects. Considering that blind areas, paths, recreation areas and parking are not only functional, but also decorative elements of landscape design, preparation for paving is carried out at the design stage. Ideally, a full-fledged landscape design project is developed, based on the characteristics of the site (soil type, topography, groundwater level, etc.). And based on the chosen style of design of the yard, taking into account the expected loads and paving conditions, the thickness of the tiles, the design of the paths, and the shape and “pattern” of the installation are selected.
As with the construction of any structures, be it a permanent house, a seasonal dacha, a utility block, a garage or a gazebo, when landscaping a yard in general and paving in particular, you need a project, at least at the level of visualization in the editor or a sketch by hand. For those who prefer to do it on their own, manufacturers offer a universal “memo”.
Roman ChizhovChief technologist of the Steingot plant
Before you start laying tiles, the following preparations must be carried out:
- The geology of the site is determined: heaving and bearing capacity of the soil, freezing depth, height of groundwater. Based on the results, the optimal paving design is selected (laying depth, composition of the pie).
- The load is determined: the thickness of the tiles, the depth of the base and the composition of the preparation layers depend on the trafficability and the expected load.
- The paving is marked according to the project, to calculate the number of consumables: squaring of tiles with an allowance of 5% for scraps, volume of crushed stone and sand, amount of geotextiles.
- Calculations are made of the number of consumables for paving, as well as related elements: curbs, storm drainage trays, etc.
Make the markings
- Calculate the width of the future path by adding up the number of tiles in the row. Don't forget to include the thickness of the borders and add 5-10 cm on both sides.
- Measure the required distance with a tape measure and use wooden or metal pegs to mark the area for laying the paving slabs. To keep them out of the way, use two pins at each corner and drive them in at a distance of 20–30 cm.
- Stretch a cord between the pegs and outline the perimeter of the work area.
- Check the diagonals of the resulting rectangle and make sure they are the same. If the distances are different, achieve the exact size by moving the pegs.
Prepare the base
dvabrevna.ru
- If there is old covering on the ground, remove it.
- Carefully remove the topsoil with a shovel. Usually it is 30–40 cm.
- Make sure to remove all roots and grass to prevent seeds from growing through the tiles.
- Level the soil with a rake and compact it well over the entire area of the trench using a hand tamper.
- To drain water from the surface of the tile, form a slope on one side of the trench at the rate of 1 cm per linear meter.
Rubber
Rubber tiles appeared recently, but have already gained some popularity
Crushed stone path
Rubber tiles appeared on sale relatively recently, but, thanks to their specific advantages, they have already found their niche. These advantages are the following:
- rubber is not afraid of extreme temperatures, humidity, cold and even fades in the sun very slowly, almost imperceptibly;
- the rubber looks nice - bright, cheerful, especially good if you choose multi-colored elements;
- You can’t slip on the rubber—the coating is specially made that way;
- it is relatively inexpensive, and it is also soft, which makes it completely safe.
Basically, rubber is used not to design paths, but to decorate playgrounds with it - if a child falls on one, he will not be injured. On the other hand, if there are children and elderly people in the house, it may also be relevant for a summer cottage.
The downside is its appearance. She is bright and pretty, but this is not appropriate everywhere.
Black and white gravel path
Pebble path
Install curbs
thewalls.ru
Paving slabs are a relatively mobile surface, so curb stones are always installed along the edges of the paving. They prevent it from spreading due to soil heaving. To fix the curbs themselves, they are installed on concrete. The height of the curb can be either higher than the tile or flush with its surface.
- Using a shovel, dig small trenches slightly wider than the curb on both sides of the site.
- Prepare a mixture according to the following calculation: 1 bucket of cement, 3 buckets of sand and 2 buckets of crushed stone. Add a little water to make the solution thick and not runny.
- Place the solution in the trenches and place curbs on top.
- Press the stones onto the concrete by tapping them with a rubber mallet and level them along the line to the desired height.
- Wait a day for the material to harden.
Rules for constructing paving stone paths
Knowing some aspects will help make a comfortable and durable design.
- The width of the path for people to move varies from 0.6 to 1.5 m . The optimal size that allows you to disperse when meeting is at least 0.9 m. A structure with a width exceeding 1.2 m will be comfortable for pedestrians.
- Curbs should be installed on the sides, preventing the path from deforming and preventing the appearance of dirt during rainstorms.
Curbs should be installed on the sides - The path should be away from trees . This is important so that their root system cannot destroy the coating. Usually it is enough to maintain 2 meters.
- When choosing the type of substrate for paving stones, it is necessary to take into account the type of soil, purpose of the coating, characteristics of the material being laid.
What types of substrates are there?
Make a pillow
mg-trotuar.ru
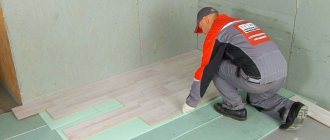
Paving slabs are laid on a well-compacted pad. Sand is sufficient for pedestrian garden paths and playgrounds; driveways to garages and parking lots are additionally reinforced with a layer of crushed stone. Also, a gravel bed is used when the groundwater level is high, acting as drainage and preventing heaving. Sometimes, for greater strength and protection against root germination, geotextiles are laid between the soil and the bedding.
How to make a walkway cushion
- Place geotextiles on the compacted soil (optional).
- Pour sand into the trench and moisten it with water.
- Compact well with a tamper to obtain a layer of 15–20 cm.
- With sufficient density, shoe marks will not remain on the sand.
How to make a pillow for a platform under a car
- Place geotextiles on the compacted soil (optional).
- Line the bottom of the trench with a thin layer of sand and compact it thoroughly.
- Fill in medium-fraction crushed stone and compact to obtain a layer of 20–25 cm.
- Sprinkle sand on top, moisten and compact to a layer of about 5 cm.
Advantages and disadvantages
This paving finish has several advantages and disadvantages.
| pros | Minuses |
| It has a huge range of shapes, colors and textures. | High price. |
| Prevents the appearance of puddles, as excess moisture drains through the seams. | It can be quite slippery and dangerous in cold weather. |
| It is quite wear-resistant, resistant to ultraviolet radiation, precipitation and temperature changes. | |
| It has a long service life of 15 to 20 years. | If installed incorrectly, the quality of the material decreases significantly and grass begins to grow between the seams. |
| Features easy installation. If one module is damaged, it can be easily replaced. |
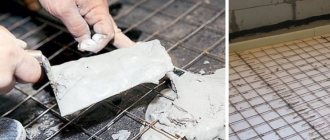
Prepare and level the cement-sand mixture along the beacons
- Mix a dry cement-sand mixture (CSM) at the following rate: 1 bucket of cement per 5-6 buckets of sand.
- Install level beacons from UD profiles for drywall or pipes. Form a slope of 1 cm by 1 m for water drainage.
- Fill a 2–4 cm high layer of CPS between the beacons and level it using the rule.
- When pits form, add the remaining amount of mixture and pull along the guides until the surface is level.
- Carefully remove the beacons and fill the resulting voids with the DSP.
Current operation
- In winter, the surface can be sprinkled with sand to reduce slipping.
- To avoid surface erosion, it is not recommended to sprinkle paths with abrasive mixtures containing salt.
- It is not recommended to clean road surfaces in winter using tools with a metal working part (crowbars, shovels) .
- If the snow was not removed on time and ice formed, under no circumstances should you remove the ice using a metal tool.
- Caring for paving requires minimal effort.
- The tiles must be washed with water as they become dirty, more often in high-traffic areas. Cleaning a small area of paving near the cottage is not very difficult.
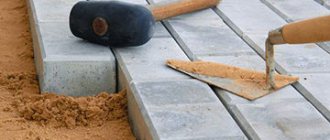
Lay paving slabs
stroyrom.ru
- Start laying paving slabs from the corner that will be most visible and from the lowest point if there is a natural slope at the site.
- Install the tiles away from you so as not to step on the prepared surface.
- Place the bricks in their place, pushing them down and knocking them tightly together with a rubber hammer.
- Use a level to check that the horizontal plane is level.
- If any tile becomes lower than the others, remove it and add a little TSP.
- If there are undercuts, first lay all the whole paving stones, and then use an angle grinder to cut out pieces of the required shape and install them.
Let's sum it up
To make paving not only practical and durable, but also aesthetically pleasing, careful planning and design are required. Manufacturers recommend installing a permeable base not only for paths in pedestrian areas, but also for entrance areas and parking areas. This will save not only money, but also time and effort, without compromising the technical and operational characteristics of the coatings.
The outstanding characteristics of vibropressed tiles are due to the peculiarities of the production cycle. About the popular shapes and installation patterns - in the previous thematic material. In the video - planning a garden plot, advice from a landscaping engineer, in simple language.
Subscribe to our Telegram channelExclusive posts every week
Fill the seams
remkvartur.ru
- Carefully sweep away any debris remaining after installation.
- Spray the paved surface generously with low pressure water and let it dry.
- Sprinkle the tiles with the dry mixture on which they were laid, and thoroughly hammer all the joints and gaps between the borders using a broom or broom. Remove any excess.
- Spray the seams with a gentle pressure of water and, after drying, fill the DSP again.
- If necessary, repeat the procedure until the joints are completely filled.