Advantages of a canopy over a gate
The main advantage of a canopy over a gate is protection from bad weather. The canopy will allow you to easily remove the keys from your bag and open the lock in rainy or snowy weather.
In addition, the canopy will protect the lock from rapid failure. Rainwater that gets into the keyhole corrodes the metal and the lock rusts. And if we take into account that in our latitudes, winter is characterized by frequent thaws, then the castle may freeze from water that gets into it.
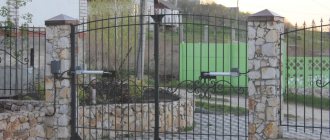
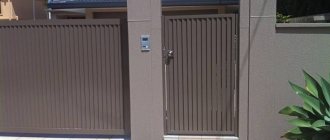
Photo 1 shows a gate with a canopy
Appearance is no less important. A canopy over the gate will significantly change and decorate the overall appearance of the entire fence.
Installation of a canopy over a gate
Stores sell ready-made canopies, but there is nothing difficult about making one yourself. In addition, by making it yourself, you can be sure of the exclusivity of the design. Often, do-it-yourself canopies over a gate look much more attractive than those sold in hardware stores.
For design you will need the following tools:
- Metal profile or sheet metal
- Decorative forged elements
- Welding machine
- Electrodes
- Building level
- Bulgarian
- Cutting and cleaning discs
- Metal brush
- Drill and drill bits
- Hammer
- Brushes and paint.
Preparatory work
At the initial stage, you need to decide on the choice of the shape of the planned structure. A sketch of the desired canopy is made on a sheet of paper. If you don’t know how to draw, you can take a look at the design of the canopy over the gate. Photos of canopies of various designs and sizes can be found on the Internet. But you need to keep in mind that not everything you like can be done independently without specialized equipment, so soberly assess your capabilities (photo 2).
In photo 2 you see an image of a polycarbonate canopy
The next stage is testing the strength of the load-bearing elements of the future structure. You need to make sure that the gate posts can support the load. If you want to make a semicircular canopy, it is better to use thin rolled metal, as it is easier to bend.
And the last point in preparation is to calculate the required amount of building material for the canopy. To do this, take measurements and select the coating from which you plan to make the canopy. It can be: soft tiles, wood, polycarbonate or metal.
Construction of the visor
For example, let’s take a simple design that you can make with your own hands without any special skills. This will be a rounded roof.
The manufacture of the canopy begins with its frame, which will rest on the gate posts. The frame is made from a metal profile in the shape of the letter “P”. The overhang of the future canopy roof is welded to the resulting frame. For convenience, it is better to make it on both sides to provide cover both at the entrance and at the exit from the yard.
To give the canopy a beautiful look, forged decorative elements are welded between the overhang and the frame post.
When the frame is ready, you can begin to bend the metal, which will give the structure a rounded shape.
Ideally, it is better to bend the metal after preheating it in a forge, but since the canopy is made by hand, few people have everything they need at home. Therefore, we clamp one edge of the sheet of metal in a vice and begin to bend it using a lever, which could well be a gas wrench. Since the roof slope will be on both sides, it is necessary to bend 2 blanks.
The curved elements are welded to the structure. This will be the basis for the roofing material.
If you are not using a welding machine professionally, then you should first practice on waste. The metal for the roof frame is thin, so it is easy to burn through. To avoid damaging the roof, make a few test welds on the waste. This way you can calculate the time required to weld the metal.
You can learn more about the canopy over the gate by watching this video:
Preparatory process
Let's consider one popular visor option - arched with polycarbonate. Using this option as an example, you can make canopies with your own hands from other materials. You are already sure what the shape of your visor will be, and you have prepared a sketch of the product, you can start manufacturing. For this you will need:
- square or rectangular steel pipe, size 15 * 15 mm or 20 * 20 mm;
- polycarbonate (to cover the visor)
- square or round metal rod (for making forged elements);
- welding electrodes;
- rivets (for fastening polycarbonate);
- primer coating for metal elements;
- paint (enamel PF - 115);
- metal cutting discs;
- anchor bolts.
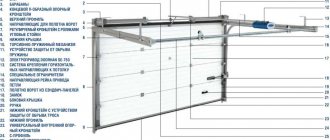
From the tools and equipment you need a welding machine, grinder, grinding wheels, hammer drill, screwdriver or rivet gun, tape measure, level and plumb line.
How to make a canopy over a gate yourself
The canopy over the gate both decorates and protects the entrance to the yard from precipitation.
How nice it is to welcome guests fully armed, despite changing weather conditions! A skillfully designed canopy prevents erosion of the foundation and supports. You can’t do without a canopy if the gate has a modern video surveillance device, an intercom, built into it. Thanks to the additional roof, you will not see snowdrifts near the gate. And there is no need to think about the option of quickly warming up the locking device at sub-zero temperatures outside the window. If we have already convinced you to install a canopy over the gate, we suggest saving money and doing it yourself. Moreover, step-by-step instructions for installing the required product were provided by experienced builders.
Improved teardrop-shaped hinges on support bearing
Today, such teardrop-shaped fittings have received another not unimportant feature. Now the sashes are also adjustable for mounting height. The hinge acquired this feature thanks to the use of the following adjustments in production:
- the lower half of the fittings, like the upper, is now hollow, but has a through hole;
- applying a thread in the hole of the lower part from below;
- the loop rod in the cavity of the lower part tightly rests against a screw screwed into the thread from below;
- An intermediate flange is used between the roller bearing and the hinge element.
Thanks to the latter feature, the panel is welded and adjusted in height or compensation for shrinkage during operating time is performed.
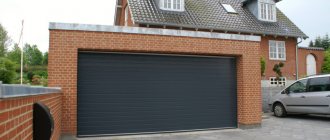
What is the best material to use to build awnings over a gate?
To ensure that the fence, gate and canopy are in harmony with each other and create a single ensemble, focus on the material from which the fence is made. If it is a durable tree, the winning option for visors is wood. Canopies made of metal look beautiful against the background of brickwork, concrete or a fence made from corrugated sheets. Forged parts add special aesthetics and uniqueness to the product.
Most owners of private houses opt for a polycarbonate canopy. It is flexible and attractive, easy to install. Thanks to the “airiness”, it is possible to make unusual and complex shapes of the visor from the material.
There are 2 types of popular polycarbonate:
- Cell phone. The panel is lined with cells from the inside, where there are longitudinal jumpers. The voids are characterized by good, highly insulating parameters and have low thermal conductivity. The jumpers act as stiffening ribs that hold the canopy over the gate.
- Monolithic. Characterized by a cast, solid sheet resembling glass. However, it is stronger and safer, and is lightweight. In general, the material can withstand temperatures from -40...+120 degrees. They are not affected by chemicals, rain and snow.
The service life of polycarbonate visors is 10 years or more.
Video description
See how it looks in this video:
loops with twisted wire are pressed against the block and the post and are also fixed in a vertical position;
the loops are welded to the supports at 2-3 points;
in the same way, they grab the second (upper) part of the hinges to the frame or leaf of the doors;
when the tacks have hardened, the gate is checked for opening - it should swing open 180 degrees without jamming or warping;
if everything is in order, the sashes are closed again, fixed and the hinges are welded onto the finishing surface with a continuous seam from the bottom up;
cooled seams are cleaned of scale with a hammer and sanded with a grinder to give a more aesthetic appearance
But this work must be done carefully so as not to damage the joint. After painting, the sanded joints will become almost invisible Source i.ytimg.com
After painting, the sanded joints will become almost invisibleSource i.ytimg.com
Do not open the gate until the welds have completely cooled and gained strength.
Metal gates can also be hung on other awnings, which are secured with screws or nuts. But the welded method is more reliable and durable, especially if you know how to properly weld hinges on gates and strictly follow all the requirements regarding their installation technology.
What you need for a polycarbonate visor
You can make a canopy at the gate over the gate with your own hands by choosing the following materials as the frame:
- Wooden base - assembling such a device is not difficult. The product is attached to self-tapping screws, no complicated tools are required. Among the disadvantages, experts note the fragility and the need to use antiseptic compounds.
- Aluminum – has a variety of capabilities. It is possible to organize shaped and forged frame elements from aluminum.
- Metal profile - includes welded parts.
- Forging.
Several distinctive features of welding hinges to corrugated sheets
Quite often, profiled sheets are used as a material for creating gates or fences. If a person needs to weld hinges to this material, then some factors should be taken into account. It is required to make lintels that must be parallel to the vertical part of the sash.
An important step in working on swing iron gates is welding the hinges
It is necessary to secure the jumpers in those places where the hinges are welded. They must divide the sash into 3 identical elements. Hinges must be welded to the jumpers. To cover the welding area and jumper, small pieces of corrugated sheeting can be screwed on top. It is better to give preference to thicker loops with a length of more than 1 m.
Step-by-step installation over the gate of an arched canopy
As an example, the frame is based on profile pipes. Self-installation of a visor consists of the following steps:
- Measure the parameters of the fence and create a drawing of the future canopy over the gate built into the fence. The sketch is displayed in the window of a special computer program and then printed on a sheet of paper. If you want the canopy to be equipped with protective functions, provide a width of the product from 120 to 150 cm. If the roof is pitched, the angle of inclination is usually set within 20-30 degrees.
- Strong pillars are made from brickwork. It should occupy 30-40 cm. A metal profile is installed in the center of the masonry. If steel supports are constructed for the gate, the frame base is welded to them or fixed with anchor bolts.
- Assemble the U-shaped frame. The frame is constructed from 3 pipes. On the sides the racks are fixed on supports.
- The sides of the entrance to the yard often suffer from precipitation and snow. Therefore, in order to protect yourself from dirt and snowdrifts, it is better to provide for a flight. The device can extend beyond the boundaries of the gate on one side or on both sides at once.
- After you have managed to fix the visor extension to the frame, weld the side spacer. The spacer is located between the canopy overhang and the support. This important detail will add rigidity to the structure and decorate the canopy.
- The arched element on which 2 arcs will be built is prepared by using thin rolled metal. The profile is easy to bend with a pipe bender. If this equipment is not available, you will have to do everything yourself.
- The pipe is welded to the extensions and additionally fixed with pipes. Areas with welding are cleaned.
- Install polycarbonate sheets. If their thickness does not exceed 8 mm, they can be easily cut with a knife. If the thickness is greater, use a fine-toothed circular saw.
- The polycarbonate is fastened to the frame using self-tapping screws and thermal washers. However, experts do not recommend removing the protective film in advance. The film will not allow the polycarbonate to be scratched.
- Prime the metal components of the visor with a primer mixture, and then paint the entire product. If desired, homemade canopies can be easily replaced with new devices. The visor turns out to be good quality and beautiful.
Step-by-step video instructions for arranging a canopy over the gate are presented below:
Hinges for swing gates. General information
Peculiarities
If we talk about the design features of the gate, do not forget even about the little things, and especially about the hinges. The main property of all hinges is the ability to turn even with the heaviest doors, while taking the bulk of the load so that the owner does not exert much effort. The second purpose of hinges is to prevent the gate from jamming and other similar problems. For this reason, the process of selecting and welding hinges requires attention.
For this reason, we characterize loops as:
- An element of force, the task of which is to take on the weight of the doors. For this reason, the hinges must be strong.
- Collapsible element. When completely disassembling the structure, make sure that the hinges cannot be removed when the gate is closed, which will prevent a burglar from entering the territory.
Features of using adjustable hinges for swing gates
The presence of holes for lubrication, since mobility depends on this, which will significantly decrease in the cold season.- The hinges determine the opening radius of the gate, so they should be welded correctly. Before welding, you should experiment and place the hinges in different places to make a drawing and make sure that opening the valves will not be problematic.
- Pay careful attention to the position of the hinges if they will be fixed inside the sash. It is important that it is easy to open and does not jam.
Varieties
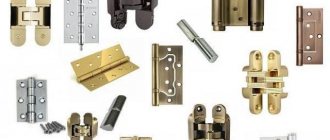
The standards prescribed in GOST divide hinges into:
- Cylindrical, with support bearing.
- Cylindrical, with reinforced structure.
- Hidden.
- Through.
- Three-section overhead.
Cylindrical, with support bearing
Cylindrical ones have a ball (bearing). This is an excellent choice for installation on standard, lightweight gates, but remember that the load on such hinges should not exceed 380 kg. This is the maximum permissible weight, but it may vary for different models, so the permissible weight should be checked when purchasing. Don't neglect these indicators. Such hinges for swing gates have a standard shape and look like a cylinder, on one part of which there is a pin. But hinges with support bearings also have a ball, which is located in the second part into which the pin is inserted.
The ball is needed for smooth operation with heavy weight. There is a plug on the other side of the cylinder, which can be removed and lubricated if necessary. Sometimes there are models with a bearing located in the middle, thanks to which we get additional sliding and smoothness. The downside is that it is difficult to lubricate, since you will need to lift the sash a little each time.
Cylindrical, with reinforced structure
Reinforced hinges can support up to 580 kg. They differ from the previous ones in appearance and in the presence of fastening plates. This makes it possible for the leaf, frame and supports to bear the weight of the gate evenly. Fastening is carried out by welding or screwing with self-tapping screws. They are made of metal that is an order of magnitude stronger, resulting in a higher weight capacity. The load-bearing capacity is also higher due to the thick walls and rod. Bearings in such hinges are always marked.
Hidden
Hinged mounts are suitable if you cannot weld or screw fasteners. To fix it, you will need to drill through the support column and use nuts and screws. But such loops have a low load-bearing capacity, the limit of which is 200 kg. Loops can be either right- or left-handed.
End-to-end
With through hinges for swing gates, the rod passes through. The simplest designs are divided into 3 main elements: a pin to connect the two halves and 2 loops. There are variations that are more complex when there may be more elements. To protect the pin from being removed, you can screw on a plug. If this is not possible, weld a special limiter.
Three-section overhead
Three-section fastenings are suitable for very heavy sashes.
Places of application
They are also suitable for fencing, and have a number of differences from previous models:
High level of wear resistance, reliability.- Eliminates the possibility of sagging of the canvas, as they take the entire load upon themselves.
- They close easily and silently.
- The most difficult type of all to crack.
Such hinges have stood the test of time, since this design was created many years ago. Now it is attractive due to its cute design, various shapes in the form of fancy figures. Look great with doors made of metal and wood.
Hidden hinges are not visible when the gate is closed, since they are located in the frame and are welded from the inside to the transverse part of the pillars. They are almost impossible to find, much less hack.
Arrow-shaped hinges can be hinged and are suitable for heavy structures. They are curly, regular and removable.
Adjustable hinges with bearings for swing gates can easily change the height of the sash. They are convenient to use if the support posts are to be displaced. The load available for such hinges is 20 kg maximum.
Distinctive features of loops in shape
- Hexagonal. They have similar features to square models, and they can be fixed between square and cylindrical, i.e. they are generalists.
- Cylindrical. They are distinguished by their high density when fixed to any gate. They have a round shape and are easy to scroll.
- Teardrop-shaped. Suitable for metal and wooden gates. Very stable and very durable, and also have an attractive design.
- Square. They have a specific shape, so during installation you will need to make a small indentation from the frame. They fit well and are attractive in appearance.
Why install a canopy on the gate
- First of all, the canopy over the gate performs a protective function. It extends the life of the material itself, the lock and hinges. The canopy roof reduces erosion of the foundation and support pillars by rain. A canopy is necessary if the gate is equipped with modern video surveillance equipment or an intercom.
- A canopy over the gate reduces the formation of snowdrifts near the exit.
- The visor will eliminate the need to come up with means to warm a lock in which the water has frozen after a sharp drop in temperature.
Basic truths
The process of installing hinges can be considered using the example of a metal gate. In order for it to properly perform its main functions, a number of conditions must be met when welding hinges:
- Provide a gap between the support post and the gate frame, which should be 3-5 mm.
- Provide a gap of several millimeters between the hinge and the gate frame by welding plates - metal plates of the required thickness - to the hinge. In total, for each loop you need two strips, the length of each of them is 2 mm less than the length of half.
- The optimal distance from the edge of the gate to the loop is 15-20 cm. If you need a middle loop, then it is located exactly in the middle between the outer loops.
First, the lower part of the fastener (with the pin) is welded to the post, then the upper part (with the groove) is welded to the sash.
A properly assembled structure should have the following parts:
- a loop;
- plate; wicket frame;
- support pillar;
- lower part (with pin);
- upper part (with groove).
This design consists of several elements.
All loops must be coaxial, that is, their centers must be on the same straight line. The alignment requirement is extremely important. It is on its compliance that it depends on how evenly the weight of the gate will be distributed on the fastenings and, accordingly, how long they will last.
To work, the master will need:
- welding machine;
- metal plate for making plates;
- Bulgarian;
- hammer;
- plumb line;
- oil for lubricating hinges;
- protective equipment - mask, gloves, overalls.
At the preparatory stage, you should mark the gate frame and sash, determining the places where the hinges will be welded. Clean them from dust, dirt, and rust. To do this, you can use a wire brush and solvents. Next, a similar treatment is performed on the surface of the hinges, and lubricant is applied to their inner part.
The traditional welding method involves the installation of plates at this stage, for which it is recommended:
- Take 2 identical plates of the required thickness and length. Place them so that there is a gap of 2-3 mm between them.
- Place the bottom part of the loop on them.
- Weld the loop to one of the plates (in this case, to the right one).
- Do the same for the top of the hinge and weld it to the left plate.
- Then you need to install the shutters in the working position and fix them.
- The plates with the lower part of each hinge are spot welded to the post, then the upper hinge elements are inserted into the lower parts and spot welded to the sash. After checking the alignment of the hinges and the operation of the gate, final welding is carried out along the contour of the plates.
Selecting material for the canopy over the gate
When deciding what to make a canopy over the gate from, you should focus on the material from which the fence and gate are built. For a wooden fence, a canopy with a frame made of wood is suitable. On fences made of brick, concrete or corrugated board, canopies with a metal frame look better. Forged canopies fit perfectly into almost any fence. The canopy roof can be made from the following materials:
- Polycarbonate;
- Corrugated sheets;
- Metal tiles;
- Plexiglas;
- PVC sheets;
- Galvanized metal;
- Slate;
- Bituminous shingles and other things.
Polycarbonate canopy design option
Where to buy or order
Currently, forged awnings are used quite widely . They are installed above swimming pools, above cars, above porches. And in the countryside, they perfectly protect firewood for barbecues, etc. from getting wet. The high demand for metal structures gives rise to a wide range of solutions offered by manufacturers.
Employees of the companies that are collected in the section “Where to buy or order forged awnings” provide customers with a wide range of products to choose from. Tags: wrought iron entrances, wrought iron carports, wrought iron canopies over the porch
Polycarbonate visors
A canopy over a polycarbonate gate will look appropriate with any hedge.
Due to its design features, this airy translucent material is perfect for arranging canopies of the most unusual and complex shapes.
Polycarbonate sheets are made from thermoplastic polymer beads and are widely recognized for their versatility and performance.
Construction of a polycarbonate canopy
- Cellular polycarbonate is a sheet, the inner layer of which is filled with cells with longitudinal jumpers. The voids give polycarbonate high sound-proofing properties and low thermal conductivity, and the bridges are additional stiffeners. Cellular polycarbonate has increased flexibility.
- Monolithic polycarbonate is a solid material, very similar to glass, only much safer, lighter and stronger. Monolithic polycarbonate also bends well and can be used for both curved and straight visors.
Types of forging
Forging can be done in two ways: cold and hot.
Cold
The metal is treated with special equipment without being exposed to high temperatures. Cold forging is much cheaper than hot forging, since the parts are repeated and do not have complex patterns. Doors made using this method are sold in stores. They are simply welded to the finished frame.
The most popular cold forging parts:
- Vine. Simulates a plant trunk.
- Plasticine. Rods without edges, imitation of hand molding.
- Baroque. Combined option. The details have from 4 to 8 curls, complemented by sharp peaks and petals.
- Vine shoot. Metal rods are intertwined in a spiral.
- Monogram. A figurative element resembling a dollar symbol.
- Twisted pipe. An imitation of a braided braid is performed.
- Basket. Lightweight inserts made of several thin rods intertwined with each other.
Even on simple wrought iron gates there are:
- cast clamps;
- twisted squares;
- bagels;
- peaks.
Equipment for cold forging is inexpensive. If you wish, you can rent it and learn how to work with metal.
Hot (artistic)
This is how they worked with iron blanks back in the old days. Artistic forging differs from cold forging in that metal must be forged at high temperatures. Hot raw materials are more flexible. It is easier to design different openwork compositions and patterns from it.
It is artistic forging that allows you to create compositions that have no analogues. In terms of service life, they are many times longer than those made using the cold method.
The customer can provide a sample or sketch from which the blacksmith will create a design.
Hot forging requires precision and experience from the master, since metal overexposed to fire loses strength, becomes brittle and is considered defective.
The only negative is the high price.
You will learn about the technological processes of forging methods in the article: “Forged fences for a private home.”
Advantages of polycarbonate
- Light weight. Reduces pressure on the supporting frame and greatly facilitates the construction of a canopy with your own hands;
- High rigidity. The polycarbonate structure is resistant to impacts, snow and wind loads;
- Flexibility. The sheets bend perfectly even in a cold state, allowing the construction of geometrically complex structures in the form of arches and tents;
- Transparency. A high degree of light transmission, more than 80%, the canopy does not obscure the area, it is externally weightless and attractive. Harmful ultraviolet radiation is thus delayed;
- Easy installation. The material is easy to process, and its installation can be easily done with your own hands;
- Practicality. Polycarbonate does not require maintenance: debris and dirt are easily removed with water and detergents, except for abrasive ones and those containing ammonia;
- Safety. The sheet of material does not shatter into dangerous fragments like glass;
- Resistance to external environmental factors.
The material can withstand a wide temperature range, from −40 to +120 degrees. The sheets are resistant to chemicals and are not afraid of rain and snow; - Wear resistance. Many manufacturers provide a warranty period of 10 years;
- Aesthetic appearance and a large selection of colors.
Return to contents
Application of internal loops
Despite some controversy among users regarding hidden garage fittings, internal hinges offer the following advantages:
- A higher level of security and burglary resistance, which is especially important if you store very expensive and valuable property in your garage.
- Long service life, which in practice is estimated at many decades.
- High resistance to loads, thanks to which doors weighing up to 400-500 kg each can be hung on hidden hinges without any significant consequences for the overall design.
If you value the security of your property, hidden hinges are a great investment and will give you peace of mind over your property.
Internal hinges for garage
Choosing the shape of the canopy over the gate
Polycarbonate canopies can be of any shape, depending on the preferences of the owner. If you plan to install a canopy over the gate with your own hands, you need to rely on your strength and, if you have insufficient experience, choose simple options.
- A single-pitch canopy over a gate is the simplest design, lightweight and practical. In case of heavy snow loads, an inclination angle of at least 20 degrees should be observed;
- Gable canopies are quite easy to install and well protect the space under the gate from slanting rain and snow;
- An arch-shaped canopy is a simple and quite popular canopy option;
Finishing and decoration of the canopy over the gate in the form of an arch
Welding without unpleasant consequences
To ensure successful welding of hinges to gates, follow these recommendations:
- do not work with a faulty welding machine;
- you can cook only after the paint has completely dried;
- clothing should not contain traces of grease, gasoline, oil or any other flammable liquids;
- Do not cook parts under pressure;
- Do not hang rags soaked in flammable liquids on the welding machine cylinder. This often caused a fire.
How to make a polycarbonate visor
A lightweight polycarbonate sheet is not picky about the choice of frame, and can be installed on any material.
- Wooden construction. Easy to assemble with your own hands. It is quickly installed on self-tapping screws and does not require complex tools. The disadvantages are the fragility and the need for treatment with antiseptics;
- Aluminum frame. The material is easy to process and install. Profiles and corners are easy to bend and cut. Aluminum does not need to be treated, painted or primed;
- Metal pipes. Can only be done using a welding machine;
The process of installing a canopy frame made of pipes
Having decided on the shape and frame for the canopy, you can proceed to assembling and installing the polycarbonate canopy. For clarity, we use an example of installing a simple arched canopy over a gate with forged parts and a frame made of profile pipes.
Installation of a polycarbonate canopy
- Measurements and drawing creation. The distance between the support posts to which the canopy structure will be attached is measured. A sketch with the required dimensions is drawn on a thick sheet of paper. In order to perform protective functions, the approximate width of the canopy should be 120–150 cm, and the angle of inclination for pitched roofs should be 20–30 degrees.
Scheme for installing a polycarbonate canopy
Option for attaching polycarbonate to the visor
All work on installing a canopy over the gate can be easily done with your own hands. As a result of these efforts, you can not only extend the life of the gate, but also create a nice design element for the fence.
With your own hands
If several criteria are met, it is possible to make a forged canopy with your own hands. To do this, the performer must first of all have the appropriate skills.
Depending on the complexity of the project being implemented, knowledge can be obtained independently by studying theoretical materials and demonstration videos. To acquire professional skills, you need to get an education in blacksmithing institutions. The skills acquired at a technical school or university will allow you not only to carry out projects for yourself and friends, but also to work as a blacksmith.
The master will also need blacksmith equipment and blacksmith tools. The final stage of preparation for the production process is the acquisition of consumables and decorative parts, the sale of which is carried out by a large number of enterprises.
Schemes and drawings
The valve diagram shows the location of all elements and their sizes. The consumption of materials and cost are indicated. The method of opening (inside or outside the yard) and the presence of automation are taken into account.
There are a huge number of options for decorative elements that are used in the production of forged sashes. Each owner makes a choice according to his own taste.
Curly sashes
Elements should be laid out on a flat surface. Over 2 meters is best. The building level is useful for obtaining a plane.
As you can see in the photo of the forged gate, a post is cut out of the profile on the top part. Place the part on the welding table, making sure the corner parts are equal.
Note! To obtain the correct shapes, it is necessary to pay attention to measuring the diagonal before starting welding work. Craftsmen use nylon thread for these purposes.
Photo gallery of design styles
Below are photos of forged fences decorated in different design directions.
Modern
Smooth lines predominate. There is an asymmetrical pattern.
A characteristic feature is plant and animal motifs in the form of flower stems, images of eagles, swans.
The elements are simple and airy.
Loft
This style is characterized by a minimum of details, which are created with little artistic roughness, without additional polishing and achieving ideal forms. Often these include straight lines, sharp angles and contrasting colors.
Baroque
This is a solemn and majestic style. The gates are decorated with many spirals, curls or various ornaments. The pattern starts from the center, smoothly moving to the edges. The rods intersect each other, forming curls. The elements are created as airy. An excellent option for combining black, brown and gold colors.
Chalet
Chalet-style forging symbolizes rural culture, so the elements are selected as simple and noble as possible. The main thing is not to overdo it with quantity.
High tech
Modern design direction, restraint of lines and practicality of every detail.
Forging is combined with innovative materials (polymers, metal alloys). Forms are strict and businesslike. No pomposity or airiness. lack of plant and other ornaments.
Provence
Light romantic style. Painting is done in delicate light shades. Small floral motifs and plant stems that run through the entire door leaf are welcome here.
Gothic
Decoration is done in black and tones close to it. This is the geometry of the patterns. All details rush upward.
Typical Gothic elements are thorns, sharp tips, peaks, trefoils.
If the owners want their gate to be different from its neighbors, memorable and impressive with its originality, then choosing forged structures will be the right decision. With certain skills and tools, you can make simple malleable elements yourself. If you do not have such skills, then it is better to order the gate from specialists.