Planks can be used to make practical and beautiful flooring. Wooden floors are coming back into fashion. This is due to a change in guidelines in the decoration of residential premises towards environmental friendliness and safety. And wood, as we know, fully satisfies these requirements. At the same time, the plank floor has an attractive appearance. And, thanks to a wide selection of lumber in color, pattern and texture, this coating fits the design of almost any interior. What characteristics should be taken into account when choosing a floor board in order to get a beautiful and durable floor that will last for several decades - read below.
How to choose the thickness and width of floor boards
There are criteria by which the choice is made. Need to consider:
- Place of use of the products;
- Type of coating (rough or finishing);
- Load on materials.
The thickness is selected depending on the purpose of the room. It is important to follow some criteria and take into account what the wear and tear will be, as well as the prospects for future repairs. There are a number of factors that are worth paying attention to:
- With a thickness of 10 millimeters, one grinding is performed with removal of the top layer up to 2 millimeters;
- The thickness of 12 millimeters will allow the board to be scraped and used as a flooring on top of a warm floor.
- For houses, the most commonly used board thickness is 15 millimeters. It will have locking connections, as well as the ability to carry out multiple repairs.
- Parquet boards up to 2 centimeters thick are laid in offices or institutions with high traffic. They are durable and can withstand variable loads.
- The greatest thickness is 2.2 cm. They are used only in those rooms where there is a constant load from human traffic.
Floor board sizes
For floorboards, the dimensions are selected taking into account the fact that all joints should be minimal, and there should be no waste left. Manufacturers offer solutions for board lengths from 2 to 6 meters.
When calculating the thickness of the boards, the distance between the logs and the load on the material are taken into account. The higher it is, the thicker the material chosen. If the distance is up to 700 millimeters, then the thickness of the floor board can be in the range of 35 to 40 millimeters, and if the distance is greater, then from 40 to 50 millimeters.
The width should be selected depending on how you want to transform the premises. But it is worth considering that any canvas is subject to greater shrinkage, and this can significantly affect the future floor covering. Manufacturers offer widths from 85 to 140 millimeters.
We invite you to familiarize yourself with our range of materials
Floorboard - Extra grade
Wood Larch Width 120 mm Thickness 27 mm Length 3 m Qty.
in pack 4 things. 3600 rub/m2Floorboard – Prima grade
Wood Larch Width 120 mm Thickness 27 mm Length 3 m Qty.
in pack 4 things. 3200 rub/m2
Which board is best for the floor?
One of the pressing questions when building a house or renovating has always been and will be which board is best to use in the house for laying the floor? If you take this process seriously, you can achieve serious savings while choosing quality products.
Unedged sheets are used for the subfloor. They have a low price, but the quality leaves much to be desired. They are not suitable as a topcoat. You need to lay tiles, laminate or other material on the wood. At the same time, such coniferous boards are used everywhere as rough boards.
Deciduous wood is suitable for a bathhouse. They withstand temperature changes and high humidity. But you need to pre-process the material.
Different types of wood are used in houses and apartments depending on the financial capabilities of the buyer. Oak, cedar and larch are the most preferred. It all depends. What kind of design would you like to create in the space? A tongue and groove board would be the most preferable option. It is smooth and durable. Ventilation grooves on the inside allow the material to “breathe.”
Larch and oak are used on open verandas. They have a sufficient degree of strength and do not rot. It is better to use a corrugated board, which will not allow moisture to accumulate. It will flow down special grooves. In winter, a person will not slide on such a board.
For each specific case, a different material is selected to be used. Everything depends on many factors, so the approach must be individual.
From the array
This type is connected to each other using a locking connection. There is a protrusion on one side and a groove on the other. This allows for stronger connections. The preferred shape for ridges or ridges is a cone, as it will be able to hold boards up to 5-6 meters in size.
In some cases, for installation, boards are cut into lengths of 3 meters to make the connection. Such a solid board can be suitable for a subfloor, so that later, for example, you can lay linoleum on it. For a bath it can also be used as a finishing product.
Glued board
This version of products is obtained by pressing and gluing several boards. The fibers are arranged in such a way as to maintain the geometry of the material. The service life is quite long. The material does not dry out and remains smooth for many years. Laminated wood is more expensive.
In this case, the laying of logs can be carried out in increments of 400 millimeters.
Terrace board
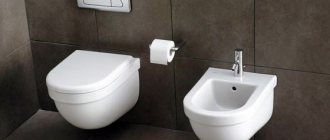
Its upper surface is wavy. Used as a material for rooms where the floor is wet. It could be a bathhouse. Or a bathroom with a bath and a swimming pool. The advantage of the material is that the foot will not slip on its textured surface.
This way you can understand which board to choose in each specific case. It all depends on its purpose. You should not skimp when choosing, as it is better for the wood to last for decades without the need to replace it.
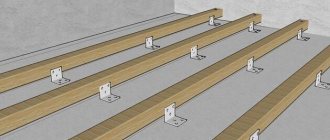
Installation of plank floors along joists
This is the most common method of installing a plank covering, as it is quite simple to implement, and at the same time makes it possible to insulate the base. Moreover, almost any thermal insulation materials can be used as insulation.
For example, if floors are installed on the ground (on the ground floor), and there are no particularly strict restrictions on the thickness of thermal insulation, then it is best to insulate them with fine or medium-fraction expanded clay. This material is not only durable, but it is also avoided by various rodents who happily live in both mineral wool and expanded polystyrene. But this is in the context of today’s article – in particular.
So, work on arranging a wooden floor using joists installed on a concrete base is carried out in this order.
| Illustration | Brief description of the operations performed |
| Before carrying out installation work, the cleaned surface of the base is checked for evenness. At the same time, differences and the need to level the floor plane using logs are determined. | |
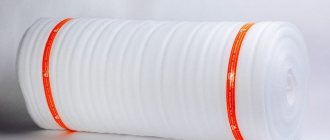
| Next comes the stage of waterproofing the base. In this case, dense polyethylene is used as a moisture-proof coating. The canvases are laid with an overlap of no less than 150 mm. The overlap lines are taped with moisture-resistant tape. The film is lifted onto the walls by approximately 150 mm, so that it rises above the joists and boarding by 50 mm. | |
| The next step is to mark the placement of joists on the walls. The optimal distance between the logs is 500 mm; if a thick board of 25÷30 mm is chosen for the flooring, then this distance can be increased to a maximum of 700 mm. At the same time, it should be taken into account that they should be placed approximately 100 mm away from the walls along which the logs will be installed. | |
| Next, the first log is laid on the base - this is a beam with a cross-section of 65x40 mm. It should be on the highest part of the floor. On the wall, the final height of the floor is measured and marked by level, taking into account its leveling and the thickness of the board. In this case, the height of the floor from the concrete floor should be 120 mm. | |
| The master made three marks on the wall - the gap between the beam and the wall (an arrow-shaped icon resting on a vertical line, somewhat reminiscent of the letter “K”), the height to which the log beam will be raised and the final height of the boardwalk from the concrete covering. | |
| To level and raise the logs to the desired height, adjusting wedges are placed under the beam. In this case, plastic wedges were chosen, which, when brought together in pairs, make it possible to very accurately set the height of the lining. Wedges are laid along the entire length of the beam, in increments of about 200÷300 mm. When raising the beam to the required height, you need to ensure that the waterproofing film remains raised on the wall to the height of the future coating | |
| After placing the timber on the wedges, be sure to check the horizontal installation using a building level. After the beam is installed, it is necessary to determine the exact height of its installation and transfer this parameter to the opposite side of the wall. This process can be carried out using a water level or a laser level. | |
| After markings have been made on the opposite wall, a second joist is placed along this wall and raised using wedge pads to the desired height. | |
| The next step is to use self-tapping screws to fix the relative position of the lags and the placed wedges. | |
| A level is installed on the logs laid along opposite walls. If there is not enough length, then the level is set on the rule, or even cords are pulled in 2-3 places, which will set the plane. | |
| The remaining logs are installed between the already installed ones. Also, with the help of wedge linings, the upper edge of the beam is raised to the laid level or a tensioned cord. | |
| When the logs are perfectly level, they are also attached to the floor surface through wedges. The sheathing for the flooring is ready. | |
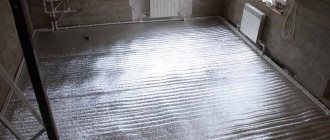
| The next step is to lay the selected insulation. In this example, mineral wool is used. Not shown here, but still, between the insulation and the boardwalk, a layer of waterproofing would be useful. Firstly, water may be accidentally spilled on the floor. And secondly, you should protect yourself from the penetration of the finest dust from fragments of mineral wool fibers into the premises. | |
| The first board of the plank covering is laid with a distance of 10 mm from the wall. It is very important to level the starting board very well, since the quality of the entire flooring will depend on this | |
| It is necessary to retreat 10 mm from both walls to the edge of the board. This gap is to compensate for the “movements” of the coating when temperature or humidity changes, so that deformation does not occur. | |
| When the board is leveled, it should be fixed, first to the middle joist. The self-tapping screw is screwed into the wall edge of the board. | |
| Then, the position of the board is controlled again, after which it is fixed to the adjacent middle lag, and then to the others. | |
| Along the outer edge, the fixed board is secured to the joists with self-tapping screws, which are screwed at an angle of 45 degrees through the groove. The heads of the screws should be deepened into the wood so that they do not interfere with the installation of the locking tenon of the next board. | |
| Next, a second board is installed in the groove of the first board, which should be pressed tightly against the first board, that is, there should be no gap left between them. In order to achieve this, the second board should be tapped to the first, and in order not to damage the groove of the second board with a hammer, the tamping should be done through a wooden beam or other piece of board. | |
| The second board is tapped along its entire length. When the gap is closed, the second board is also fixed from the outside with self-tapping screws to each of the joists. | |
| In this way, the entire plank covering is installed up to the opposite wall. As the insulation board is covered, the next row of insulation blocks is laid between the joists. | |
| If at the end of the covering the whole board does not fit, then it should be made narrower. The cut from it is made from the side that will be turned towards the wall. To accurately determine the desired width, you will need two boards. One of them is laid on the last board of the covering, aligned with it, and another board is installed on top of it, which should rest against the wall. Then a line is drawn along it, on the bottom board, and the cut will be made along this marking. | |
| The edge cut should be made at a slight angle, as shown in the illustration. Therefore, you should immediately outline the direction of the cut. This creates a ventilation gap necessary for long-term operation of the coating. | |
| Cutting the board can be done using a jigsaw, or, if possible, a circular saw. Both of these tools allow cutting at the desired angle. | |
| The finished board should fit freely into the gap between the wall and the penultimate board. | |
| To pull the last board to the rest of the covering, a special tool is used - a hammer. It is installed in the gap between the last board and the wall with one of its sides, made in the form of a corner, and the other side of the tool is struck with a hammer. The tamping is carried out carefully, starting from the beginning of the board, then in increments of approximately 500 mm. | |
| After the board is lined, it should be fixed along the edge to the joists using vertical screws. | |
| Next, you can try on the baseboard - it should completely cover the gap between the wall and the covering. The plinth is attached only after the floors are brought to perfect condition. | |
| If the plank covering still has gaps at the joints, or cracks directly in the boards themselves, then the floors should be puttied. You can make your own putty from very fine sawdust and wood varnish. The consistency of the mass should resemble medium thick porridge. The putty is applied using a wide rubber spatula, with which it is literally rubbed into the gaps. | |
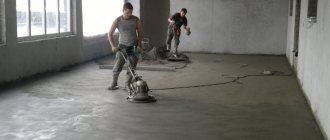
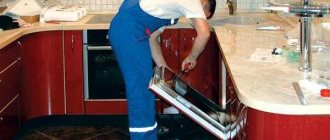
| If a high-quality board was used for the flooring, then it will be enough to sand it well using a hand sander. However, in some cases it is necessary to involve a scraping machine, which will not only scrape the board covering, but also grind it. | |
| After sanding, the floors need to be vacuumed thoroughly so that even fine dust does not remain on them. Next comes the application of varnish or paint. The decorative coating is applied in three or even four layers, each of which must dry well before applying the next. The better the varnish or paint is applied, the higher the abrasion resistance of the coating will be. | |
| The final stage is framing the covering with plinths. It can only be attached to the wall, that is, it should not limit the thermal expansion of the coating. First, a hole is drilled in the baseboard so that the head of the screw is recessed into the wood by 2÷2.5 mm. The remaining space above the cap is filled with putty, which is sanded after drying. Well, then the baseboard is coated with varnish (paint) using a soft brush. |
* * * * * * *
We hope that our article will be useful both in terms of choosing a material for a plank floor, and as instructions for self-installation of the covering.
And one more thing - a video is offered in which the masters not only share the secrets of the technology, but also warn about possible common mistakes.
Wood types for floors
Before purchasing, you need to understand which board to choose depending on its type. It is important to study the properties of the material, operating conditions and other characteristics. Only after this, high-quality flooring boards are purchased:
- Coniferous species. They are most often used in houses and apartments, as they have the best price-quality ratio. Pine and spruce have a lot of resins that prevent the wood from deteriorating under the influence of an unfavorable environment. Mold and mildew do not form on coniferous trees. Vapor permeability allows you to maintain an optimal level of humidity in any room.
- Aspen and alder. The service life is low, since the strength does not withstand high loads. Positive effects on health have been noted. They are used in homes in children's rooms, as well as in baths and saunas. Alder and aspen are not installed in areas with high traffic.
- Linden. Before installation you need to treat with an antiseptic. Linden does not have high strength and is prone to the formation of fungus and mold. The cost is low, but preparation is required before installation work.
- Cedar. The wood has a beautiful structure. It withstands high loads, as well as changes in humidity. Contains essential oils. They have a beneficial effect on health and maintain the indoor microclimate. Yes, the cost of cedar is high, but due to its qualities it pays off quickly.
- Siberian larch. In total, manufacturers offer 12 shades. Strength and durability makes the material preferable. Mold does not form on larch, it is resistant to moisture and does not rot. It emits a pleasant aroma, which also has antiseptic properties. A healthy climate will be maintained in the house.
- Oak. This type of wood used for flooring material is durable and also has a long service life. Oak is moisture resistant, and it is not susceptible to rotting or fungus. Thermal and sound insulation of such wood has good performance. Oak is expensive, but the price pays off over long-term use.
Quality classes of floor boards
All materials are divided from Extra class to class C.
- Extra. Such products should not have any defects or knots. The entire surface is flat.
- A. There are no cores, chips, cracks or fallen knots on the surface. Small blue spots, 2 small cracks, resin and knots at a distance of 150 centimeters are allowed.
- B. 4 knots at a distance of 150 centimeters are allowed, there may be 2 cracks or minor damage on the surface.
- C. Low class. The surface may have cracks, contrasting stripes, mechanical damage and 2 knots.
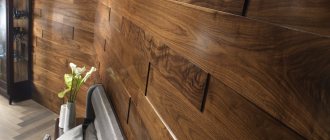
Technical board: main advantages
The two-layer technical board for floor finishing is characterized by high wear resistance and durability. Such performance indicators are achieved due to the fact that the proverb consists of two layers: a top wood layer and a bottom layer, represented by plywood. The wood layer is most often made from durable hardwood (oak, ash, walnut).
In addition, the main advantages of the technical board include:
- This coating does not require maintaining special temperature conditions and a certain level of humidity.
- Laminated, two-layer timber is less susceptible to deformation than completely natural wood.
- A technical board floor can be repeatedly sanded, polished and varnished.
- Laying technical boards does not require the organization of plywood flooring or underlay.
- Higher level of sound insulation than when using a regular board.
Related article: How to choose an interesting interior for a room
Technical boards are great for warehouses
Caring for engineered (technical) boards is quite simple: most models have a smooth coating without pores (which easily get clogged with dirt and dust). The disadvantages of the coating include its high cost, compared to an ordinary wooden board. But repairs to such a floor will not be needed soon.
How to calculate quantity
All materials are sold in cubes. This means that you need to calculate the amount of material that will be suitable for your home per cubic meter. The first thing to do is calculate the volume of one board. To do this, you need to multiply the dimensions of the lumber among themselves: width by thickness and length.
For example, if the size 25 x 100 x 6000 mm is used. All this data is converted into meters: 0.025 m, 0.1 m and 6 m. The volume will be as follows: 0.025 * 0.1 * 6 = 0.015 cubic meters. m.
In one cubic meter of material there will be: 0.015 cubic meters - 47.61 pieces.
For any shipment, the number of boards is rounded down. When purchasing, it is better to buy 15-30 percent more material, as some will be rejected. It is better to initially stock up on a large quantity of products, since wood from another batch may not be suitable.
Shipping and payment
We deliver lumber using our own vehicles throughout Moscow and the region (the vehicle is selected based on the volume and maximum length of the purchased products).
Pickup from our warehouses and delivery to other regions by transport companies is possible. Payment Methods:
- Cash payment.
- Cashless payment (invoice with VAT).
The materials necessary for loading lumber and preserving their presentation are also provided free of charge - spacers, bars, packing tape, etc.
Road map
1 You leave a request for consultation with a specialist Or call us at +7 (495) 765-26-38
2 You receive a calculation of the cost of the order, we prepare the documents
3 We reserve goods in the warehouse
4 Choose delivery or pickup from our warehouses
5 Decide on the payment method
6 You receive high-quality lumber on time
Laying floorboards
The entire installation process is divided into 3 stages:
- Installation of logs;
- Waterproofing and insulation.
- Installation of the finishing coating.
During the installation process, ventilation holes must also be provided. First, decide on the distance between the joists. A distance of 600 millimeters is considered optimal. They need to be laid across the length of the boards. It is better to initially do all the work according to the level, since in the next stages everything will be much easier to do.
The second stage involves creating additional thermal insulation and protection from moisture. At this time, additional processing of the material with special means is carried out.
The most critical step is the process of installing wood. Laying should begin with a small gap of 10 millimeters from the wall. Natural wood has plasticity and mobility. Using a tongue and groove, the first board is placed against the wall and secured with self-tapping screws. The initial reliability depends on the quality of the tongue and groove fastening. Next, you need to apply one board to another and insert it into special phases. If you need to lay the material in two rows, then it is better to make a slight offset between them. This will provide greater strength.
The plinth closes the gap between the wall and the board. This technical hole must be left. After this, we can assume that the coating is installed. Tiles or any other material are laid on it. The design of the finish depends solely on the preferences of the individual.
If you follow the technology and lay the floorboard in a wooden house, it will last for decades without the need for repairs. The thickness of the tongue and groove board should be calculated individually, but during installation you should adhere to certain rules.
How to care for wood flooring
Of course, a wooden floor most often has to be protected from water, which is somehow absorbed into the wood. Because of this, it is recommended to use only engineered or solid wood in the kitchen or hallway. Traces formed as a result of water ingress can be removed by restoration.
Also, you should not drop anything heavy on a wooden floor, and if this does happen, then there is simple advice: treat small dents and scratches on the wood calmly. A wooden board acquires its truly natural appearance during use. True, not everyone shares this opinion, so whether to put a wooden floor in your apartment or not is up to you to decide.
Manufacturers recommend treating wood with oil, since in case of damage it will be enough to restore only the damaged fragment of the floor. If you cover the board with varnish, then during restoration you will have to remove all the varnish and re-treat the entire surface of the floor - for a uniform coating.
Photos: cover, 3 – Katya Zaklivenets, 1 – Olya Shangina, 2 – Yasya Vogelgardt
Laying on joists
In addition, it is much easier to attach boards to the joists. There are two main ways to do this. In the first case, ordinary screws are used. In the second (if the floor is laid from tongue-and-groove boards), pneumatic nails are used. In the first case, you have to additionally hide screws or nails so that they are not visible on the floor surface; in the second case, the connected structures themselves hide each fastener.
If it is laid on top of lags that are uneven relative to each other, it will sag, and the coating will begin to creak or even break. Before this installation method, you should figure out how to properly lay plywood sheets in order to prevent the floor surface from warping in the future.
How many boards in one cubic meter
There are no strict standards in this industry, nor is there a clear distinction between varieties. Some manufacturers produce only two varieties, others may have five or six. You have to navigate on the spot.
There is only a more or less established standard for length: 6 meters. But many sawmills make three- and two-meter boards. Moreover, a cubic meter of three-meter ones will cost less than six-meter ones. So if you don’t need a long board, look for a suitable size: it will be cheaper.
For example, we will lay a 40*150 mm board. Convert millimeters to meters:
We will take a standard length of 6 m. The total will be 0.04 m * 0.15 m * 6 m = 0.036 m 3. One board is 0.036 cubic meters. Now we find how many such boards there will be in one cube (we divide one by 0.036), it turns out 27.7 pieces, but 27 pieces will be shipped.
Now about the volume of purchases. Having calculated how many boards you will need, take at least 10-15% (or preferably 30%) with a margin. Firstly, defects always occur, and secondly, most likely in a year or two the floor will have to be rebuilt - cracks will appear, some boards will be unscrewed with a “propeller”. And then you will need to change or add boards. If there is nothing left, then those purchased from another batch are unlikely to become normal. There will definitely be problems: either the thickness will not fit, or there will be problems with the tongue and groove. In general, a number of pieces should be in stock for a couple of years.
First of all, you need to decide on the humidity. The best option for baths is an average humidity of about 20-25%. If you take a board with natural humidity, it will move when drying; there will be a lot of “skis” and “propellers”. They can then only be used in the construction of fences. If you take overdried - chamber drying - in conditions of high humidity in the bath, it will begin to swell, the floor will warp and rise. So the best option is medium humidity.
When purchasing tongue and groove boards, you also need to pay attention to the geometry and dimensions of the tongue and groove. In order for everything to connect without problems, the groove is made a little deeper than the height of the ridge. Then everything fits together easily. On an incorrectly configured machine, the opposite often happens. Then, no matter how hard you try, you won’t be able to make a floor without cracks. You will have to either change the boards (if possible) or remove part of the tenon.
You also need to check how much the boards sagged during drying. They are stacked, arranged in bars. Sometimes they become uneven. Then when laying them together it will be problematic.
↑ Quality classes of floor lumber
The following types of wood are used for arranging the floor surface:
- Extra class. Wood of this class is mainly used for finishing flooring. There are no defects or knots on the canvas, the surface is smooth and has a uniform shade.
- Class A. There are no cores, cracks or chips on the surface of the material. Resin and knots can be located at a distance of 1.5 meters from each other. Used for finishing flooring.
- Class B. Acceptable at a distance of 1.5 meters are 4 knots, minor damage and 2 non-through cracks. Used as finishing floor coverings.
- Class C is a low class of wood. Most often used as a rough coating. The canvases have visible defects: cracks, chips, knots.