The most expensive and very important stage in any project is the renovation of the bathroom. This is a room that everyone uses. At the same time, the bathroom must have not only all the necessary technical elements (plumbing, furniture, plumbing, household appliances), but also the durability of the finishing materials. In this article, we will tell you step by step the order in which bathroom renovations are usually carried out. And the sequence is very important - because... Sometimes you will have to take into account many little things in advance for the upcoming work.
Is it possible to do everything yourself?
The first question that needs to be resolved before renovating a bathroom is who exactly will do the renovation work? Even those who are used to handling any home renovation on their own feel a little hesitant when it comes to the bathroom.
However, it is quite possible to renovate a bathroom yourself. Even the most difficult stages (for example, laying tiles) do not require the use of specialized construction equipment - they can be dealt with using ordinary tools. All you need is to carefully study the still unfamiliar points, read the instructions and video tutorials and follow all the important rules in the process.
What are the benefits of DIY repairs?
- First of all, you save - you only have to pay for building materials, whereas when ordering repairs from a team, often most of the budget goes to paying workers.
- In addition, the renovation takes place at a time convenient for you - you can update the entire bathroom in one or two weeks or carry out the work in stages.
- And finally, along with the inconveniences associated with the renovation itself, you also do not have to put up with the constant presence of strangers in the apartment.
Repair crew prices
In order to finally understand whether it is profitable to do the repairs yourself, let’s take a look at the prices of construction teams. On average, the cost of renovating a small bathroom (4-6 sq.m.) starts from 35 – 40 thousand rubles. At first glance, this may not seem like much, especially considering that we are talking about turnkey finishing.
In fact, the situation looks somewhat more complicated. What does minimum cost repair mean? This means savings on literally everything - on materials for finishing and cladding, on plumbing, on fittings, on the design of the room. By deciding to entrust the renovation to a professional team, you will save yourself the hassle - but most likely, you will not get the bathroom you dreamed of. In addition, cheap materials tend to deteriorate very quickly - it is likely that in a couple of years you will have to change the plumbing or renovate the room again.
How much will a higher level renovation cost? Prices start at 40 thousand and go up, exceeding 100 thousand rubles for a bathroom of 4-6 square meters. The better the building materials and the quality of the plumbing, the more unusual and thoughtful the design of the room - the higher the price rises in accordance with the volume of work. The cost of a truly high-quality repair will be 2–3 times higher than the minimum level.
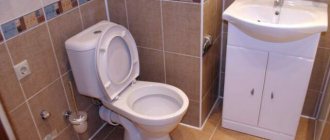
Toilet
For this reason, in fact, the toilet was created. When choosing this device, you should first of all think: should you install a wall-hung toilet?
The faucet, washbasin spout and shower diffuser built into the wall are nothing more than a tribute to fashion. Their technical and economic feasibility, to put it mildly, is very, very doubtful: the slightest malfunction is tantamount to a breakthrough, hence the exorbitant high cost of the devices and their reliability by several times less. In some countries, building codes already explicitly prohibit them.
But the toilet is a completely different matter. The floor around its pedestal, and especially the nook under the outlet, is difficult to clean, and if you take a smear there and submit it for analysis to the SES... the faint of heart are asked to refrain from viewing.
Under the wall-hung toilet there is a flat, easy-to-clean floor. You can’t make a niche in the wall for it in our typical house - the wall thickness is not enough - but in any toilet the hanging bracket and flush tank are very easily covered with a plumbing cabinet, which does not allow dirt to accumulate in the nooks and crannies. And repairing a small toilet in this case simultaneously solves another important sanitary and hygienic problem, which will be discussed in its place.
Sequence of work
In order to carry out a quality bathroom renovation, you need to carefully study the details of each stage. Now we will briefly describe the sequence of these stages, note the key points and talk about the finishing options that are most popular.
In what order are repairs carried out?
- A detailed project plan is drawn up. The design of the bathroom is being developed, both the main points and minor details are thought through. In accordance with the drawn up project, the repair budget is planned - specific materials are selected in the required quantity.
- Materials are purchased. This is one of the most important stages - here you need to carefully compare offers from different manufacturers and prices, study reviews of materials, and understand what the difference between them is.
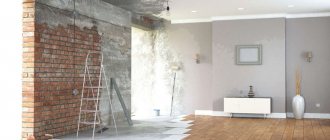
- The repair itself begins with the floor . The old covering is removed, a new screed is poured, waterproofing is applied, on top of which a new porcelain stoneware floor is laid.
- After installing the floor, it is recommended to do electrical wiring - in order to replace it, you need access to the rough walls. After installing the wiring, you can proceed directly to wall cladding. Also, if the water supply and sewerage pipes are planned to be hidden, at this stage they need to be “walled up” in the walls.
- Then they move on to the ceiling and ventilation. Since the bathroom is a room with high humidity, it is fundamentally important not only to install a new ventilation grille, but also to make sure that the ventilation hole has sufficient draft.
- The penultimate stage is the installation of water and sewer pipes - if they pass over the walls.
- And finally, the very last step is to install fresh fixtures and other equipment in the updated bathroom.
See also: Do-it-yourself slatted ceiling installation
Let's look at each point in a little more detail.
Plumbing installation
When all the dirty finishing work is completed, you can begin the final stage of toilet renovation. You should start by installing the toilet.
Toilet installation steps
- Having installed the toilet on the floor, they try it on and use a marker to mark its location and mounting points.
- We move the toilet to the side and drill holes for the dowels that secure it to the floor.
- We screw the toilet and cover the bolt heads with decorative caps.
- We connect the toilet pipe with a corrugated pipe to the pipe on the riser. We seal with special rings with cuffs to make the connection airtight.
- We install the flush tank on a special platform on top or attach it to the wall. We assemble the insides of the tank - float, valve, flush lever and connect it to the cold water supply pipe according to the instructions.
If the size of the room or a combined bathroom allows, then it is necessary to install a sink and faucet. For ease of installation, it is better to assemble and connect the mixer before attaching the sink to the wall. Having attached the washbasin to the wall using dowels or anchors, we proceed to connect the flexible hoses to the pre-installed threaded fittings. Lastly, we install a siphon and a drain into the sewer system with a rubber seal.
After installation is completed, the entire system must be flushed with plenty of water. All identified leaks are repaired. Now you can cover the communications and drain with a decorative pedestal or cabinet. The joints between the floor and the toilet can be filled with silicone sealant.
If you have minimal tools and finishing skills, you can easily realize your creative ideas for renovating a toilet. You can do this yourself - quickly and inexpensively.
Plan and design project
The renovation begins with drawing up a detailed plan and design project. This is the most important point from which all other stages build.
At the moment, there are many design styles that allow you to completely transform your bathroom. Classic and baroque, minimalism and hi-tech, modern and Provence - which of these directions should you choose for your bathroom?
It depends on your personal preferences - and also on the size of the room. If you are the owner of a private house or spacious modern apartment, then your flight of imagination will be practically unlimited. But if you only have a small bathroom of standard sizes at your disposal, then it will be useful to remember a few rules.
- Light colors in the interior visually make the space more voluminous, while dark colors noticeably narrow it. Accordingly, rich, deep shades are not suitable for a small bathroom - it is better to use beige, white, light blue and light green tones.
- For spacious bathrooms, it is permissible to choose plumbing fixtures of any size and shape; for small ones, it is better to prefer rounded, smooth outlines and smoothed corners. Having dismantled the old bathtub, it is worth carefully examining modern shower cabins - they are much more compact, and it is likely that you will find them convenient enough to install instead of a bathtub.
- If we are talking about a small bathroom, you should think about whether it is necessary to install a washing machine in it, or is it better to move it to the kitchen or hallway? If the equipment can only be placed in the bathroom, make careful calculations and try to compensate for the lack of space by choosing the right plumbing fixtures.
Toilet with washbasin in Khrushchev
Look again at the drawing of the bathroom cabinet. Yes, there is a small washstand there, and you can wash your hands right there. But where can I get one? In railway cars they even cost more... Do it yourself:
- The spout is ready-made, like a goose, with as little carry-out as possible.
- The sink is a plastic, reusable deep bowl with a narrow bottom and an upper edge bent down. The choice is rich, the prices are inexpensive.
- Water supply is via metal-plastic pipes, like in a kitchen sink from tees on the pipes.
- The outlet is a 32 mm corrugated tee on the outlet from the bathtub to the kitchen (that’s what it’s for!).
- Siphon - due to the bending of the corrugation.
An alternative is a miniature sink. But you'll have to look for it.
How do you get a shell from a bowl? First, in the center of the bottom of the bowl we drill 4 holes of 4 mm each, inscribed in a circle with a diameter of 30 mm; this will be the grid. Then we cut out a 12-18 mm round boss from plywood: the outer diameter is the diameter of the bottom of the bowl, excluding the collar; internal – 35 mm. We impregnate the boss with PVA emulsion. Then we glue the boss with AQUARIUM silicone glue to the bottom of the bowl and use the same silicone to glue the corrugation into it.
Now all that remains is to cut out holes for the bowl in the shelf of the cabinet using a compass drill for stone (the cabinet is already tiled) with a diameter along the upper diameter of the bowl; then it will lie with its bent edge on the shelf and under the spout. The main thing is not to make a mistake with the markings: the water should flow slightly away from the very center of the sink-bowl so as not to splash on the mesh.
And finally, we fix the mini-sink with silicone, now cheaper construction material. We insert the corrugation into the sewer pipe and seal it with the same silicone. In the closet, we put a fastening nut on the spout handles, take them out, attach them to the spout fittings, insert it into place, secure it with the nut - the mini washstand is ready.
Note:
Do not glue the boss with construction silicone or superglue (cyanoacrylate glue). The first one is not strong enough, and the joint on the second one will fall apart in six months or a year.
Bottom line
Self-repair of a toilet can be done by an average home craftsman. In addition to significant money savings, this will give you experience with which you can take on much more serious bathroom renovations.
Purchase of materials
What materials should you choose for bathroom renovations, and how to purchase them?
Of course, you always want to save on tiles, pipes, screed, adhesives and other aspects. However, it must be remembered that the savings must be reasonable. If you are quite limited by budget, then it is better to look for building materials in the middle price category. At the same time, you don’t need to get carried away with too cheap options - by buying the most inexpensive materials, you save on the quality of your own repairs. Try to choose trusted manufacturers.
In what quantities should I purchase materials for repairs? It is recommended to purchase tiles, screed and everything else with a small margin. Even experienced builders make mistakes in their work, and some material is wasted. Most likely, you cannot avoid this either.
If you buy materials in exactly the quantity that is needed according to calculations, you can end up in an unpleasant situation - for example, you find that there are not enough tiles, and the store where you bought it no longer sells material of the same color and texture. As a rule, materials are purchased with approximately a ten percent reserve - this allows you to reliably insure yourself.
Redecorating
Cosmetic renovation of a toilet assumes that the matter is limited to finishing and painting, and all plumbing fixtures remain in place. The finishing of the walls and ceiling in this case does not differ from that already described, but we deal with the floor more simply:
- We remove the baseboard.
- We seal the perimeter of the room and the circumference of the riser (or the contour of the cross, if it is semi-recessed into the floor) with silicone.
- Option 1: pour liquid polymer self-leveling floor onto the floor directly over the previous tiles in a layer of 10-15 mm. Calculation of volume - based on the area of the room.
- Option 2: lay marmoleum, having first removed the toilet. Cheaper, and rusted fasteners can be replaced. If the fastenings are in good working order, we make cross-shaped cuts on the marmoleum sheet in the places for the bolts (this way you don’t need to measure with pinpoint precision), and after laying the excess is cut off with a mounting knife.
- We put the plinth in place - you're done.
Toilet BEFORE and AFTER cosmetic repairs without replacing communications
Floor
Traditionally, bathroom renovation starts from the floor. What material is used as flooring?
Of course, the choice is not limited to just tiles. However, it remains the most reliable, inexpensive and accessible. It is quite durable, beautiful, easy to install, and most importantly, it is not at all afraid of water.
In what order is work carried out on installing a new floor?
- First you need to completely dismantle the old floor to the base. The old tile is removed, and the old screed and waterproofing layer are removed using a hammer drill.
- Most likely, the cleaned floor will not be very smooth - there may be small cracks, potholes and height differences on it. Therefore, the next step will be priming the surface.
- After the primer has dried, the floor will need to be waterproofed. Even minor bathroom flooding can cause big problems. To prevent water from seeping into the neighbors, before laying the screed, the floor is thoroughly coated with bitumen-based mixtures or waterproofing mastics. Coating is carried out with a slight approach to the walls.
After the applied waterproofing layer has dried, you can proceed directly to the screed.
The main requirement when laying screed is to create as level a surface as possible for the finished floor. For leveling, it is customary to use beacons and a special building level. The height of the floor screed should be at least 3 centimeters - but keep in mind that the floor in the bathroom should remain slightly lower than the level of the floors in the rest of the house.
After the screed has completely dried, you can begin laying new tiles. It is recommended to start from the corner of the room. Small identical gaps are always left between the squares of the tiles - their width is equalized using special crosses. Subsequently, when the glue under the tiles has completely dried and the floor is ready for use, these seams will need to be sealed with a special grout to match the color of the tiles.
See also: How to reduce water consumption in an apartment?
Which type of utility wiring to choose when renovating a bathroom?
Before starting a wiring project, it is better to familiarize yourself with the options for such circuits and choose the one that is most suitable for you. There are not many of them, three types, but one with pass-through sockets is very rare, so we will not touch on it.
- Serial type wiring
In this type, taps from cold and hot water supply are installed to the first consumer. Next, the first consumer connects to the second, the second to the third. At each water collection site a tee is installed to which the consumer is connected. This classic scheme is designed for bathrooms where there are few water consumers.
The main disadvantage of serial-type wiring is that when several consumers are used simultaneously, the pressure in them will be weak, which can affect their functioning.
However, for small bathrooms in apartments with one bathroom, this type of wiring is best suited. The only downside that can be noted is that it will be difficult to disconnect one of the plumbing fixtures to repair or replace it, since everything is interconnected.
Serial type wiring is easy to install, but it is not very convenient to use in large apartments and bathrooms. However, this is the best solution for small rooms with one bathroom.
- Collector type of wiring
In this type of wiring there is a main element that distributes all water flows, called a collector, through which all consumers are connected to the main line.
It is also possible to install a shut-off valve in each collector outlet. In this case, it will be very convenient to use.
This can be explained as follows. When several taps are turned on at once, the water pressure will not drop. All consumers will have the opportunity to function at maximum capacity.
If for some reason the pressure has decreased, you can solve this problem by briefly turning off the water supply to one consumer (for example, to the toilet). Then the water pressure in the rest of the plumbing equipment will increase.
The collector type of wiring is more convenient to use than the serial type. There are rarely problems with water pressure, since each consumer has a separate line. But this system requires some effort in design and installation.
An important point can also be noted that in the collector type of wiring it is possible to replace or repair individual equipment without turning off the water in the entire bathroom. This system is more reliable, since each consumer is connected using a separate pipe without other unnecessary elements.
If any problems begin with one of the devices, a leak can only be noticed at the collector or device itself; in these places it will quickly become apparent. Therefore, installation can be carried out safely using a hidden method.
The advantages also include ease of use. If one of the consumers is damaged, there is no need to look for the cause by crawling under the sink and disassembling the entire system. It is necessary to call specialists and close the shut-off valve on the collector of the damaged equipment that has leaked.
This can be done by anyone, both an elderly person and a very young child. If one of the devices is turned off, the others will function properly.
Wiring
So, you laid new tiles on the bathroom floor and waited for them to dry. Now it’s time to move on to covering the walls - but before that it’s worth installing new communications in the room.
The bathroom is a room with constantly high humidity. Theoretically, it is possible to install electrical wiring in a given room both under the cladding and on top of it - just in the second case, you will need to buy cables with reliable insulation. However, in practice, it is recommended to lay power cables for light and electrical appliances under the cladding. Hidden wiring will look more aesthetically pleasing, and the risk of short circuits will be significantly reduced.
Is it possible to install sockets in the bathroom, or is it better to connect electrical appliances outside the room? Yes - but the sockets must be of a waterproof type and must be equipped with a ground connection. In addition, both power outlets and switches can only be placed in “safe” areas of the bathroom - away from sources of water, at least 60 centimeters from the sink, bathtub or shower.
All that stuff
Installing other plumbing fixtures, a boiler, gluing tiles to the wall and wallpaper are not special. It is advisable to simply paint the ceiling: cheap and cheerful. Of course, a plasterboard ceiling in the toilet is not forbidden, even a multi-level one with LED lighting, but it is done in the same way as in other rooms, with only one difference: the plasterboard is moisture-resistant and green.
Water supply and sewerage
After electrical wiring and before wall cladding, it is also recommended to carry out work on replacing pipes - water supply and sewer. Firstly, there is less chance of damaging freshly laid tiles in the process, and secondly, the pipes can also be hidden under the cladding. This will not only make the bathroom more comfortable, but will also free up extra centimeters of space.
During a global renovation, the pipes in the bathroom are completely replaced, including the sewer riser - since old communications may leak sooner or later, and redoing the repair will be very inconvenient. You can replace water pipes with either metal or plastic ones - the latter are in particular demand because they are not susceptible to rust, are easy to install and generally prove to be more reliable than metal options.
If you do not want to lay water pipes behind the future tiles, another option is possible - they can be put away in neat boxes made of plastic or plasterboard.
Repair of toilet walls. Tiles, PVC and MDF panels. Step-by-step instruction
You need to repair the walls according to almost the same instructions as the floor. You should:
- Clean the walls down to the ground.
- Level the surface. To do this, you can no longer use cement mortar, but ready-made plaster compositions. It is advisable to make a perfectly flat surface.
- Prepare the base for finishing.
Further actions depend on which finish was chosen. If you plan to lay tiles, then you should buy tile adhesive. It is most convenient to work with him. But you can also use cement mortar.
For plastic or MDF panels you need to make a lath. It is made of wood or metal. It is advisable to measure the room, since individual panels will probably need to be cut. Laying the panels is convenient; there are special grooves. After installing the first panel, all subsequent panels are placed in the grooves. Also, after the work is completed, it is necessary to secure the corners.
Wall decoration
After installing a new floor and laying all communications, you can begin the “cosmetic” stage of repairs - that is, cladding the walls. Typically, two types of materials are used for this - classic tiles or PVC plastic panels.
What are the advantages of ceramic tiles?
- Durability. Tiles are the most moisture-resistant material. Having tiled the walls once, you will be able not to redo the work for decades - and all this time the tile will retain its beautiful appearance.
- Beauty. There are many options for tiles for bathroom walls on the construction market - there are plain and patterned tiles, glossy and matte, smooth and with a three-dimensional texture.
- Easy to care for. The tiles can be easily washed with water and do not collect any deposits.
Perhaps there is only one drawback to tiles - of course, they are expensive, and given the surface area of the walls, you will need to buy quite a lot of them.
The technology for laying tiles on the wall is quite simple. To begin with, the wall surface is thoroughly cleaned of old finishing materials and leveled using putty. The smoother the rough wall prepared for the tiles is, the easier it will be to lay it. A primer is applied to the wall for better adhesion.
After the primer has dried, a special tile adhesive is diluted, and the material begins to be laid from the corner of the room farthest from the door, periodically checking with a building level how smooth the wall is. When installing wall tiles, it is recommended to choose an adhesive with a minimum drying time - otherwise there is a risk that the tiles will “slide” along the wall and disrupt the symmetry of the installation.
Another popular finishing option for the bathroom is PVC panels. What are their advantages?
- Low cost. The cost of finishing the walls will be several times lower than when using tiles.
- Moisture resistance. If installed correctly, plastic panels can last more than 10 years without losing their attractiveness.
- Easy to install. Decorating bathroom walls with PVC panels is easier than laying tiles evenly - especially if you do not have experience in the relevant work.
But of course, we must remember that the highest quality plastic will still not compare with tiles in terms of service life and will become more fragile over the years. In addition, plastic panels do not allow air to pass through, so condensation actively forms on them, and the room becomes noticeably stuffier.
How are walls decorated with PVC panels? The panels can be “planted” either with glue or on wooden or metal slats. In practice, the second option is more often chosen - in this case, there is no need to perfectly align the wall. But of course, the surface is still carefully primed and treated with an antiseptic - otherwise fungus will quickly develop in the bathroom from the humidity. A metal or wooden frame is mounted on a prepared wall, and PVC panels are placed on top using self-tapping screws. The finished cladding is carefully treated with sealant at the joints, and the seams between the walls are closed with plastic corners.
See also: Wall hung toilet
In general, tiling a bathroom with plastic panels is cheaper, easier and faster than laying tiles. However, this option is less durable, and the microclimate in the bathroom may change for the worse.
Laying communications
What is she? Where to start repairing a toilet in a new building, when reconstruction is not needed, but only bringing the room back to normal? In this case, you will not need to prepare anything in advance, since the working surface is already suitable for finishing.
The first step is to connect water supply and sewerage, as well as electrical wiring to the toilet installation site. Without this, the bathroom simply will not be able to function. If you live in a panel house, which is most often built today, then the restroom will already have risers for hot and cold water. To minimize physical and financial costs, this is where it is best to install a distribution unit. To give the room a more aesthetic and attractive appearance, all pipes are hidden in a special box.
If you don’t know where to start renovating a toilet, then just follow the following sequence:
- The first step is to install the toilet and connect it to the drain riser. For this, a corrugated plastic pipe is usually used, laid at a slight angle.
- Next, the riser is connected directly to the sewer drain using the same pipe, which is connected at a slope of about two centimeters per linear meter. Clamps are used for fixation.
- A tee is inserted into the riser responsible for supplying cold water, through which water is supplied to the drain tank. If you want your bathroom to have a sink for washing hands, then immediately make separate outlets for hot and cold water. It is best to use hidden installation so that they are not visible.
- If the heating of water for the bathroom will be carried out using a water heater located in the toilet, then immediately make the piping to connect it.
- Electrical wiring should be laid exclusively in grooves. In this case, the cable is placed in a special corrugated box, which eliminates the possibility of mechanical damage and short circuit.
- The risers are hidden in special boxes, the frame of which can be made of a wooden beam impregnated with an antiseptic solution, or a metal profile. Then it is sheathed at the final stage of repair with finishing material, for example, clapboard.
This, in fact, is the entire sequence of repairs in the toilet, which occurs at the initial stage. Next, further work will be described in detail and tips will be given that will help you deal with everything much easier.
Ceiling, ventilation
When renovating a bathroom, the two most popular ceiling options are slatted or suspended. What are both designs, what are their advantages and disadvantages?
The slatted ceiling consists of narrow aluminum slats mounted on guides made of the same material. The entire structure is fixed to the ceiling, with the gap between the slats and the main ceiling being about 10 cm.
- Slatted ceilings allow you to create a beautiful design - they come in matte and glossy, plain and patterned, with stone, fabric or leather texture.
- Aluminum slats are not afraid of water and fire and are very durable.
- The slatted ceiling eliminates the occurrence of fungus and mold on its surface, in addition, air flows freely to the main ceiling.
The disadvantage of a slatted ceiling is that it is quite difficult to install it yourself. In addition, if your upstairs neighbors cause a flood, water will seep through the slats directly into the bathroom.
Stretch ceilings are made of polyvinyl chloride fabric. It is also almost impossible to install them yourself - you will need a heat gun, so it is better to call specialists. However, the cost of installing a suspended ceiling in a bathroom will be very moderate.
- Stretch ceilings are resistant to moisture and tolerate high temperatures.
- Just like behind a slatted ceiling, communications can be hidden behind a stretch fabric - but the ceiling will only take up about 3 centimeters of space.
- The tension fabric can withstand enormous weight - in the event of a flood from above, water will collect behind the surface of the ceiling and can be held by it for quite a long time.
- There are many design options for stretch ceilings - from a simple glossy or matte surface to photo printing.
What are the disadvantages of the ceiling? First of all, the rough surface of the ceiling behind the canvas is not ventilated at all - therefore, it needs careful treatment with antiseptics. In addition, the stretch fabric is very easy to puncture - although the risk of such an incident in the bathroom is not very high.
As for ventilation, it is very important to check how well the duct opening copes with its task. If the draft is too low, then the ventilation needs to be cleaned or forced ventilation organized. This point is especially important for bathrooms with plastic panels on the walls and suspended ceilings - they can be very stuffy.
Door replacement
Here is the cheapest and easiest option: order with delivery and installation. There are many companies, the vast majority are presented on the Internet, the prices for toilet and bathroom doors are cheaper than any DIY option (And yet, in case of do-it-yourself installation - read here).
If “replacement” is understood as removing, painting and installing again, then remember: you need to paint only in a horizontal position, otherwise it will not do without drips. The paint is the same as others for the toilet. Whitewash, in order of preference - titanium, lead (don't worry, this is not free lead, they are not poisonous), zinc. The latter turn yellow after 3-4 years from traces of ammonia in the air; titanium ones are almost eternal.