Plastic pools have become the most popular in Russia due to their reasonable cost and adaptability to the harsh conditions of our homeland. In the first part, we described how to choose a monolithic pool bowl. Now let’s look at the smallest details of how the pool bowl is installed.
This article will become a guide for you, with the help of which you can equip an artificial pond on your site.
Selecting a location
For a monolithic bowl, first of all you need to choose a place
The first place any construction begins is choosing a location for any structure. For a future pool, you need to choose an area on your site that meets the following requirements:
- The area is initially flat. There are no large stones or asphalt.
- There are no trees or other plantings with a strong root system located nearby. With further development, they can damage the walls and bottom of the pool. Also, leaves will constantly clog the water;
- The groundwater level should be 20 centimeters or more below the bottom of the tank. To determine the water level, dig a well to a depth equal to the depth of the pool plus 20 cm. If water has not appeared after 2 days, you can build;
- The supply of water and electricity to the site should not be difficult;
- There should be no house, garage or parking lot nearby. Keep in mind that splashes can reach up to 3-4 meters.
Artificial surfaces
In the era of development of technologies for the production of synthetic materials, as well as their high popularity, it is worth mentioning various market offers that are also worthy of attention. They can be based on composite or natural materials and contain up to 20 or more components. Therefore, you should pay attention to the chemical content and sanitary certificates, because the coating will come into contact with people, as well as the water in which you spend time:
- Rubber tiles are a practical material with increased durability. Budget solution for finishing the area around the pool;
- Polymer sand tiles are a good option with increased strength and wear resistance, which is used even indoors;
- Seamless rubber coatings are an opportunity to avoid problems with seams and level differences. There is a large assortment of colors and shades, material textures!
We carry out calculations
Before construction, it is necessary to carry out calculations
Once you have chosen a suitable location, you can begin making calculations.
You can also install a plastic pool with your own hands in the house itself. But there are no typical cases for installing an indoor pool, so we are considering installing an outdoor pool bowl.
The hole should be dug with a margin of 20 centimeters on each side. The depth should be calculated based on the depth of the pool itself and its base cushion.
The base is installed 20 centimeters thick if the soil is sandy or gravel. If there is clay soil under the pillow, then the thickness of the foundation should be 25 centimeters.
Next, sketch out how water pipes, electrical wires and the tank’s own communications will be supplied. Note where the filter will be located, how much space it will take up and how to connect to the bowl.
Properties of polypropylene
This material is one of the technological achievements in the chemical industry. Polypropylene was created relatively recently - in the middle of the 20th century.
In 1954, the result of the joint work of the German organic chemist Karl Ziegler and the Italian chemist Giulio Natta was the discovery of metal complex catalysis for the polymerization of olefins. Thanks to this achievement, scientists were awarded the Nobel Prize.
Polypropylene is a cloudy white solid obtained by industrial polymerization of propylene under medium and low pressure conditions with mandatory interaction with organometallic catalysts. To put it in simpler terms, polypropylene is the lightest thermoplastic.
Materials of different thicknesses are used for construction purposes.
Polypropylene is produced in several types:
- Polypropylene homopolymer (PP HO). Polypropylene, the chemical composition of which contains macromolecules with identical monomer units. This polymer is quite hard, due to which it has high bending strength.
- Metallocene polypropylene (mPP) is produced by polymerization using appropriate catalysts. This material is very similar to rubber.
- Copolymer (PPCP) is produced in the form of transparent or white granules. The value of this material is its high impact strength at low temperatures and simultaneous elasticity.
- Polypropylene random copolymer (PP random copolymer) has a crystalline structure. This material is widely used in the production of food packaging, laminating films and coatings.
Due to its versatility, polypropylene is widely used in various fields of activity. The ability to modify polypropylene to produce an elastic or hard, high-strength material makes it more in demand than plastics and polyvinyl chloride.
Pit preparation
After all the calculations have been made, you can get down to business.
Pit for a plastic pool
To begin, mark the boundaries of the hole on the ground with a shovel or a special spray can. Measure everything again and make sure that no errors were made in the calculations and markings.
You can dig a hole yourself, with a team of workers, or using special equipment. It all depends on your preferences, timing and budget.
Tiling the edges
If you decide to opt for this type of material, then it is better to consider relief tiles or porcelain stoneware. It is preferable to choose pool tiles based on safety considerations. Porcelain tiles, like relief tiles, have an anti-slip and rough surface, as well as a low level of water absorption. The risk of slipping and serious injury is minimized.
Advantages:
- variety of designs and color palette;
- durability of the material;
- ease of maintenance.
Flaws:
- strong heating from the sun's rays.
Laying the foundation
When the pit is completely ready, all measurements have been taken again and no errors have been found, you can begin laying the foundation for the future bowl.
The so-called pool cushion
The first layer of crushed stone is laid in order to level the site. We level it using a flat board with an attached level. Next, we compact this layer with special equipment. If you don’t have this at your disposal, then you can try to stamp it down as tightly as possible.
Some limit themselves exclusively to the first layer, but we strongly do not recommend this, as this will seriously affect the life of the pool.
Next, along the perimeter we prepare formwork for pouring concrete 15-20 centimeters high. The concrete layer can be installed without reinforcement, but if possible, then the extra rigidity of the foundation will not hurt. We pour the foundation and let it dry and completely harden for 3 days.
The third and last layer is polystyrene foam 3-4 centimeters thick. After laying it, you can consider laying the foundation completed successfully.
How to finish it yourself?
Let's look at the general procedure for finishing a pool.
Side
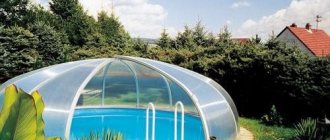
Finishing the sides of an outdoor pool is necessary to strengthen the structure and protect the supports from mechanical stress. At the same time, a bypass path is being built, as well as a platform for sun loungers.
Procedure:
- The area around the bowl is cleared of foreign objects, plants are removed, and the layer of turf is removed.
- They make markings and make sockets for supports.
- They build a frame intended for installing the outer cladding of vertical surfaces and for laying a bypass path and flooring for a platform for sun loungers.
- The outer surface of the frame is sheathed with decorative panels or lined with stone, tiles or other materials. The bypass path is laid so that the inner edge covers the sides of the pool and protects them from possible damage.
- They install stairs, handrails, and perform finishing work.
The technology for finishing the sides may be different, depending on the chosen material.
The video will tell you how to decorate the side of the pool:
Inside
The inner surface of the bowl is finished with tiles (or porcelain stoneware), mosaics or PVC film. The first options are suitable for concrete bowls, and PVC film can be used in almost any situation.
Tile installation procedure:
- Level and clean surfaces, fill potholes, and seal pipe passages.
- Mix the tile adhesive and begin laying the covering on the sides.
- After this, the bottom of the bowl is covered with tiles, moving towards the stairs.
- Leave the tiles until the glue completely hardens, after which the seams are grouted with moisture-resistant grout.
- They install ladders, attach circulation elements, skimmers and other parts.
Outside
Finishing the outside of the bowl is required for frame pools that need to protect the film from accidental cuts or other impacts. In addition, the outside is finished with concrete bowls installed on the ground surface.
Procedure for covering a bowl with clapboard:
Installation of vertical posts around the perimeter of the pool. For this purpose, nests are made and posts are secured in the ground.- Bunch of racks with horizontal slats. Use wooden blocks or narrow edged boards.
- Installation of lining. Measure the height and cut the lining to length, after which they begin installation using secret fastening (clamps, or screws installed in grooves).
- Finishing the top edge of the trim with a decorative strip. Its width should be chosen so that the upper edge of the bowl is covered.
- Installation of stairs.
Instead of lining, you can use planed edged boards, which can be lightly burned with a blowtorch to give a decorative effect.
Bottom
To finish the bottom, tiles or mosaics are usually used. However, you can save a little and use a PVC liner.
Procedure:
- Metal or plastic corners are installed along the perimeter of the bottom.
- Strips of film are cut and laid, the edges of which are brought under the corners and pressed with screws.
- The film strips are soldered using a hair dryer.
It is recommended to lay a pool net on top of the film sheet to protect the liner from mechanical damage.
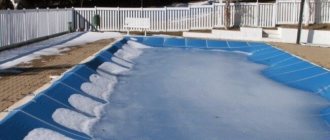
Installing the bowl
A plastic or composite monolithic bowl is placed on a prepared base with an equal margin on each side.
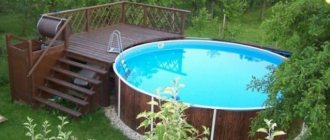
Installation of an artificial pond
There are several ways to place the bowl in the hole. It depends on its weight and size. If the bowl is small or medium-sized, then it can be installed with the help of a small but friendly company. Large tanks will require the use of a tap.
Offer from professionals
Our company carries out all work related to the construction and design of swimming pools, and specifically offers:
- Production of polypropylene bowls to order.
- Selection of finished products made from modern materials.
- Modern equipment for swimming pools with a guarantee from the manufacturers.
- Finishing with ceramic tiles for all types of pools.
- Affordable prices for the construction of a personal pool from any materials on a turnkey basis in Moscow and the region.
- Installation, maintenance, repair of operating systems.
Delivery of equipment anywhere in the country.
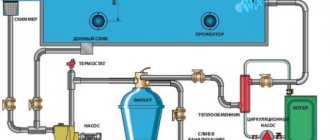
Connecting all systems to the bowl
Next, we connect all systems to the bowl using pipes. Next, we will permanently concrete them or fill them with earth, so here we need to do everything as efficiently as possible.
Pipes are brought to the pool through small trenches
After all communications have been completed, we check all systems for leaks and fill the pool to 10 centimeters.
Recreation area equipment
This is a safe area with railings in case of elevation, as well as improved anti-slip surfaces. Sun loungers are installed here, hammocks are hung, wicker furniture and a table with chairs are installed. Often, the recreation area is equipped with a barbecue, barbecue, fireplace for evening relaxation in an atmosphere of warmth and a beautiful play of flames!
Nearby you can put rocking chairs, pergolas with shading, arrange a playground and install an inflatable pool for kids!
Mandatory elements are paths to the recreation area, as well as decorative lighting!
You should place a summer shower nearby, because going for a swim in the pool immediately after a working day is not recommended. An outdoor shower is also useful without a pool, because today it is an integral part of a suburban area. You can take a cool shower at any time, for example, after working in the garden or after cooking delicious food on the grill for a long time.
You can equip a shower with a stone or concrete platform, a plastic tray with water drainage into the drainage system or sewer after filtration. It should be a semi-closed structure that eliminates exposure to drafts. Also, partial shading is desirable.
It is necessary to supply water, preferably hot and cold, or install a tank in which the water will be heated by the sun in summer. Internal equipment includes a shower stand, a shower with a hose, an overhead shower, a mixer, shelves for soaps and shampoos, as well as hooks for clothes!
The decoration of the shower can be varied - from a polyester curtain on rings sliding along the pipes of the frame, to expensive wooden or plastic lining. At your own discretion and in combination with the overall design program for the recreation area, right down to mosaics and natural stone!
Strengthening the pool in the soil
When filling the pool, we gradually fill the gap between the bowl and the ground. We need water in the reservoir to maintain pressure from the inside and prevent the bowl from deforming under the weight of the earth.
There is also the option of concreting the side walls of the pool. Water will not be able to compensate for the pressure of concrete from the inside, so they use supports made of wooden beams, as shown in the video below.
We trample down the soil near the walls of the pool to compact it. You can also use a special tamping device, but you need to be careful with it so as not to damage the pipes connected to the bowl.
Stage 2: Digging a pit
After completing the preparatory procedures, proceed to the actual construction. First, dig a pit for the pool:
- According to the markings in the project, drive pegs into the area and stretch ropes between them to mark the boundaries of the future pit.
- Dig a hole of the required dimensions.
- Arrange drainage - it will protect the bowl from pressure: level the bottom of the hole, lay geotextiles on it and fill it with crushed stone to a depth of 30 cm. Carefully compact the resulting drainage.
- Create a screed: lay one row of bricks on the bottom of the pit and firmly fix the reinforcing mesh on top.
- Prepare the concrete solution. To fill it neatly, construct a trench from wooden boards.
- Start pouring concrete. You should end up with a slab with the following parameters: width - 50 cm larger than the bowl, thickness - at least 20 cm, but not more than 50 cm. After this, let the solution harden and set properly.
- Finally, lay thermal insulation material on the dried surface of the pit. It could even be regular foam. The main thing is to secure it well.
Pit preparation