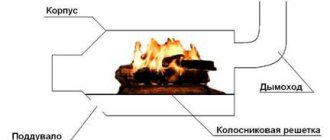
Today, a swimming pool in a summer cottage is an affordable luxury. But it is important not only to correctly design and construct this element of landscape design, but also to take proper care of it. Sooner or later, the owner of the site has the idea that he needs to build a canopy for a polycarbonate pool with his own hands. This design will allow you to keep the pool clean and transform the local area.
A polycarbonate canopy over the pool is practicality, style and comfort
Pros and cons of a pool under polycarbonate
To figure out whether a roof is needed over the pool, you need to carefully analyze the positive and negative aspects of the structure.
Pros:
- An open canopy partially prevents water pollution from leaves, droppings of flying birds and other large debris. If the polycarbonate roof smoothly merges with the walls, forming a closed structure, then the pool is maximally protected even from wind blowing dust.
- The canopy allows you to use the pool in inclement weather. Enclosed structures provide favorable conditions for relaxation at the dacha even in the autumn.
- A polycarbonate roof allows light to pass through, diffuses it, and blocks UV rays. You can sunbathe safely for a long time under a canopy at your dacha.
- The closed type of canopy reduces the cooling rate of the water in the pool. The owner of a dacha reduces the cost of heating it.
- The roof reduces the rate of water evaporation. The pool will have to be refilled less often.
- A canopy, even if it is open, protects the pool from precipitation at the dacha in winter and autumn.
Minuses:
- Covering your pool with polycarbonate will require additional investment.
- The roof requires additional care. If the snow is not cleared off in winter, the polycarbonate will fail under heavy weight. The procedure is often impossible, since no one lives at the dacha in winter. It is necessary to come specially after each snowfall.
Despite two serious disadvantages, the canopy has more advantages. Because of the disadvantages, you should not refuse to build a useful structure at your dacha.
Important! The roof reduces the likelihood of the harmful effects of snow and rain on the bowl, communications and pool equipment.
Necessary calculations before construction
Before starting construction, it is necessary to draw up a plan and preliminary estimate:
Determining the location on the site where the pool will be located.- Determining the condition of the old greenhouse frame (if any). If there is no frame, you will need to purchase one.
- Choosing a bowl shape.
- It will be necessary to stock up on tools and materials - concrete, shovel, concrete mixer, sand, wooden beam, screwdriver or drill, polycarbonate, fastening materials, wheelbarrow or stretcher, wrenches, bubble level, skewers, spatulas, jigsaw, as well as ventilation and heating systems and water filtration.
Approximate cost of materials:
| Tools and materials | Price/Cost per 1 unit of product (RUB) |
| Shovel with handle | 400 |
| Concrete mixer | 15000 |
| Sand (25 kg) | 70 |
| Wooden beam | 1800 |
| Screwdriver | 3000 |
| Greenhouse | 12000 |
| Greenhouse installation by a specialist | 5000 |
| Pool bowl | 12000 |
| Cement (25 kg) | 185 |
| Filtration unit | 40000 |
| Air heater | 10000 |
| Fasteners, hardware, accessories | 4000 |
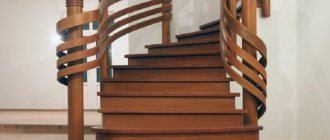
| Stairs and handrails | 20000 |
| TOTAL: | 123455 |
These are the basic outlines of the pre-construction plan and estimate. It will be difficult to calculate the exact amount of costs, since you first need to decide on the shape of the frame and bowl. The final amount will depend on them.
Types of polycarbonate pool canopies
All canopies are conditionally divided into two groups:
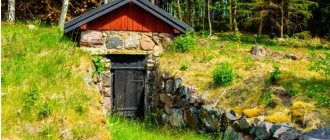
- Stationary structure. It is a capital building on a foundation. The roof often blends seamlessly into the walls, creating a complete pool cover. The area of a stationary canopy is larger than the dimensions of the pool. Recreation areas are organized under the shelter, furniture and flowerpots with ornamental plants are installed. If heating is installed inside the closed shed, the pool at the dacha can be used all year round or until severe frosts occur.
- A telescopic roof is considered a mobile structure. The canopy consists of several sections of different sizes. They move along guide rails. If necessary, the pool can be fully opened, partially opened or closed. During opening, each smaller polycarbonate section slides under the larger section.
In turn, stationary and telescopic canopies are divided into two more groups:
The roofs are closed and smoothly merge into the walls. Above the pool at the dacha you get a full-fledged covered structure made of polycarbonate. The resting place is completely protected from wind and precipitation.
Open canopies are a simple polycarbonate structure without walls. Only the roof protects the pool. Sometimes the canopy is made partially open with one wall, which is placed on the windy side.
Of the minor classifications, the next difference is height. The owner of the dacha maintains this parameter at his own discretion. Low canopies are created only to cover the pool from pollution. People can move under tall structures.
Roofs are distinguished by shape. Usually they follow the outline of the font. For example, a polycarbonate cover for a round pool has a similar circle shape. The roof itself is made single or gable, arched, asymmetrical or another type. Depending on the polycarbonate used for glazing, canopies vary in color. Transparent roofs are considered a classic, but if desired, you can install a colored one at your dacha, for example, blue.
Advice! The polycarbonate cover over the pool should be harmoniously combined in shape and color with the architectural ensemble and fit harmoniously into the landscape design.
Work order
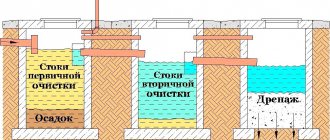
To build a pool, they purchase plastic water pipes, fittings, cables and pipes for it, waterproof lamps (optional) and serious equipment - a skimmer for filtration, a circulation pump.
A greenhouse assembled with your own hands does not always turn out the way the master intended, so in the case of a swimming pool it makes sense to buy a finished product, which will only have to be assembled and fixed on a strip foundation. The minimum distance between it and the sides of the bowl is 300 mm. Bigger is better, since there should be enough passage even for one person.
Installation of the finished bowl
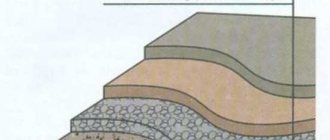
First they do excavation work - they dig a pit intended for the bowl and trenches for the cable. The first one should have dimensions that exceed all the parameters of the finished bowl by 250-300 mm. The bottom is compacted and lined with geotextile; this fabric will protect the soil from washing out. Then a thick sand cushion is poured, it is poured with plenty of water, and compacted well. Next, the walls are covered: they use boards (25 mm) treated with antiseptic impregnation.
A bowl is lowered into the pit, the outside of the side is insulated with polystyrene foam, the gaps between the boards are covered in layers with fine sand, each “portion” is carefully compacted. Another option is to fill the space with concrete, but this operation is done simultaneously with water entering the pool. In this way, possible deflections of the bowl are avoided; this is achieved by equalizing the pressure difference.
Then they lay the pipes in trenches, bring them to the bowl, and treat all joints with sealant. The trenches are dug in, and the font itself is protected from debris by covering it with shields made from the same boards.
Construction made of polystyrene foam blocks
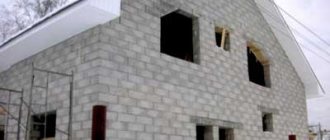
This option is a compromise between a concrete and a commercial bowl. Expanded polystyrene is lightweight but durable, well ventilated, but has good thermal insulation characteristics, so the water will remain warm even at night. Multi-level bowls and stairs are often made from polystyrene foam blocks, designed for convenient entry.
To construct the bowl, large-format blocks are used, their size is XXL. Each of them has grooves that allow fastening structural elements with reinforcement. Expanded polystyrene is easily cut with a hacksaw, so there are no difficulties with fitting them. The craftsman will only have to cut holes for the pipes (for filtration, drainage). They are insulated with polyurethane foam.
After assembling and installing the structure in the pit, rods are inserted into the voids - holes specially made for vertical reinforcement - which must be connected
Dilute the solution, pour it into the interblock space, paying special attention to the joints. Then the bowl is left alone for several days, and after drying, it is meticulously inspected - an inspection is carried out, identifying potential cracks
If there are any, the cracks are drilled out a little and treated with putty.
After it dries, the holes are filled with a solution, which is left until final hardening, then the surfaces are plastered. The bottom and walls of the finished bowl are covered with waterproofing material, PVC facing film, and anti-slip tiles. The perimeter edges are decorated with ceramic tiles.
Greenhouse works
Referring to the frame drawings, mark the soil around the pool. Inside the resulting contour, a layer of soil is removed, its thickness is 200 mm. A trench is dug around the perimeter for a strip base (500 mm). The formwork is installed there, then the structure is reinforced with a reinforcing belt. Fill the trench with concrete, then, without waiting for complete setting, insert the embedded parts intended for the racks of the greenhouse.
After half a month, the space between the base and the bowl is filled with sand and gravel, and paving slabs are laid on them. Consulting the instructions, install the frame using bolts or welding. The finished “skeleton” is coated with an anti-corrosion compound and painted. Then, using thermal washers, polycarbonate sheets are attached to it, connecting profiles are installed at the joints, and a sliding mechanism is mounted. The last stage is the installation of the door, installation of lamps and heating devices.
A swimming pool in a greenhouse is a dream that can become a reality, but it will require a lot of effort to make it come true. Many experts argue that building a bowl on your own is not the best idea, but they favor the assembly of greenhouses and pavilions. Therefore, before deciding on an “adventure”, it is better to see how other masters accomplish this feat. For example, in this video:
Which polycarbonate is better for a swimming pool?
You should choose polycarbonate for canopy glazing at the design stage of the structure. The design of the sheathing will depend on this. There are two types of material:
- Monolithic polycarbonate, has no cells. Externally, the material resembles glass. The sheets are characterized by increased strength and will last 3 times longer than their cellular counterpart. In terms of cost, the material will cost more for the owner of the dacha. Due to the greater weight, reinforced sheathing will be required. Monolithic polycarbonate is optimal for glazing canopies with even slopes, but can be used for roofs of complex shapes. From the outside, the pool cover at the dacha will resemble a glass structure.
- Cellular polycarbonate consists of many longitudinal channels. They are shaped like a honeycomb. This is where the name “cellular polycarbonate” comes from. The material for the pool roof is budget-friendly and has long been popular among dacha owners. Polycarbonate is lightweight, low cost, but has a short service life. Due to the voids inside, the sheets can withstand a small load. Large accumulations of snow will cause cellular polycarbonate to fail if the owner of the dacha does not clean the roof in time. The sheets have good flexibility and are ideal for glazing arched and round canopies.
To build a reliable polycarbonate pool cover with your own hands, you need to choose the right material thickness. Here, the snow load characteristic of a particular region, roof shape, size, and sheathing parameters are taken into account. For roof glazing, sheets of thickness 8, 10 and 16 mm are used. If the canopy at the dacha is closed, then you will need more material for glazing the walls. Due to the minimum load, polycarbonate with a thickness of 6 mm will be used here.
In the video, the rules for choosing polycarbonate for a canopy:
Popular manufacturing brands
The following models and brands of popular types of shelters are available on the market:
Solar coatings .
They are manufactured by KOKIDO (Hong Kong), DEL (France), PolyAerPak (Russia). Products are produced in rolls. The approximate cost of products of this type is from 700 rubles per m2. You can purchase the Bestway 58242 round cover from the Chinese company Bestway.- Tension awnings . The market offers awnings from China (models EASY SET POOL for round and BESTWAY 58103 for rectangular pools), USA, Canada (SYNTHETICS), Russia (PROTECT, models “Universal S” and “Facade 35”). Cheap products cost from 500 rubles per piece, more expensive options from 3,000 rubles.
- Blinds . You can purchase coating from the companies Poolmagic (Russia), DEL (France). Inexpensive options cost from 6,000 rubles per m2. French manufacturers present the models “DEL ROLL-OVER”, “Del Solaire”.
Polycarbonate color for pool cover
Polycarbonate is produced in different colors. There are no special requirements for selection here. The owner of the dacha, at his discretion, glazes the roof with yellow, red, blue, green or other colored sheets.
Transparent material is considered a classic. It is most often preferred for awnings as it does not distort natural light. Under a roof made of colored polycarbonate you can get a special atmosphere. For example, relaxing near a pool where the space is illuminated by blue or red light is difficult. The eyes get tired quickly, it puts pressure on the head, creating a feeling of discomfort.
Do you need a fence?
A roof for a round pool also requires a certain safety zone, that is, an area around the pool with protective nets or walls - primarily for the safe stay of children in the area next to the pond. And if you decide to protect your children from unplanned diving into the pool, then it is advisable to at least erect a mesh barrier around the fence.
The design of a lightweight fence consists of several metal sections consisting of a frame frame on which a galvanized metal mesh with a rectangular cell is stretched. You choose the sizes yourself. The material should be made of stainless steel, preferably metal pipes of round and rectangular cross-section.
After digging shallow trenches on the ground, concrete blocks are installed across the fence. The barrier pins are inserted into holes in these concrete blocks.
Sketches of polycarbonate pool covers
Video
How to install a sliding structure, see below:
My requirements: - dome structure - diameter of 4 meters or more - cheap material - lightweight material, so that in theory the folded dome can be moved without a machine - the ability to assemble individual segments in advance, so that there is less work on site
Question: Are domes made from PVC pipes? Answer: yes, they do. Tyk
Question: how to connect PVC pipes? Answer: A simple option is connection with soft connectors (source). The main disadvantage is insufficient rigidity for large domes.
A good option is a connection on two cylinders (source). Please note that this connection is patented; details are available on the authors' website. I don’t know how to do such things, but for some reason it seems to me that it is not very difficult.
All sorts of different things: If anyone is interested, there are star connectors, but I am skeptical about them.
Another very interesting option is a dome based on hexagons.
And here is another great video demonstrating the assembly of a high dome on cylindrical connectors
A do-it-yourself pool dome is usually made of polycarbonate. A complex design requires careful calculations and the construction of a reliable foundation and frame.
How to make a canopy over a polycarbonate pool with your own hands
It’s better to create a simple canopy yourself at the dacha. Initially, the project is developed. You definitely need a drawing that shows all the dimensions of the roof, the shape, and connecting nodes. If you have a diagram, it will be easier to make an estimate.
Preparing the base
When building any type of polycarbonate pool canopy, you lay the foundation with your own hands. The type of foundation depends on the roof structure and its weight. If you install a simple open-type canopy at your dacha, all you need to do is concrete the metal pillars in the ground. To do this, markings are applied along the perimeter of the area near the pool, holes are dug 80 cm deep. A layer of crushed stone 10 cm thick is poured onto the bottom. The pillars are installed in the holes, leveled, and fixed with large stones. Each hole is filled with a liquid concrete solution.
Under a heavy canopy, closed structure or telescopic roof, you will need a reliable foundation in the form of a concrete strip. The process of its creation involves digging a trench 80 cm deep. The parameter was not taken by chance, but is focused on the average level of soil freezing. The width of the tape depends on the type of roof. If you install a stationary structure over a swimming pool at your dacha, a base width of 20 cm is sufficient. In telescopic canopies, the sections slide along rail guides laid parallel to each other on the foundation. The width of the tape will depend on their number. Typically the rail set is placed on a 60 cm wide base.
To fill the tape, formwork is placed around the perimeter of the trench from boards. A 20 cm thick cushion of crushed stone and sand is poured onto the bottom. The walls of the trench are covered with roofing felt. A reinforced frame is tied from reinforcement 10-12 mm thick. Pouring concrete with crushed stone is carried out in one day. The foundation is allowed to harden for about 1 month.
Frame construction
When the concrete base has completely hardened, it’s time to cover the pool with polycarbonate with your own hands, but first you need to build a frame. The structure is the skeleton of the canopy. Polycarbonate sheets will be attached to it.
For a dacha, a common construction option is timber. However, it is not practical to use it to create a frame. A lot of moisture evaporates from the pool. Wood rots quickly. Such a frame will last the owner of a dacha for 5-6 years. It is optimal to use a profile pipe.
Advice! To ensure that the metal frame of the pool roof is maximally protected from corrosion, a galvanized pipe or profile is used during construction.
The assembly of the roof frame begins with the bottom frame (if the structure is the simplest without walls, the frame is done only at the top of the racks). The profile according to the drawing is cut to the required length. The blanks are laid on the foundation (if a concrete strip is poured), and a frame is welded from them. The structure is secured to the base with anchors. The racks are vertically welded to the bottom trim. If the supports were simply concreted in the ground without filling the tape, then the frame of the lower frame is welded to them. The pillars are connected at the top with similar strapping.
For the roof itself, trusses are made on the ground. They are lifted onto the frame and welded to the profile of the upper trim. The frame is reinforced with jumpers. All trusses are connected to each other by longitudinal elements. The finished canopy frame is treated with an anti-corrosion agent and painted.
Polycarbonate sheathing
When the frame is ready, all that remains is to hide the pool at the dacha under polycarbonate, that is, it is time to start glazing. Work starts from the roof. Polycarbonate is applied to the trusses, markings are applied with a marker, and the locations of the holes for the screws are marked. If honeycomb material is chosen for a canopy at the dacha, then the sheets are arranged in cells perpendicular to the ground.
The sheets are cut with a jigsaw. Holes 1-2 mm larger in diameter are drilled for self-tapping screws. Holes are drilled in the profile itself in the same way, but with a smaller diameter than the thickness of the self-tapping screw so that it is screwed in tightly. When the fragments are ready, the polycarbonate is laid on the frame and secured with self-tapping screws with sealing washers at 20 cm intervals. The sheets are joined using a joining profile. The ends are covered with plugs that prevent dirt from entering the polycarbonate cells. When the roof is glazed, the walls are made using a similar principle (if they are provided for by the canopy design).
Size selection
The roof completely covers the pool and the surrounding area.
The dimensions of the roof must meet the objectives. For example, the height of removable options can be about 1 m. Such structures are removed before swimming in the pool and returned to their place the rest of the time. Similar types are built to cover a permanent pool for the winter.
The cover should not touch the sides of the pool when it is covered.
High roofs are made if the pavilion is expected to be stationary. The head of the tallest visitor should not touch the frame elements. The optimal height for areas where people move is considered to be about 2 m.
Heavy and stationary structures are installed along the outer perimeter of the bowl on the ground or foundation. Lightweight, removable options can be placed on the side of the pool, making sure to provide fastenings to prevent the roof from being blown away by the wind.
Caring for your polycarbonate pool cover
The main enemy of an indoor polycarbonate pool in a country house is snow and dirt. In the first case, large snow accumulations in winter can cause the roof to collapse. After each snowfall, it is cleaned with a soft scraper, broom or other device.
Dust settles in dry weather in summer. Polycarbonate loses its transparency. It becomes dark under the canopy, and the roof looks ugly. Remove dirt with plain water. You can add a little detergent without abrasive particles. During washing, polycarbonate is wiped with a brush or rag attached to a device with a long handle.
What are they needed for?
The pool bowl must be covered. This will achieve the following:
Thanks to the lid, leaves, debris, insects, and rainwater will not get inside. This will save time on cleaning filters.- The water will evaporate more slowly.
- The presence of a lid will limit the access of children and pets to water.
- The proliferation of algae and pathogenic bacteria will slow down.
- Water cooling will decrease.